headlamp Peugeot 508 2020 Owner's Manual
[x] Cancel search | Manufacturer: PEUGEOT, Model Year: 2020, Model line: 508, Model: Peugeot 508 2020Pages: 276, PDF Size: 8.43 MB
Page 4 of 276

2
Contents
■
Overview
■
Eco-driving
1Instruments
Digital instrument panels 9
Warning and indicator lamps 11
Indicators 16
Manual test 20
Total distance recorder 20
Lighting dimmer 20
Trip computer 21
Touch screen 22
Remote features (Hybrid) 24
2Access
Electronic key with remote control function and
built-in key, 25
Keyless Entry and Starting 27
Back-up procedures 29
Central locking 30
Alarm 31
Doors 33
Boot 34
Hands-free tailgate 34
Electric windows 38
Panoramic sunroof 39
3Ease of use and comfort
Driving position 41
Front seats 42
Steering wheel adjustment 45
Mirrors 45
Rear seats 46
Heating and Ventilation 48
Dual-zone automatic air conditioning 49
Front demisting - defrosting 52
Heated windscreen 52
Rear screen demisting/defrosting 52
Additional heating/ventilation system 53
Thermal pre-conditioning (Hybrid) 54
Front fittings 55
Courtesy lamps 58
Interior ambient lighting 59
Rear fittings 59
Boot fittings 60
4Lighting and visibility
Exterior lighting control stalk 65
Direction indicators 66
Headlamp beam height adjustment 67
Automatic illumination of headlamps 67
Guide-me-home and welcome lighting 67
Automatic headlamp dipping 68
Static cornering lighting 69
Night Vision 69
Wiper control stalk 71
Changing a wiper blade 73
Automatic wipers 73
5Safety
General safety recommendations 75
Hazard warning lamps 75
Horn 76
Pedestrian horn
(Hybrid) 76
Emergency or assistance call 76
Electronic stability control (ESC) 78
Seat belts 80
Airbags 81
Active bonnet 84
Child seats 85
Deactivating the front passenger airbag 87
ISOFIX child seats 89
i-Size child seats 93
Child lock 94
6Driving
Driving recommendations 96
Starting/Switching off the engine 97
Starting hybrid vehicles 98
Electric parking brake 99
Manual gearbox 102
Automatic gearbox 102
Electric automatic gearbox (Hybrid) 105
Hill start assist 106
Active Suspension Control 107
Driving modes 107
Gear efficiency indicator 108
Stop & Start 109
Under-inflation detection 11 0
Driving and manoeuvring aids - General
recommendations
11 2
Speed Limit Recognition and
Recommendation
11 3
Speed limiter 11 6
Programmable cruise control 11 9
Memorising speeds 120
Drive Assist Plus 121
Adaptive Cruise Control 121
Active Lane Keeping Assist 125
Page 7 of 276
5
Overview
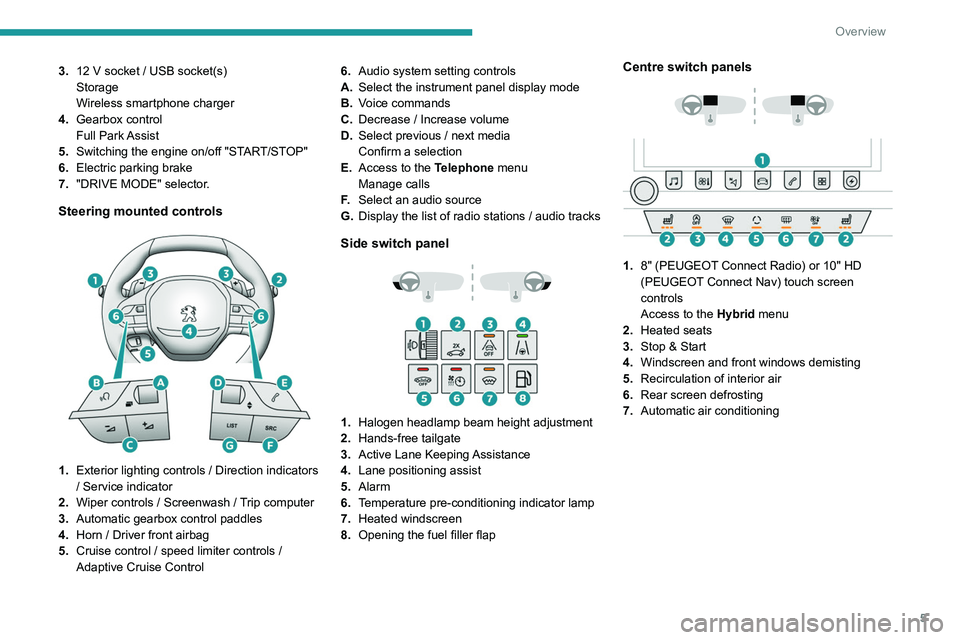
3.12 V socket / USB socket(s)
Storage
Wireless smartphone charger
4. Gearbox control
Full Park Assist
5. Switching the engine on/off "START/STOP"
6. Electric parking brake
7. "DRIVE MODE" selector.
Steering mounted controls
1.Exterior lighting controls / Direction indicators
/ Service indicator
2. Wiper controls / Screenwash / Trip computer
3. Automatic gearbox control paddles
4. Horn / Driver front airbag
5. Cruise control / speed limiter controls
/
Adaptive Cruise Control 6.
Audio system setting controls
A. Select the instrument panel display mode
B. Voice commands
C. Decrease / Increase volume
D. Select previous / next media
Confirm a selection
E. Access to the Telephone menu
Manage calls
F. Select an audio source
G. Display the list of radio stations / audio tracks
Side switch panel
1. Halogen headlamp beam height adjustment
2. Hands-free tailgate
3. Active Lane Keeping Assistance
4. Lane positioning assist
5. Alarm
6. Temperature pre-conditioning indicator lamp
7. Heated windscreen
8. Opening the fuel filler flap
Centre switch panels
1. 8" (PEUGEOT Connect Radio) or 10" HD
(PEUGEOT Connect Nav) touch screen
controls
Access to the Hybrid menu
2. Heated seats
3. Stop & Start
4. Windscreen and front windows demisting
5. Recirculation of interior air
6. Rear screen defrosting
7. Automatic air conditioning
Page 9 of 276

7
Eco-driving
Eco-driving
Eco-driving refers to a range of everyday
practices that allow the motorist to optimise their
fuel consumption and CO
2emissions.
Optimise your use of the gearbox
With a manual gearbox, move off gently and
change up promptly. While accelerating, change
up early.
With an automatic gearbox, favour automatic
mode and avoid pressing the accelerator pedal
heavily or suddenly.
The gear efficiency indicator prompts you to
engage the most suitable gear: whenever this
indication is displayed on the instrument panel,
follow it straight away.
With an automatic gearbox, this indicator
appears only in manual mode.
Drive smoothly
Maintain a safe distance between vehicles, use
engine braking rather than the brake pedal and
press the accelerator gradually. These attitudes
help to save fuel, reduce CO
2 emissions and
decrease general traffic noise.
Favour the use of the "Eco" driving mode by
selecting it using the "Drive Mode" control.
If the vehicle has the steering-mounted
"CRUISE" control, use cruise control at speeds
above 25 mph (40
km/h) when the traffic is
flowing well.
Use electrical equipment wisely
Before moving off, if the passenger compartment
is too warm, ventilate it by opening the windows
and air vents before using the air conditioning.
At speeds above 31
mph (50 km/h), close the
windows and leave the air vents open.
Consider using equipment that can help keep
the temperature in the passenger compartment
down (sunroof blind and window blinds, etc.).
Unless automatically regulated, switch off the air
conditioning as soon as the desired temperature
has been reached.
Switch off the demisting and defrosting functions,
if they are not managed automatically.
Switch off the heated seat as soon as possible.
Switch off the headlamps and foglamps when
the visibility conditions do not require their use.
Avoid running the engine before moving off,
particularly in winter; your vehicle will warm up
much faster while driving.
As a passenger, avoid connecting your
multimedia devices (film, music, video game,
etc.) to help reduce consumption of electrical
energy, and hence fuel.
Disconnect all portable devices before leaving
the vehicle.
Limit the causes of excess consumption
Spread loads throughout the vehicle; place the
heaviest items in the boot, as close as possible
to the rear seats.
Limit the loads carried in the vehicle and
minimise wind resistance (roof bars, roof rack, bicycle carrier, trailer, etc.). Preferably, use a
roof box.
Remove roof bars and roof racks after use.
At the end of winter, remove snow tyres and refit
summer tyres.
Comply with servicing instructions
Check tyre pressures regularly, with the tyres
cold, referring to the label in the door aperture on
the driver's side.
Carry out this check in particular:
–
before a long journey
.
–
at each change of season.
–
after a long period out of use.
Do not overlook the spare wheel and, where
applicable, the tyres on your trailer or caravan.
Have your vehicle serviced regularly (engine oil,
oil filter
, air filter, passenger compartment filter,
etc.) and observe the schedule of operations in
the manufacturer's service schedule.
With a BlueHDi Diesel engine, if the SCR system
is faulty, your vehicle will emit pollution. Visit
a PEUGEOT dealer or a qualified workshop
as soon as possible to restore your vehicle’s
nitrogen oxide emissions to regulatory
compliance.
When filling the fuel tank, do not continue after
the third nozzle cut-out, to avoid overflow.
You will only see the fuel consumption of your
new vehicle settle down to a consistent average
after the first 1,900 miles (3,000 kilometres).
Page 18 of 276

16
Instruments
The engine will not switch off at the next traffic
stop, if the exterior temperature is:
–
below 0°C.
–
above +35°C.
Flashing then fixed, accompanied by a
message.
The system has a fault.
Carry out (3).
Night VisionFixed.
The system has been activated, but
the vehicle is travelling too fast or the exterior
temperature conditions are outside the operating
range.
The display is available with the "Night vision"
mode but the system does not emit an alert.
Rear foglampsFixed.
The lamps are on.
Green warning/indicator lamps
Stop & Start
Fixed.
When the vehicle stops, the Stop & Start
puts the engine into STOP mode.
Flashing temporarily.
STOP mode is momentarily unavailable
or START mode is automatically triggered.
Vehicle ready to drive (Hybrid)Fixed, accompanied by an audible signal
when it comes on.
The vehicle is ready to drive. The indicator lamp goes out upon reaching a
speed of approximately 3 mph (5
km/h) and
lights up again when the vehicle stops moving.
The lamp will go out when you turn off the
engine and exit the vehicle.
Park Assist or Full Park AssistFixed.
The function is active.
Active Lane Keeping AssistFixed.
The function has been activated.
All the conditions have been met: the system is
operating.
Automatic wipingFixed.
Automatic windscreen wiping is activated.
Night VisionFixed.
The function has been activated.
All the conditions have been met: the system is
operating.
Direction indicators
Flashing with audible signal.
The direction indicators are on.
SidelampsFixed.
The lamps are on.
Dipped beam headlampsFixed.
The lamps are on.
Automatic headlamp dippingFixed.
The function has been activated
via the touch screen (Driving
/ Vehicle menu).
The lighting control stalk is in the "AUTO"
position.
Blue warning/indicator lamps
Main beam headlamps
Fixed.
The lamps are on.
Black/white warning lamps
Automatic gearbox or Electric automatic
gearbox (e-EAT8) (Hybrid)
Fixed.
The automatic gearbox is locked.
You must press the Unlock button to unlock it.
eSave function (Hybrid)Fixed, accompanied by the reserved
electric range.
The
eSave function is activated.
Indicators
Service indicator
The servicing information is expressed in terms
of distance (kilometres or miles) and time
(months or days).
The alert is given at whichever of these two
terms is reached first.
Page 28 of 276

26
Access
Locking the vehicle
Driving with the doors locked could make
it more difficult for the emergency services to
enter the vehicle in an emergency.
As a safety precaution, take the electronic key
with you when leaving the vehicle, even for a
short time.
Purchasing a second-hand vehicle
Have the key codes memorised by a
PEUGEOT dealer, to ensure that the keys
in your possession are the only ones able to
start the vehicle.
Keyless Entry and
Starting
This system allows the unlocking, locking
and starting of the vehicle, while carrying the
If motorised operation of the tailgate is
deactivated, pressing the button releases
the tailgate.
To lock the vehicle, it is necessary to close
the tailgate again.
Locking the vehicle
Normal locking
► Press the locking button.
Locking and alarm activation is confirmed by the
lighting of the direction indicators.
The door mirrors fold.
An access (door or boot) that is not properly closed prevents locking of the
vehicle. However, if the vehicle is fitted with
an alarm, it will be activated after 45
seconds.
If the vehicle is unlocked but the doors or boot
are not subsequently opened,
the vehicle
will automatically lock itself again after about
30
seconds. If the vehicle is fitted with an
alarm, it will also be reactivated automatically.
Deadlocking
► Press the locking button again within
5 seconds to deadlock the vehicle (confirmed by
the temporary lighting of the direction indicators).
Deadlocking renders the interior door
controls inoperative. It also deactivates
the central locking button.
The horn remains operational.
Never leave anyone inside the vehicle
when it is deadlocked.
Closing the windows
Holding the locking button pressed for
more than 3 seconds closes the windows.
When closing the windows, ensure that
no person or object could prevent their
correct closure.
To leave the windows partly open on versions
with alarm, you must first deactivate the
interior volumetric alarm protection.
For more information on the Alarm, refer to
the corresponding section.
"Peugeot Adaptive LED technology"
With the Full LED 3D rear lamps, the
lamps illuminate in a scrolling pattern upon
locking and unlocking the vehicle, as well as
when the lamps are lit remotely.
Locating the vehicle
This function helps you to spot your vehicle from
a distance, with the vehicle locked:
–
The direction indicators or sidelamps and/or
daytime running lamps, depending on version,
flash for approximately 10 seconds.
–
The door mirror spotlamps come on.
– The courtesy lamps come on.► Press this button.
Remote lighting of the
lamps
Availability of this function depends on version.► Press this button. The sidelamps,
dipped beam headlamps, number plate
lamps and door mirror spotlamps come on for 30
seconds.
Pressing again before the end of the timed
period switches off the lamps immediately.
Advice
Remote control
The remote control is a sensitive, high-
frequency device; avoid handling it in your
pocket, due to the risk of unintentionally
unlocking the vehicle.
Avoid pressing the remote control buttons
while out of range of the vehicle, due to
the risk of rendering the remote control
inoperative. It would then be necessary to
reset it.
Anti-theft protection
Do not modify the electronic vehicle
immobiliser, as this might result in
malfunctions.
Page 47 of 276

45
Ease of use and comfort
3From the front seat:► Press this button; its green indicator
lamp comes on.
The settings page is displayed on the touch
screen with the last memorised settings.
If the settings suit you and you make no
changes, the display returns to its previous state,
and the function activates immediately
.
Seats must be adjusted one after another,
starting with the driver's seat.
To modify the settings:
►
Begin with the driver
’s seat.
►
Select a massage intensity from the three
levels offered: " 1
" (Low), "2" (Normal) or "3"
(High).
►
Select another type of massage from the
ones offered.
►
W
ait for the driver's seat settings page to
disappear.
►
Next, proceed with the passenger's seat in
the same way
.
The changes are applied immediately.
Once activated, the system starts a one hour
massage cycle, made up of sequences of 6
minutes of massage followed by 3 minutes at
rest.
The system automatically stops at the end of the
cycle; the indicator lamp for the button goes off.Steering wheel
adjustment
► When stationary , pull the control to release
the steering wheel.
►
Adjust the height and reach to suit your
driving position.
►
Push the control lever to lock the steering
wheel.
As a safety measure, these adjustments must only be carried out with the vehicle
stationary.
Mirrors
Door mirrors
On versions fitted with ‘electrochrome’ mirrors,
a system connected to a brightness sensor
darkens the mirror to reduce the nuisance to the
driver caused by low sun or headlamp beams
from other vehicles.
As a safety measure, the mirrors should be adjusted to reduce the "blind spots".
The objects that you see in the mirrors are
in fact closer than they appear. Take this
into account in order to correctly judge the
distance of vehicles approaching from behind.
Demisting/Defrosting
If the vehicle is so equipped, demisting/
defrosting of the heated door mirrors is
performed when the heated rear screen is
switched on.
For more information on Rear screen
demisting/defrosting , refer to the
corresponding section.
Adjustment
► Move control A to the right or to the left to
select the corresponding mirror.
►
Move control
B in any of the four directions
to adjust.
Page 48 of 276

46
Ease of use and comfort
Removing a head restraint
► First tilt the corresponding backrest.
► Pull the head restraint fully up.
► Press the lug A to release the head restraint
and remove it completely.
► Store the head restraint.
Refitting a head restraint
► Insert the head restraint rods into the guides
in the corresponding seat backrest.
► Push the head restraint down as far as it will
go.
► Press the lug A to release the head restraint
and push it fully down.
Never drive with passengers seated at
the rear when the head restraints are
removed; the head restraints should be in
place and in the high position.
The head restraint for the centre seat
and those for the outer seats are not
interchangeable.
Folding the backrests
Each section of the backrest has two release
controls:
– a grip 1 on the outer edge of the backrest,
– a lever 2 on the boot side trim (SW).
Manoeuvring the seat backrests should
only be done when the vehicle is
stationary.
► Return control A to its central position.
Electric folding
If the vehicle is so equipped, the mirrors can
be folded electrically from the inside, with the
vehicle parked and the ignition on:
► Place control A in the centre
position.
►
Pull control A
back.
►
Lock the vehicle from the outside.
Electric unfolding
► From outside: unlock the vehicle.
► From inside: with the ignition on, place
control
A in the central position and then pull it
rearwards.
The automatic door mirror folding/ unfolding function is configured via the
Driving
/ Vehicle touch screen menu.
Manual folding
The mirrors can be folded manually (parking
obstruction, narrow garage, etc.).
►
T
urn the mirror towards the vehicle.
Automatic tilting in reverse gear
Function which automatically tilts the mirrors
downwards to assist with parking manoeuvres in
reverse gear. With the engine running, on engaging reverse
gear, the mirror glasses tilt downwards.
They return to their initial position:
–
A
few seconds after coming out of reverse
gear.
–
Once the vehicle speed exceeds 6 mph
(10
km/h),
–
When the engine is switched off.
It is set via the
Driving / Vehicle touch
screen menu.
Interior rear view mirror
Equipped with an anti-dazzle system, which
darkens the mirror glass and reduces the
nuisance to the driver caused by the sun,
headlamps of other vehicles, etc.
Automatic "electrochrome" model
This system automatically and progressively
transitions between day and night modes, using
a sensor that measures the light entering from
the rear of the vehicle.
To ensure optimum visibility during your manoeuvres, the mirror lightens
automatically when reverse gear is engaged.
Rear seats
Rear head restraints
High position (use):
► Pull the head restraint fully up.
Low position (stowing; when the seats are not
in use):
►
Press the lug
A to release the head restraint
and push it down.
The rear head restraints can be removed.
Page 67 of 276

65
Lighting and visibility
4Exterior lighting control
stalk
Main lighting
Automatic illumination of lamps/daytime running lamps
Sidelamps only
Dipped or main beam headlamps
"Highway function "
With "Full LED" technology headlamps,
the range of the dipped beam headlamps is
automatically increased once the speed of the
vehicle is above 68 mph (110
km/h).
"Peugeot Adaptive LED technology"
With the Full LED 3D rear lamps,
brightness is adjusted automatically for
optimum visibility at all times, both at day and
night.
Headlamp dipping
► Pull the stalk to switch between dipped and
main beam headlamps.
In “
AUTO” and sidelamps modes, the driver can
switch on the main beam headlamps temporarily
(“headlamp flash”) by pulling the stalk.
Displays
Illumination of the corresponding indicator lamp
in the instrument panel confirms that the lighting
selected is on.
A fault with a lamp is signalled by the permanent illumination of this warning
lamp, accompanied by the display of a message
and an audible signal.
Rear foglamps
They only work if the dipped or main beam headlamps are on.
► Rotate the ring forwards to switch them on
and backwards to switch them off.
When the lamps are switched off automatically
("
AUTO" position), the foglamps and the dipped
beam headlamps will remain on.
Switching on the foglamps is prohibited
in clear weather or in rain, both day and
night. In these situations, the power of their
beams may dazzle other drivers. They must
only be used in fog or falling snow (rules may
vary depending on country).
Do not forget to switch off the foglamps when
they are no longer necessary.
Switching off of the lamps when the
ignition is switched off
When the ignition is switched off, all of the
lamps turn off immediately, except for dipped
beam headlamps if automatic guide-me-home
lighting is activated.
Switching on the lamps after
switching off the ignition
To reactivate the lighting control, rotate the
ring to the "AUTO" position, then to the
desired position.
Page 68 of 276

66
Lighting and visibility
Headlamp beam height
adjustment
Manual adjustment of the
halogen headlamps
To avoid causing a nuisance to other road users,
the height of these headlamp beams should be
adjusted according to the load in the vehicle.
0 (Initial setting) Driver only or driver + front passenger
1 5 people
2 5 people + load in the boot
3 Driver only + load in the boot
4 5 6 Not used
Automatic adjustment of
the Full LED technology
headlamps
This system automatically adjusts the height of
the headlamp beams according to the load in the
vehicle.
If the driver's door is opened, a temporary
audible signal warns the driver that the lamps
are on.
They will go off automatically after a period of
time that depends on the state of charge of
the battery (entering energy economy mode).
In some weather conditions (e.g. low
temperature or humidity), misting on the
internal surface of the glass of the headlamps
and rear lamps is normal, and will disappear
after the lamps have been on for a few
minutes.
Never look too closely at the luminous
beam of Full LED headlamps: risk of
serious eye injury!
Travelling abroad
Vehicles equipped with halogen
headlamps:
If planning to use your vehicle in a country
that drives on the other side of the road, the
headlamp dipped beams must be adjusted to
avoid dazzling oncoming drivers. Contact a
PEUGEOT dealer or a qualified workshop.
Daytime running lamps /
Sidelamps
These LED lamps at the front and rear of the
vehicle light up automatically when the engine
starts.
They perform the following functions:
–
Daytime running lamps (lighting control stalk
at position
"AUTO" with adequate ambient light).
–
Sidelamps (lighting control stalk at position
"
AUTO" with low ambient light or "Sidelamps
only" or "Dipped/main beam headlamps").
Direction indicators
► Left or right: lower or raise the lighting control
stalk, beyond the point of resistance.
If you forget to cancel the direction
indicators for more than 20 seconds, the
volume of the audible signal will increase if
the speed is above 50 mph (80 km/h).
Three flashes
► Press briefly upwards or downwards, without
going beyond the point of resistance; the
direction indicators will flash 3 times.
Parking lamps
Vehicle side marking by lighting the sidelamps
on the traffic side only.
►
Depending on version, within one minute
of switching off the ignition, move the lighting
control stalk up or down, depending which side
the traffic is on (for example, when parking on
the left, moving the lighting control stalk upwards
turns on the right-hand sidelamps).
This is confirmed by an audible signal and the
lighting of the corresponding direction indicator
lamp on the instrument panel.
►
T
o switch off the parking lamps, return the
lighting control stalk to the central position.
Page 69 of 276

67
Lighting and visibility
4Headlamp beam height
adjustment
Manual adjustment of the
halogen headlamps
To avoid causing a nuisance to other road users,
the height of these headlamp beams should be
adjusted according to the load in the vehicle.
0 (Initial setting) Driver only or driver + front passenger
1 5 people
2 5 people + load in the boot
3 Driver only + load in the boot
4 5 6 Not used
Automatic adjustment of
the Full LED technology
headlamps
This system automatically adjusts the height of
the headlamp beams according to the load in the
vehicle.
In the event of a malfunction, this warning
lamp comes on on the instrument panel,
accompanied by the display of a message and
an audible signal.
The system then places the headlamp beams in
the lowest position.
Have the system checked by a PEUGEOT
dealer or a qualified workshop.
Do not touch the "Full LED" technology
headlamps - risk of electrocution!
Automatic illumination of headlamps
When the ring is at the "AUTO" position and
a low level of ambient light is detected by
the rain/sunshine sensor
, the number plate
lamps,
sidelamps and dipped beam headlamps
are switched on automatically, without any action
on the part of the driver. They can also come on
if rain is detected, at the same time as automatic
operation of the windscreen wipers.
As soon as the brightness returns to a sufficient
level or after the windscreen wipers are switched
off, the lamps are switched off automatically.
Malfunction
In the event of a malfunction of the rain/
sunshine sensor, the vehicle’s lighting
comes on and this warning lamp is displayed in
the instrument panel, accompanied by an
audible signal and/or the display of a message.
Contact a PEUGEOT dealer or a qualified
workshop.
Do not cover the rain/sunshine sensor
located at the top centre of the
windscreen behind the interior rear view
mirror; the associated functions would no
longer be controlled.
In fog or snow, the rain/sunshine sensor
may detect sufficient light. In this case,
the lighting will not come on automatically.
Guide-me-home and
welcome lighting
Guide-me-home lighting
Automatic
With the ring in the "AUTO" position, when the
light is poor, the dipped beam headlamps come
on automatically when the ignition is switched
off.
You can activate/deactivate this function and adjust the guide-me-home lighting
duration in the Driving
/ Vehicle touch screen
menu.