rear view mirror PEUGEOT 508 2023 Owners Manual
[x] Cancel search | Manufacturer: PEUGEOT, Model Year: 2023, Model line: 508, Model: PEUGEOT 508 2023Pages: 244, PDF Size: 7.38 MB
Page 4 of 244
2
Contents
■
OverviewOverview 4
■
Eco-driving
1Dashboard instrumentsDriver information 10
Digital instrument panels 10
Warning and indicator lamps 11
Indicators 18
Manual test 21
Total distance recorder 22
Trip computer 22
10-inch touch screen 23
Remotely operable additional functions
(Rechargeable hybrid)
25
2AccessElectronic key with remote control function
and built-in key 26
Keyless Entry and Start 28
Central locking 30
Back-up procedures 30
Alarm 32
Doors 34
Boot 35
Motorised tailgate 36
Electric windows 39
Panoramic sunroof 41
3Ease of use and comfortDriving position 43
Front seats 44
Steering wheel adjustment 47
Mirrors 47
Rear seats 49
Heating and Ventilation 50
Dual-zone automatic air conditioning 51
Front demisting/defrosting 54
Heated windscreen 54
Rear screen demisting/defrosting 55
Temperature pre-conditioning
(Rechargeable hybrid)
55
Front fittings 56
Courtesy lamps 59
Interior ambient lighting 60
Rear fittings 60
Boot fittings 61
4Lighting and visibilityExterior lighting control stalk 66
Direction indicators 67
Headlamp beam height adjustment 67
Automatic illumination of headlamps 68
Guide-me-home and welcome lighting 68
Automatic lighting systems - General
recommendations
69
Peugeot Matrix LED Technology 2.0 69
Adaptive Frontlight System 70
Night Vision 71
Wiper control stalk 73
Changing a wiper blade 75
Automatic wipers 75
5SafetyGeneral safety recommendations 77
Hazard warning lamps 77
Horn 78
Pedestrian horn (Rechargeable hybrid) 78
Emergency or assistance 78
Event Data Recording system 80
Electronic stability control (ESC) 81
Seat belts 83
Airbags 85
Active bonnet 87
Child seats 88
Deactivating the front passenger airbag 90
ISOFIX child seats 90
i-Size child seats 91
Installing child seats 93
Child lock 96
6DrivingDriving recommendations 97
Starting/switching off the engine 99
Starting rechargeable hybrid vehicles 99
Electric parking brake 101
Automatic gearbox 103
Active Suspension Control 106
Driving modes 106
Hill start assist 108
Gear shift indicator 109
Stop & Start 109
Tyre under-inflation detection 11 0
Driving and manoeuvring aids - General
recommendations
11 2
Shortcuts for driving aids 11 3
Road signs recognition 11 4
Speed limiter 11 8
Cruise control - Specific recommendations 11 9
Programmable cruise control 120
Page 50 of 244
48
Ease of use and comfort
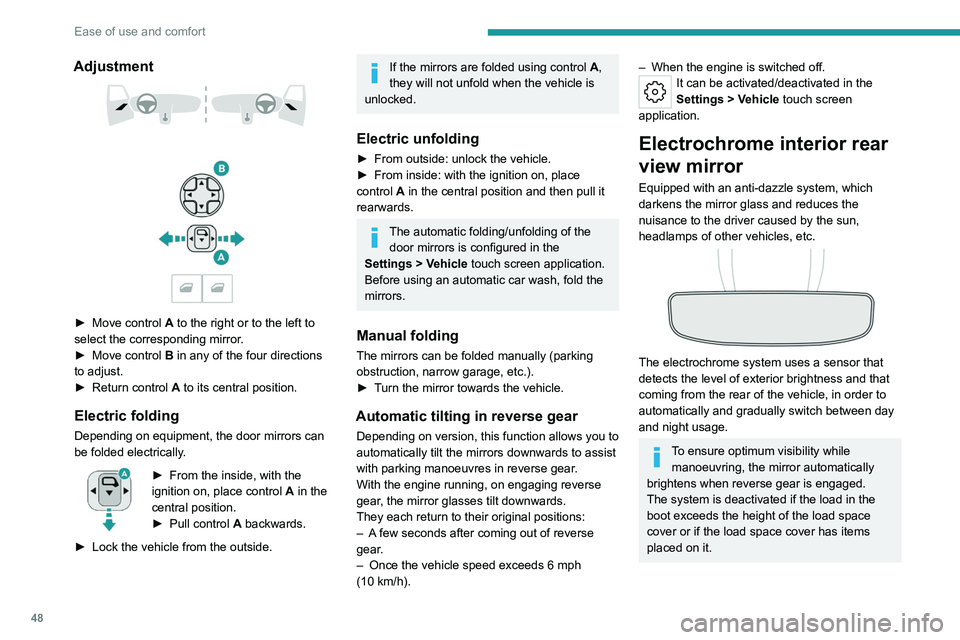
Adjustment
► Move control A to the right or to the left to
select the corresponding mirror.
►
Move control
B in any of the four directions
to adjust.
►
Return control A
to its central position.
Electric folding
Depending on equipment, the door mirrors can
be folded electrically.
► From the inside, with the
ignition on, place control A
in the
central position.
►
Pull control A
backwards.
►
Lock the vehicle from the outside.
If the mirrors are folded using control A,
they will not unfold when the vehicle is
unlocked.
Electric unfolding
► From outside: unlock the vehicle.
► From inside: with the ignition on, place
control
A in the central position and then pull it
rearwards.
The automatic folding/unfolding of the door mirrors is configured in the
Settings
> Vehicle touch screen application.
Before using an automatic car wash, fold the
mirrors.
Manual folding
The mirrors can be folded manually (parking
obstruction, narrow garage, etc.).
►
T
urn the mirror towards the vehicle.
Automatic tilting in reverse gear
Depending on version, this function allows you to
automatically tilt the mirrors downwards to assist
with parking manoeuvres in reverse gear.
With the engine running, on engaging reverse
gear, the mirror glasses tilt downwards.
They each return to their original positions:
–
A
few seconds after coming out of reverse
gear.
–
Once the vehicle speed exceeds 6 mph
(10
km/h).
– When the engine is switched off.It can be activated/deactivated in the
Settings > Vehicle touch screen
application.
Electrochrome interior rear
view mirror
Equipped with an anti-dazzle system, which
darkens the mirror glass and reduces the
nuisance to the driver caused by the sun,
headlamps of other vehicles, etc.
The electrochrome system uses a sensor that
detects the level of exterior brightness and that
coming from the rear of the vehicle, in order to
automatically and gradually switch between day
and night usage.
To ensure optimum visibility while manoeuvring, the mirror automatically
brightens when reverse gear is engaged.
The system is deactivated if the load in the
boot exceeds the height of the load space
cover or if the load space cover has items
placed on it.
Page 70 of 244
68
Lighting and visibility
Automatic illumination of lamps
With the lighting control stalk in the “ AUTO”
position and if a low level of exterior brightness
is detected by the rain/sunshine sensor, the
sidelamps and dipped beam headlamps are
switched on automatically, without any action on
the part of the driver. They may also come on if
rain is detected, at the same time as automatic
operation of the windscreen wipers.
As soon as the brightness returns to a sufficient
level or after the windscreen wipers are switched
off, the lamps are switched off automatically.
Malfunction
In the event of a malfunction of the rain/
sunshine sensor, the vehicle’s lamps
come on and this warning lamp is displayed on
the instrument panel, accompanied by an
audible signal and/or the display of a message.
Have it checked by a PEUGEOT dealer or a
qualified workshop.
Do not cover the rain/sunshine sensor
located at the top centre of the
windscreen behind the interior rear view
mirror; the associated functions would no
longer be controlled.
In fog or snow, the rain/sunshine sensor
may detect sufficient light. For this
reason, the lighting will not come on
automatically.
The inner surface of the windscreen may become misted up and affect the proper
operation of the rain/sunshine sensor.
In humid and cold weather, demist the
windscreen regularly.
Guide-me-home and
welcome lighting
Guide-me-home lighting
Automatic
With the ring of the lighting control stalk in the
"AUTO” position and when the light is poor, the
dipped beam headlamps come on automatically
when the ignition is switched off.
You can activate/deactivate and adjust the duration of the guide-me-home
lighting in the Settings
> Vehicle touch screen
application.
Manual
► With the ignition off, pull the lighting control
stalk toward you ("headlamp flash") to activate/
deactivate the function.
Manual guide-me-home lighting goes off
automatically after a period of time.
Welcome lighting
When the vehicle is unlocked in low light
conditions and the "Automatic illumination of
headlamps" function is activated, this system
automatically switches on:
–
On the outside, sidelamps, dipped beam
headlamps and door mirror spotlamps.
–
Inside, courtesy lamps and footwell lighting.
You can activate/deactivate and adjust the duration of the welcome lighting in the
Settings
> Vehicle touch screen application.
Door mirror spotlamps
These spotlamps facilitate access to the vehicle
by lighting the ground near the front doors.
The spotlamps come on automatically:
Page 72 of 244
70
Lighting and visibility
Nominal main beam lighting is restored as soon
as the vehicle is no longer detected by the
system.
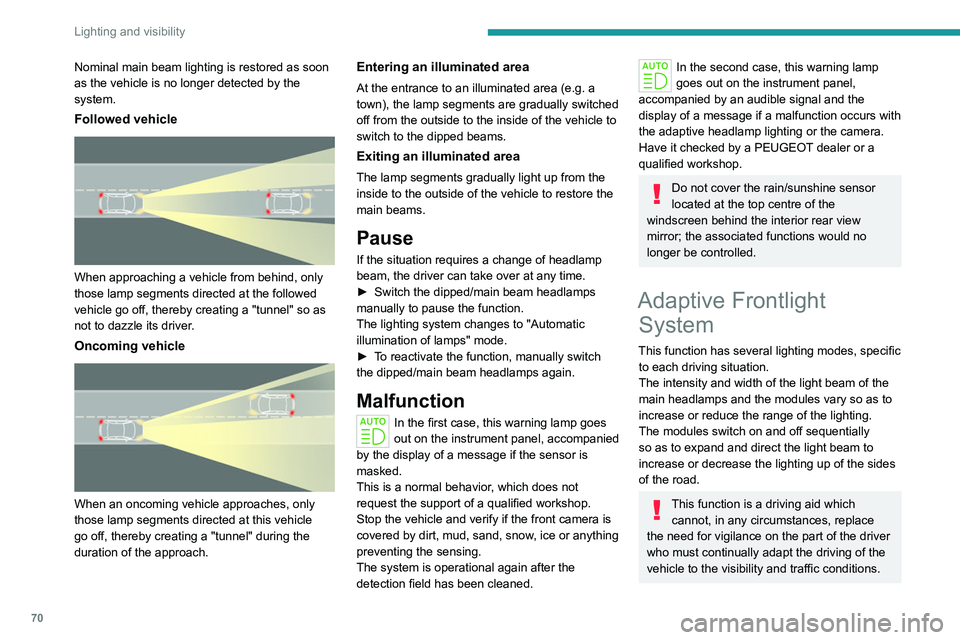
Followed vehicle
When approaching a vehicle from behind, only
those lamp segments directed at the followed
vehicle go off, thereby creating a "tunnel" so as
not to dazzle its driver.
Oncoming vehicle
When an oncoming vehicle approaches, only
those lamp segments directed at this vehicle
go off, thereby creating a "tunnel" during the
duration of the approach.
Entering an illuminated area
At the entrance to an illuminated area (e.g. a
town), the lamp segments are gradually switched
off from the outside to the inside of the vehicle to
switch to the dipped beams.
Exiting an illuminated area
The lamp segments gradually light up from the
inside to the outside of the vehicle to restore the
main beams.
Pause
If the situation requires a change of headlamp
beam, the driver can take over at any time.
►
Switch the dipped/main beam headlamps
manually to pause the function.
The lighting system changes to "Automatic
illumination of lamps" mode.
►
T
o reactivate the function, manually switch
the dipped/main beam headlamps again.
Malfunction
In the first case, this warning lamp goes
out on the instrument panel, accompanied
by the display of a message if the sensor is
masked.
This is a normal behavior, which does not
request the support of a qualified workshop.
Stop the vehicle and verify if the front camera is
covered by dirt, mud, sand, snow, ice or anything
preventing the sensing.
The system is operational again after the
detection field has been cleaned.
In the second case, this warning lamp
goes out on the instrument panel,
accompanied by an audible signal and the
display of a message if a malfunction occurs with
the adaptive headlamp lighting or the camera.
Have it checked by a PEUGEOT dealer or a
qualified workshop.
Do not cover the rain/sunshine sensor
located at the top centre of the
windscreen behind the interior rear view
mirror; the associated functions would no
longer be controlled.
Adaptive Frontlight System
This function has several lighting modes, specific
to each driving situation.
The intensity and width of the light beam of the
main headlamps and the modules vary so as to
increase or reduce the range of the lighting.
The modules switch on and off sequentially
so as to expand and direct the light beam to
increase or decrease the lighting up of the sides
of the road.
This function is a driving aid which cannot, in any circumstances, replace
the need for vigilance on the part of the driver
who must continually adapt the driving of the
vehicle to the visibility and traffic conditions.
Page 77 of 244
75
Lighting and visibility
4Changing a wiper blade
Removing/Refitting at the front
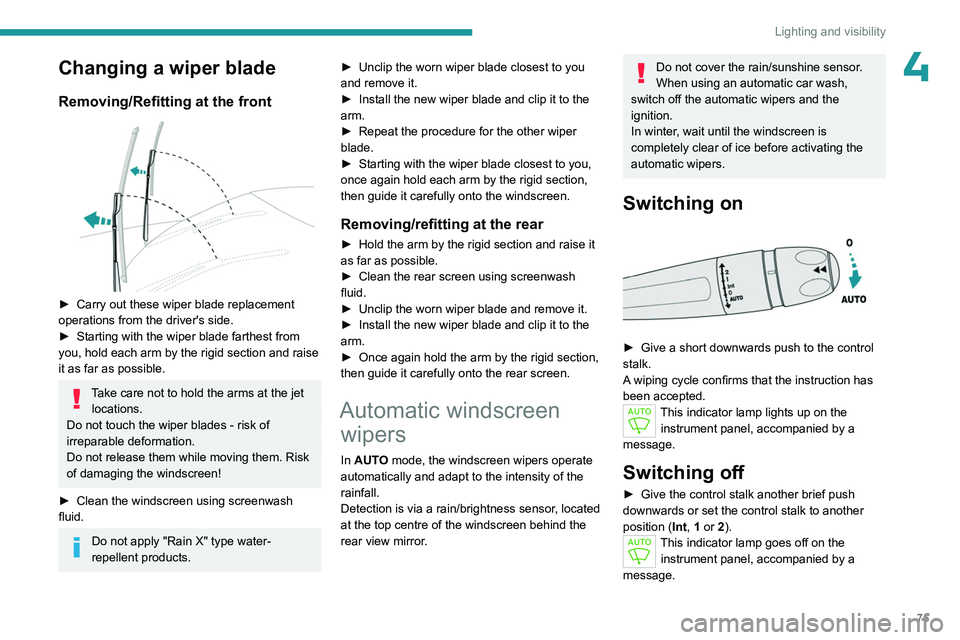
► Carry out these wiper blade replacement
operations from the driver's side.
►
Starting with the wiper blade farthest from
you, hold each arm by the rigid section and raise
it as far as possible.
Take care not to hold the arms at the jet locations.
Do not touch the wiper blades - risk of
irreparable deformation.
Do not release them while moving them. Risk
of damaging the windscreen!
►
Clean the windscreen using screenwash
fluid.
Do not apply "Rain X" type water-
repellent products. ►
Unclip the worn wiper blade closest to you
and remove it.
►
Install the new wiper blade and clip it to the
arm.
►
Repeat the procedure for the other wiper
blade.
►
Starting with the wiper blade closest to you,
once again hold each arm by the rigid section,
then guide it carefully onto the windscreen.
Removing/refitting at the rear
► Hold the arm by the rigid section and raise it
as far as possible.
►
Clean the rear screen using screenwash
fluid.
►
Unclip the worn wiper blade and remove it.
►
Install the new wiper blade and clip it to the
arm.
►
Once again hold the arm by the rigid section,
then guide it carefully onto the rear screen.
Automatic windscreen wipers
In AUTO mode, the windscreen wipers operate
automatically and adapt to the intensity of the
rainfall.
Detection is via a rain/brightness sensor, located
at the top centre of the windscreen behind the
rear view mirror.
Do not cover the rain/sunshine sensor.
When using an automatic car wash,
switch off the automatic wipers and the
ignition.
In winter, wait until the windscreen is
completely clear of ice before activating the
automatic wipers.
Switching on
► Give a short downwards push to the control
stalk.
A
wiping cycle confirms that the instruction has
been accepted.
This indicator lamp lights up on the instrument panel, accompanied by a
message.
Switching off
► Give the control stalk another brief push
downwards or set the control stalk to another
position ( Int
, 1 or 2).
This indicator lamp goes off on the instrument panel, accompanied by a
message.
Page 143 of 244
141
Driving
6Activation/Deactivation
To activate the camera, engage reverse gear.
The system is deactivated:
–
when changing out of reverse gear
.
–
by pressing the cross in the top left-hand
corner of the touch screen.
Automatic zoom view
The rear camera records the vehicle's
surroundings during the manoeuvre in order to
create a view from above the rear of the vehicle
in its close surroundings, allowing the vehicle to
be manoeuvred around nearby obstacles.
Using the sensors located on the rear bumper,
the automatic zoom view is displayed when
approaching an obstacle at the red line (less
than 30 cm) during the manoeuvre.
This view is only available automatically.
Obstacles may appear further away than
they actually are.
It is important to monitor the sides of the
vehicle during the manoeuvre, using the
mirrors.
Parking sensors also provide additional
information about the area around the vehicle.
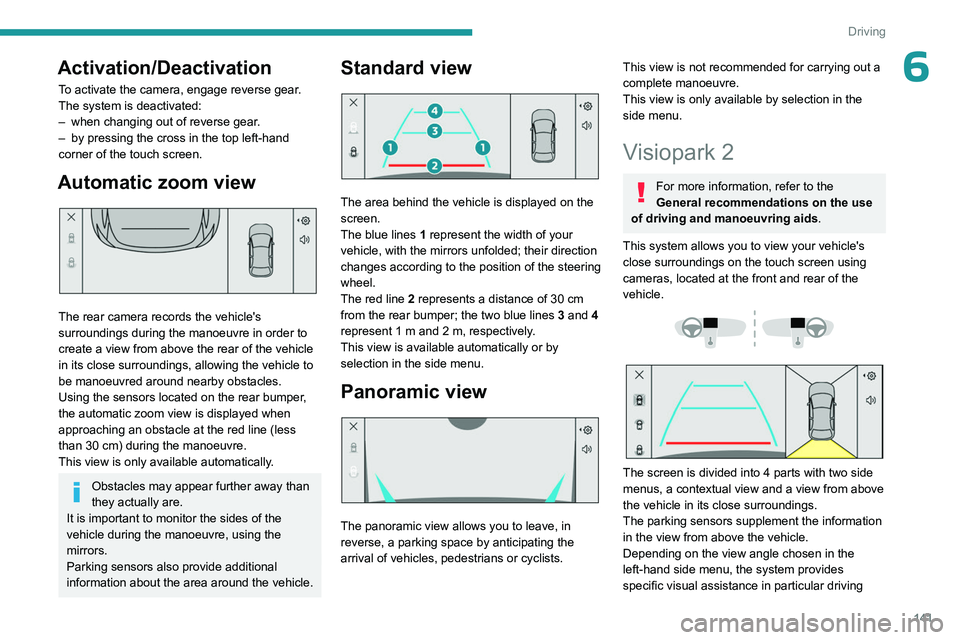
Standard view
The area behind the vehicle is displayed on the
screen.
The blue lines 1 represent the width of your
vehicle, with the mirrors unfolded; their direction
changes according to the position of the steering
wheel.
The red line 2 represents a distance of 30
cm
from the rear bumper; the two blue lines 3 and 4
represent 1
m and 2 m, respectively.
This view is available automatically or by
selection in the side menu.
Panoramic view
The panoramic view allows you to leave, in
reverse, a parking space by anticipating the
arrival of vehicles, pedestrians or cyclists.
This view is not recommended for carrying out a
complete manoeuvre.
This view is only available by selection in the
side menu.
Visiopark 2
For more information, refer to the
General recommendations on the use
of driving and manoeuvring aids .
This system allows you to view your vehicle's
close surroundings on the touch screen using
cameras, located at the front and rear of the
vehicle.
The screen is divided into 4 parts with two side
menus, a contextual view and a view from above
the vehicle in its close surroundings.
The parking sensors supplement the information
in the view from above the vehicle.
Depending on the view angle chosen in the
left-hand side menu, the system provides
specific visual assistance in particular driving
Page 145 of 244
143
Driving
6Obstacles may appear further away than
they actually are.
It is important to monitor the sides of the
vehicle during the manoeuvre, using the
mirrors.
Parking sensors also provide additional
information about the area around the vehicle.
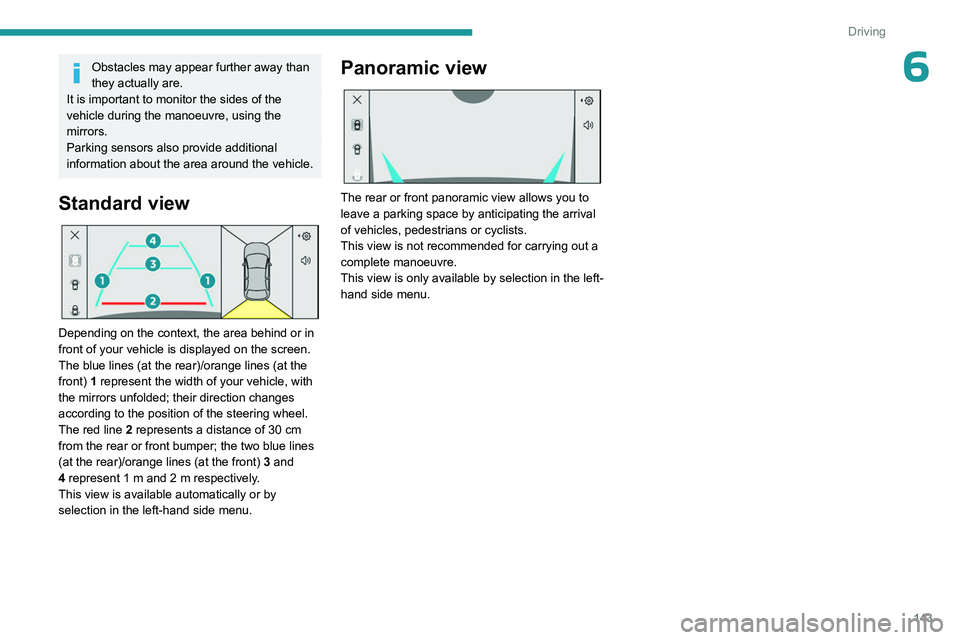
Standard view
Depending on the context, the area behind or in
front of your vehicle is displayed on the screen.
The blue lines (at the rear)/orange lines (at the
front) 1 represent the width of your vehicle, with
the mirrors unfolded;
their direction changes
according to the position of the steering wheel.
The red line 2 represents a distance of 30 cm
from the rear or front bumper; the two blue lines
(at the rear)/orange lines (at the front)
3
and
4
represent 1 m and 2 m respectively.
This view is available automatically or by
selection in the left-hand side menu.
Panoramic view
The rear or front panoramic view allows you to
leave a parking space by anticipating the arrival
of vehicles, pedestrians or cyclists.
This view is not recommended for carrying out a
complete manoeuvre.
This view is only available by selection in the left-
hand side menu.
Page 220 of 244
218
Alphabetical index
Inflating tyres and accessories
(using the kit)
174, 176
Information, vehicle
10, 212
Infrared camera
71, 113
Instrument panel
10, 22, 113
Instrument panels
10
ISOFIX mountings
90, 95
J
Jack 173–174, 176
Jump starting
183
K
Key 26–27, 30–31
Key, electronic
28–29
Keyless Entry and Starting
28–29, 99
Key not recognised
100
Key with remote control
26, 98
Kit, hands-free
204
Kit, puncture repair
172–174
Kit, temporary puncture repair
172–174, 176
Klaxon
78
L
Labels, identification 195
Lamps, parking
67
Lamps, rear 181
Lamps with Full LED technology
67, 181
Lane keeping assist
134
Lane positioning assist
121, 125–127
Leather (care)
171
LEDs - Light-emitting diodes
67, 180–181
Level, AdBlue®
165
Level, brake fluid
164
Level, Diesel additive
165–166
Level, engine coolant
19, 165
Level, engine oil
18, 164
Levels and checks
163–165
Level, screenwash fluid
74, 165
Light-emitting diodes - LEDs
67, 180–181
Lighting, boot
65
Lighting dimmer
22
Lighting, exterior
66, 69
Lighting, guide-me home
68
Lighting, interior
59–60
Lighting, mood
60
Lighting, welcome
68
Loading
159–160
Load reduction mode
162
Load space cover
61–62
Locating your vehicle
27
Locking
27–28
Locking from the inside
30
Locking the doors
30
Log, alerts
21
Long objects, transporting
60
Lumbar
44–45M
Mains socket (domestic network) 149–150
Maintenance (advice)
148, 169
Maintenance, routine
113, 165, 167
Manoeuvring aids (recommendations)
11 2
Map reading lamps
59
Markings, identification
195
Massage function
46–47
Massage, multi-point
46–47
Mat
59, 113
Menu, shortcuts
24
Mirror, rear view
48
Mirrors, door
47–48, 55, 136
Mirror, vanity
56
Misfuel prevention
146
Mobile application
25, 55, 155, 157
Motor, electric
107, 147, 193
Motorised tailgate
36–37
Mountings, ISOFIX
90, 95
N
Net, high load retaining 63–64
Night vision
71
Night Vision
71
O
Obstacle detection 138