lock Peugeot Bipper 2008 Owner's Guide
[x] Cancel search | Manufacturer: PEUGEOT, Model Year: 2008, Model line: Bipper, Model: Peugeot Bipper 2008Pages: 131, PDF Size: 1.44 MB
Page 87 of 131
81
5
SAFETY
Seat belts
Good practice
Wherever you are seated in the vehicle,
always fasten your seat belt, even for short
journeys.
The seat belts are fitted with an inertia reel
which automatically adjusts the length of the
strap to your size. The seat belt is rolled up
automatically when not in use.
Ensure that the seat belt is rolled up
correctly after use.
After folding or moving a seat, ensure that
the seat belt is rolled up correctly in its
compartment and that the buckle is ready to
accommodate the tongue. The inertia reels are fitted with a device
which automatically locks the strap in the
event of a collision or emergency braking or
if the vehicle rolls over.
The air bag warning light comes
on if the pretensioners are
triggered. Consult a PEUGEOT
dealer .
Depending on the nature and seriousness
of any impact, the pretensioning device may
be triggered before and independently of
inflation of the air bags. It instantly tightens
the seat belts against the body of the
occupants.
The triggering of the pretensioners is
accompanied by a slight discharge of
harmless smoke and a noise, due to the
activation of the pyrotechnic cartridge
incorporated in the system.
The force limiter reduces the pressure of the
seat belt against the body of the occupants.
The equipment fitted to these seat belts is
operational when the ignition is switched on. In order to be effective, a seat belt must:
- restrain one person only,
- must not be twisted, check by pulling in
front of you with an even movement,
- be tightened as close to the body as possible.
The upper part of the seat belt should be
positioned in the hollow of the shoulder.
The lap part should be placed as low as
possible on the pelvis.
Do not invert the seat belt buckles as they
will not fulfil their role completely. If the
seats are fitted with armrests, the lap part of
the seat belt should always pass under the
armrest.
Check that the seat belt is fastened correctly
by pulling the strap firmly.
Recommendations for children:
- use a suitable child seat if the passenger is less than 12 years old or shorter than
one metre fifty,
- never allow a child to travel on your lap, even with the seat belt fastened.
For further information regarding child
seats, refer to the "Children on board"
section of chapter 5.
In accordance with current safety
regulations, your PEUGEOT dealer
guarantees all work or any checks, from
testing to maintenance, on your seat belt
equipment.
Have the seat belts checked regularly
(even after a minor impact) by a PEUGEOT
dealer : they must not show any signs of
wear, cutting or fraying and they must not be
transformed or modified.
Clean the seat belt straps with soapy
water or a textile cleaning product, sold
by a PEUGEOT dealer .
Page 99 of 131

90
Child safety
ADVICE ON CHILD SEATS
The incorrect installation of a child seat in a
vehicle compromises the child’s protection in
the event of an accident.
Remember to fasten the seat belts or the
child seat harnesses keeping the slack in
relation to the child’s body to a minimum ,
even for short journeys.
For optimum installation of the "forward
facing" child seat, ensure that the back of
the child seat is in contact with the back of
the vehicle’s seat and that the head restraint
does not cause any discomfort. Installing a booster seat
The chest part of the seat belt must be
positioned on the child’s shoulder without
touching the neck.
Ensure that the lap part of the seat belt
passes correctly over the child’s thighs.
PEUGEOT recommends the use of a
booster seat which has a back, fitted with a
seat belt guide at shoulder level.
As a safety precaution, do not leave:
- one or more children alone and unsupervised in a vehicle,
- a child or an animal in a vehicle which is exposed to the sun, with the windows
closed,
- the keys within reach of children inside the vehicle.
To prevent accidental opening of the doors,
use the "Child lock".
To protect young children from the sun, fit
side blinds on the rear windows.
If the head restraint has to be removed,
ensure that it is stored or attached securely
to prevent it from being thrown around the
vehicle in the event of sharp braking.
Children under the age of 10 must not travel
in the "forward facing" position on the front
passenger seat, unless the rear seats are
already occupied by other children, cannot
be used or are absent.
Disarm the passenger air bag when a "rear
facing" child seat is installed on the front
seat.
Otherwise, the child would risk being
seriously injured or killed if the air bag were
to inflate.
Page 100 of 131
91
5
SAFETY
Child safety
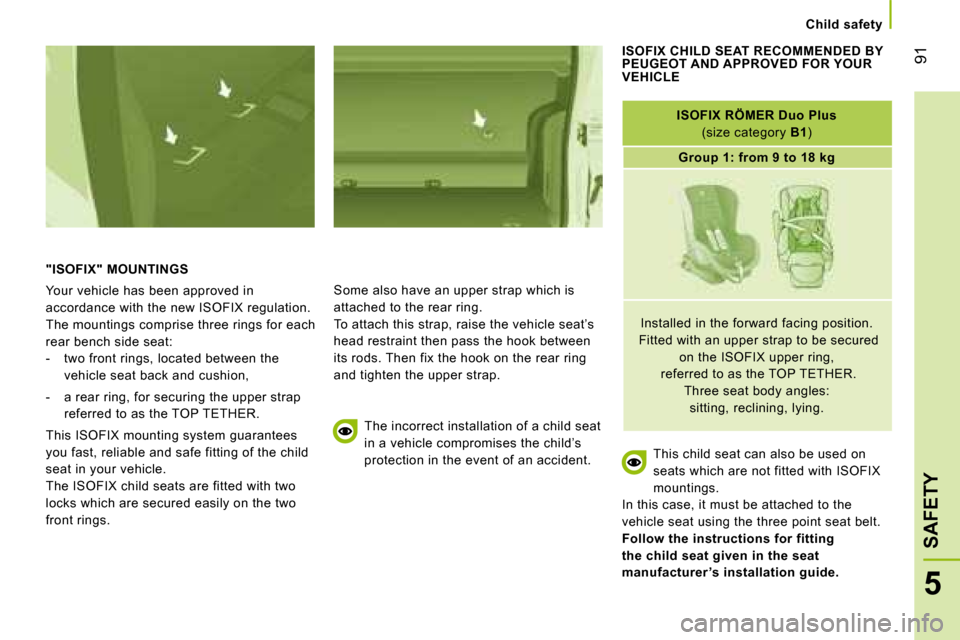
"ISOFIX" MOUNTINGS
Your vehicle has been approved in
accordance with the new ISOFIX regulation.
The mountings comprise three rings for each
rear bench side seat:
- two front rings, located between the vehicle seat back and cushion,
- a rear ring, for securing the upper strap referred to as the TOP TETHER.
This ISOFIX mounting system guarantees
you fast, reliable and safe fitting of the child
seat in your vehicle.
The ISOFIX child seats are fitted with two
locks which are secured easily on the two
front rings. Some also have an upper strap which is
attached to the rear ring.
To attach this strap, raise the vehicle seat’s
head restraint then pass the hook between
its rods. Then fix the hook on the rear ring
and tighten the upper strap.
The incorrect installation of a child seat
in a vehicle compromises the child’s
protection in the event of an accident.
ISOFIX CHILD SEAT RECOMMENDED BY PEUGEOT AND APPROVED FOR YOUR VEHICLE
ISOFIX RÖMER Duo Plus
(size category B1 )
Group 1: from 9 to 18 kg
Installed in the forward facing position.
Fitted with an upper strap to be secured on the ISOFIX upper ring,
referred to as the TOP TETHER. Three seat body angles: sitting, reclining, lying.
This child seat can also be used on
seats which are not fitted with ISOFIX
mountings.
In this case, it must be attached to the
vehicle seat using the three point seat belt.
Follow the instructions for fitting
the child seat given in the seat
manufacturer ’s installation guide.
Page 108 of 131
98
Battery
The batteries contain harmful
substances such as sulphuric acid and
lead. They must be discarded in accordance
with the provisions of the law and must not,
in any circumstances, be discarded with
household waste.
Take used batteries to a special collection
point.
Before disconnecting the battery, you must
wait for 2 minutes after switching off the
ignition.
Never disconnect a terminal when the
engine is running.
Never charge a battery without first
disconnecting the terminals.
Close the windows and doors before
disconnecting the battery.
After every reconnection of the battery,
switch on the ignition and wait 1 minute
before starting to allow the electronic
systems to be initialised. If slight difficulties
are experienced after this, please consult a
PEUGEOT dealer . It is advisable to disconnect the battery
if the vehicle is not to be used for a
period of more than one month.
If the battery has been disconnected
for some time, it may be necessary to
reinitialise the following functions:
- the display parameters (date, time, language, distance unit and temperature
unit),
- the radio stations,
- the central locking.
Some settings are cleared and must be
reprogrammed, consult a PEUGEOT dealer .
Page 110 of 131
100
Changing a wheel
Removing
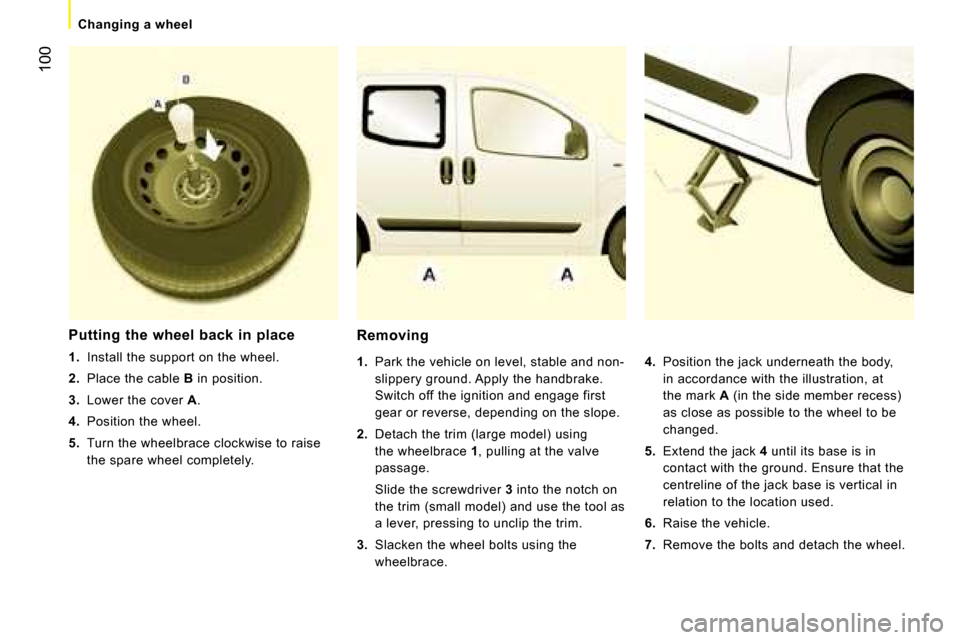
1. Park the vehicle on level, stable and non-
slippery ground. Apply the handbrake.
Switch off the ignition and engage first
gear or reverse, depending on the slope.
2. Detach the trim (large model) using
the wheelbrace 1 , pulling at the valve
passage.
Slide the screwdriver 3 into the notch on
the trim (small model) and use the tool as
a lever, pressing to unclip the trim.
3. Slacken the wheel bolts using the
wheelbrace.
4. Position the jack underneath the body,
in accordance with the illustration, at
the mark A (in the side member recess)
as close as possible to the wheel to be
changed.
5. Extend the jack 4 until its base is in
contact with the ground. Ensure that the
centreline of the jack base is vertical in
relation to the location used.
6. Raise the vehicle.
7. Remove the bolts and detach the wheel.
Putting the wheel back in place
1. Install the support on the wheel.
2. Place the cable B in position.
3. Lower the cover A .
4. Position the wheel.
5. Turn the wheelbrace clockwise to raise
the spare wheel completely.
Page 114 of 131
104
Changing a bulb
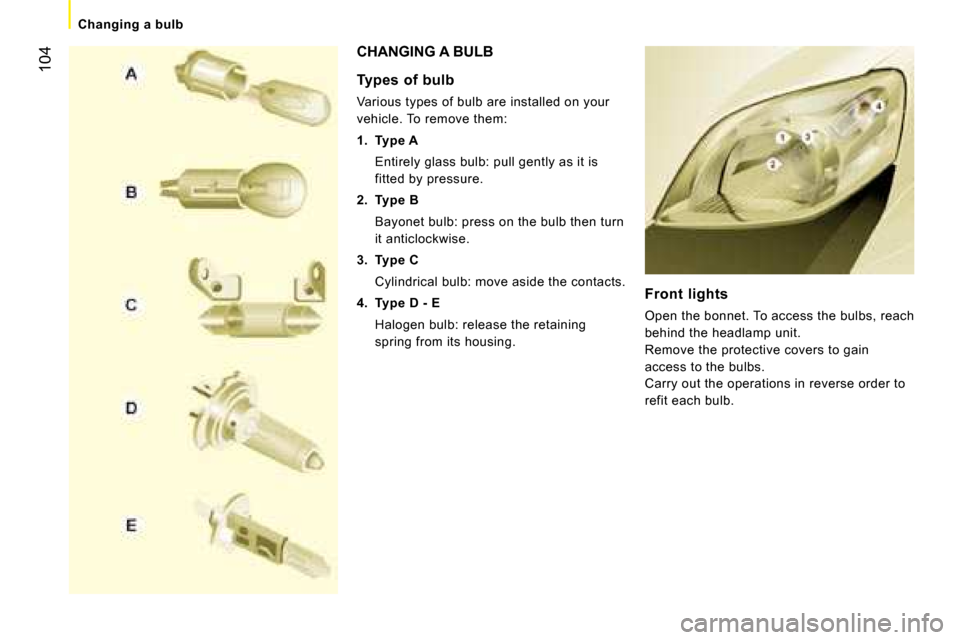
Front lights
Open the bonnet. To access the bulbs, reach
behind the headlamp unit.
Remove the protective covers to gain
access to the bulbs.
Carry out the operations in reverse order to
refit each bulb.
CHANGING A BULB
T ypes of bulb
Various types of bulb are installed on your
vehicle. To remove them:
1. Type A
Entirely glass bulb: pull gently as it is fitted by pressure.
2. Type B
Bayonet bulb: press on the bulb then turn it anticlockwise.
3. Type C
Cylindrical bulb: move aside the contacts.
4. Type D - E
Halogen bulb: release the retaining spring from its housing.
Page 115 of 131
105
7
TROUBLESHOOTING
Changing a bulb
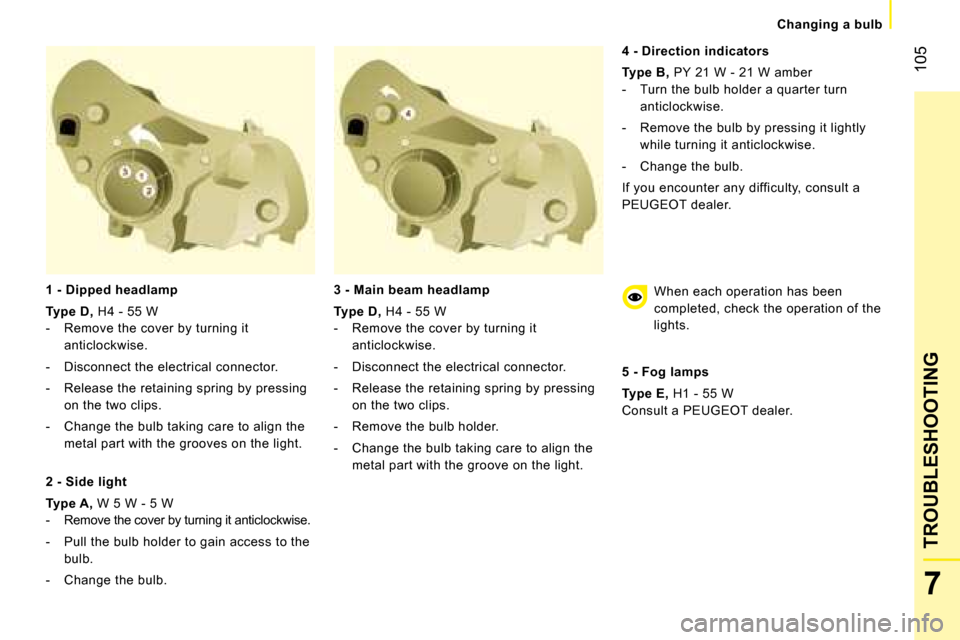
1 - Dipped headlamp
Type D
, H4 - 55 W
- Remove the cover by turning it anticlockwise.
- Disconnect the electrical connector.
- Release the retaining spring by pressing on the two clips.
- Change the bulb taking care to align the metal part with the grooves on the light.
2 - Side light
Type A , W 5 W - 5 W
- Remove the cover by turning it anticlockwise.
- Pull the bulb holder to gain access to the bulb.
- Change the bulb.
3 - Main beam headlamp
Type D
, H4 - 55 W
- Remove the cover by turning it anticlockwise.
- Disconnect the electrical connector.
- Release the retaining spring by pressing on the two clips.
- Remove the bulb holder.
- Change the bulb taking care to align the metal part with the groove on the light.
4 - Direction indicators
Type B
, PY 21 W - 21 W amber
- Turn the bulb holder a quarter turn anticlockwise.
- Remove the bulb by pressing it lightly while turning it anticlockwise.
- Change the bulb.
If you encounter any difficulty, consult a
PEUGEOT dealer.
When each operation has been
completed, check the operation of the
lights.
5 - Fog lamps
Type E , H1 - 55 W
Consult a PEUGEOT dealer.
Page 122 of 131
111
7
TROUBLESHOOTING
Changing a fuse
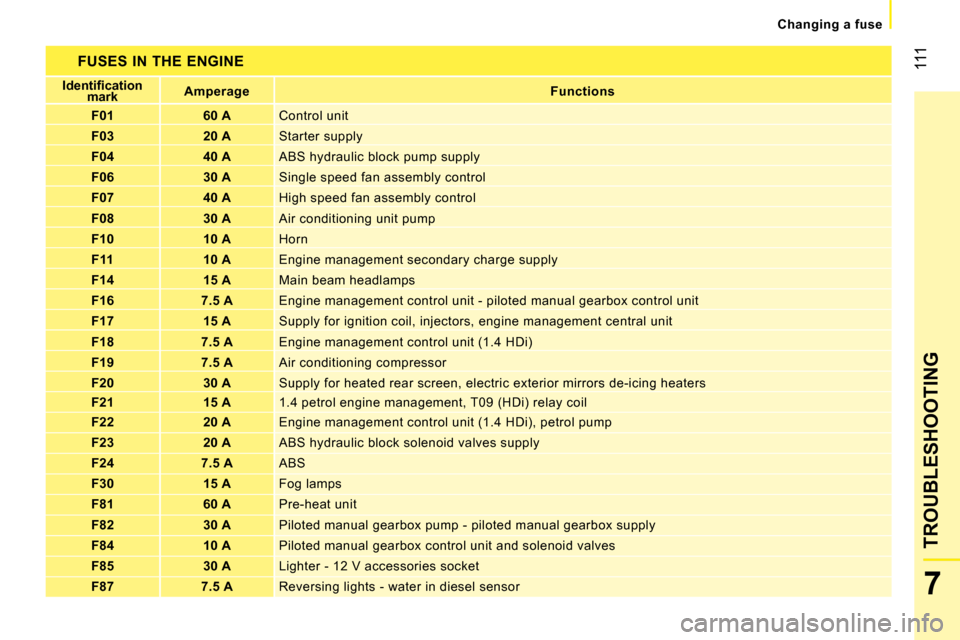
FUSES IN THE ENGINE
�I�d�e�n�t�i�fi� �c�a�t�i�o�n�
mark
Amperage
Functions
F01 60 A Control unit
F03 20 A Starter supply
F04 40 A ABS hydraulic block pump supply
F06 30 A Single speed fan assembly control
F07 40 A High speed fan assembly control
F08 30 A Air conditioning unit pump
F10 10 A Horn
F11 10 A Engine management secondary charge supply
F14 15 A Main beam headlamps
F16 7.5 A Engine management control unit - piloted manual ge arbox control unit
F17 15 A Supply for ignition coil, injectors, engine manage ment central unit
F18 7.5 A Engine management control unit (1.4 HDi)
F19 7.5 A Air conditioning compressor
F20 30 A Supply for heated rear screen, electric exterior m irrors de-icing heaters
F21 15 A 1.4 petrol engine management, T09 (HDi) relay coil
F22 20 A Engine management control unit (1.4 HDi), petrol p ump
F23 20 A ABS hydraulic block solenoid valves supply
F24 7.5 A ABS
F30 15 A Fog lamps
F81 60 A Pre-heat unit
F82 30 A Piloted manual gearbox pump - piloted manual gearb ox supply
F84 10 A Piloted manual gearbox control unit and solenoid v alves
F85 30 A Lighter - 12 V accessories socket
F87 7.5 A Reversing lights - water in diesel sensor
Page 125 of 131
114
Fuel
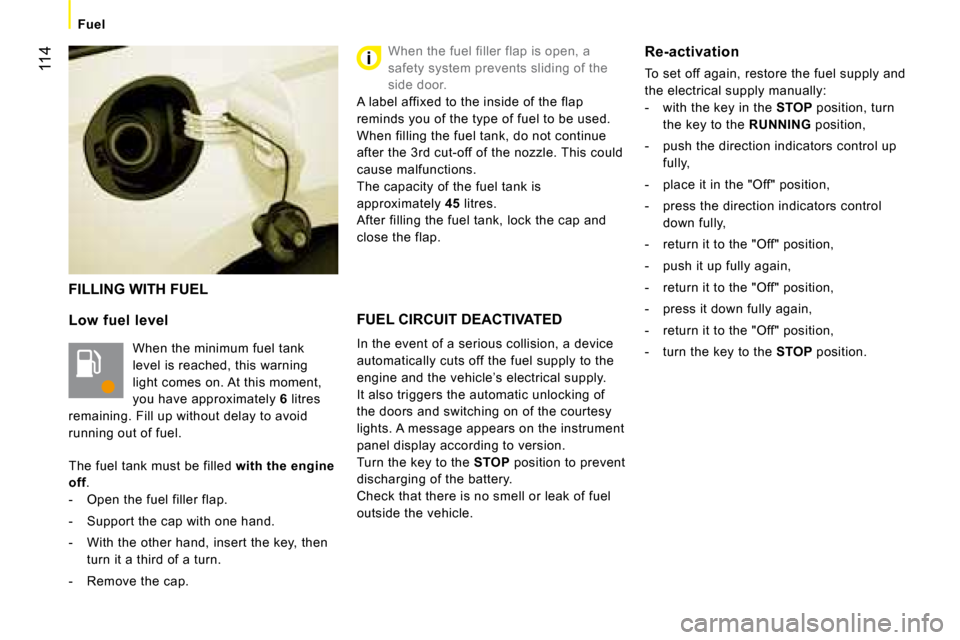
FILLING WITH FUEL
Low fuel level
When the minimum fuel tank
level is reached, this warning
light comes on. At this moment,
you have approximately 6 litres
remaining. Fill up without delay to avoid
running out of fuel.
The fuel tank must be filled with the engine
off .
- Open the fuel filler flap.
- Support the cap with one hand.
- With the other hand, insert the key, then turn it a third of a turn.
- Remove the cap.
FUEL CIRCUIT DEACTIVATED
In the event of a serious collision, a device
automatically cuts off the fuel supply to the
engine and the vehicle’s electrical supply.
It also triggers the automatic unlocking of
the doors and switching on of the courtesy
lights. A message appears on the instrument
panel display according to version.
Turn the key to the STOP position to prevent
discharging of the battery.
Check that there is no smell or leak of fuel
outside the vehicle.
When the fuel filler flap is open, a
safety system prevents sliding of the
side door.
A label affixed to the inside of the flap
reminds you of the type of fuel to be used.
When filling the fuel tank, do not continue
after the 3rd cut-off of the nozzle. This could
cause malfunctions.
The capacity of the fuel tank is
approximately 45 litres.
After filling the fuel tank, lock the cap and
close the flap.
Re-activation
To set off again, restore the fuel supply and
the electrical supply manually:
- with the key in the STOP position, turn
the key to the RUNNING position,
- push the direction indicators control up fully,
- place it in the "Off" position,
- press the direction indicators control down fully,
- return it to the "Off" position,
- push it up fully again,
- return it to the "Off" position,
- press it down fully again,
- return it to the "Off" position,
- turn the key to the STOP position.
Page 126 of 131
116
Opening the bonnet
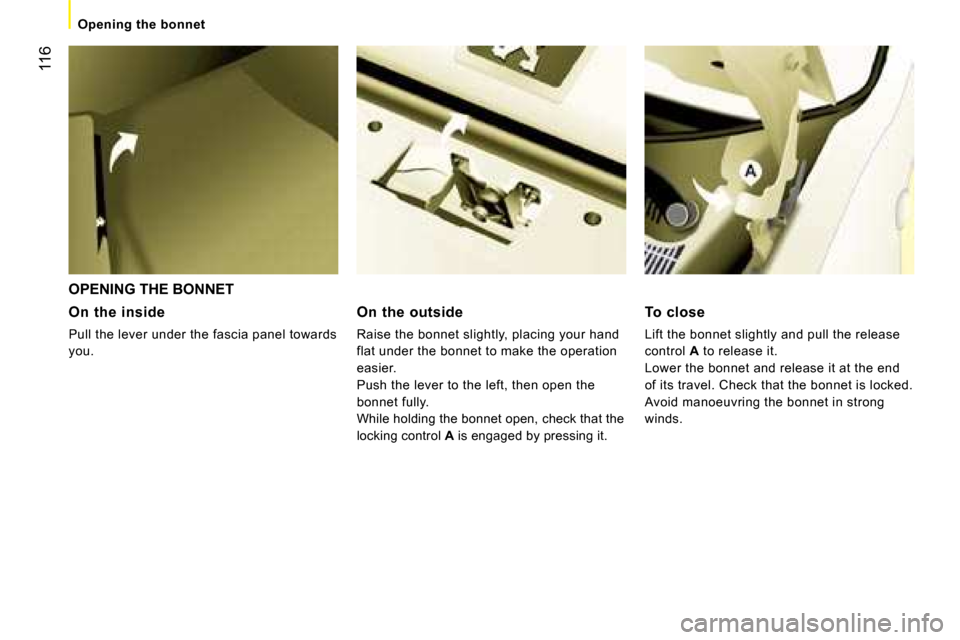
OPENING THE BONNET
On the inside
Pull the lever under the fascia panel towards
you.
On the outside
Raise the bonnet slightly, placing your hand
flat under the bonnet to make the operation
easier.
Push the lever to the left, then open the
bonnet fully.
While holding the bonnet open, check that the
locking control A is engaged by pressing it.
To close
Lift the bonnet slightly and pull the release
control A to release it.
Lower the bonnet and release it at the end
of its travel. Check that the bonnet is locked.
Avoid manoeuvring the bonnet in strong
winds.