headlamp Peugeot Boxer 2010 Owner's Manual
[x] Cancel search | Manufacturer: PEUGEOT, Model Year: 2010, Model line: Boxer, Model: Peugeot Boxer 2010Pages: 167, PDF Size: 4.33 MB
Page 4 of 167
8
Familiarisation
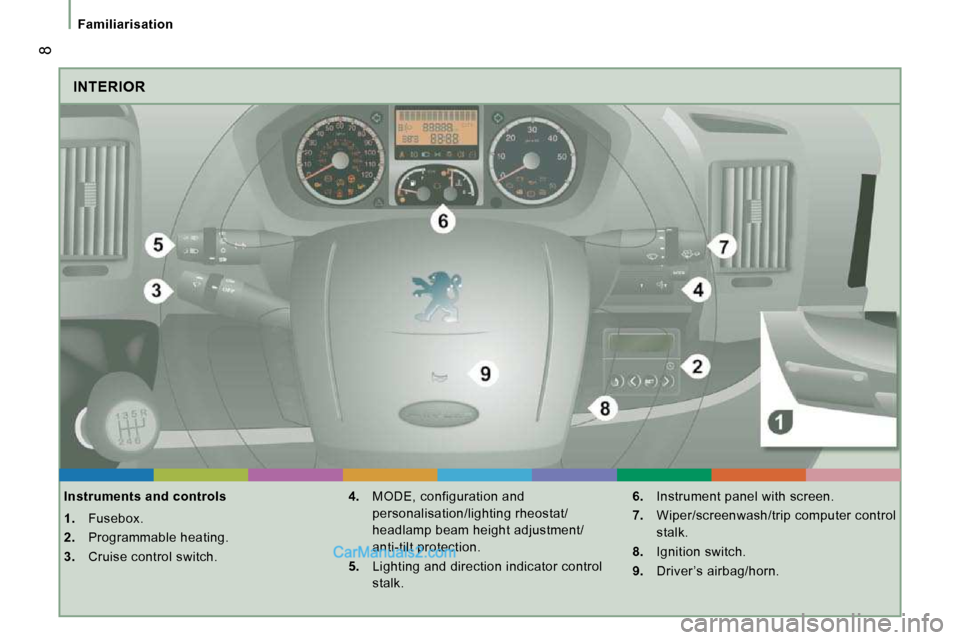
INTERIOR
Instruments and controls
1. Fusebox.
2. Programmable heating.
3. Cruise control switch.
4. MODE, configuration and
personalisation/lighting rheostat/
headlamp beam height adjustment/
anti-tilt protection.
5. Lighting and direction indicator control
stalk.
6. Instrument panel with screen.
7. Wiper/screenwash/trip computer control
stalk.
8. Ignition switch.
9. Driver ’s airbag/horn.
Page 8 of 167
233
12
Familiarisation
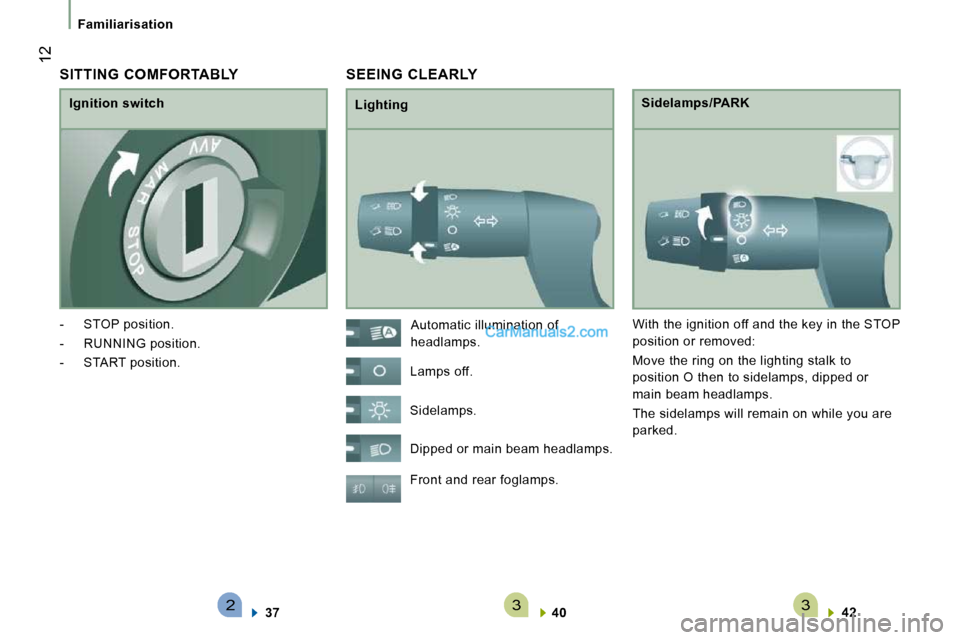
SEEING CLEARLY
Lighting Sidelamps/PARK
Front and rear foglamps.
40
42
Automatic illumination of
headlamps.
Lamps off.
Sidelamps.
Dipped or main beam headlamps. With the ignition off and the key in the STOP
position or removed:
Move the ring on the lighting stalk to
position O then to sidelamps, dipped or
main beam headlamps.
The sidelamps will remain on while you are
parked.
SITTING COMFORTABLY
Ignition switch
- STOP position.
- RUNNING position.
- START position.
37
Page 38 of 167
40
Steering mounted controls
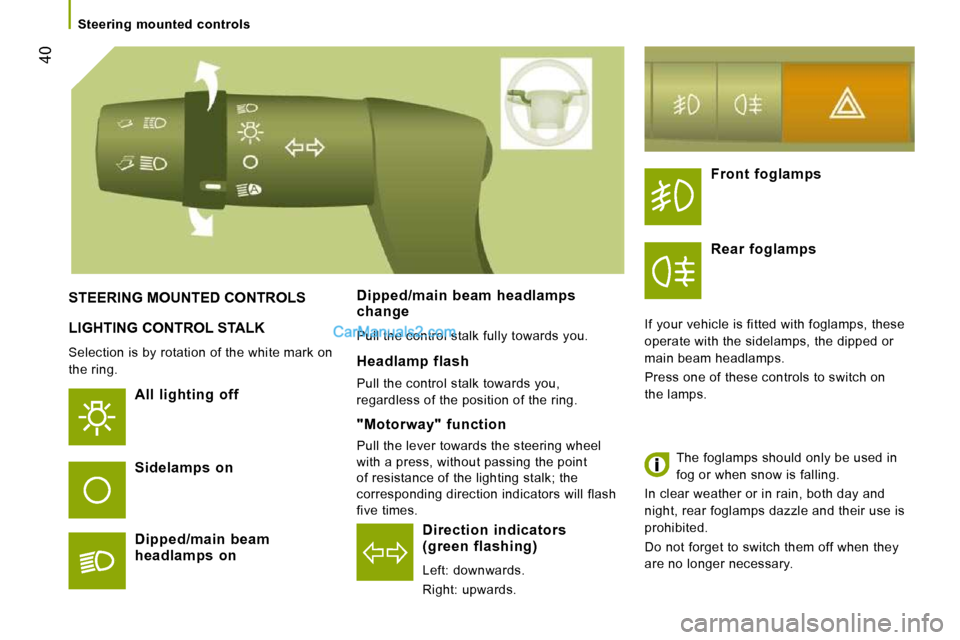
LIGHTING CONTROL STALK
Selection is by rotation of the white mark on
the ring.
All lighting off
Direction indicators(green flashing)
Left: downwards.
Right: upwards.
STEERING MOUNTED CONTROLS
Sidelamps on
Dipped/main beam headlamps on
Dipped/main beam headlamps change
Pull the control stalk fully towards you.
Headlamp flash
Pull the control stalk towards you,
regardless of the position of the ring.
Front foglamps
Rear foglamps
If your vehicle is fitted with foglamps, these
operate with the sidelamps, the dipped or
main beam headlamps.
Press one of these controls to switch on
the lamps. The foglamps should only be used in
fog or when snow is falling.
In clear weather or in rain, both day and
night, rear foglamps dazzle and their use is
prohibited.
Do not forget to switch them off when they
are no longer necessary.
"Motorway" function
Pull the lever towards the steering wheel
with a press, without passing the point
of resistance of the lighting stalk; the
corresponding direction indicators will flash
five times.
Page 39 of 167
41
3
EASE OF USE AND COMFORT
Steering mounted controls
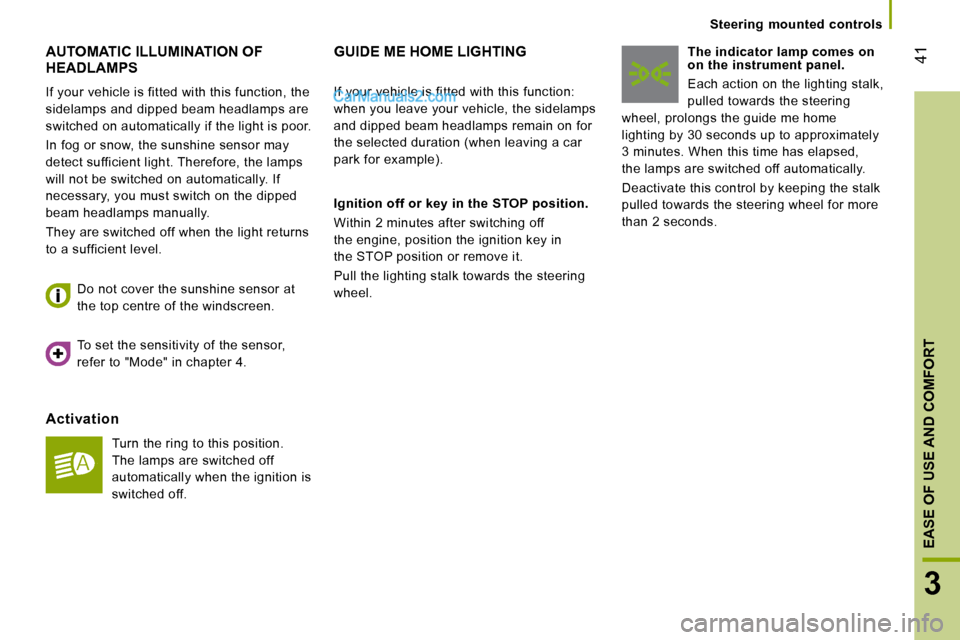
AUTOMATIC ILLUMINATION OF HEADLAMPS
If your vehicle is fitted with this function, the
sidelamps and dipped beam headlamps are
switched on automatically if the light is poor.
In fog or snow, the sunshine sensor may
detect sufficient light. Therefore, the lamps
will not be switched on automatically. If
necessary, you must switch on the dipped
beam headlamps manually.
They are switched off when the light returns
to a sufficient level.
Activation
Turn the ring to this position.
The lamps are switched off
automatically when the ignition is
switched off.
Do not cover the sunshine sensor at
the top centre of the windscreen.
GUIDE ME HOME LIGHTING
Ignition off or key in the STOP position.
Within 2 minutes after switching off
the engine, position the ignition key in
the STOP position or remove it.
Pull the lighting stalk towards the steering
wheel. The indicator lamp comes on
on the instrument panel.
Each action on the lighting stalk,
pulled towards the steering
wheel, prolongs the guide me home
lighting by 30 seconds up to approximately
3 minutes. When this time has elapsed,
the lamps are switched off automatically.
Deactivate this control by keeping the stalk
pulled towards the steering wheel for more
than 2 seconds.
If your vehicle is fitted with this function:
when you leave your vehicle, the sidelamps
and dipped beam headlamps remain on for
the selected duration (when leaving a car
park for example).
To set the sensitivity of the sensor,
refer to "Mode" in chapter 4.
Page 40 of 167
42
Steering mounted controls
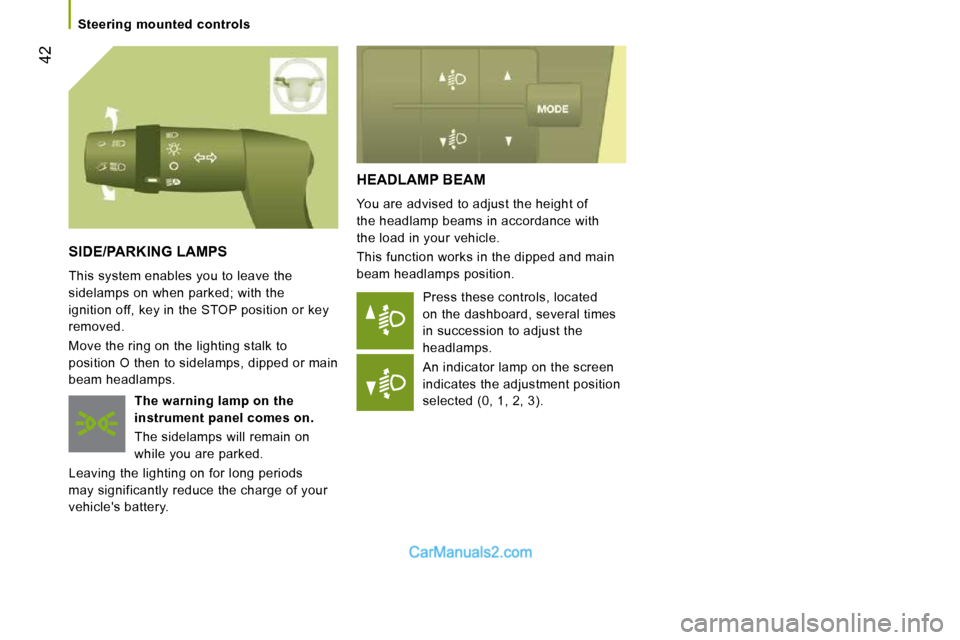
HEADLAMP BEAM
You are advised to adjust the height of
the headlamp beams in accordance with
the load in your vehicle.
This function works in the dipped and main
beam headlamps position. Press these controls, located
on the dashboard, several times
in succession to adjust the
headlamps.
An indicator lamp on the screen
indicates the adjustment position
selected (0, 1, 2, 3).
SIDE/PARKING LAMPS
This system enables you to leave the
sidelamps on when parked; with the
ignition off, key in the STOP position or key
removed.
Move the ring on the lighting stalk to
position O then to sidelamps, dipped or main
beam headlamps.
The warning
lamp
on the
instrument panel comes on.
The sidelamps will remain on
while you are parked.
Leaving the lighting on for long periods
may significantly reduce the charge of your
vehicle's battery.
Page 41 of 167
43
3
EASE OF USE AND COMFORT
Steering mounted controls
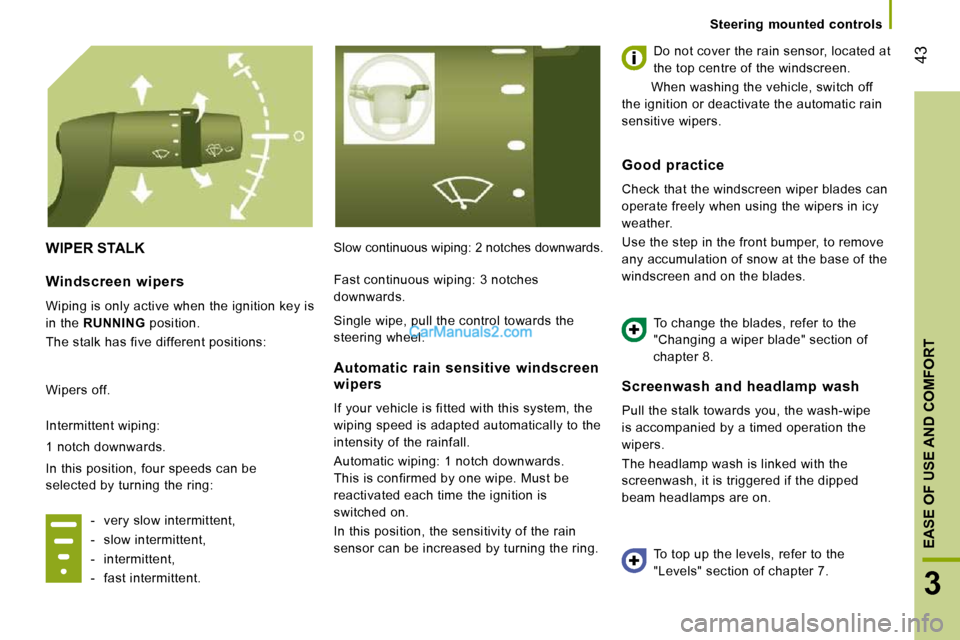
WIPER STALK Slow continuous wiping: 2 notches downwards.
Do not cover the rain sensor, located at
the top centre of the windscreen.
When washing the vehicle, switch off
the ignition or deactivate the automatic rain
sensitive wipers.
Screenwash and headlamp wash
Pull the stalk towards you, the wash-wipe
is accompanied by a timed operation the
wipers.
The headlamp wash is linked with the
screenwash, it is triggered if the dipped
beam headlamps are on.
Windscreen wipers
Wiping is only active when the ignition key is
in the RUNNING position.
The stalk has five different positions:
Wipers off.
Intermittent wiping:
1 notch downwards.
In this position, four speeds can be
selected by turning the ring:
- very slow intermittent,
- slow intermittent,
- intermittent,
- fast intermittent.
Automatic rain sensitive windscreen wipers
If your vehicle is fitted with this system, the
wiping speed is adapted automatically to the
intensity of the rainfall.
Automatic wiping: 1 notch downwards.
This is confirmed by one wipe. Must be
reactivated each time the ignition is
switched on.
In this position, the sensitivity of the rain
sensor can be increased by turning the ring.
Good practice
Check that the windscreen wiper blades can
operate freely when using the wipers in icy
weather.
Use the step in the front bumper, to remove
any accumulation of snow at the base of the
windscreen and on the blades.
To change the blades, refer to the
"Changing a wiper blade" section of
chapter 8.
To top up the levels, refer to the
"Levels" section of chapter 7.
Fast continuous wiping: 3 notches
downwards.
Single wipe, pull the control towards the
steering wheel.
Page 72 of 167
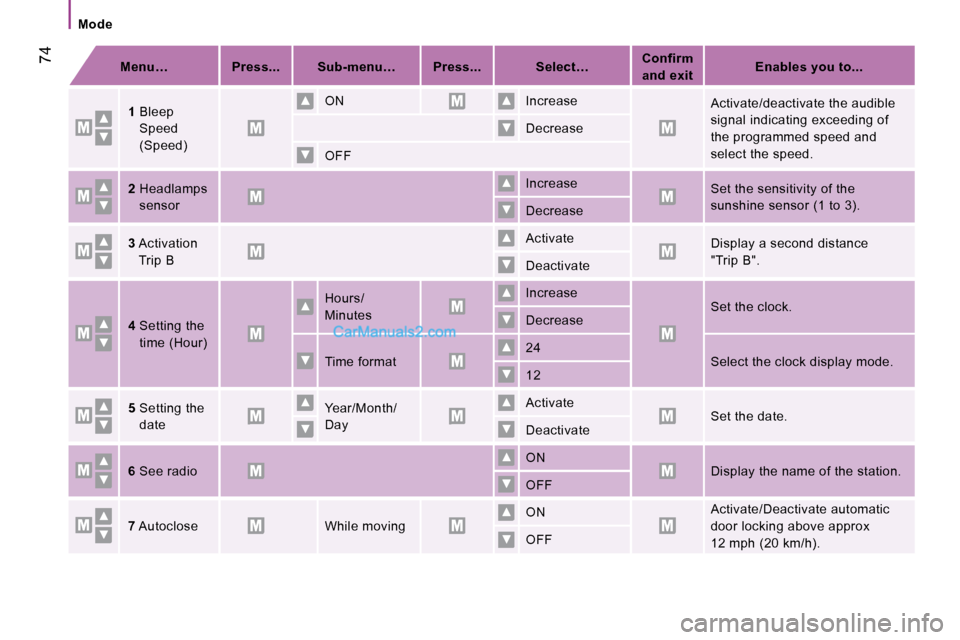
Mode
74
Menu… Press... Sub-menu… Press... Select…
Confirm
and exit
Enables you to...
1 Bleep
Speed
(Speed)
ON
Increase
Activate/deactivate the audible
signal indicating exceeding of
the programmed speed and
select the speed.
Decrease
OFF
2 Headlamps
sensor Increase
Set the sensitivity of the
sunshine sensor (1 to 3).
Decrease
3 Activation
Trip B Activate
Display a second distance
"Trip B".
Deactivate
4 Setting the
time (Hour)
Hours/
Minutes
Increase
Set the clock.
Decrease
Time format 24
Select the clock display mode.
12
5 Setting the
date Year/Month/
Day Activate Set the date.
Deactivate
6 See radio ON
Display the name of the station.
OFF
7 Autoclose While moving ON Activate/Deactivate automatic
door locking above approx
12 mph (20 km/h).
OFF
Page 127 of 167
125
7
CHECKS
Under the bonnet
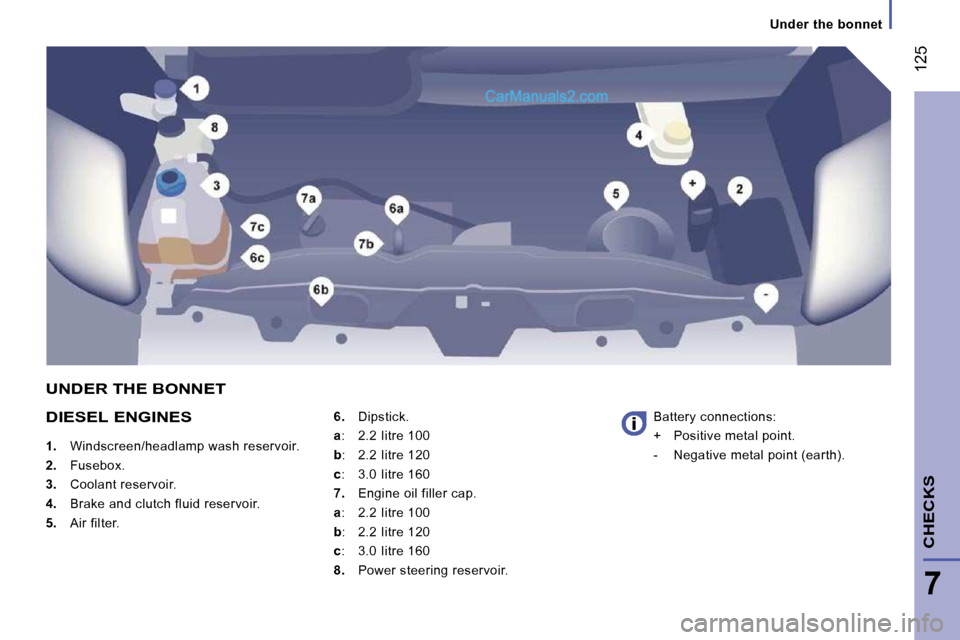
DIESEL ENGINES
1. Windscreen/headlamp wash reservoir.
2. Fusebox.
3. Coolant reservoir.
4. Brake and clutch fluid reservoir.
5. Air filter.
6. Dipstick.
a : 2.2 Iitre 100
b : 2.2 Iitre 120
c : 3.0 Iitre 160
7. Engine oil filler cap.
a : 2.2 Iitre 100
b : 2.2 Iitre 120
c : 3.0 Iitre 160
8. Power steering reservoir. Battery connections:
+ Positive metal point.
- Negative metal point (earth).
UNDER THE BONNET
Page 129 of 167
127
7
CHECKS
Levels
Cooling system
Only use the fluid recommended by the
manufacturer. Otherwise, you risk seriously
damaging your engine. When the engine
is warm, the temperature of the coolant is
controlled by the engine fan. As this fan can
operate with the ignition key removed and
because the cooling system is pressurised,
wait for at least one hour after the engine
has stopped before carrying out any work.
Slacken the cap by 1/4 of a turn to release
the pressure to prevent any risk of scalding.
When the pressure has dropped, remove the
cap and top up the level with coolant.
If fluid has to be added frequently, this
indicates a failure which must be checked by
a PEUGEOT dealer as soon as possible.
Power steering fluid level
The vehicle must be parked on level ground
with the engine cold. Unscrew the cap
integrated with the gauge and check the
level which must be between the MIN and
MAX marks.
Used oil
Avoid prolonged contact of used oil with the
skin.
Brake fluid is harmful to health and very
corrosive.
Do not dispose of used oil, brake fluid or
coolant into drains or into the ground but
into the containers dedicated to this use at
PEUGEOT dealerships (France) or to an
authorised waste disposal site.
Topping up
The level must be between the MIN and
MAX marks on the expansion bottle. If
more than 1 litre of fluid is required to top
up the level, have the system checked by a
PEUGEOT dealer.
Windscreen wash and headlamp wash level
For best quality cleaning and to prevent
freezing, this fluid must not be topped up or
replaced with plain water.
Capacity of the reservoir: approximately
5.5 litres.
Page 139 of 167
138
Changing a bulb
TYPES OF BULB
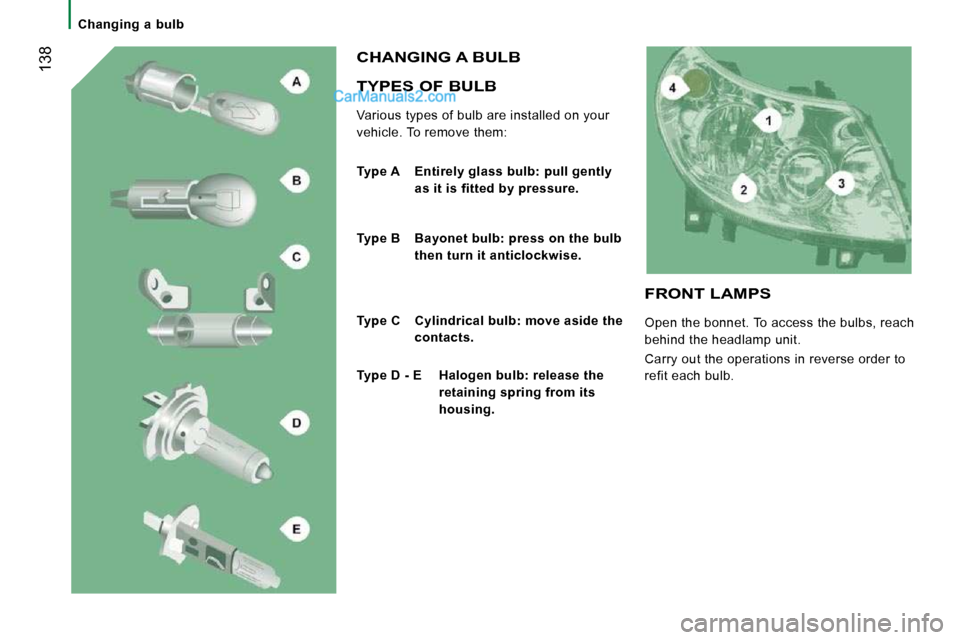
Various types of bulb are installed on your
vehicle. To remove them:
CHANGING A BULB
Type A Entirely glass bulb: pull gently
as it is fitted by pressure.
Type B Bayonet bulb: press on the bulb
then turn it anticlockwise.
Type C Cylindrical bulb: move aside the
contacts.
Type D - E Halogen bulb: release the
retaining spring from its
housing.
FRONT LAMPS
Open the bonnet. To access the bulbs, reach
behind the headlamp unit.
Carry out the operations in reverse order to
refit each bulb.