change wheel Peugeot Boxer 2011.5 Owner's Manual - RHD (UK, Australia)
[x] Cancel search | Manufacturer: PEUGEOT, Model Year: 2011.5, Model line: Boxer, Model: Peugeot Boxer 2011.5Pages: 184, PDF Size: 4.86 MB
Page 6 of 184
4
PRESENTATION
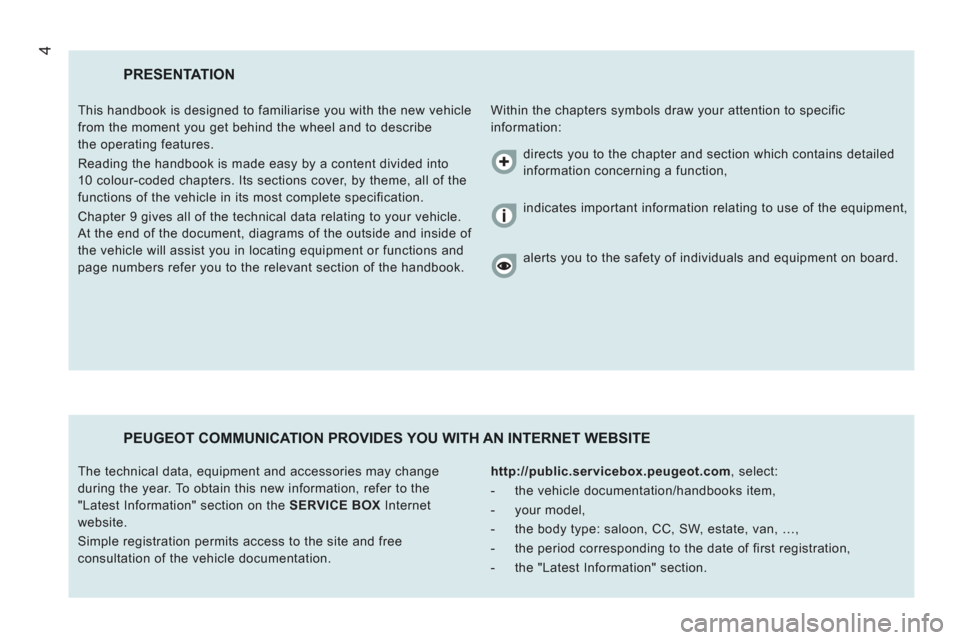
Within the chapters symbols draw your attention to specific
information: This handbook is designed to familiarise you with the new vehicle
from the moment you get behind the wheel and to describe
the operating features.
Reading the handbook is made easy by a content divided into
10 colour-coded chapters. Its sections cover, by theme, all of the
functions of the vehicle in its most complete specification.
Chapter 9 gives all of the technical data relating to your vehicle.
At the end of the document, diagrams of the outside and inside of
the vehicle will assist you in locating equipment or functions and
page numbers refer you to the relevant section of the handbook.
PEUGEOT COMMUNICATION PROVIDES YOU WITH AN INTERNET WEBSITE
http://public.servicebox.peugeot.com
, select:
- the vehicle documentation/handbooks item,
- your model,
- the body type: saloon, CC, SW, estate, van, …,
- the period corresponding to the date of first registration,
- the "Latest Information" section. The technical data, equipment and accessories may change
during the year. To obtain this new information, refer to the
"Latest Information" section on the SERVICE BOX
Internet
website.
Simple registration permits access to the site and free
consultation of the vehicle documentation. directs you to the chapter and section which contains detailed
information concerning a function,
indicates important information relating to use of the equipment,
alerts you to the safety of individuals and equipment on board.
Page 21 of 184
19
Limit the causes of excessconsumption
Spread loads throughout the vehicle;
place the heaviest items in the bottom of
the boot, as close as possible to the rear
seats.
Limit the loads carried in the vehicle and
reduce wind resistance (roof bars, roof
rack, bicycle carrier, trailer...). Use a roof
box in preference.
Remove roof bars and roof racks after use.
At the end of winter, remove snow tyres
and refit your summer tyres.
Observe the recommendations on maintenance
Check the tyre pressures regularly, when
cold, referring to the label in the door
aperture, driver's side.
Carry out this check in particular:
- before a long journey,
- at each change of season,
- after a long period out of use.
Don't forget the spare wheel and the tyres
on any trailer or caravan.
Have your vehicle serviced regularly
(engine oil, oil filter, air filter...) and observe
the schedule of operations recommended by
the manufacturer.
When refuelling, do not continue after
the 3 rd cut-off of the nozzle to avoid any
overflow.
At the wheel of your new vehicle, it is only
after the fi rst 1 800 miles (3 000 kilometres)
that you will see the fuel consumption
settle down to a consistent average.
Page 36 of 184
34
Instruments and controls
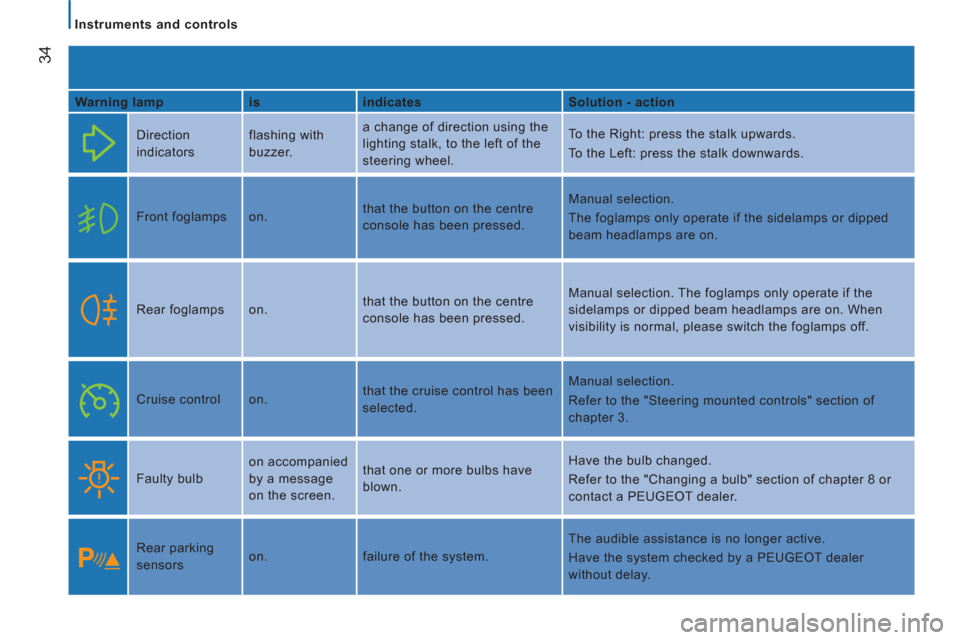
Warning lamp
is
indicates
Solution - action
Direction
indicators flashing with
buzzer. a change of direction using the
lighting stalk, to the left of the
steering wheel. To the Right: press the stalk upwards.
To the Left: press the stalk downwards.
Front foglamps on. that the button on the centre
console has been pressed. Manual selection.
The foglamps only operate if the sidelamps or dipped
beam headlamps are on.
Rear foglamps on. that the button on the centre
console has been pressed. Manual selection. The foglamps only operate if the
sidelamps or dipped beam headlamps are on. When
visibility is normal, please switch the foglamps off.
Cruise control on. that the cruise control has been
selected. Manual selection.
Refer to the "Steering mounted controls" section of
chapter 3.
Faulty bulb on accompanied
by a message
on the screen. that one or more bulbs have
blown. Have the bulb changed.
Refer to the "Changing a bulb" section of chapter 8 or
contact a PEUGEOT dealer.
Rear parking
sensors on. failure of the system. The audible assistance is no longer active.
Have the system checked by a PEUGEOT dealer
without delay.
Page 40 of 184
38
Gearbox and steering wheel
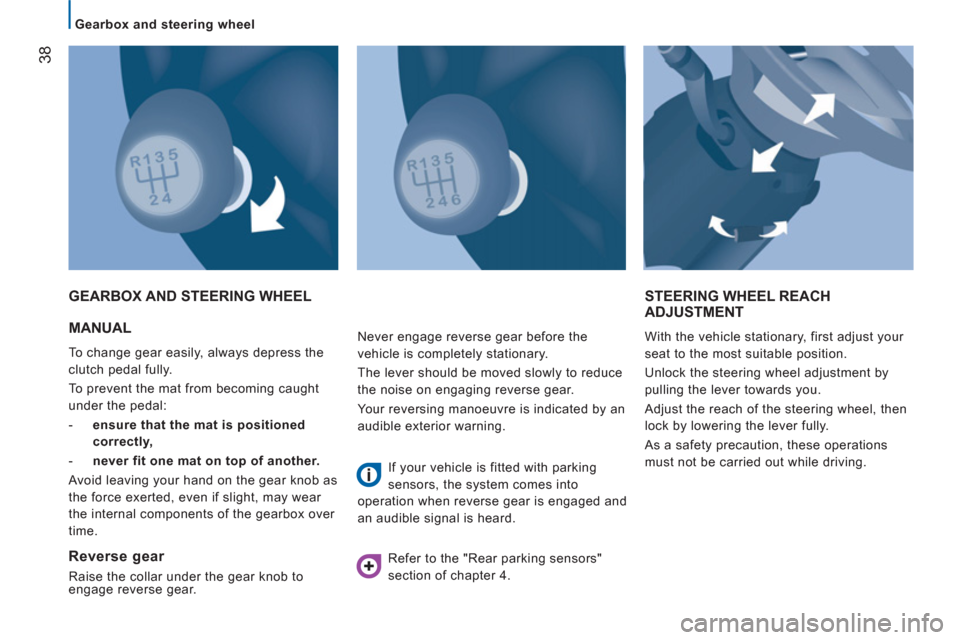
MANUAL
To change gear easily, always depress the
clutch pedal fully.
To prevent the mat from becoming caught
under the pedal:
- ensure that the mat is positioned
correctly,
- never fit one mat on top of another.
Avoid leaving your hand on the gear knob as
the force exerted, even if slight, may wear
the internal components of the gearbox over
time.
GEARBOX AND STEERING WHEEL STEERING WHEEL REACH
ADJUSTMENT
With the vehicle stationary, first adjust your
seat to the most suitable position.
Unlock the steering wheel adjustment by
pulling the lever towards you.
Adjust the reach of the steering wheel, then
lock by lowering the lever fully.
As a safety precaution, these operations
must not be carried out while driving.
Reverse gear
Raise the collar under the gear knob to
engage reverse gear. Never engage reverse gear before the
vehicle is completely stationary.
The lever should be moved slowly to reduce
the noise on engaging reverse gear.
Your reversing manoeuvre is indicated by an
audible exterior warning.
If your vehicle is fitted with parking
sensors, the system comes into
operation when reverse gear is engaged and
an audible signal is heard.
Refer to the "Rear parking sensors"
section of chapter 4.
Page 44 of 184
42
Steering mounted controls
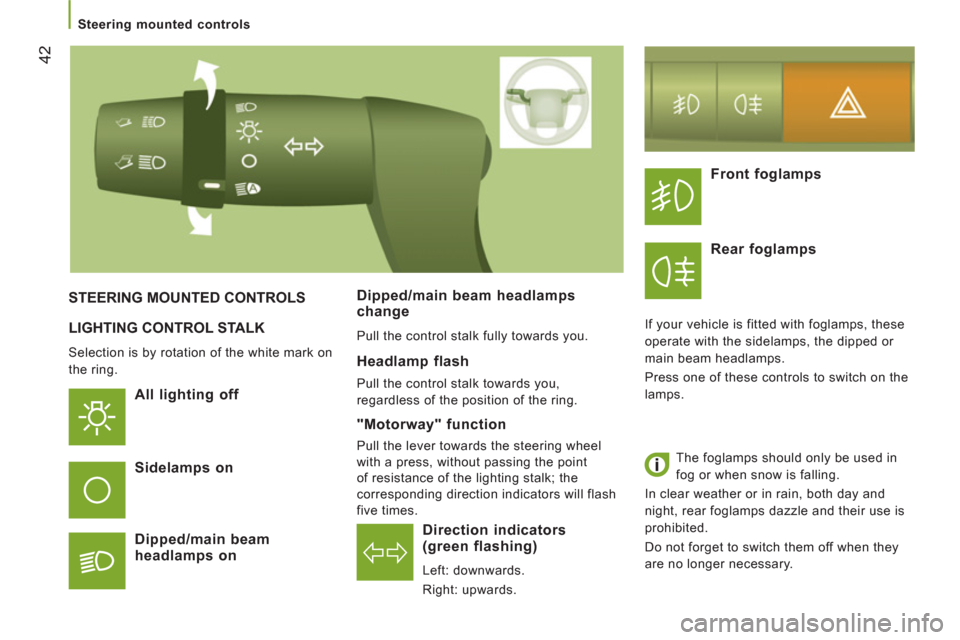
LIGHTING CONTROL STALK
Selection is by rotation of the white mark on
the ring.
All lighting off
Direction indicators
(green flashing)
Left: downwards.
Right: upwards.
STEERING MOUNTED CONTROLS
Sidelam
ps on
Di
pped/main beam
headlamps on Dipped
/main beam headlampschange
Pull the control stalk fully towards you.
Headlamp flash
Pull the control stalk towards you,
regardless of the position of the ring.
Front foglamps
Rear fo
glamps
If your vehicle is fitted with foglamps, these
operate with the sidelamps, the dipped or
main beam headlamps.
Press one of these controls to switch on the
lamps.
The foglamps should only be used in
fog or when snow is falling.
In clear weather or in rain, both day and
night, rear foglamps dazzle and their use is
prohibited.
Do not forget to switch them off when they
are no longer necessary.
"Motorway" function
Pull the lever towards the steering wheel
with a press, without passing the point
of resistance of the lighting stalk; the
corresponding direction indicators will flash
five times.
Page 47 of 184
45
3
EASE OF USE AND COMFOR
T
Steering mounted controls
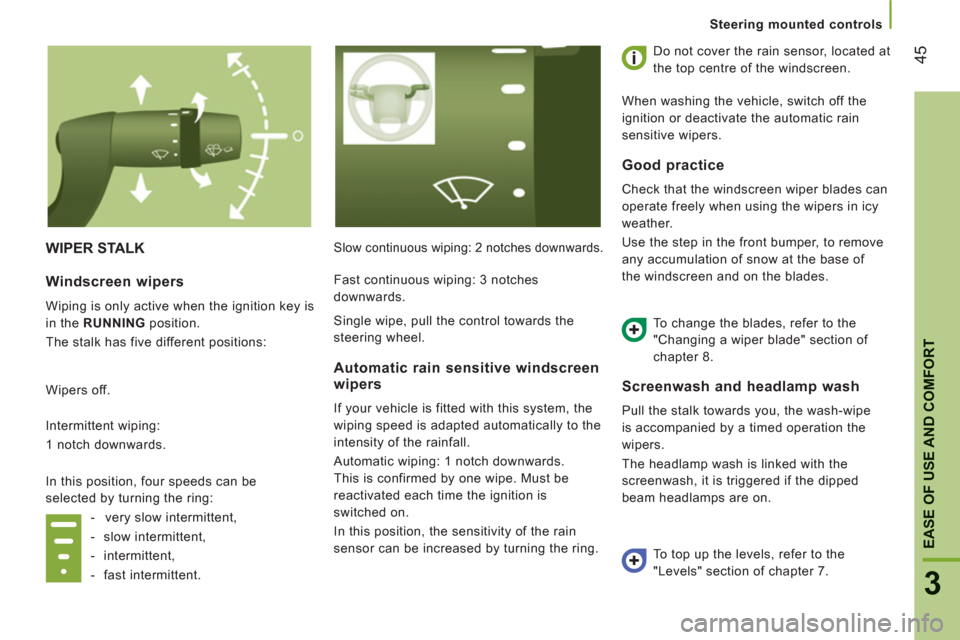
WIPER STALK Slow continuous wiping: 2 notches downwards.
Do not cover the rain sensor, located at
the top centre of the windscreen.
When washing the vehicle, switch off the
ignition or deactivate the automatic rain
sensitive wipers.
Screenwash
and headlamp wash
Pull the stalk towards you, the wash-wipe
is accompanied by a timed operation the
wipers.
The headlamp wash is linked with the
screenwash, it is triggered if the dipped
beam headlamps are on.
Windscreen wipers
Wiping is only active when the ignition key is
in the RUNNING
position.
The stalk has five different positions:
Wipers off.
Intermittent wiping:
1 notch downwards.
In this position, four speeds can be
selected by turning the ring:
- very slow intermittent,
- slow intermittent,
- intermittent,
- fast intermittent.
Automatic rain sensitive windscreen
wipers
If your vehicle is fitted with this system, the
wiping speed is adapted automatically to the
intensity of the rainfall.
Automatic wiping: 1 notch downwards.
This is confirmed by one wipe. Must be
reactivated each time the ignition is
switched on.
In this position, the sensitivity of the rain
sensor can be increased by turning the ring.
Good practice
Check that the windscreen wiper blades can
operate freely when using the wipers in icy
weather.
Use the step in the front bumper, to remove
any accumulation of snow at the base of
the windscreen and on the blades.
To change the blades, refer to the
"Changing a wiper blade" section of
chapter 8.
To top up the levels, refer to the
"Levels" section of chapter 7. Fast continuous wiping: 3 notches
downwards.
Single wipe, pull the control towards the
steering wheel.
Page 84 of 184
Pneumatic suspension
Deactivation
Make a long press on both controls
simultaneously to deactivate the system.
The LEDs remain on.
Return to the nominal floor height
Press the same number of times in reverse
as the level of the position displayed.
Reactivation
A second long press on both controls
simultaneously reactivates the system.
The LEDs go off.
Automatic correction of loading
floor height
Above 12 mph (20 km/h), the system
automatically returns the rear height to its
nominal value.
Warning lamp
Refer to the "Instruments and controls"
section of chapter 2.
Good practice
Driving with the suspension set too high or
too low risks damaging components under
the body.
The height may be adjusted automatically to
take account of changes of temperature or
loading.
You must avoid using this control in the
following circumstances:
- when working underneath the vehicle,
- when changing a wheel,
- when the vehicle is being transported by
lorry, train, ferry, boat, ...
Above 3 mph (5 km/h), the system
reactivates automatically.
Page 146 of 184
144
Changing a wheel
1. PARKING THE VEHICLE
As far as possible, park the vehicle on level,
stable and non-slippery ground.
Apply the parking brake, switch off the
ignition and engage first gear.
Put on a high visibility jacket and position
the warning triangle.
If possible, place a chock under the
wheel diagonally opposite the wheel to be
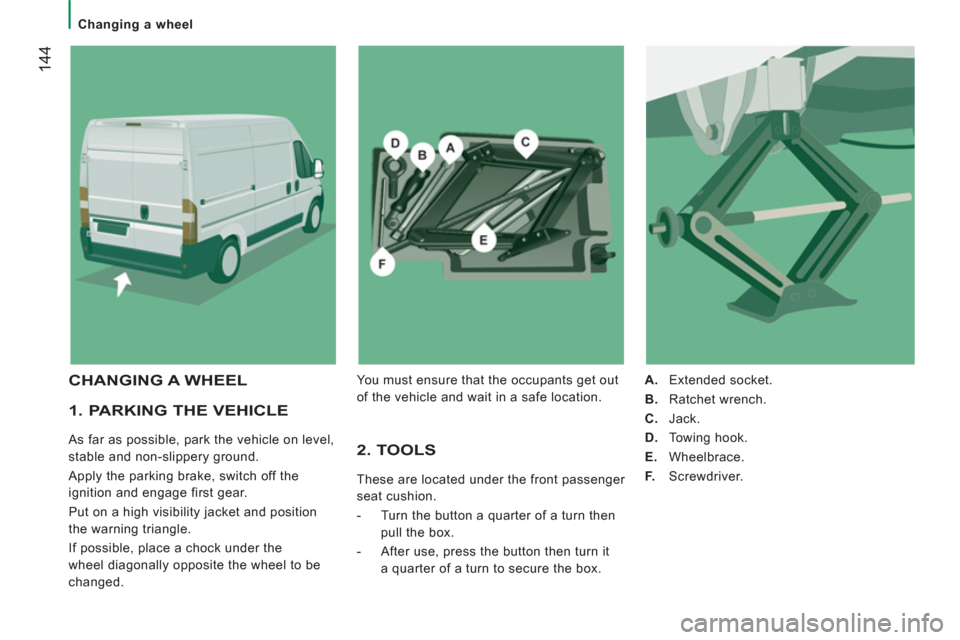
changed. 2. TOOLS
These are located under the front passenger
seat cushion.
- Turn the button a quarter of a turn then
pull the box.
- After use, press the button then turn it
a quarter of a turn to secure the box.
A.
Extended socket.
B.
Ratchet wrench.
C.
Jack.
D.
Towing hook.
E.
Wheelbrace.
F.
Screwdriver.
CHANGING A WHEEL
You must ensure that the occupants get out
of the vehicle and wait in a safe location.
Page 147 of 184
QUICK HELP
8
Changing a wheel
4. OPERATING PROCEDURE
- Remove the trim using the screwdriver F
as a lever.
-
Release the bolts using the wheelbrace E
.
- Position the jack C
at one of the four
locations provided on the underbody
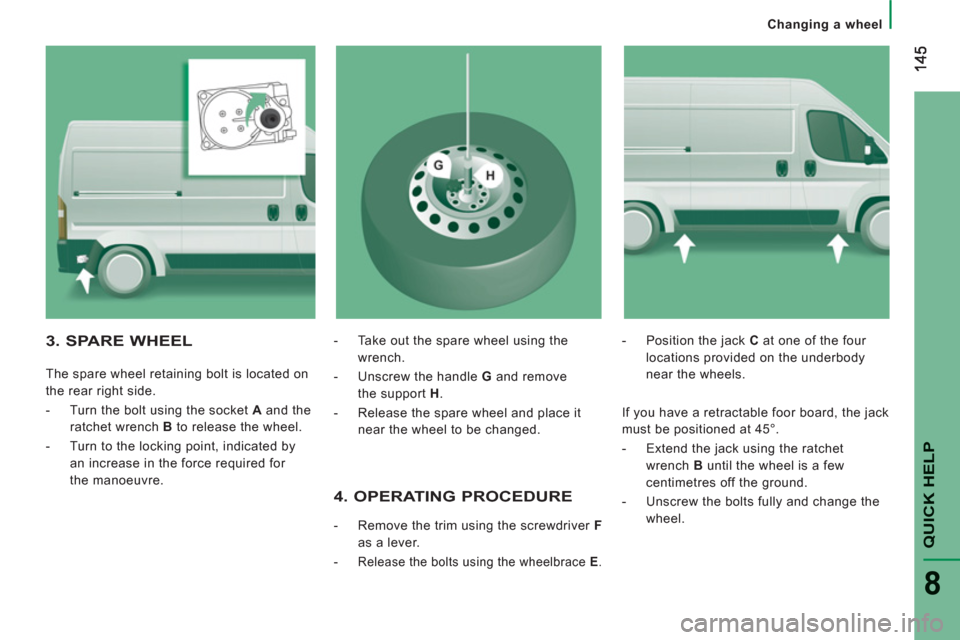
near the wheels. 3. SPARE WHEEL
The spare wheel retaining bolt is located on
the rear right side.
- Turn the bolt using the socket A
and the
ratchet wrench B
to release the wheel.
- Turn to the locking point, indicated by
an increase in the force required for
the manoeuvre.
- Take out the spare wheel using the
wrench.
- Unscrew the handle G
and remove
the support H
.
- Release the spare wheel and place it
near the wheel to be changed.
If you have a retractable foor board, the jack
must be positioned at 45°.
- Extend the jack using the ratchet
wrench B
until the wheel is a few
centimetres off the ground.
- Unscrew the bolts fully and change the
wheel.
Page 152 of 184
150
Changing a bulb
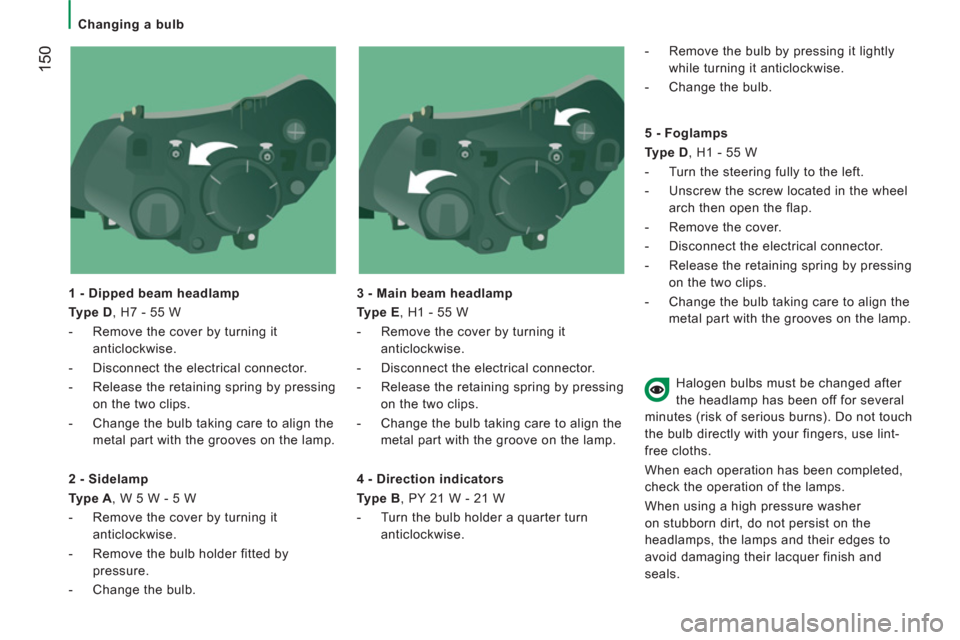
1 - Dipped beam headlamp
Type D
, H7 - 55 W
- Remove the cover by turning it
anticlockwise.
- Disconnect the electrical connector.
- Release the retaining spring by pressing
on the two clips.
- Change the bulb taking care to align the
metal part with the grooves on the lamp.
3 - Main beam headlamp
Type E
, H1 - 55 W
- Remove the cover by turning it
anticlockwise.
- Disconnect the electrical connector.
- Release the retaining spring by pressing
on the two clips.
- Change the bulb taking care to align the
metal part with the groove on the lamp.
2 - Sidelamp
Type A
, W 5 W - 5 W
- Remove the cover by turning it
anticlockwise.
- Remove the bulb holder fitted by
pressure.
- Change the bulb.
4 - Direction indicators
Type B
, PY 21 W - 21 W
- Turn the bulb holder a quarter turn
anticlockwise.
- Remove the bulb by pressing it lightly
while turning it anticlockwise.
- Change the bulb.
5 - Foglamps
Type D
, H1 - 55 W
- Turn the steering fully to the left.
- Unscrew the screw located in the wheel
arch then open the flap.
- Remove the cover.
- Disconnect the electrical connector.
- Release the retaining spring by pressing
on the two clips.
- Change the bulb taking care to align the
metal part with the grooves on the lamp.
Halogen bulbs must be changed after
the headlamp has been off for several
minutes (risk of serious burns). Do not touch
the bulb directly with your fingers, use lint-
free cloths.
When each operation has been completed,
check the operation of the lamps.
When using a high pressure washer
on stubborn dirt, do not persist on the
headlamps, the lamps and their edges to
avoid damaging their lacquer finish and
seals.