brake Peugeot Boxer 2020 Owner's Guide
[x] Cancel search | Manufacturer: PEUGEOT, Model Year: 2020, Model line: Boxer, Model: Peugeot Boxer 2020Pages: 196, PDF Size: 5.1 MB
Page 87 of 196

85
Driving
6In the following cases, deactivating the system
via the vehicle's configuration menu is advised:
– towing a trailer,– carrying long objects on roof bars or roof rack,– with snow chains fitted,– before using an automatic car wash, with the engine running,– before placing the vehicle on a rolling road in a workshop,– towed vehicle, engine running,– following an impact to the windscreen close to the detection camera.
It is automatically deactivated after
detection of a fault with the brake pedal
switch or with at least two brake lamps.
After an impact, the function automatically stops operating. Contact a
PEUGEOT dealer or a qualified workshop to
have the system checked.
It is possible that warnings are not given,
are given too late or seem unjustified.
The driver must always stay in control of their
vehicle and be prepared to react at any time
to avoid an accident.
Cases of non-detection by the system:
– Pedestrians, cyclists, animals, objects on the road.– Vehicles crossing your lane.– Vehicles driving in the opposite direction.
Pay particular attention:– When narrow vehicles (motorcycles) are present and/or there are vehicles
staggered across the traffic lane.
– When entering a tunnel or crossing a bridge.
When the driver must suspend the system:
– Vehicles in a tight bend.– When approaching a roundabout.
– When a vehicle cuts in sharply between your vehicle and the one in front.
Distance Alert
It warns the driver that their vehicle is at risk of
collision with the vehicle in front.
Modifying the alert trigger threshold
This trigger threshold determines the sensitivity
with which the function warns of the risk of
collision.
The threshold is set via the vehicle configuration menu.
► Select one of the three pre-defined thresholds:– "Near ".– "Normal".– "Distant".
The last threshold selected is memorised when
the ignition is switched off.
Operation
Depending on the degree of risk of collision
detected by the system and the alert threshold
chosen by the driver, several different levels
of alert may be triggered and displayed in the
instrument panel.
They take account of the vehicle dynamics, the
speed of your vehicle and the one in front, the
environmental conditions and the operation of
the vehicle (cornering, actions on the pedals,
etc.) to trigger the alert at the best moment.
Level 1 (orange): visual alert only,
signalling that the vehicle in front is very
close.
Page 88 of 196
86
Driving
The message "Vehicle close" is displayed.Level 2 (red): visual and audible alert,
signalling that a collision is imminent.
The message "Brake! " is displayed.
Level 3: finally, in some cases, a haptic alert
in the form of micro-braking can be given,
confirming the risk of collision.
Where the speed of your vehicle is too
high approaching another vehicle, the
first level of alert may not be displayed: the
level 2 alert may be displayed directly.
Important:
the level 1 alert is never displayed for a stationary obstacle or when the " Close"
trigger threshold has been selected.
Intelligent emergency
braking assistance
If the driver brakes, but not sufficiently to avoid a
collision, this system will supplement the braking,
within the limits of the laws of physics.
This assistance will only be provided if the driver
presses the brake pedal.
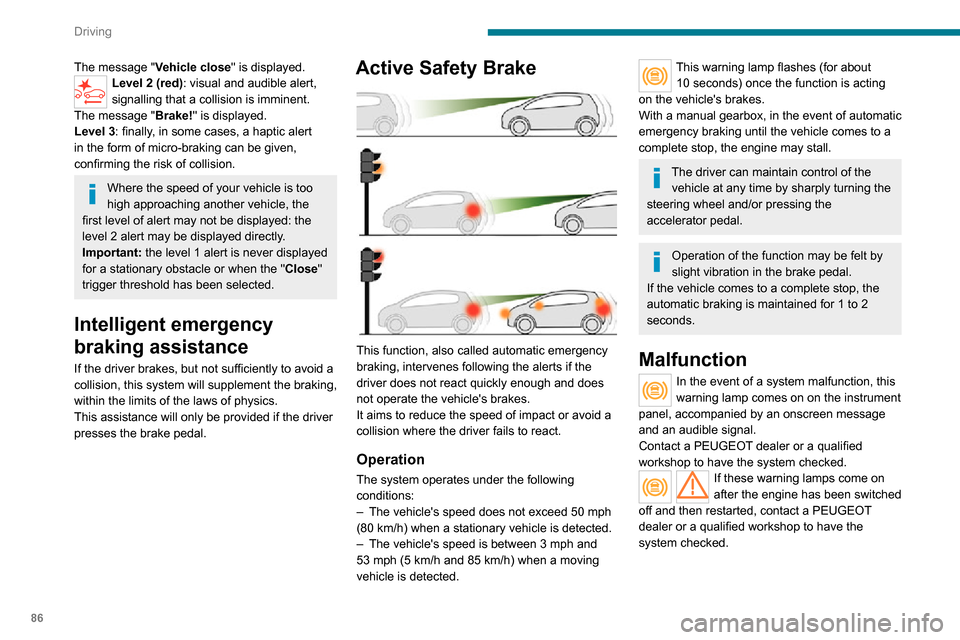
Active Safety Brake
This function, also called automatic emergency
braking, intervenes following the alerts if the
driver does not react quickly enough and does
not operate the vehicle's brakes.
It aims to reduce the speed of impact or avoid a
collision where the driver fails to react.
Operation
The system operates under the following
conditions:
– The vehicle's speed does not exceed 50 mph (80 km/h) when a stationary vehicle is detected.
– The vehicle's speed is between 3 mph and 53 mph (5 km/h and 85 km/h) when a moving vehicle is detected.
This warning lamp flashes (for about 10 seconds) once the function is acting on the vehicle's brakes.
With a manual gearbox, in the event of automatic
emergency braking until the vehicle comes to a
complete stop, the engine may stall.
The driver can maintain control of the vehicle at any time by sharply turning the
steering wheel and/or pressing the
accelerator pedal.
Operation of the function may be felt by
slight vibration in the brake pedal.
If the vehicle comes to a complete stop, the
automatic braking is maintained for 1 to 2
seconds.
Malfunction
In the event of a system malfunction, this
warning lamp comes on on the instrument
panel, accompanied by an onscreen message
and an audible signal.
Contact a PEUGEOT dealer or a qualified
workshop to have the system checked.
If these warning lamps come on
after the engine has been switched
off and then restarted, contact a PEUGEOT
dealer or a qualified workshop to have the
system checked.
Audible rear parking
sensors
Refer to the General recommendations on the
use of driving and manoeuvring aids .
If fitted to your vehicle, the system consists of 4
proximity sensors installed in the rear bumper.
They detect any obstacle, e.g. person, vehicle,
tree, barrier, which is behind the vehicle while
manoeuvring.
Certain types of obstacle detected at the
beginning of the manoeuvre will no longer be
detected at the end of manoeuvre if they are
located in the blind spots between and under the
sensors. Examples: stake, roadworks cone or
pavement post.
The rear parking sensors may be associated
with the reversing camera.
Switching on
► Engage reverse gear with the gear lever.
Page 89 of 196
87
Driving
6Audible rear parking sensors
Refer to the General recommendations on the
use of driving and manoeuvring aids .
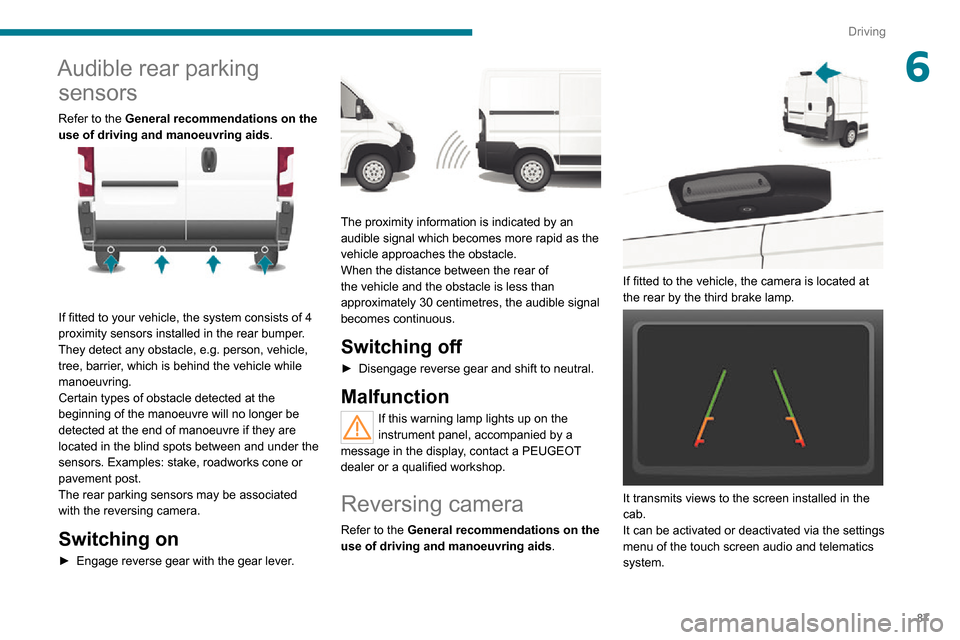
If fitted to your vehicle, the system consists of 4
proximity sensors installed in the rear bumper.
They detect any obstacle, e.g. person, vehicle,
tree, barrier, which is behind the vehicle while
manoeuvring.
Certain types of obstacle detected at the
beginning of the manoeuvre will no longer be
detected at the end of manoeuvre if they are
located in the blind spots between and under the
sensors. Examples: stake, roadworks cone or
pavement post.
The rear parking sensors may be associated
with the reversing camera.
Switching on
► Engage reverse gear with the gear lever .
The proximity information is indicated by an
audible signal which becomes more rapid as the
vehicle approaches the obstacle.
When the distance between the rear of
the vehicle and the obstacle is less than
approximately 30 centimetres, the audible signal
becomes continuous.
Switching off
► Disengage reverse gear and shift to neutral.
Malfunction
If this warning lamp lights up on the
instrument panel, accompanied by a
message in the display, contact a PEUGEOT
dealer or a qualified workshop.
Reversing camera
Refer to the General recommendations on the
use of driving and manoeuvring aids .
If fitted to the vehicle, the camera is located at
the rear by the third brake lamp.
It transmits views to the screen installed in the
cab.
It can be activated or deactivated via the settings
menu of the touch screen audio and telematics
system.
Page 93 of 196
91
Practical information
7For other versions, the second button is
replaced by a fuse; contact a PEUGEOT
dealer or a qualified workshop.
Compatibility of fuels
Diesel fuels conforming to the EN590, EN16734
and EN16709 standards and containing up to
7%, 10%, 20% and 30% fatty acid methyl ester
respectively. The use of B20 or B30 fuels, even
occasionally, imposes special maintenance
conditions referred to as "Arduous conditions".
Paraffinic Diesel fuel conforming to the EN15940
standard.
The use of any other type of (bio) fuel (vegetable or animal oils, pure or diluted,
domestic fuel, etc.) is strictly prohibited (risk
of damage to the engine and fuel system).
The only Diesel fuel additives authorised for use are those that meet the B715000
standard.
Diesel at low temperature
At temperatures below 0 °C (+32 °F), the formation of paraffins in summer-type Diesel
fuels could prevent the engine from operating
correctly. In these temperature conditions, use
winter-type Diesel fuel and keep the fuel tank
more than 50 % full.At temperatures below -15 °C (+5 °F) to avoid problems starting, it is best to park the vehicle
under shelter (heated garage).
Travelling abroad
Certain fuels could damage your vehicle’s
engine.
In certain countries, the use of a particular
fuel may be required (specific octane rating,
specific trade name, etc.) to ensure correct
operation of the engine.
For all additional information, consult a dealer.
Snow chains
In wintry conditions, snow chains improve
traction as well as the behaviour of the
vehicle when braking.
The snow chains must be fitted only to the front wheels. They must never be
fitted to "space-saver" type spare wheels.
Observe the legislation in force in your
country on the use of snow chains and
the maximum authorised speed.
Use only the chains designed to be fitted to the
type of wheel fitted to your vehicle:
Original tyre size Maximum link size.
205/70 R15 16 mm
215/70 R15 12 mm
225/70 R15 16 mm
215/75 R16 12 mm
225/75 R16 16 mm
For more information on snow chains, contact a
PEUGEOT dealer or a qualified workshop.
Installation tips
► To fit the chains during a journey, stop the vehicle on a flat surface on the side of the road.► Apply the parking brake and position any wheel chocks under the wheels to prevent
movement of the vehicle.
► Fit the chains following the instructions provided by the manufacturer.► Move off gently and drive for a few moments, without exceeding 31 mph (50 km/h).► Stop the vehicle and check that the snow chains are correctly tightened.
It is strongly recommended that before
you leave, you practise fitting the snow
chains on a level and dry surface.
Avoid driving with snow chains on roads that have been cleared of snow to avoid
damaging the vehicle's tyres and the road
surface. If the vehicle is fitted with alloy
Page 97 of 196
95
Practical information
7
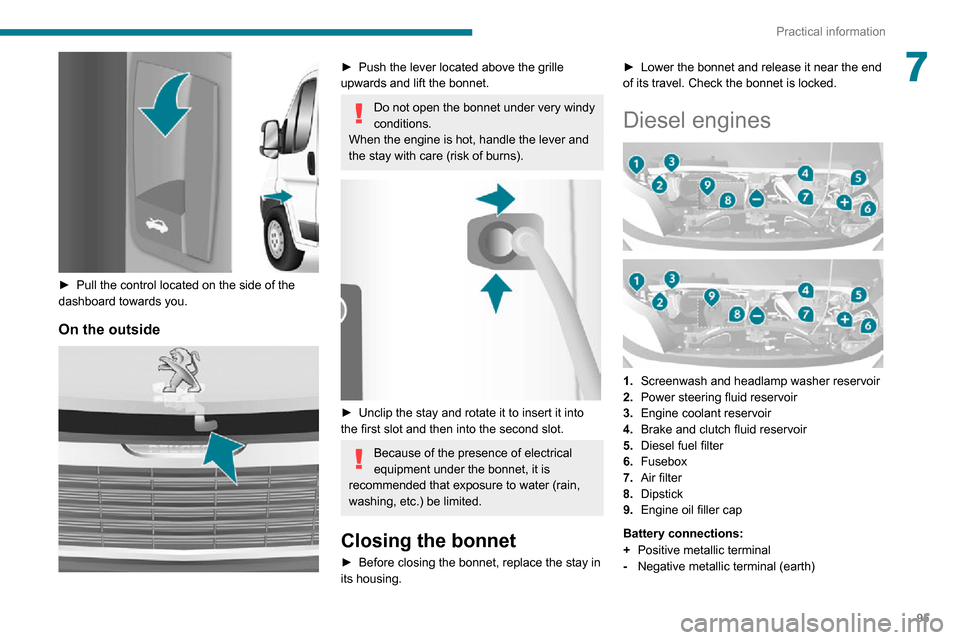
► Pull the control located on the side of the dashboard towards you.
On the outside
► Push the lever located above the grille upwards and lift the bonnet.
Do not open the bonnet under very windy
conditions.
When the engine is hot, handle the lever and
the stay with care (risk of burns).
► Unclip the stay and rotate it to insert it into the first slot and then into the second slot.
Because of the presence of electrical
equipment under the bonnet, it is
recommended that exposure to water (rain,
washing, etc.) be limited.
Closing the bonnet
► Before closing the bonnet, replace the stay in its housing.
► Lower the bonnet and release it near the end of its travel. Check the bonnet is locked.
Diesel engines
1.Screenwash and headlamp washer reservoir
2. Power steering fluid reservoir
3. Engine coolant reservoir
4. Brake and clutch fluid reservoir
5. Diesel fuel filter
6. Fusebox
7. Air filter
8. Dipstick
9. Engine oil filler cap
Battery connections:
+ Positive metallic terminal
- Negative metallic terminal (earth)
Page 98 of 196
96
Practical information
Topping up the engine oil level
► Remove the dipstick before topping up.► Recover the oil filler neck.► Unscrew the filler cap.► Install the oil filler neck in the filler hole.► Top up with oil.► Remove the oil filler neck from the filler hole.► Replace the filler cap.► Replace the dipstick.
Brake fluid
The level of this fluid should be close to
the "MAX" mark. If not, check the brake
pad wear.
The Diesel circuit is under very high
pressure.
All work on this circuit must be carried out
only by a PEUGEOT dealer or a qualified
workshop.
Checking levels
Check all of the following levels regularly in
accordance with the manufacturer's service
schedule. Top them up if required, unless
otherwise indicated.
If a level drops significantly, have the
corresponding system checked by a PEUGEOT
dealer or a qualified workshop.
The fluids must comply with the manufacturer's requirements and with
the vehicle's engine.
Take care when working under the bonnet, as certain areas of the engine
may be extremely hot (risk of burns) and the
cooling fan could start at any time (even with
the ignition off).
If the engine cover is to be removed /
refitted, handle it with care to avoid
damaging the mounting clips.
Used products
Avoid prolonged contact of used oil or fluids with the skin.
Most of these fluids are harmful to health and
very corrosive.
Do not discard used oil or fluids into sewers or onto the ground.
Empty used oil into the containers reserved
for this purpose at a PEUGEOT dealer or a
qualified workshop.
Engine oil
The level is checked, with the engine having been switched off for at least 30
minutes and on level ground, using the dipstick.
It is normal to top up the oil level between two
services (or oil changes). It is recommended
that you check the level, and top up if necessary,
every 3,000 miles (5,000 km).
In order to maintain the reliability of the
engine and emissions control system,
never use additives in the engine oil.
Checking using the dipstick
For the location of the dipstick, please refer
to the illustration of the corresponding engine
compartment.
► Grasp the dipstick by its coloured grip and pull it out completely.
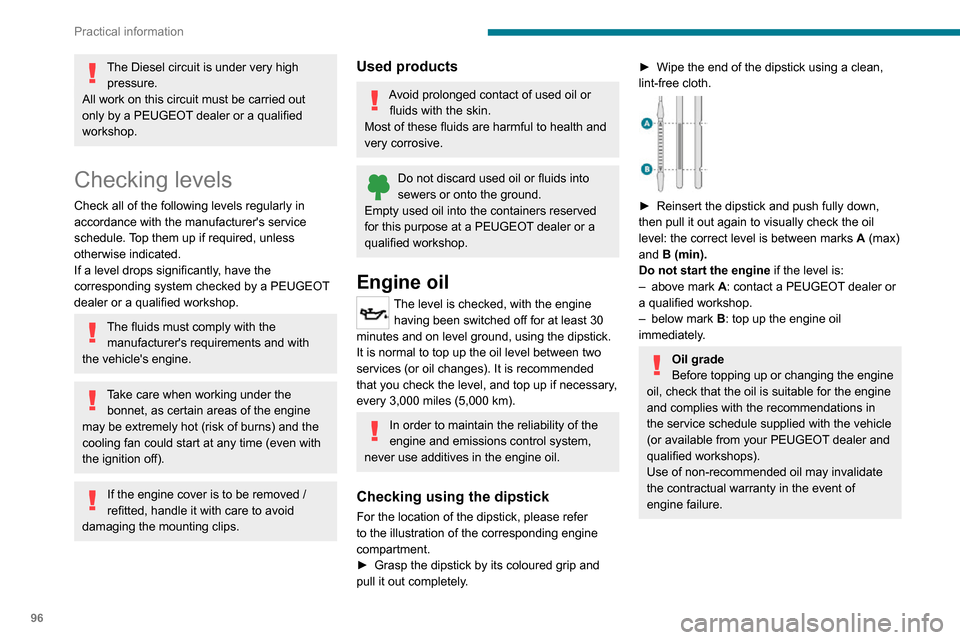
► Wipe the end of the dipstick using a clean, lint-free cloth.
► Reinsert the dipstick and push fully down, then pull it out again to visually check the oil
level: the correct level is between marks A (max) and B (min).
Do not start the engine if the level is:
– above mark A: contact a PEUGEOT dealer or
a qualified workshop.
– below mark B: top up the engine oil
immediately.
Oil grade
Before topping up or changing the engine
oil, check that the oil is suitable for the engine
and complies with the recommendations in
the service schedule supplied with the vehicle
(or available from your PEUGEOT dealer and
qualified workshops).
Use of non-recommended oil may invalidate
the contractual warranty in the event of
engine failure.
Page 99 of 196
97
Practical information
7Topping up the engine oil level
► Remove the dipstick before topping up.► Recover the oil filler neck.► Unscrew the filler cap.► Install the oil filler neck in the filler hole.► Top up with oil.► Remove the oil filler neck from the filler hole.► Replace the filler cap.► Replace the dipstick.
Brake fluid
The level of this fluid should be close to
the "MAX" mark. If not, check the brake
pad wear.
To know how often the brake fluid should be
replaced, refer to the manufacturer's servicing
schedule.
If topping up, clean the cap before
replacing it. Use only DOT4 brake fluid
from a sealed canister.
Power steering fluid
The level of this fluid should be close to the "MAX" mark. Check it, with the
vehicle parked on level ground and with the
engine cold, by reading the level on the filler
neck.
Unscrew the cap secured to the dipstick. To
access the reservoir cap, remove the protective
cover by turning its three fixing screws a quarter
turn, then remove the second cover placed on
the cap.
Engine coolant
It is normal to top up this fluid between
two services.
The check and top-up must only be done with
the engine cold.
A low level presents a risk of serious damage to
the engine.
The level of this fluid should be close to the
"MAX" mark but should never exceed it.
If the level is close to or below the " MIN” mark, it
is essential to top up.
When the engine is hot, the temperature of this
fluid is regulated by the fan.
As the cooling system is pressurised, wait at
least one hour after switching off the engine
before carrying out any work.
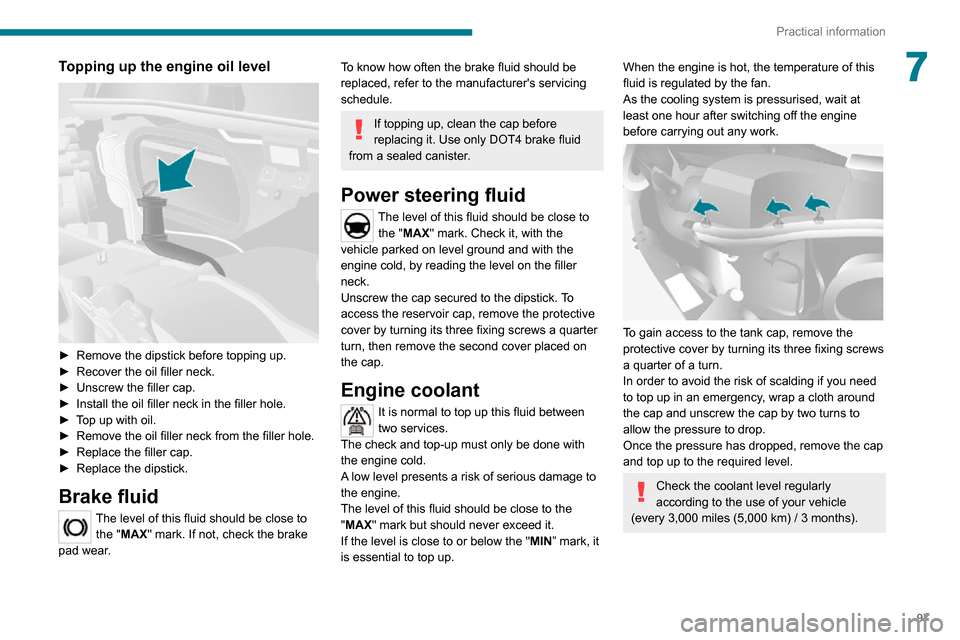
To gain access to the tank cap, remove the
protective cover by turning its three fixing screws
a quarter of a turn.
In order to avoid the risk of scalding if you need
to top up in an emergency, wrap a cloth around
the cap and unscrew the cap by two turns to
allow the pressure to drop.
Once the pressure has dropped, remove the cap
and top up to the required level.
Check the coolant level regularly
according to the use of your vehicle
(every 3,000 miles (5,000 km) / 3 months).
Page 101 of 196
99
Practical information
7A clogged passenger compartment filter can adversely affect air conditioning
system performance and generate
undesirable odours.
Oil filter
Change the oil filter each time the engine
oil is changed.
Particle filter (Diesel)
In addition to the catalytic converter, this filter
actively contributes to the preservation of
air quality by trapping the unburnt pollutant
particles. Black exhaust fumes are therefore not
emitted.
Operation
This filter, inserted into the exhaust system,
accumulates the carbonaceous particles. The
engine management computer automatically
and periodically manages the removal of
carbonaceous particles (regeneration).
The regeneration procedure is triggered
according to the amount of accumulated
particles and the conditions of use of the vehicle.
During this phase, you may notice certain
phenomena - accelerated idling, triggering of
the cooling fan, increased smoke and increased
temperature at the exhaust - which have no
impact on the operation of the vehicle and the
environment.
Following prolonged operation of the
vehicle at very low speed or at idle, you
may, in exceptional circumstances, notice the
emission of water vapour at the exhaust while
accelerating. This has no impact on the
vehicle’s behaviour and the environment.
Due to the high exhaust temperatures
caused by the normal operation of the
particle filter, it is recommended not to park
the vehicle on flammable materials (grass, dry
leaves, pine needles, etc.) to avoid any risk of
fire.
Saturation/Regeneration
If there is a risk of clogging, this warning
lamp comes on, accompanied by a
message on the instrument panel display.
This warning is due to the start of saturation of
the particle filter (exceptionally long urban driving
conditions: reduced speed, traffic jams, etc.).
In order to regenerate the filter, it is
recommended to drive as soon as possible -
when traffic conditions and regulations permit
- at a speed of at least 37 mph (60 km/h), with
an engine speed above 2,000 rpm for about
15 minutes (until the warning lamp and/or the
message disappear).
If possible, avoid switching off the engine
before the end of filter regeneration; repeated
interruptions can lead to early deterioration of the
engine oil. It is not recommended to terminate
the filter regeneration with the vehicle stationary.
Malfunction
If this alert persists, do not ignore this warning;
this indicates that a malfunction has occurred in
the exhaust system/particle filter assembly.
Have the assembly checked by a PEUGEOT
dealer or a qualified workshop.
Manual gearbox
The gearbox does not require any maintenance (no oil change).
Brake pads
Brake wear depends on the style of
driving, particularly in the case of vehicles
used in town, over short distances. It may be
necessary to have the condition of the brakes
checked, even between vehicle services.
Unless there is a leak in the circuit, a drop in the
brake fluid level indicates that the brake pads
are worn.
If this warning lamp comes on, have the
brake pads checked by a PEUGEOT
dealer or a qualified workshop.
After washing the vehicle, moisture, or in wintry conditions, ice can form on the
brake discs and pads: braking efficiency may
be reduced. Gently dab the brakes to dry and
defrost them.
Page 102 of 196
100
Practical information
reading and have an adverse effect on road holding.
Fitting different tyres on the front and rear axles
can cause the ESC to mistime.
AdBlue® (BlueHDi
engines)
To respect the environment and ensure
compliance with the Euro 6 standard, without
adversely affecting the performance or fuel
consumption of its Diesel engines, PEUGEOT
has taken the decision to equip its vehicles
with a system that associates SCR (Selective
Catalytic Reduction) with a Diesel Particle Filter
(DPF) for the treatment of exhaust gases.
SCR system
Using a liquid called AdBlue® that contains
urea, a catalytic converter turns up to 85% of
the nitrogen oxides (NOx) into nitrogen and
Brake disc wear
For information on checking brake disc
wear, contact a PEUGEOT dealer or a
qualified workshop.
Manual parking brake
If you notice excessive brake lever travel
or decreased effectiveness, the parking
brake must be adjusted, even between two
services.
This system must be checked by a PEUGEOT
dealer or a qualified workshop.
Diesel fuel filter
The Diesel fuel filter is located under the bonnet,
close to the brake fluid reservoir.
If this warning lamp comes on, the filter
must be purged to remove water.
You can also purge the fuel filter regularly, every
time the engine oil is changed.
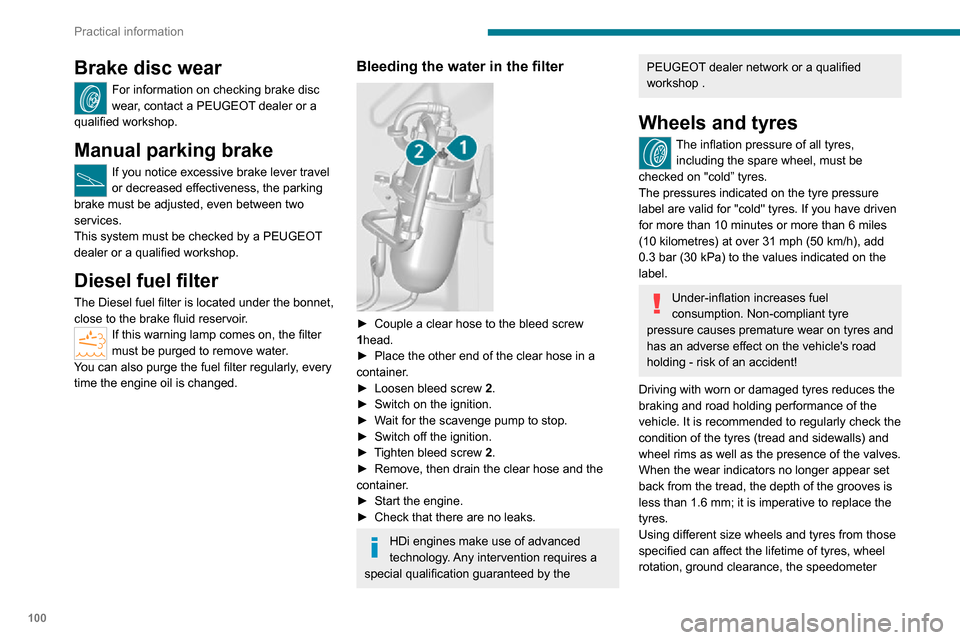
Bleeding the water in the filter
► Couple a clear hose to the bleed screw 1head.► Place the other end of the clear hose in a container.► Loosen bleed screw 2.► Switch on the ignition.► Wait for the scavenge pump to stop.► Switch off the ignition.► Tighten bleed screw 2.► Remove, then drain the clear hose and the container.► Start the engine.► Check that there are no leaks.
HDi engines make use of advanced
technology. Any intervention requires a
special qualification guaranteed by the
PEUGEOT dealer network or a qualified workshop .
Wheels and tyres
The inflation pressure of all tyres,
including the spare wheel, must be
checked on "cold” tyres.
The pressures indicated on the tyre pressure
label are valid for "cold" tyres. If you have driven
for more than 10 minutes or more than 6 miles
(10 kilometres) at over 31 mph (50 km/h), add 0.3 bar (30 kPa) to the values indicated on the
label.
Under-inflation increases fuel
consumption. Non-compliant tyre
pressure causes premature wear on tyres and
has an adverse effect on the vehicle's road
holding - risk of an accident!
Driving with worn or damaged tyres reduces the
braking and road holding performance of the
vehicle. It is recommended to regularly check the
condition of the tyres (tread and sidewalls) and
wheel rims as well as the presence of the valves.
When the wear indicators no longer appear set
back from the tread, the depth of the grooves is
less than 1.6 mm; it is imperative to replace the
tyres.
Using different size wheels and tyres from those
specified can affect the lifetime of tyres, wheel
rotation, ground clearance, the speedometer
Page 106 of 196
104
In the event of a breakdown
Temporary puncture repair kit
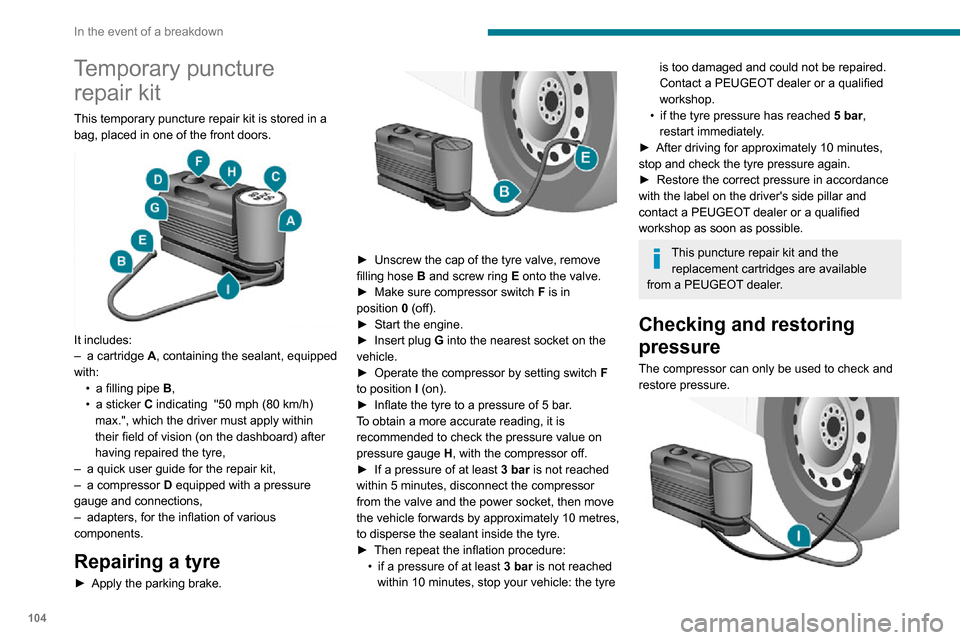
This temporary puncture repair kit is stored in a
bag, placed in one of the front doors.
It includes:– a cartridge A, containing the sealant, equipped
with:
• a filling pipe B,• a sticker C indicating "50 mph (80 km/h) max.", which the driver must apply within
their field of vision (on the dashboard) after
having repaired the tyre,
– a quick user guide for the repair kit,– a compressor D equipped with a pressure
gauge and connections,
– adapters, for the inflation of various
components.
Repairing a tyre
► Apply the parking brake.
► Unscrew the cap of the tyre valve, remove filling hose B and screw ring E onto the valve.► Make sure compressor switch F is in position 0 (off).► Start the engine.► Insert plug G into the nearest socket on the
vehicle.
► Operate the compressor by setting switch F
to position I (on).
► Inflate the tyre to a pressure of 5 bar .To obtain a more accurate reading, it is
recommended to check the pressure value on
pressure gauge H, with the compressor off.
► If a pressure of at least 3 bar is not reached within 5 minutes, disconnect the compressor
from the valve and the power socket, then move
the vehicle forwards by approximately 10 metres,
to disperse the sealant inside the tyre.
► Then repeat the inflation procedure:• if a pressure of at least 3 bar is not reached within 10 minutes, stop your vehicle: the tyre
is too damaged and could not be repaired.
Contact a PEUGEOT dealer or a qualified
workshop.
• if the tyre pressure has reached 5 bar,
restart immediately.
► After driving for approximately 10 minutes, stop and check the tyre pressure again.► Restore the correct pressure in accordance with the label on the driver's side pillar and
contact a PEUGEOT dealer or a qualified
workshop as soon as possible.
This puncture repair kit and the replacement cartridges are available
from a PEUGEOT dealer.
Checking and restoring
pressure
The compressor can only be used to check and
restore pressure.
► Disconnect hose I and directly connect it
to the tyre valve; the cartridge will thereby be
connected to the compressor and the sealant will
not be injected.
If the tyre needs to be deflated, connect hose
I to the tyre valve and press the yellow button
located in the centre of the compressor switch.
Replacing the cartridge
To replace the sealant cartridge, proceed as
follows:
► Disconnect the hose I.► Turn the cartridge to be replaced anti-clockwise and lift it.► Insert the new cartridge and turn it clockwise,► Reconnect the hose I and connect pipe B to
its location.
The cartridge contains ethylene glycol, which is harmful if swallowed and irritates
the eyes.
It must be kept out of the reach of children.