height adjustment Peugeot Boxer Benne 2012 Owner's Manual
[x] Cancel search | Manufacturer: PEUGEOT, Model Year: 2012, Model line: Boxer Benne, Model: Peugeot Boxer Benne 2012Pages: 184, PDF Size: 5.43 MB
Page 10 of 184
8
Familiarisation
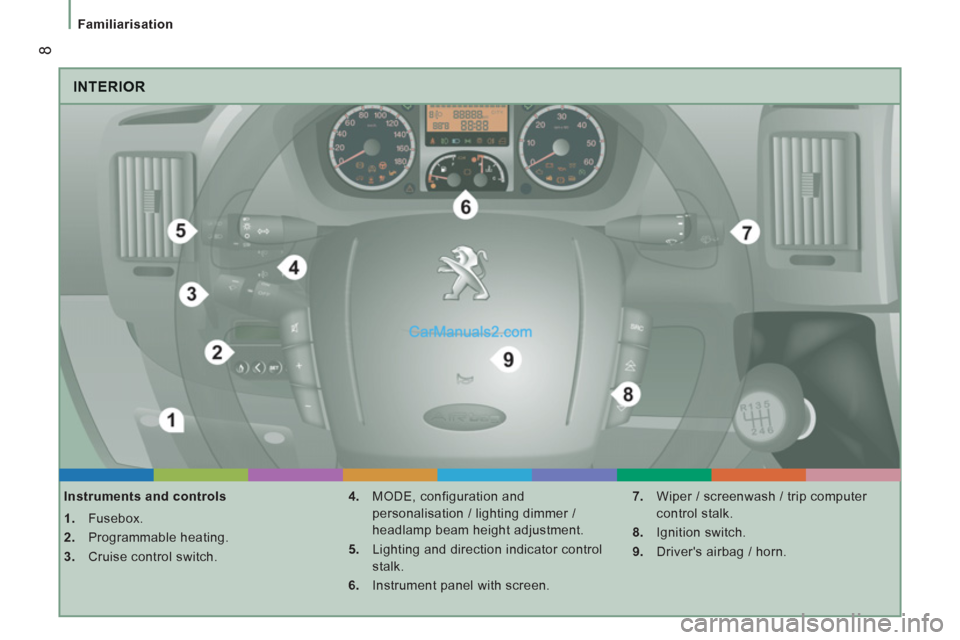
INTERIOR
Instruments and controls
1.
Fusebox.
2.
Programmable heating.
3.
Cruise control switch.
4.
MODE, configuration and
personalisation / lighting dimmer /
headlamp beam height adjustment.
5.
Lighting and direction indicator control
stalk.
6.
Instrument panel with screen.
7.
Wiper / screenwash / trip computer
control stalk.
8.
Ignition switch.
9.
Driver's airbag / horn.
Page 12 of 184
3
10
Familiarisation
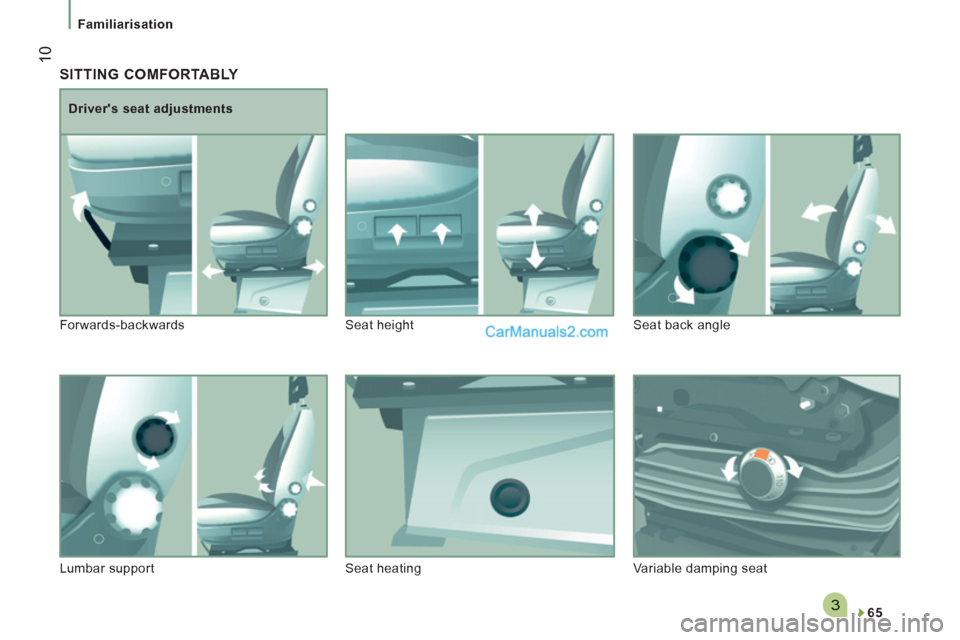
SITTING COMFORTABLY
65
Driver's seat adjustments
Forwards-backwards Seat height Seat back angle
Lumbar support Seat heating Variable damping seat
Page 13 of 184
523
5
1
FAMILIARISATION
11
Familiarisation
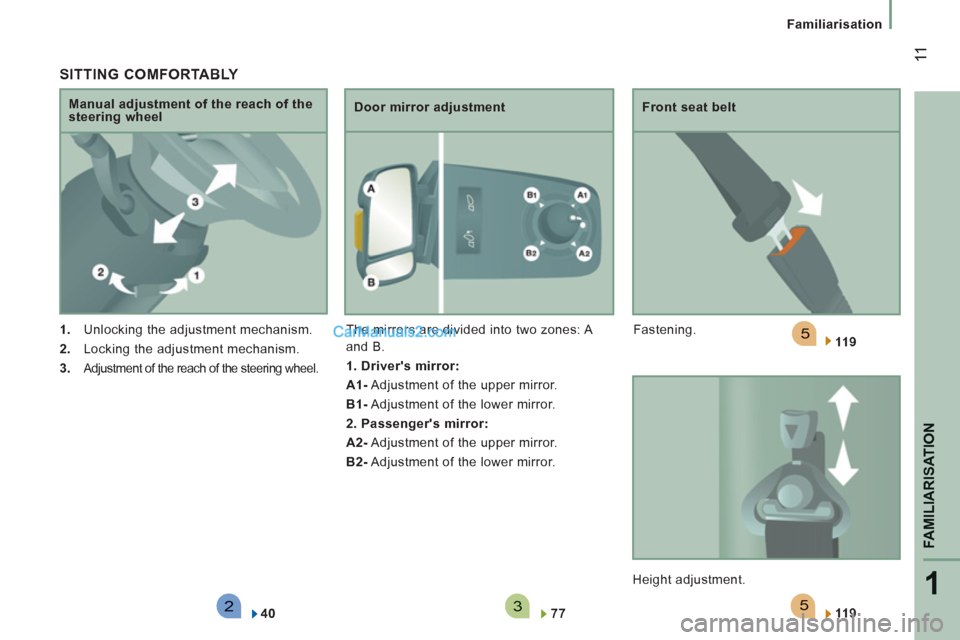
SITTING COMFORTABLY
1.
Unlocking the adjustment mechanism.
2.
Locking the adjustment mechanism.
3.
Adjustment of the reach of the steering wheel.
Manual adjustment of the reach of the
steering wheel
Door mirror adjustment
The mirrors are divided into two zones: A
and B.
1. Driver's mirror:
A1-
Adjustment of the upper mirror.
B1-
Adjustment of the lower mirror.
2. Passenger's mirror:
A2-
Adjustment of the upper mirror.
B2-
Adjustment of the lower mirror.
40
77
Front seat belt
Fastening.
Height adjustment.
11 9
11 9
Page 51 of 184
49
3
EASE OF USE
and
COMFOR
T
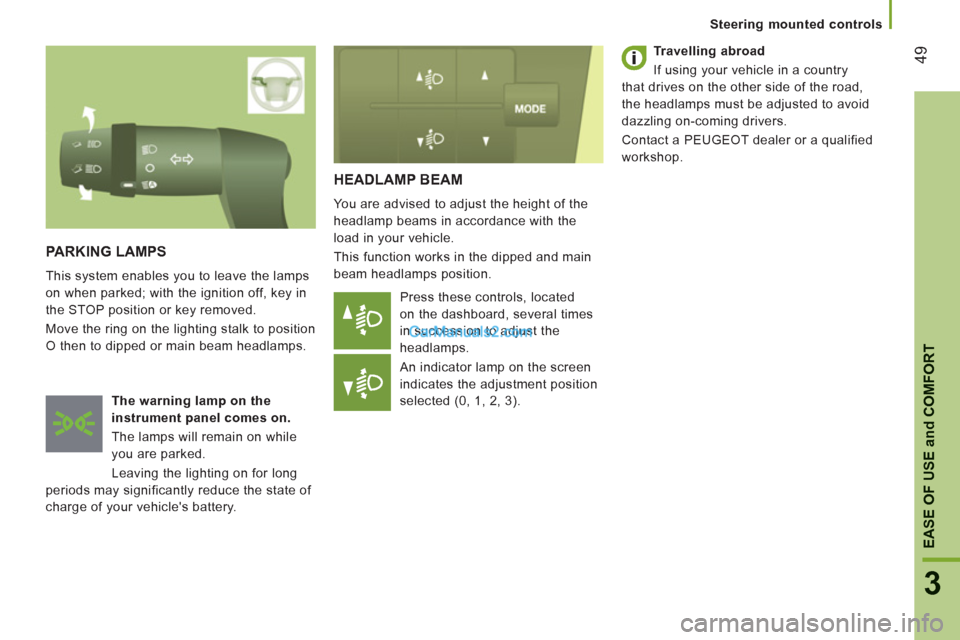
HEADLAMP BEAM
You are advised to adjust the height of the
headlamp beams in accordance with the
load in your vehicle.
This function works in the dipped and main
beam headlamps position.
Press these controls, located
on the dashboard, several times
in succession to adjust the
headlamps.
An indicator lamp on the screen
indicates the adjustment position
selected (0, 1, 2, 3).
PARKING LAMPS
This system enables you to leave the lamps
on when parked; with the ignition off, key in
the STOP position or key removed.
Move the ring on the lighting stalk to position
O then to dipped or main beam headlamps.
The warning lamp on the
instrument panel comes on.
The lamps will remain on while
you are parked.
Leaving the lighting on for long
periods may significantly reduce the state of
charge of your vehicle's battery.
Travelling abroad
If using your vehicle in a country
that drives on the other side of the road,
the headlamps must be adjusted to avoid
dazzling on-coming drivers.
Contact a PEUGEOT dealer or a qualified
workshop.
Steerin
g mounted controls
Page 68 of 184
Seats
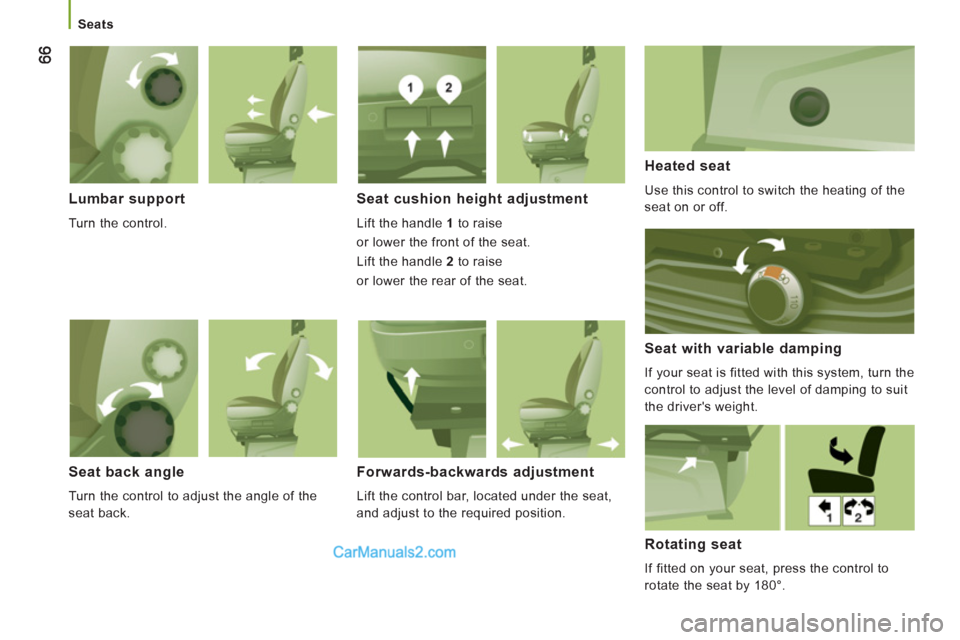
Lumbar support
Turn the control.
Seat cushion height adjustment
Lift the handle 1
to raise
or lower the front of the seat.
Lift the handle 2
to raise
or lower the rear of the seat.
Heated seat
Use this control to switch the heating of the
seat on or off.
Seat with variable damping
If your seat is fitted with this system, turn the
control to adjust the level of damping to suit
the driver's weight.
Seat back angle
Turn the control to adjust the angle of the
seat back.
Forwards-backwards adjustment
Lift the control bar, located under the seat,
and adjust to the required position.
Rotating seat
If fitted on your seat, press the control to
rotate the seat by 180°.
Page 88 of 184
86
Pneumatic suspension
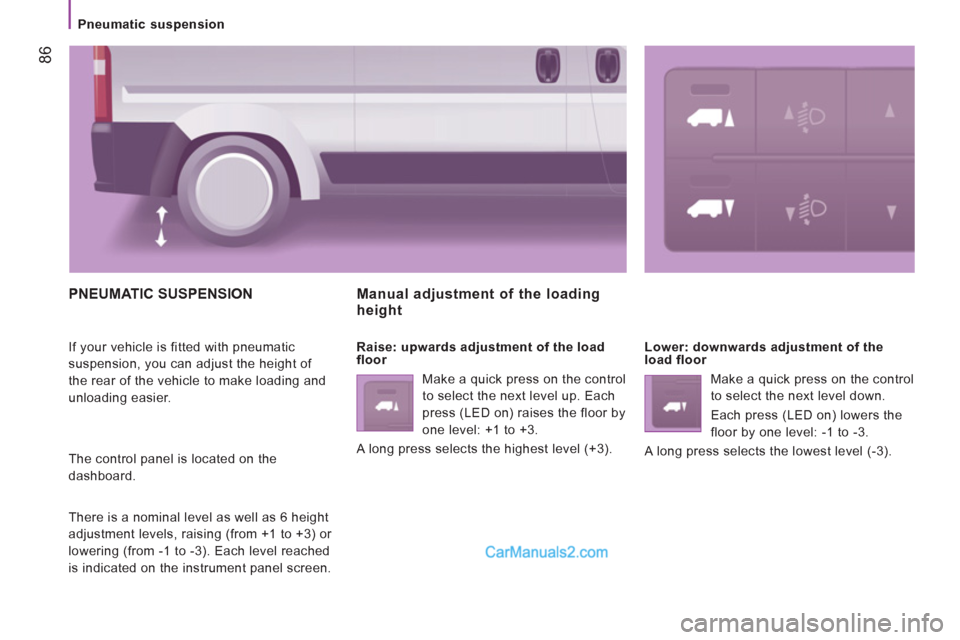
PNEUMATIC SUSPENSION
If your vehicle is fitted with pneumatic
suspension, you can adjust the height of
the rear of the vehicle to make loading and
unloading easier.
The control panel is located on the
dashboard.
There is a nominal level as well as 6 height
adjustment levels, raising (from +1 to +3) or
lowering (from -1 to -3). Each level reached
is indicated on the instrument panel screen.
Manual adjustment of the loadingheight
Raise: upwards adjustment of the load
floor
Make a quick press on the control
to select the next level up. Each
press (LED on) raises the floor by
one level: +1 to +3.
A long press selects the highest level (+3).
Lower: downwards adjustment of the
load floor
Make a quick press on the control
to select the next level down.
Each press (LED on) lowers the
floor by one level: -1 to -3.
A long press selects the lowest level (-3).
Page 121 of 184
5
SAFETY
Seat belts
SEAT BELTS
CAB SEAT BELTS
The front seats are fitted with pre-tensioners
and force limiters.
The bench rear seat is fitted with two seat
belts.
If you install a bench seat after handover, it
must be fitted with seat belts.
REAR SEAT BELTS
The seats/bench seats are fitted with three-
point seat belts and inertia reels.
The centre seat has a seat belt guide and
inertia reel, solid with the seat back. Height adjustment
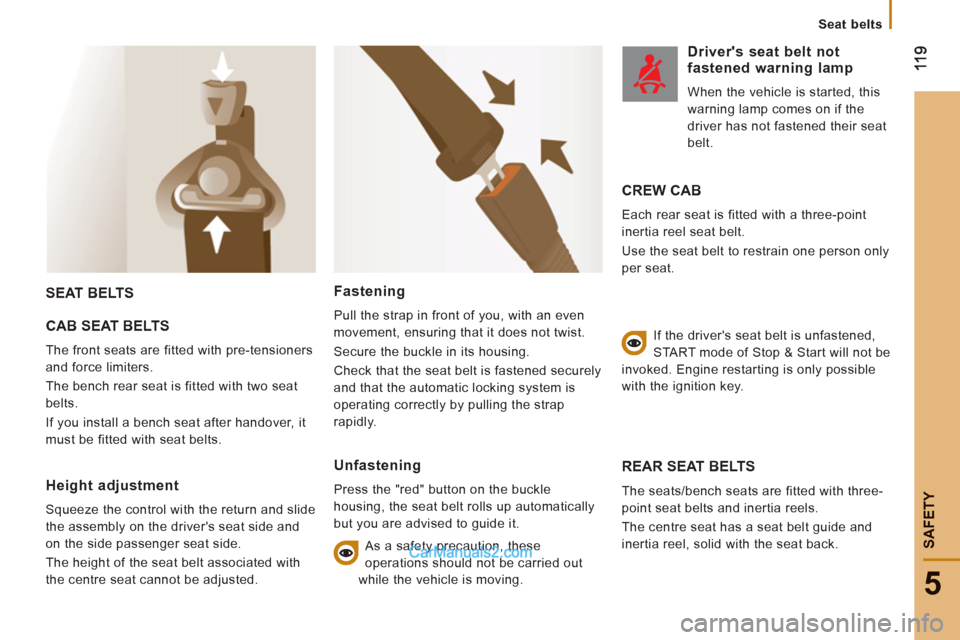
Squeeze the control with the return and slide
the assembly on the driver's seat side and
on the side passenger seat side.
The height of the seat belt associated with
the centre seat cannot be adjusted.
Fastening
Pull the strap in front of you, with an even
movement, ensuring that it does not twist.
Secure the buckle in its housing.
Check that the seat belt is fastened securely
and that the automatic locking system is
operating correctly by pulling the strap
rapidly.
Unfastening
Press the "red" button on the buckle
housing, the seat belt rolls up automatically
but you are advised to guide it.
As a safety precaution, these
operations should not be carried out
while the vehicle is moving.
Driver's seat belt not fastened warning lamp
When the vehicle is started, this
warning lamp comes on if the
driver has not fastened their seat
belt.
CREW CAB
Each rear seat is fitted with a three-point
inertia reel seat belt.
Use the seat belt to restrain one person only
per seat.
If the driver's seat belt is unfastened,
START mode of Stop & Start will not be
invoked. Engine restarting is only possible
with the ignition key.
Page 176 of 184
174
Exterior
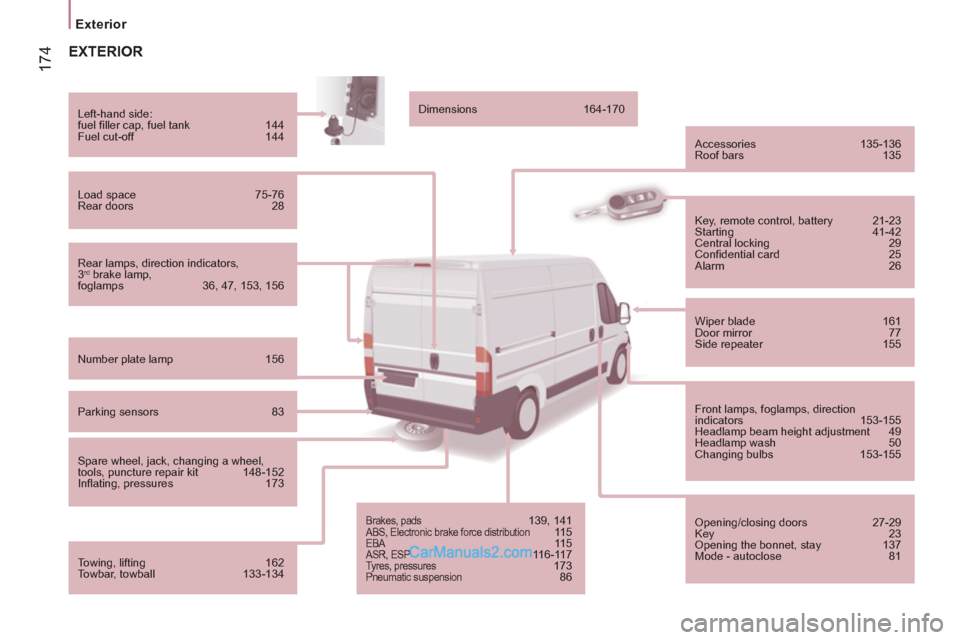
EXTERIOR
Rear lamps, direction indicators,
3 rd
brake lamp,
foglamps 36, 47, 153, 156
Left-hand side:
fuel fi ller cap, fuel tank 144
Fuel cut-off 144
Load space 75-76
Rear doors 28
Number plate lamp 156
Parking sensors 83
Spare wheel, jack, changing a wheel,
tools, puncture repair kit 148-152
Infl ating, pressures 173
Towing, lifting 162
Towbar, towball 133-134
Dimensions 164-170
Accessories 135-136
Roof bars 135
Brakes, pads 139, 141
ABS, Electronic brake force distribution 11 5
EBA 11 5
ASR, ESP 116-117
Tyres, pressures 173
Pneumatic suspension 86
Key, remote control, battery 21-23
Starting 41-42
Central locking 29
Confi dential card 25
Alarm 26
Wiper blade 161
Door mirror 77
Side repeater 155
Front lamps, foglamps, direction
indicators 153-155
Headlamp beam height adjustment 49
Headlamp wash 50
Changing bulbs 153-155
Opening/closing doors 27-29
Key 23
Opening the bonnet, stay 137
Mode - autoclose 81
Page 177 of 184
17
5
Instruments and controls
10
VISUAL SEARCH
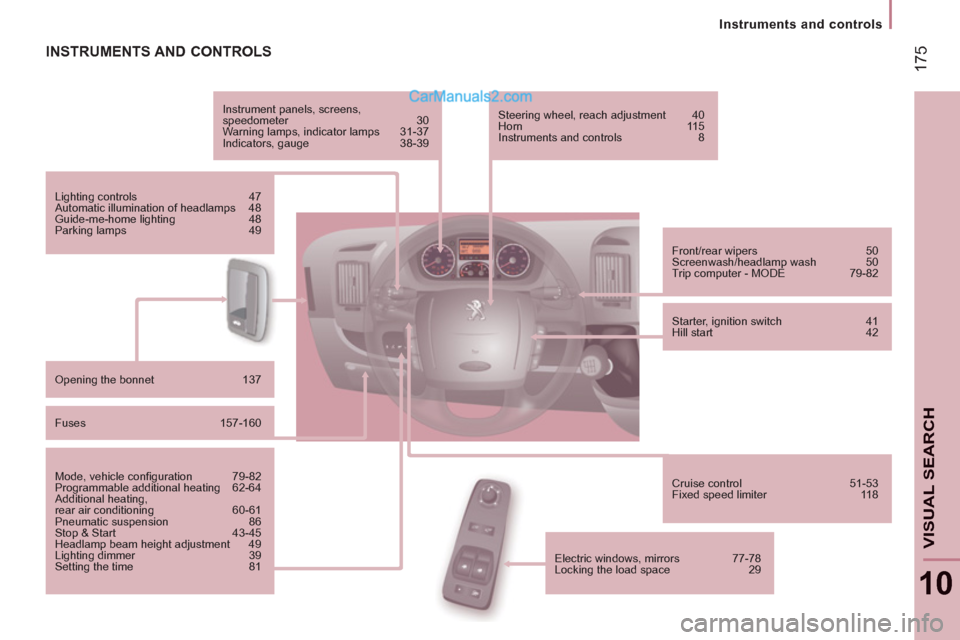
INSTRUMENTS AND CONTROLS
Instrument panels, screens,
speedometer 30
Warning lamps, indicator lamps 31-37
Indicators, gauge 38-39
Lighting controls 47
Automatic illumination of headlamps 48
Guide-me-home lighting 48
Parking lamps 49
Opening the bonnet 137
Fuses 157-160
Mode, vehicle confi guration 79-82
Programmable additional heating 62-64
Additional heating,
rear air conditioning 60-61
Pneumatic suspension 86
Stop & Start 43-45
Headlamp beam height adjustment 49
Lighting dimmer 39
Setting the time 81
Front/rear wipers 50
Screenwash/headlamp wash 50
Trip computer - MODE 79-82
Starter, ignition switch 41
Hill start 42
Cruise control 51-53
Fixed speed limiter 118
Steering wheel, reach adjustment 40
Horn 115
Instruments and controls 8
Electric windows, mirrors 77-78
Locking the load space 29