PEUGEOT EXPERT 2001 Workshop Manual
Manufacturer: PEUGEOT, Model Year: 2001, Model line: EXPERT, Model: PEUGEOT EXPERT 2001Pages: 127, PDF Size: 4.95 MB
Page 51 of 127
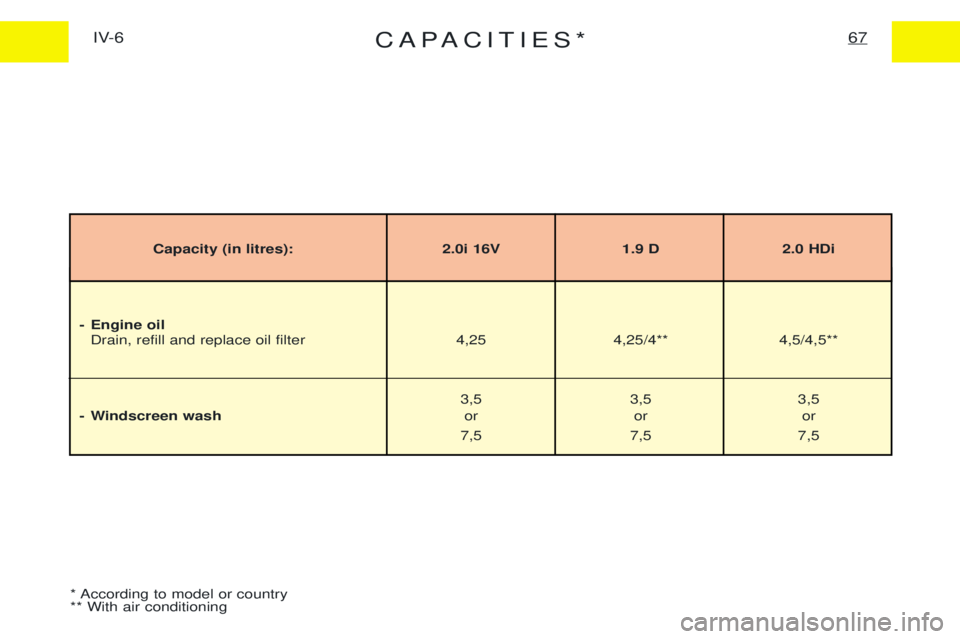
CAPACITIES*67IV-6
* According to model or country ** With air conditioning
Capacity (in litres): 2.0i 16V 1.9 D 2.0 HDi
- Engine oil Drain, refill and replace oil filter 4,25 4,25/4** 4,5/4,5**
3,5 3,5 3,5
- Windscreen wash or or or
7,5 7,5 7,5
Page 52 of 127

STEERING LOCK - IGNITION - STARTERII-1
40
¥ S : Steering lock
To free the steering, turn the steering wheel slightly at the same time as tur- ning the key; avoid using undue force.
¥ A : Accessories
Allows certain electrical accessories to be used. The battery charge warning lamp illuminates.
¥ M : Ignition The following warning lamps should come on: battery charge, handbrake, oil
pressure, engine coolant temperature According to the specific version of
vehicle, the following warning lamps should also come on: Stop, ABS, Engineautodiagnostic, Preheating (Diesel), Front airbag. If one of these lamps fails to light, it could indicate a fault in the system concerned. ¥ D : Starter Release the key as soon as the engine has started. Never operate with the engine running.
These warning lamps are tested with the ignition key in the ignition on position.
Page 53 of 127
STEERING LOCK - IGNITION - STARTER41II-1
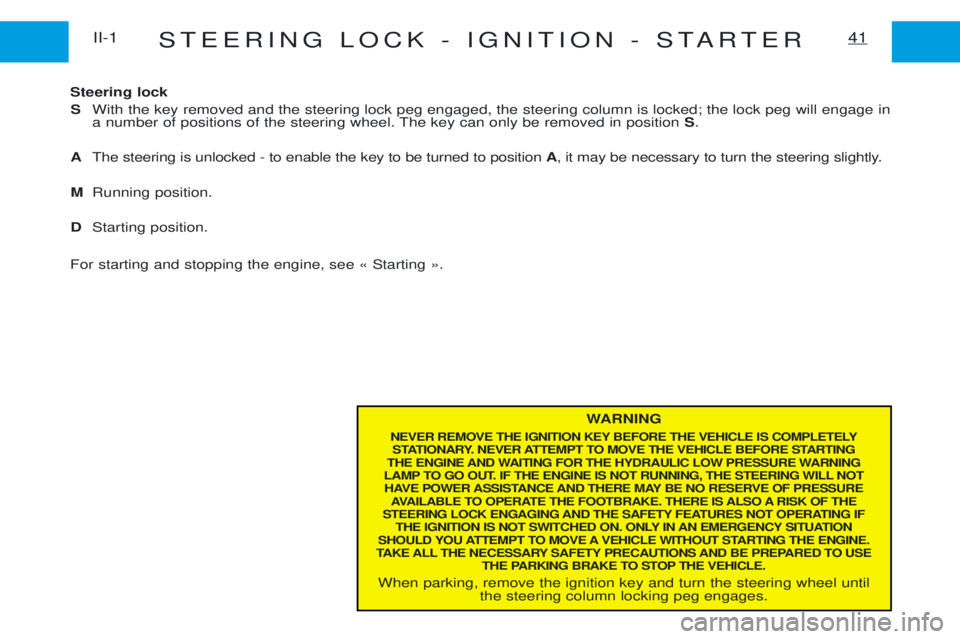
WARNING
NEVER REMOVE THE IGNITION KEY BEFORE THE VEHICLE IS COMPLETELY STATIONARY. NEVER ATTEMPT TO MOVE THE VEHICLE BEFORE STARTING
THE ENGINE AND WAITING FOR THE HYDRAULIC LOW PRESSURE WARNING
LAMP TO GO OUT. IF THE ENGINE IS NOT RUNNING, THE STEERING WILL NOT HAVE POWER ASSISTANCE AND THERE MAY BE NO RESERVE OF PRESSURE AVAILABLE TO OPERATE THE FOOTBRAKE. THERE IS ALSO A RISK OF THE
STEERING LOCK ENGAGING AND THE SAFETY FEATURES NOT OPERATING IF THE IGNITION IS NOT SWITCHED ON. ONLY IN AN EMERGENCY SITUATION
SHOULD YOU ATTEMPT TO MOVE A VEHICLE WITHOUT STARTING THE ENGINE.
TAKE ALL THE NECESSARY SAFETY PRECAUTIONS AND BE PREPARED TO USE THE PARKING BRAKE TO STOP THE VEHICLE.
When parking, remove the ignition key and turn the steering wheel until the steering column locking peg engages.
Steering lock
S With the key removed and the steering lock peg engaged, the steering column is locked; the lock peg will engage in
a number of positions of the steering wheel. The key can only be removed in position S.
A The steering is unlocked - to enable the key to be turned to position A, it may be necessary to turn the steering slightly.
M Running position.
D Starting position.
For starting and stopping the engine, see Ç Starting È.
Page 54 of 127
STARTINGII-2
42
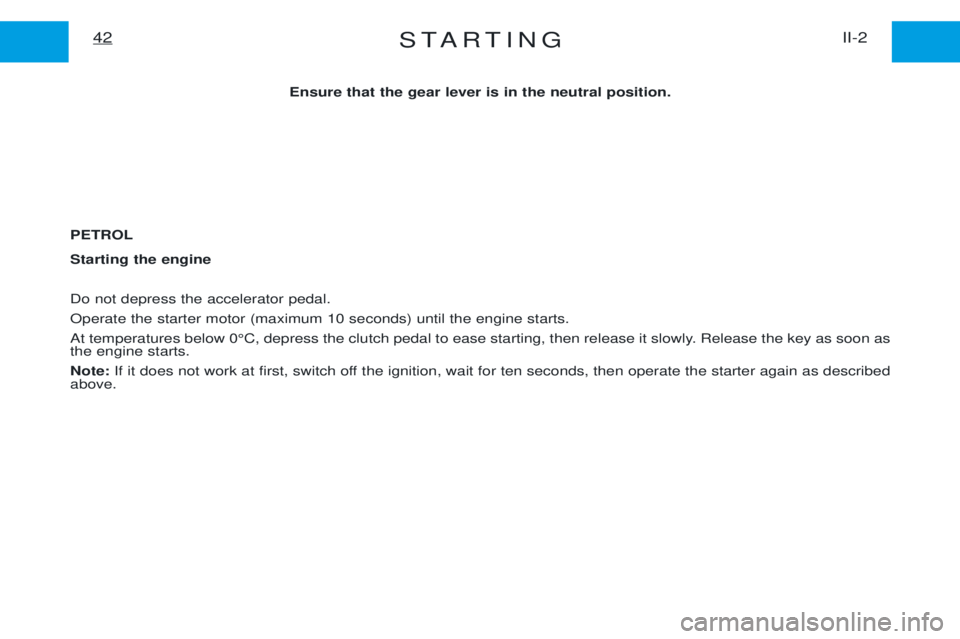
Ensure that the gear lever is in the neutral position.
PETROL Starting the engine Do not depress the accelerator pedal. Operate the starter motor (maximum 10 seconds) until the engine starts.
At temperatures below 0¡C, depress the clutch pedal to ease starting, then release it slowly. Release the key as soon as the engine starts. Note: If it does not work at first, switch off the ignition, wait for ten seconds, then operate the starter again as described
above.
Page 55 of 127
STARTING43II-2
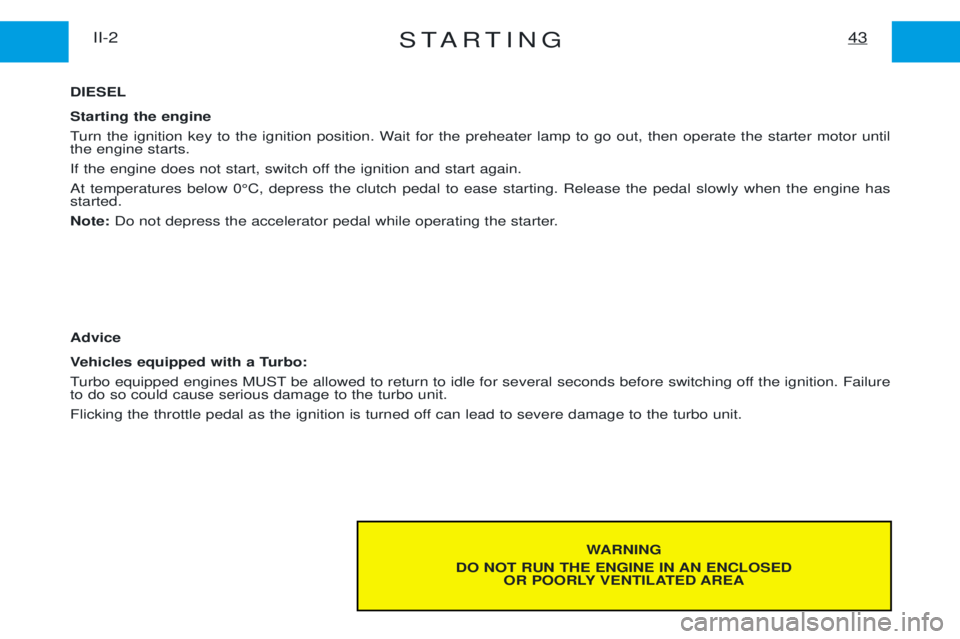
WARNING
DO NOT RUN THE ENGINE IN AN ENCLOSED OR POORLY VENTILATED AREA
DIESEL Starting the engine
Turn the ignition key to the ignition position. Wait for the preheater lamp to go out, then operate the starter motor until the engine starts.
If the engine does not start, switch off the ignition and start again.At temperatures below 0¡C, depress the clutch pedal to ease starting. Release the pedal slowly when the engine has started. Note:
Do not depress the accelerator pedal while operating the starter.
Advice
Vehicles equipped with a Turbo:
Turbo equipped engines MUST be allowed to return to idle for several seconds before switching off the ignition. Failure to do so could cause serious damage to the turbo unit.
Flicking the throttle pedal as the ignition is turned off can lead to severe damage to the turbo unit.
Page 56 of 127

BRAKESII-3
44
Handbrake
To create a passage between the front seats, the handbrake lever is mounted
to the right of the driverÕs seat. The handbrake is operated by pulling the lever firmly up - pressing the foot-
brake will reduce the effort required to apply the handbrake. The handbrake is capable of holding the vehicle on all slopes likely to be
encountered but increased effort will be needed on steep slopes.
In all circumstances, as a precautionary measure, engage first gear.On steep slopes, turn the steering towards the kerb.
To release the brake, pull the lever lightly up, press the button on the end of the lever and return the lever to the fully down position. The warning lamp will come on if the handbrake is on or not fully released when the engine is running .
Page 57 of 127
BRAKES45II-4ABS - Anti-lock Braking System* This system improves vehicle safety by preventing the wheels from locking under emergency braking or when
braking on surfaces offering poor adhesion.
It thus also allows control of the steering to be retained. The operation of the various electronic components of the system is continuously monitored, both before and during your
journey. On switching on the ignition, the ABS lamp will light for approximately two seconds. If it stays on or lights when
driving, the ABS computer has detected a fault and has disconnected the ABS system. If the lamp lights whilst driving, it
again indicates that a fault has been detected and that the ABS system is inactive. In both situations, the normal braking
system is not affected and will continue to function as a conventional braking system without ABS. Nevertheless, to re-
establish the full safety features of the ABS system, It is recommended that the vehicle be examined by a dealer as soonas possible.
On slippery roads (loose stones, snow, ice, etc.), it is imperative to drive with caution.
* According to model or country
Protection fuses under the dashboardF12
(under the bonnet)
MF4 (with ABS)
Page 58 of 127
GEAR LEVERII-6
46
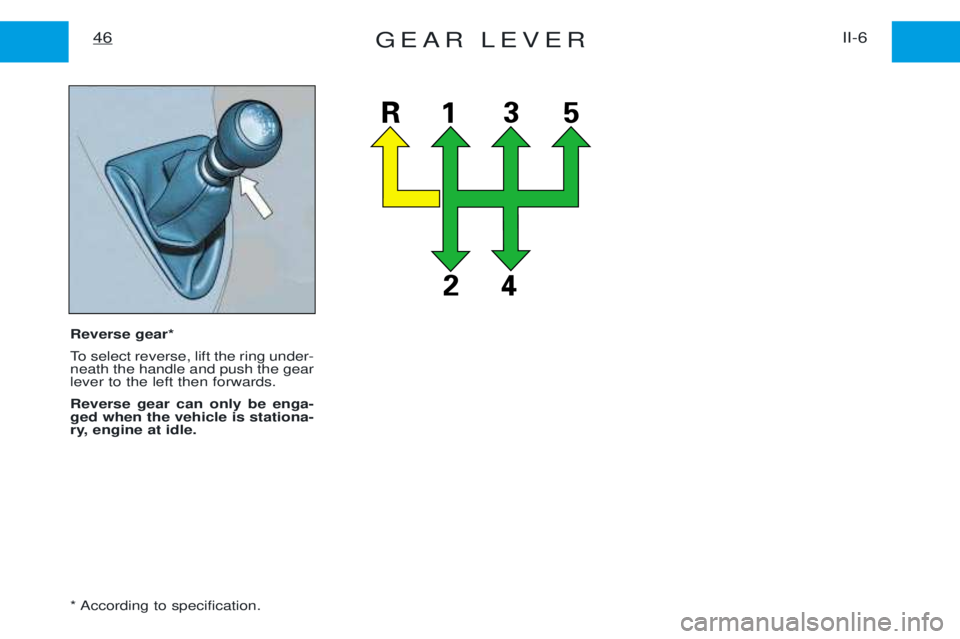
Reverse gear*
To select reverse, lift the ring under- neath the handle and push the gearlever to the left then forwards. Reverse gear can only be enga- ged when the vehicle is stationa-
ry, engine at idle.
* According to specification.
Page 59 of 127
SEAT BELTS114
Replacing the pyrotechnic pretensioner systems
They must be replaced following deployment or within ten years after first
registration of the vehicle. This must be done by the dealer network. In accordance with the strict security regulations in force, any repairs or checks must be performed exclusively by the dealer network. Any repairs that have not been carried out in strict compliance with the regulations could prevent the systems from operating correctly or couldcause their premature deployment, with the risk of bodily injuries.
Warning When the pretensioners are deployed, there is a light dischargeof harmless smoke and a loudnoise, both due to the detonation ofthe integral explosive cartridgesthat activate them. Seat belts equipped with pyrotechnic pretensioners and grabbers
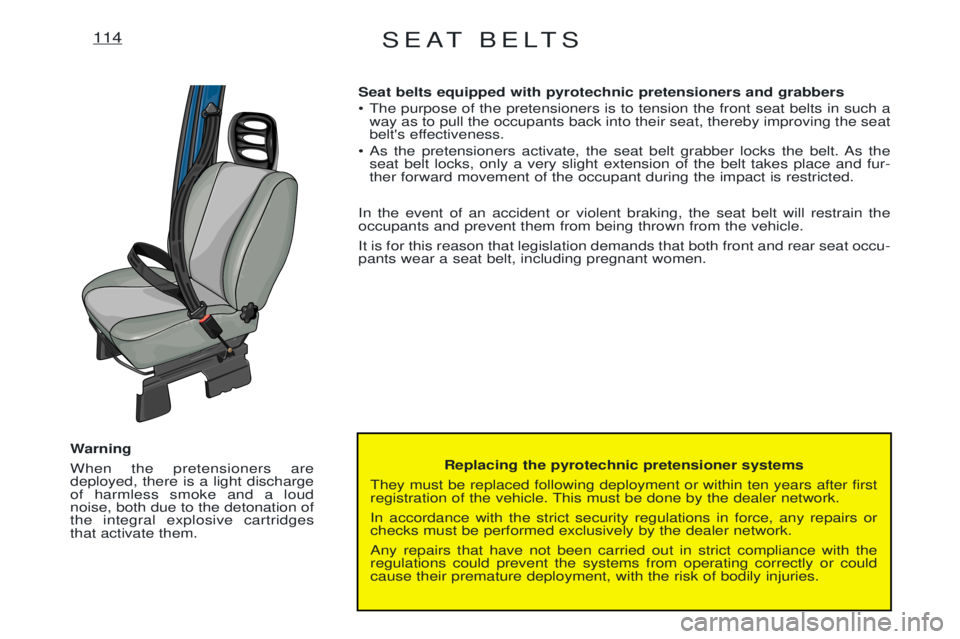
¥ The purpose of the pretensioners is to tension the front seat belts in such a
way as to pull the occupants back into their seat, thereby improving the seat
belt's effectiveness.
¥ As the pretensioners activate, the seat belt grabber locks the belt. As the seat belt locks, only a very slight extension of the belt takes place and fur-ther forward movement of the occupant during the impact is restricted.
In the event of an accident or violent braking, the seat belt will restrain theoccupants and prevent them from being thrown from the vehicle. It is for this reason that legislation demands that both front and rear seat occu- pants wear a seat belt, including pregnant women.
Page 60 of 127
SEAT BELTS115
- Make all seat belt adjustments when the vehicle is stationary.
- Do not allow the seat belt to rest on any hard or breakable objectsin your pockets.
- Do not use any type of clip or clamp which would prevent the seat belt from tensioning correctly.
- Never use the same seat belt for more than one occupant.
- Never carry a child on your lap.
- Check the seat belts and attachments regularly for cleanliness.
- Have the seat belts checked periodically by your dealer, especially after an accident (even if only minor).
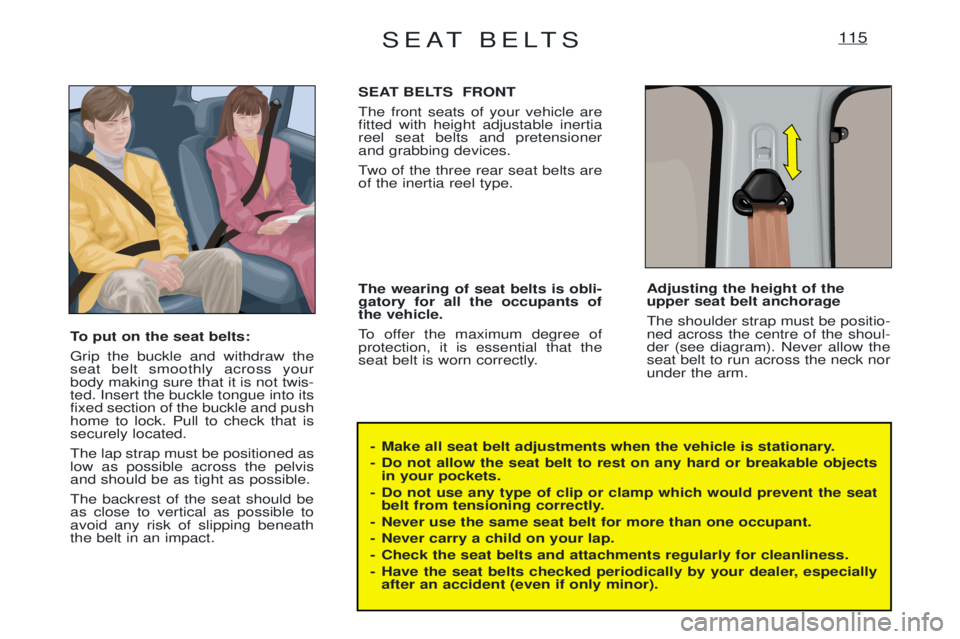
To put on the seat belts: Grip the buckle and withdraw the seat belt smoothly across yourbody making sure that it is not twis-ted. Insert the buckle tongue into itsfixed section of the buckle and pushhome to lock. Pull to check that issecurely located. The lap strap must be positioned as low as possible across the pelvisand should be as tight as possible. The backrest of the seat should be as close to vertical as possible toavoid any risk of slipping beneaththe belt in an impact. SEAT BELTS FRONT The front seats of your vehicle are fitted with height adjustable inertiareel seat belts and pretensionerand grabbing devices.
Two of the three rear seat belts are of the inertia reel type. The wearing of seat belts is obli- gatory for all the occupants ofthe vehicle.
To offer the maximum degree of protection, it is essential that the
seat belt is worn correctly.
Adjusting the height of theupper seat belt anchorage The shoulder strap must be positio- ned across the centre of the shoul-der (see diagram). Never allow theseat belt to run across the neck norunder the arm.