PEUGEOT EXPERT 2018 Owners Manual
Manufacturer: PEUGEOT, Model Year: 2018, Model line: EXPERT, Model: PEUGEOT EXPERT 2018Pages: 416, PDF Size: 14.12 MB
Page 91 of 416
89
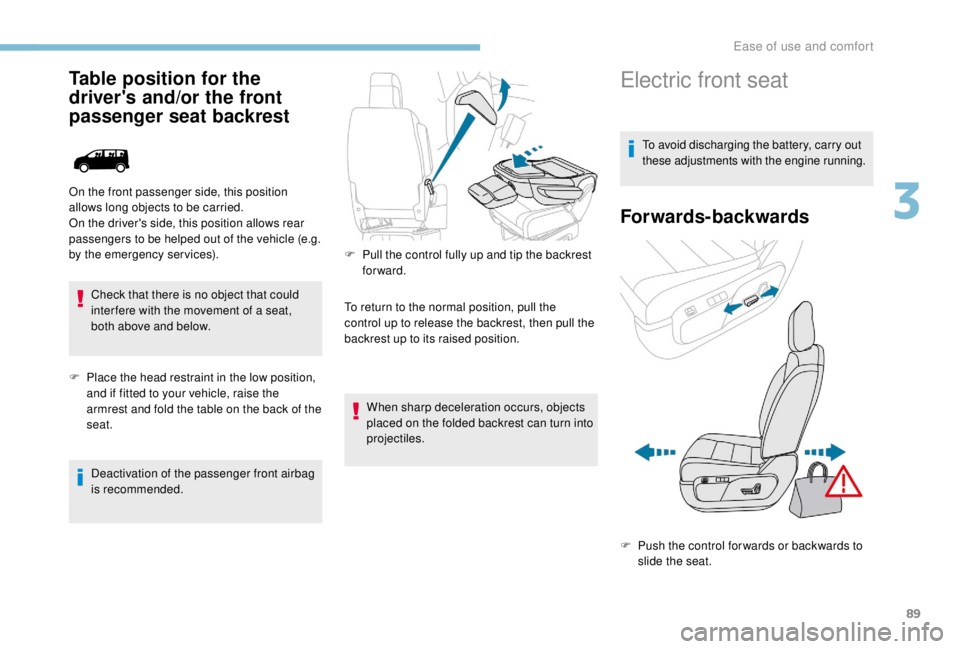
Table position for the
driver's and/or the front
passenger seat backrest
Check that there is no object that could
inter fere with the movement of a seat,
both above and below.
F
P
lace the head restraint in the low position,
and if fitted to your vehicle, raise the
armrest and fold the table on the back of the
seat.
Deactivation of the passenger front airbag
is recommended.
On the front passenger side, this position
allows long objects to be carried.
On the driver's side, this position allows rear
passengers to be helped out of the vehicle (e.g.
by the emergency services).
F
P
ull the control fully up and tip the backrest
forward.
To return to the normal position, pull the
control up to release the backrest, then pull the
backrest up to its raised position.
When sharp deceleration occurs, objects
placed on the folded backrest can turn into
projectiles.
Electric front seat
To avoid discharging the battery, carry out
these adjustments with the engine running.
Forwards-backwards
F Push the control for wards or backwards to slide the seat.
3
Ease of use and comfort
Page 92 of 416
90
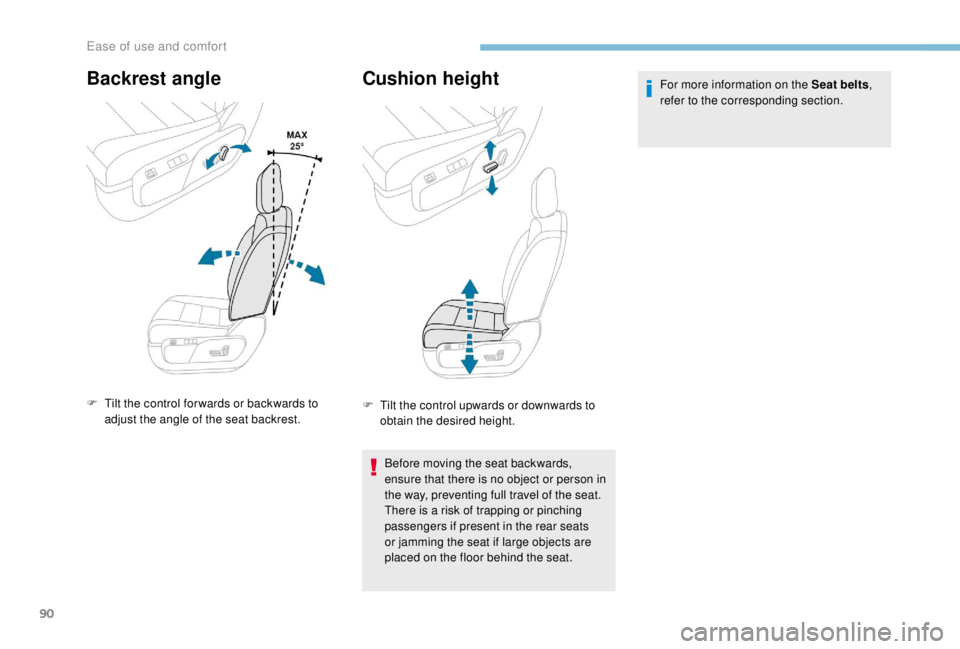
Backrest angle
F Tilt the control for wards or backwards to adjust the angle of the seat backrest.
Cushion height
F Tilt the control upwards or downwards to obtain the desired height.
Before moving the seat backwards,
ensure that there is no object or person in
the way, preventing full travel of the seat.
There is a risk of trapping or pinching
passengers if present in the rear seats
or jamming the seat if large objects are
placed on the floor behind the seat. For more information on the Seat belts
,
refer to the corresponding section.
Ease of use and comfort
Page 93 of 416
91
Additional adjustments
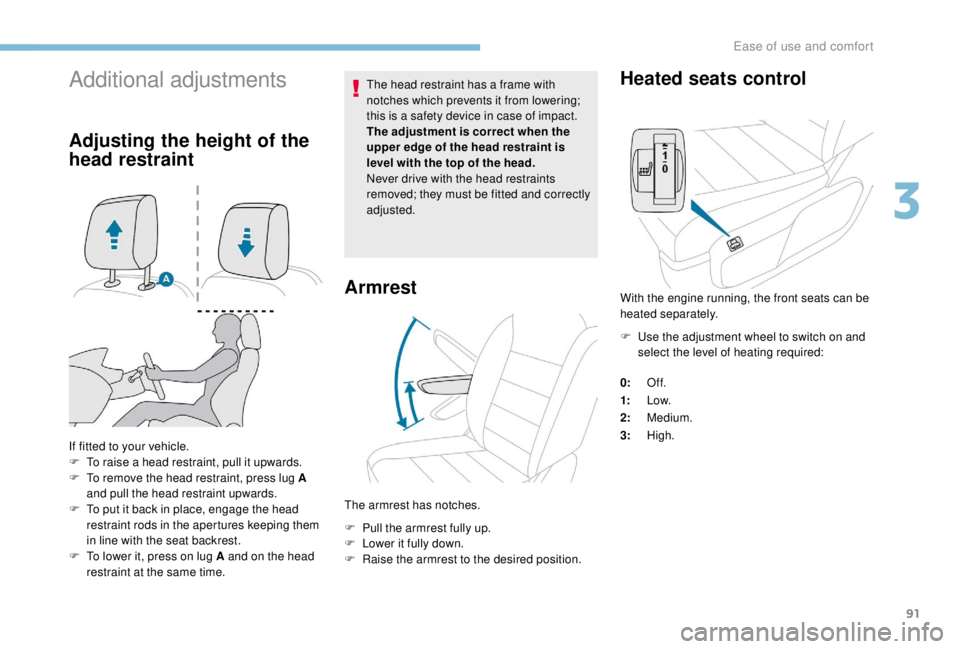
Adjusting the height of the
head restraint
If fitted to your vehicle.
F T o raise a head restraint, pull it upwards.
F
T
o remove the head restraint, press lug A
and pull the head restraint upwards.
F
T
o put it back in place, engage the head
restraint rods in the apertures keeping them
in line with the seat backrest.
F
T
o lower it, press on lug A and on the head
restraint at the same time. The head restraint has a frame with
notches which prevents it from lowering;
this is a safety device in case of impact.
The adjustment is correct when the
upper edge of the head restraint is
level with the top of the head.
Never drive with the head restraints
removed; they must be fitted and correctly
adjusted.
Armrest
The armrest has notches.
F
P
ull the armrest fully up.
F
L
ower it fully down.
F
R
aise the armrest to the desired position.
Heated seats control
With the engine running, the front seats can be
heated separately.
F
U
se the adjustment wheel to switch on and
select the level of heating required:
0: Of f.
1: Low.
2: Medium.
3: High.
3
Ease of use and comfort
Page 94 of 416
92
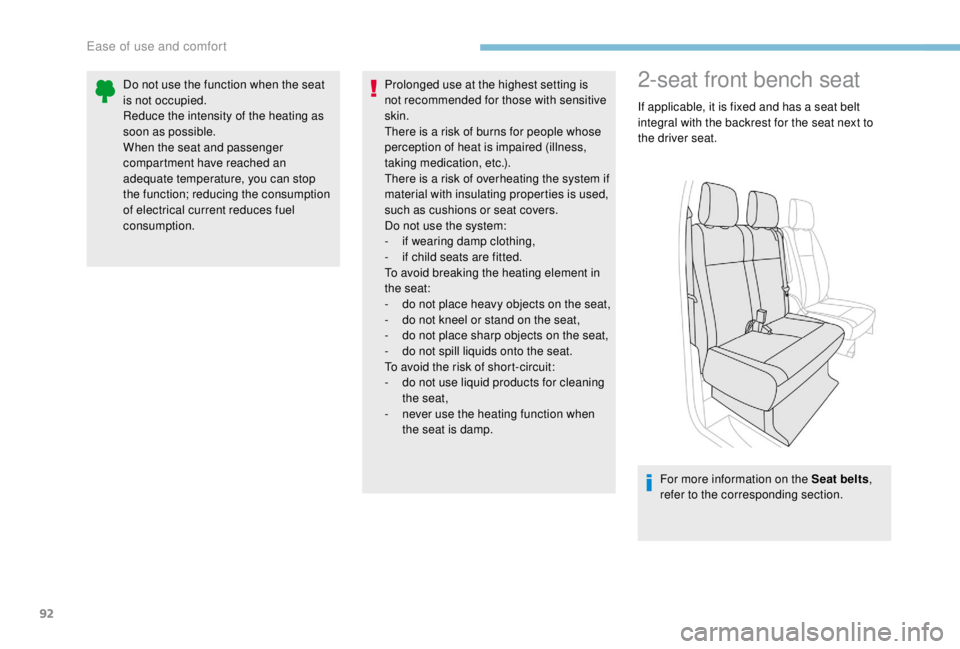
2-seat front bench seat
If applicable, it is fixed and has a seat belt
integral with the backrest for the seat next to
the driver seat.For more information on the Seat belts ,
refer to the corresponding section.
Do not use the function when the seat
is not occupied.
Reduce the intensity of the heating as
soon as possible.
When the seat and passenger
compartment have reached an
adequate temperature, you can stop
the function; reducing the consumption
of electrical current reduces fuel
consumption.
Prolonged use at the highest setting is
not recommended for those with sensitive
skin.
There is a risk of burns for people whose
perception of heat is impaired (illness,
taking medication, etc.).
There is a risk of overheating the system if
material with insulating properties is used,
such as cushions or seat covers.
Do not use the system:
-
i
f wearing damp clothing,
-
i
f child seats are fitted.
To avoid breaking the heating element in
the seat:
-
d
o not place heavy objects on the seat,
-
d
o not kneel or stand on the seat,
-
d
o not place sharp objects on the seat,
-
d
o not spill liquids onto the seat.
To avoid the risk of short-circuit:
-
d
o not use liquid products for cleaning
the seat,
-
n
ever use the heating function when
the seat is damp.
Ease of use and comfort
Page 95 of 416
93
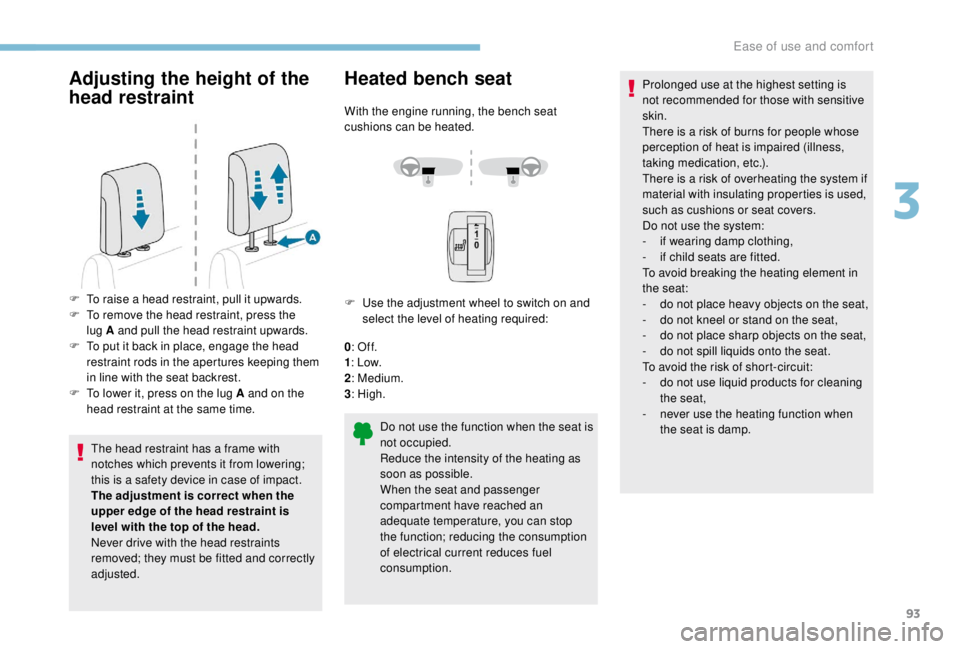
Adjusting the height of the
head restraint
The head restraint has a frame with
notches which prevents it from lowering;
this is a safety device in case of impact.
The adjustment is correct when the
upper edge of the head restraint is
level with the top of the head.
Never drive with the head restraints
removed; they must be fitted and correctly
adjusted.
Heated bench seat
With the engine running, the bench seat
cushions can be heated.
F
U
se the adjustment wheel to switch on and
select the level of heating required:
0 : Of f.
1 : Low.
2 : Medium.
3 : High.
F
T
o raise a head restraint, pull it upwards.
F
T
o remove the head restraint, press the
lug A and pull the head restraint upwards.
F
T
o put it back in place, engage the head
restraint rods in the apertures keeping them
in line with the seat backrest.
F
T
o lower it, press on the lug A and on the
head restraint at the same time.
Do not use the function when the seat is
not occupied.
Reduce the intensity of the heating as
soon as possible.
When the seat and passenger
compartment have reached an
adequate temperature, you can stop
the function; reducing the consumption
of electrical current reduces fuel
consumption.Prolonged use at the highest setting is
not recommended for those with sensitive
skin.
There is a risk of burns for people whose
perception of heat is impaired (illness,
taking medication, etc.).
There is a risk of overheating the system if
material with insulating properties is used,
such as cushions or seat covers.
Do not use the system:
-
i
f wearing damp clothing,
-
i
f child seats are fitted.
To avoid breaking the heating element in
the seat:
-
d
o not place heavy objects on the seat,
-
d
o not kneel or stand on the seat,
-
d
o not place sharp objects on the seat,
-
d
o not spill liquids onto the seat.
To avoid the risk of short-circuit:
-
d
o not use liquid products for cleaning
the seat,
-
n
ever use the heating function when
the seat is damp.
3
Ease of use and comfort
Page 96 of 416
94
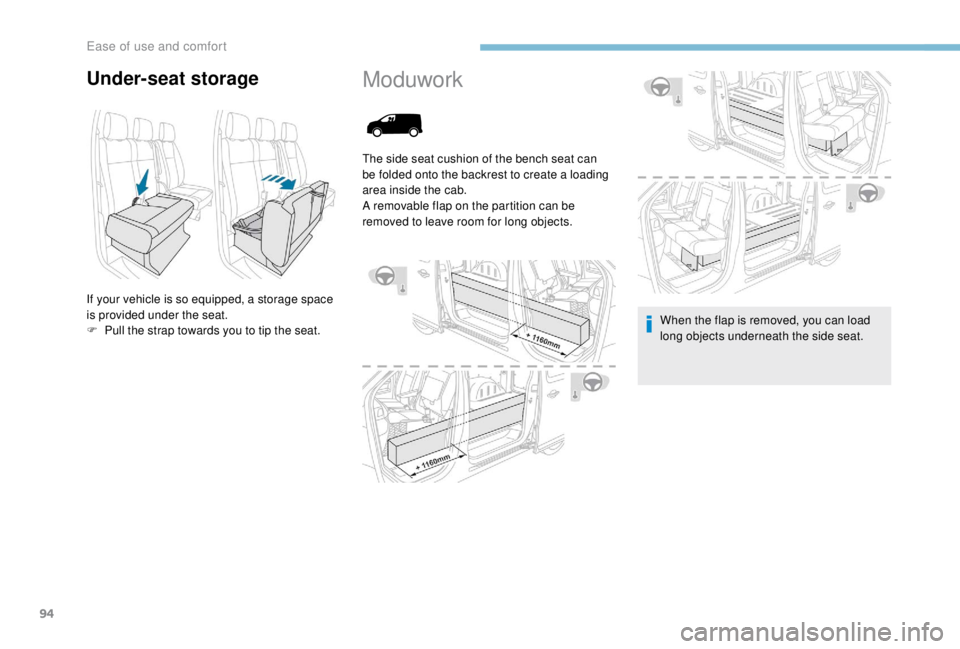
Under-seat storage
If your vehicle is so equipped, a storage space
is provided under the seat.
F
P
ull the strap towards you to tip the seat.
Moduwork
The side seat cushion of the bench seat can
be folded onto the backrest to create a loading
area inside the cab.
A removable flap on the partition can be
removed to leave room for long objects.
When the flap is removed, you can load
long objects underneath the side seat.
Ease of use and comfort
Page 97 of 416
95
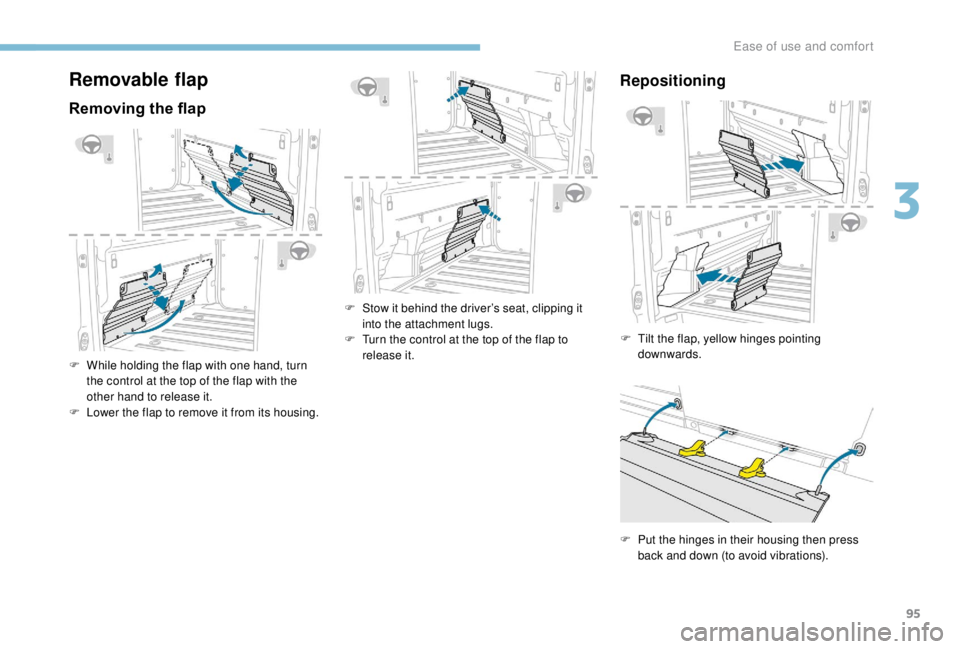
Removable flap
Removing the flap
F While holding the flap with one hand, turn the control at the top of the flap with the
other hand to release it.
F
L
ower the flap to remove it from its housing. F
S
tow it behind the driver’s seat, clipping it
into the attachment lugs.
F
T
urn the control at the top of the flap to
release it.
Repositioning
F Tilt the flap, yellow hinges pointing downwards.
F
P
ut the hinges in their housing then press
back and down (to avoid vibrations).
3
Ease of use and comfort
Page 98 of 416
96
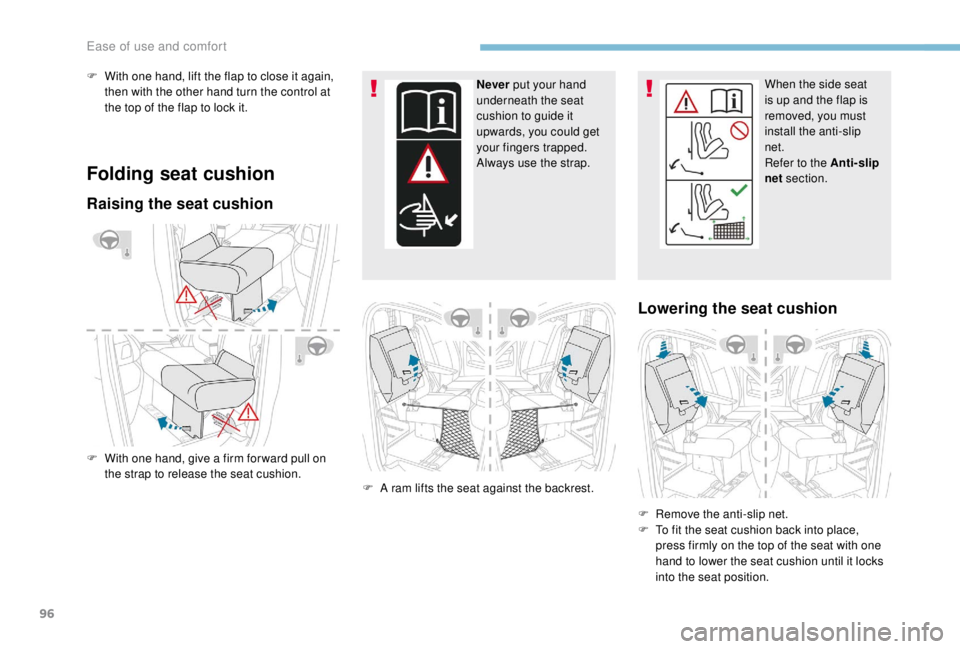
Folding seat cushion
Raising the seat cushion
F With one hand, give a firm for ward pull on the strap to release the seat cushion. Never put your hand
underneath the seat
cushion to guide it
upwards, you could get
your fingers trapped.
Always use the strap.
F
A r
am lifts the seat against the backrest.
F
W
ith one hand, lift the flap to close it again,
then with the other hand turn the control at
the top of the flap to lock it. When the side seat
is up and the flap is
removed, you must
install the anti-slip
net.
Refer to the Anti-slip
net
section.
Lowering the seat cushion
F Remove the anti-slip net.
F
T o fit the seat cushion back into place,
press firmly on the top of the seat with one
hand to lower the seat cushion until it locks
into the seat position.
Ease of use and comfort
Page 99 of 416
97
Anti-slip net
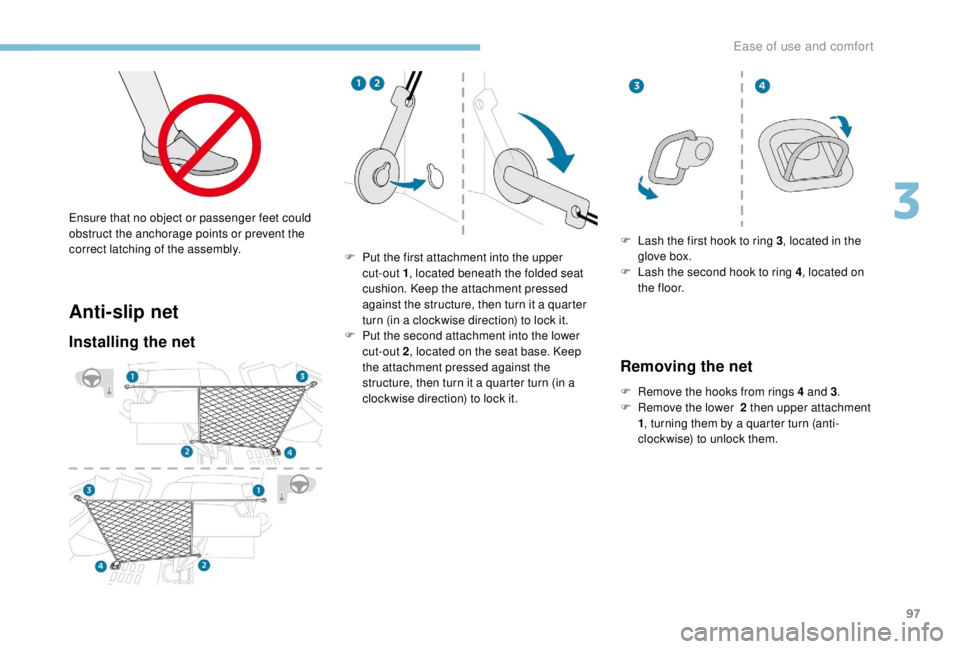
Installing the net
F Put the first attachment into the upper cut-out 1 , located beneath the folded seat
cushion. Keep the attachment pressed
against the structure, then turn it a quarter
turn (in a clockwise direction) to lock it.
F
P
ut the second attachment into the lower
cut-out 2 , located on the seat base. Keep
the attachment pressed against the
structure, then turn it a quarter turn (in a
clockwise direction) to lock it.
Ensure that no object or passenger feet could
obstruct the anchorage points or prevent the
correct latching of the assembly.
F
L
ash the first hook to ring 3
, located in the
glove box.
F L ash the second hook to ring 4, located on
t h e f l o o r.
Removing the net
F Remove the hooks from rings 4 and 3.
F R emove the lower 2 then upper attachment
1 , turning them by a quarter turn (anti-
clockwise) to unlock them.
3
Ease of use and comfort
Page 100 of 416
98
Make sure that the size, shape and
volume of the loads inside the vehicle are
compatible with the highway code and
safety regulations and do not impair the
driver’s field of vision.
All loads must be appropriately secured
to prevent or minimise displacement and
prevent injury risks.
Install the anti-slip net (delivered with the
vehicle) when the seat is raised and the
partition flap removed.
Never use the net for any other
applications.
Regularly check the condition of the
net. When signs of wear or tear appear,
contact a PEUGEOT dealer to have
it replaced by a net that meets the
specifications required by PEUGEOT for
your vehicle.
Always fit the removable flap back into
place when you are not carrying any long
loads."Swivelling writing table"
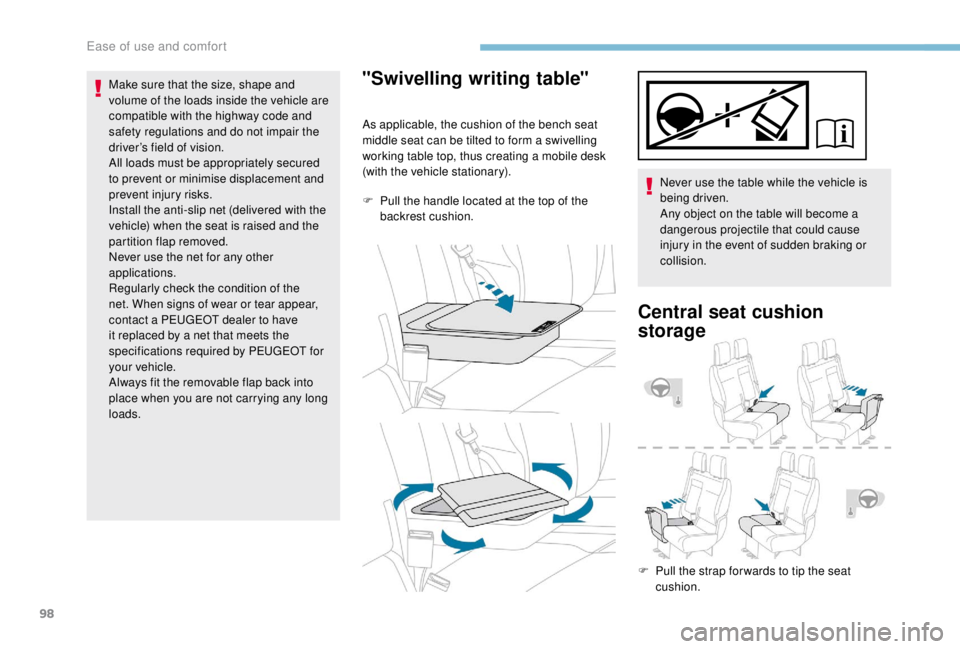
As applicable, the cushion of the bench seat
middle seat can be tilted to form a swivelling
working table top, thus creating a mobile desk
(with the vehicle stationary).
F
P
ull the handle located at the top of the
backrest cushion. Never use the table while the vehicle is
being driven.
Any object on the table will become a
dangerous projectile that could cause
injury in the event of sudden braking or
collision.
Central seat cushion
storage
F Pull the strap for wards to tip the seat
cushion.
Ease of use and comfort