Jack Peugeot Expert 2019 Owner's Manual
[x] Cancel search | Manufacturer: PEUGEOT, Model Year: 2019, Model line: Expert, Model: Peugeot Expert 2019Pages: 324, PDF Size: 13.07 MB
Page 6 of 324
4
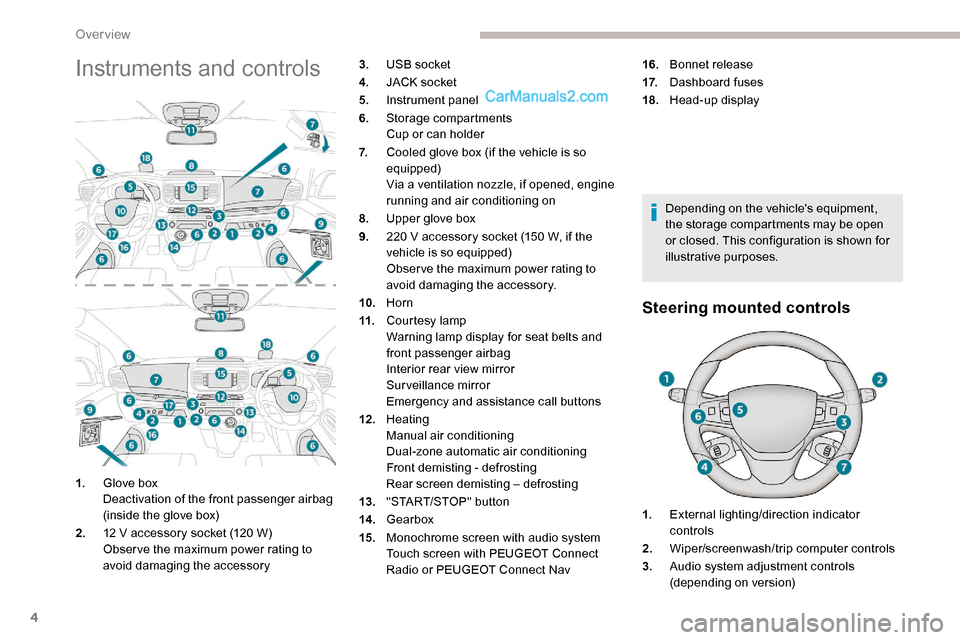
Instruments and controls
Depending on the vehicle's equipment,
the storage compartments may be open
or closed. This configuration is shown for
illustrative purposes.
Steering mounted controls
1.Glove box
Deactivation of the front passenger airbag
(inside the glove box)
2. 12 V accessory socket (120 W)
Obser ve the maximum power rating to
avoid damaging the accessory 3.
USB socket
4. JACK socket
5. Instrument panel
6. Storage compartments
Cup or can holder
7. Cooled glove box (if the vehicle is so
equipped)
Via a ventilation nozzle, if opened, engine
running and air conditioning on
8. Upper glove box
9. 220 V accessory socket (150 W, if the
vehicle is so equipped)
Obser ve the maximum power rating to
avoid damaging the accessory.
10. Horn
11. Courtesy lamp
Warning lamp display for seat belts and
front passenger airbag
Interior rear view mirror
Surveillance mirror
Emergency and assistance call buttons
12 . Heating
Manual air conditioning
Dual-zone automatic air conditioning
Front demisting - defrosting
Rear screen demisting – defrosting
13. "START/STOP" button
14 . Gearbox
15. Monochrome screen with audio system
Touch screen with PEUGEOT Connect
Radio or PEUGEOT Connect Nav 16.
Bonnet release
17. Dashboard fuses
18. Head-up display
1. External lighting/direction indicator
controls
2. Wiper/screenwash/trip computer controls
3. Audio system adjustment controls
(depending on version)
Over view
Page 80 of 324
78
When the USB socket is used, the
portable device charges automatically.
While charging, a message is displayed
if the power consumption of the portable
device exceeds the amperage supplied by
the vehicle.
For more information on the use of this
equipment, refer to the Audio equipment
and telematics section.
JACK socket
This allows the connection of a portable device
for listening to audio files via the vehicle's
speakers.
The files are managed using the portable
device.
For more details on how to use this
equipment, refer to the Audio equipment
and telematics section.
220 V socket
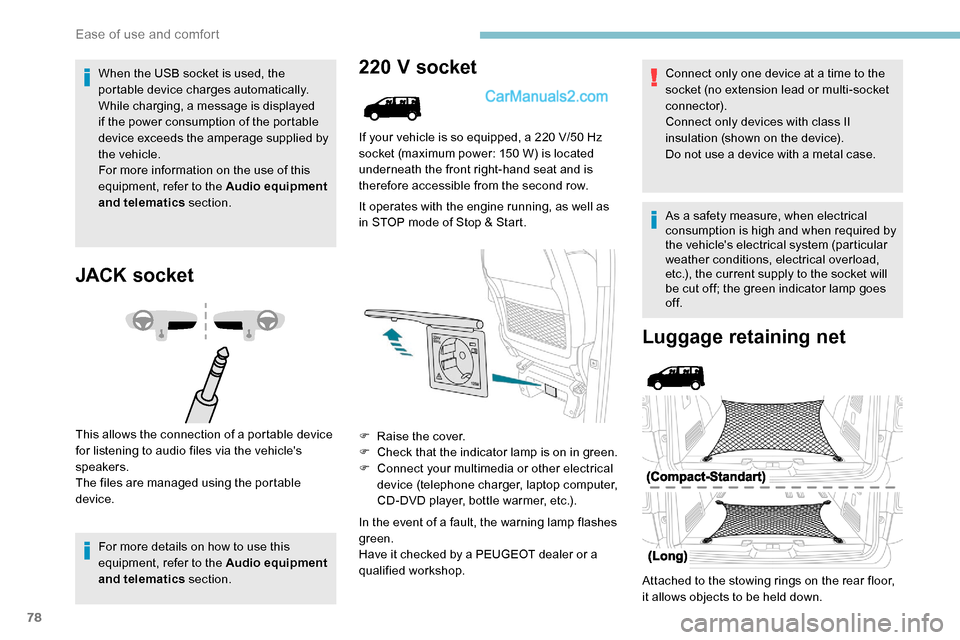
If your vehicle is so equipped, a 220 V/50 Hz
socket (maximum power: 150 W) is located
underneath the front right-hand seat and is
therefore accessible from the second row.
It operates with the engine running, as well as
in STOP mode of Stop & Start.
F
Ra
ise the cover.
F
C
heck that the indicator lamp is on in green.
F
C
onnect your multimedia or other electrical
device (telephone charger, laptop computer,
CD-DVD player, bottle warmer, etc.).
In the event of a fault, the warning lamp flashes
green.
Have it checked by a PEUGEOT dealer or a
qualified workshop.
Luggage retaining net
Attached to the stowing rings on the rear floor,
it allows objects to be held down. Connect only one device at a time to the
socket (no extension lead or multi-socket
connector).
Connect only devices with class II
insulation (shown on the device).
Do not use a device with a metal case.
As a safety measure, when electrical
consumption is high and when required by
the vehicle's electrical system (particular
weather conditions, electrical overload,
etc.), the current supply to the socket will
be cut off; the green indicator lamp goes
of f.
Ease of use and comfort
Page 208 of 324
206
Be careful of fluid discharge.
The expiry date of the fluid is indicated on
the cartridge.
The sealant cartridge is designed for
single use; it must be replaced even if only
partly used.
After use, do not discard the cartridge into
the environment, take it to an authorised
waste disposal site or a PEUGEOT dealer.
Do not forget to obtain a new sealant
cartridge, available from PEUGEOT
dealers or from a qualified workshop.
Spare wheel
Scan the QR code on page 3 to view
explanatory videos.
Procedure for changing a damaged wheel with
the spare wheel using the tools provided with
the vehicle.
Access to the tools
The tools are stowed in a tool box. For more information on the Tool box ,
refer to the corresponding section.
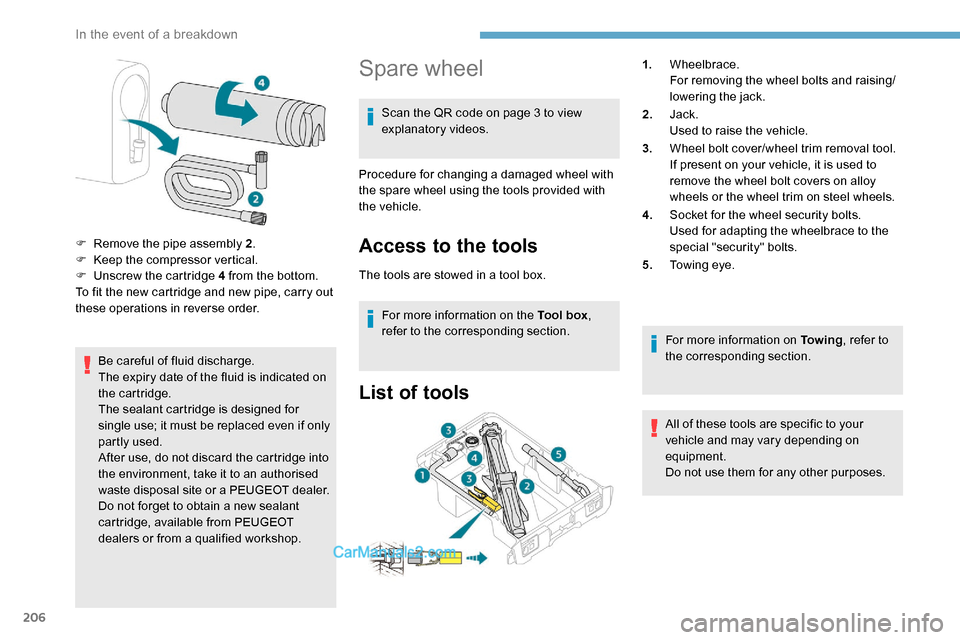
List of tools
For more information on To w i n g , refer to
the corresponding section.
All of these tools are specific to your
vehicle and may vary depending on
equipment.
Do not use them for any other purposes.
F
R
emove the pipe assembly 2
.
F
K
eep the compressor vertical.
F
U
nscrew the cartridge 4 from the bottom.
To fit the new cartridge and new pipe, carry out
these operations in reverse order. 1.
Wheelbrace.
For removing the wheel bolts and raising/
lowering the jack.
2. Jack.
Used to raise the vehicle.
3. Wheel bolt cover/wheel trim removal tool.
If present on your vehicle, it is used to
remove the wheel bolt covers on alloy
wheels or the wheel trim on steel wheels.
4. Socket for the wheel security bolts.
Used for adapting the wheelbrace to the
special "security" bolts.
5. Towing eye.
In the event of a breakdown
Page 209 of 324
207
The jack must only be used to change
a wheel with a damaged or punctured tyre.
Do not use any jack other than the one
supplied with this vehicle.
If the vehicle does not have its original
jack, contact a PEUGEOT dealer or a
qualified workshop to obtain the correct
jack for it.
The jack meets European standards,
as defined in the Machinery Directive
2006/42/CE.
The jack does not require any
maintenance.
Access to the spare wheel
F Access to the spare wheel is from the rear.
F D epending on version, open the side-
hinged doors or the tailgate.
To avoid any unwanted opening of the
electric side door(s), deactivate the
Hands-Free Access function in the vehicle
configuration menu.
For more information on the Hands-
Free Sliding Side Door , refer to the
corresponding section. F
I
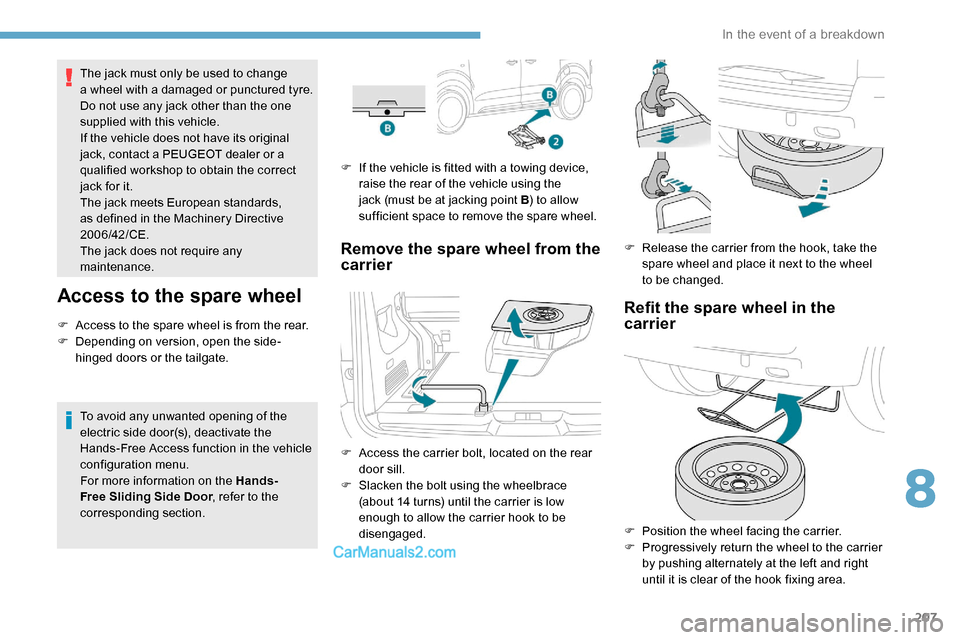
f the vehicle is fitted with a towing device,
raise the rear of the vehicle using the
jack (must be at jacking point B ) to allow
sufficient space to remove the spare wheel.
Remove the spare wheel from the
carrier
F Access the carrier bolt, located on the rear door sill.
F
S
lacken the bolt using the wheelbrace
(about 14 turns) until the carrier is low
enough to allow the carrier hook to be
disengaged. F
R
elease the carrier from the hook, take the
spare wheel and place it next to the wheel
to be changed.
Refit the spare wheel in the
carrier
F Position the wheel facing the carrier.
F P rogressively return the wheel to the carrier
by pushing alternately at the left and right
until it is clear of the hook fixing area.
8
In the event of a breakdown
Page 210 of 324
208
Tyre in the carrier
If you want to change the size of the tyre on the
spare wheel, follow the instructions below.A punctured tyre of size 215 or 225 can be
placed in the carrier.
Removing a wheel
Parking the vehicle
Immobilise the vehicle where it does not
block traffic: the ground must be level,
stable and non-slippery.
With a manual gearbox, engage first gear
then switch off the ignition to block the
wheels.
With an automatic gearbox, place the gear
selector in position
P then switch off the
ignition to block the wheels.
With an electronic gearbox, place the gear
selector in position
A then switch off the
ignition to block the wheels.
Apply the parking brake and check that
the warning lamp is on in the instrument
panel.
The occupants must get out of the vehicle
and wait where they are safe.
Never go underneath a vehicle raised
using a jack; use an axle stand.
F
E
ngage the carrier on the hook, then tighten
the bolt using the wheelbrace until the bolt
is fully tightened.
Original tyre size Compact-
Standard Long
215/65 R16 Placing a
225 wheel in the carrier is prohibited.
There is no restriction.
215/60 R17
215/60 R17 M&S
2 2 5 / 5 5 R17
Placing a 215 wheel in the
carrier is not
recommended
(risk of noise).
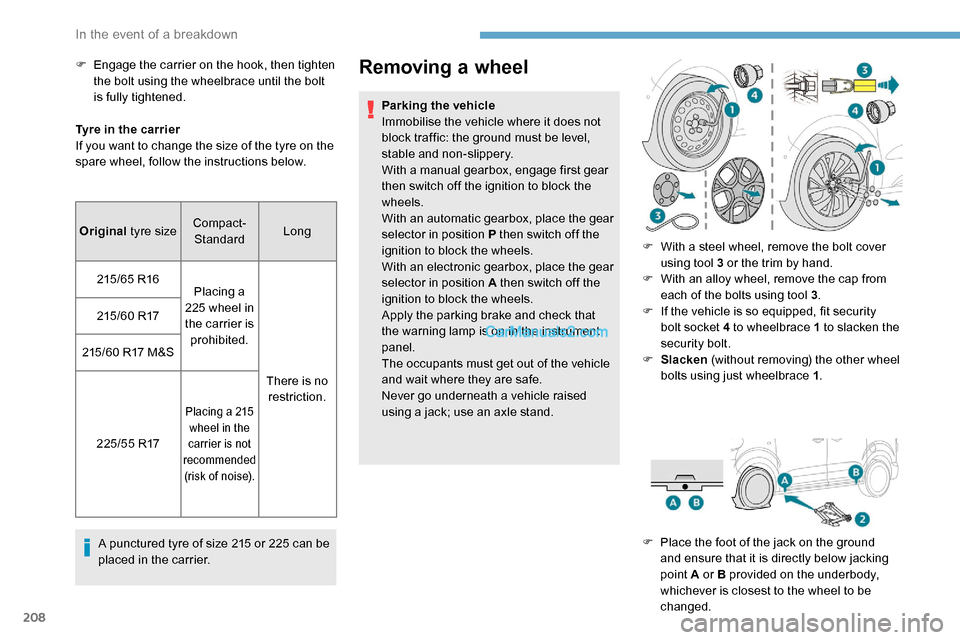
F With a steel wheel, remove the bolt cover using tool 3 or the trim by hand.
F
W
ith an alloy wheel, remove the cap from
each of the bolts using tool
3.
F
I
f the vehicle is so equipped, fit security
bolt socket
4 to wheelbrace 1 to slacken the
security bolt.
F
S
lacken (without removing) the other wheel
bolts using just wheelbrace
1.
F
P
lace the foot of the jack on the ground
and ensure that it is directly below jacking
point
A or B provided on the underbody,
whichever is closest to the wheel to be
changed.
In the event of a breakdown
Page 211 of 324
209
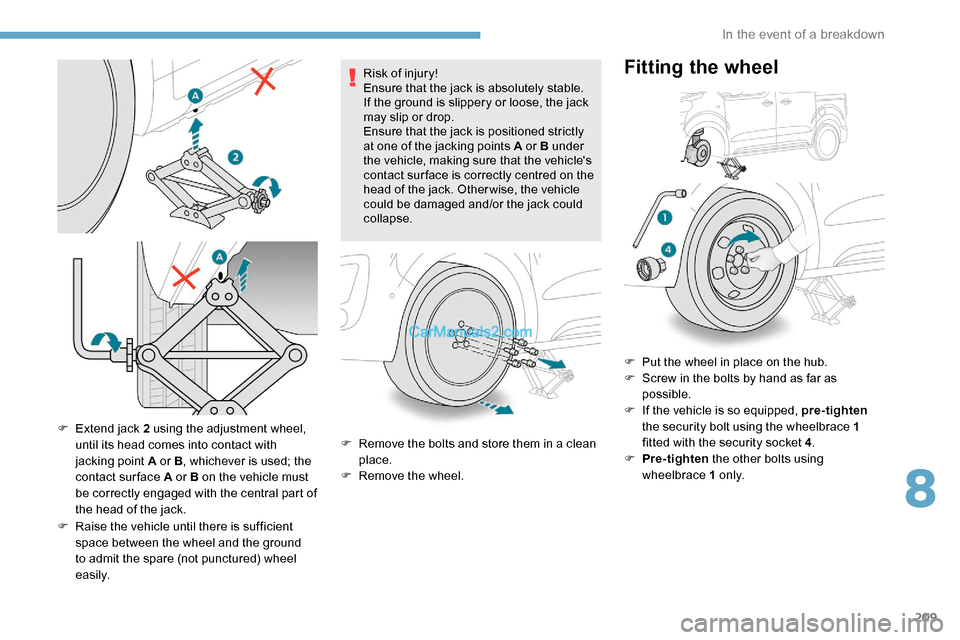
F Extend jack 2 using the adjustment wheel,
until its head comes into contact with
jacking point
A or B, whichever is used; the
contact sur face
A or B on the vehicle must
be correctly engaged with the central part of
the head of the jack.
F
Ra
ise the vehicle until there is sufficient
space between the wheel and the ground
to admit the spare (not punctured) wheel
easily. Risk of injury!
Ensure that the jack is absolutely stable.
If the ground is slippery or loose, the jack
may slip or drop.
Ensure that the jack is positioned strictly
at one of the jacking points
A or B under
the vehicle, making sure that the vehicle's
contact sur face is correctly centred on the
head of the jack. Otherwise, the vehicle
could be damaged and/or the jack could
collapse.
F R emove the bolts and store them in a clean
place.
F
R
emove the wheel.F
P
ut the wheel in place on the hub.
F
S
crew in the bolts by hand as far as
possible.
F
I
f the vehicle is so equipped, pre-tighten
the security bolt using the wheelbrace 1
fitted with the security socket 4 .
F
P
re-tighten the other bolts using
wheelbrace 1 o n l y.
Fitting the wheel
8
In the event of a breakdown
Page 212 of 324
210
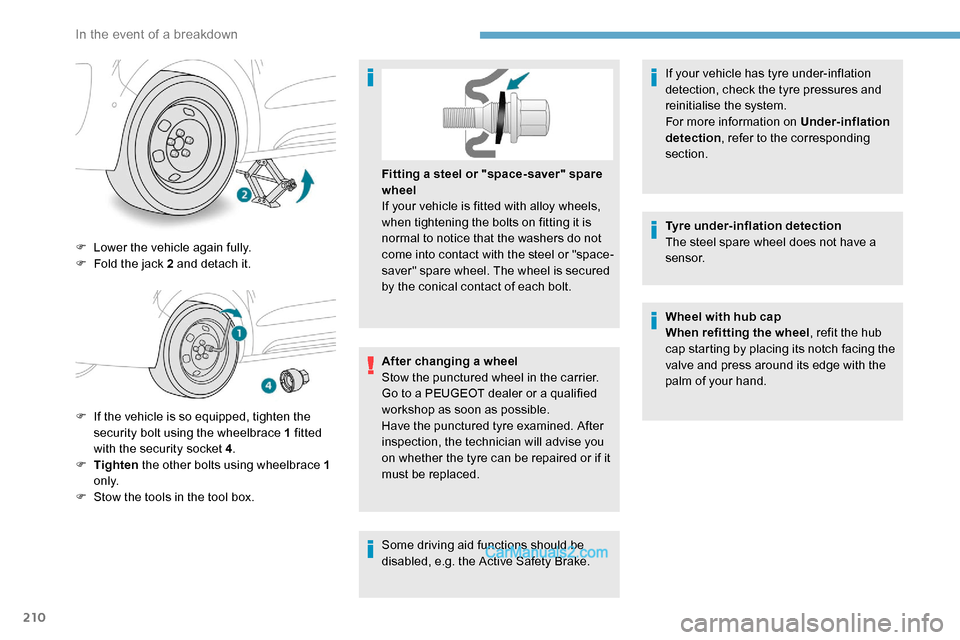
F Lower the vehicle again fully.
F F old the jack 2 and detach it.
F
I
f the vehicle is so equipped, tighten the
security bolt using the wheelbrace 1 fitted
with the security socket 4 .
F
T
ighten the other bolts using wheelbrace 1
o n l y.
F
S
tow the tools in the tool box. After changing a wheel
Stow the punctured wheel in the carrier.
Go to a PEUGEOT dealer or a qualified
workshop as soon as possible.
Have the punctured tyre examined. After
inspection, the technician will advise you
on whether the tyre can be repaired or if it
must be replaced. Fitting a steel or "space-saver" spare
wheel
If your vehicle is fitted with alloy wheels,
when tightening the bolts on fitting it is
normal to notice that the washers do not
come into contact with the steel or "space-
saver" spare wheel. The wheel is secured
by the conical contact of each bolt.
Some driving aid functions should be
disabled, e.g. the Active Safety Brake. If your vehicle has tyre under-inflation
detection, check the tyre pressures and
reinitialise the system.
For more information on Under-inflation
detection
, refer to the corresponding
section.
Tyre under-inflation detection
The steel spare wheel does not have a
sensor.
Wheel with hub cap
When refitting the wheel , refit the hub
cap starting by placing its notch facing the
valve and press around its edge with the
palm of your hand.
In the event of a breakdown
Page 242 of 324
8
- Repeat: the tracks played are only those
from the current album or folder.
Press this button to display the
contextual menu for the Media
function.
Press this button to select the
chosen play mode.
Press this button to confirm.
The choice made is displayed at the top of the
screen.
Choosing a track to play
Press one of these buttons to go to
the previous / next track.
Press one of these buttons to go to
the previous / next folder.
File classification
Make a long press on this button to
display the different classifications. Select by "
Folder" / "Artist " /
" Genre " / "Playlist ".
Depending on availability and type
of device used.
Press OK to select the desired
classification, then press OK again
to confirm.
Playing files
Make a short press on this button to
display the chosen classification.
Navigate in the list using the left /
right and up / down buttons.
Confirm the selection by pressing
OK.
Press one of these buttons to go to
the previous / next track in the list.
Press and hold one of these buttons
for fast for ward or rewind.
Press one of these buttons to go
to the previous / next " Folder" /
" Artist " / "Genre " / "Playlist "* in
the list.
Auxiliary socket (AUX)
(depending on model / depending on
equipment)
*
D
epending on availability and the type of
device used. Connect a portable device (MP3 player, etc.)
to the Jack socket using an audio cable (not
supplied).
Any additional equipment connected to
the system must conform to the standard
of the product or standard IEC 60950 -1.
Press the SOURCE button several
times in succession and select
" AUX ".
First adjust the volume on your portable device
(to a high level). Then adjust the volume of your
audio system. Display and management of the
controls are via the portable device.
Do not connect a device to both the Jack
auxiliary socket and the USB port at the
same time.
Bluetooth® audio system
Page 260 of 324
8
Press Radio Media to display the
primary page.
Press the " OPTIONS" button to go to the
secondary page.
Activate/deactivate " FM- DAB
tracking ".
Press in the grey zone to confirm.
If "FM-DAB tracking" is activated, there
may be a difference of a few seconds
when the system switches to FM analogue
radio with sometimes a variation in
volume.
Once the digital signal quality is restored,
the system automatically changes back
to " DA B ".Media
USB socket
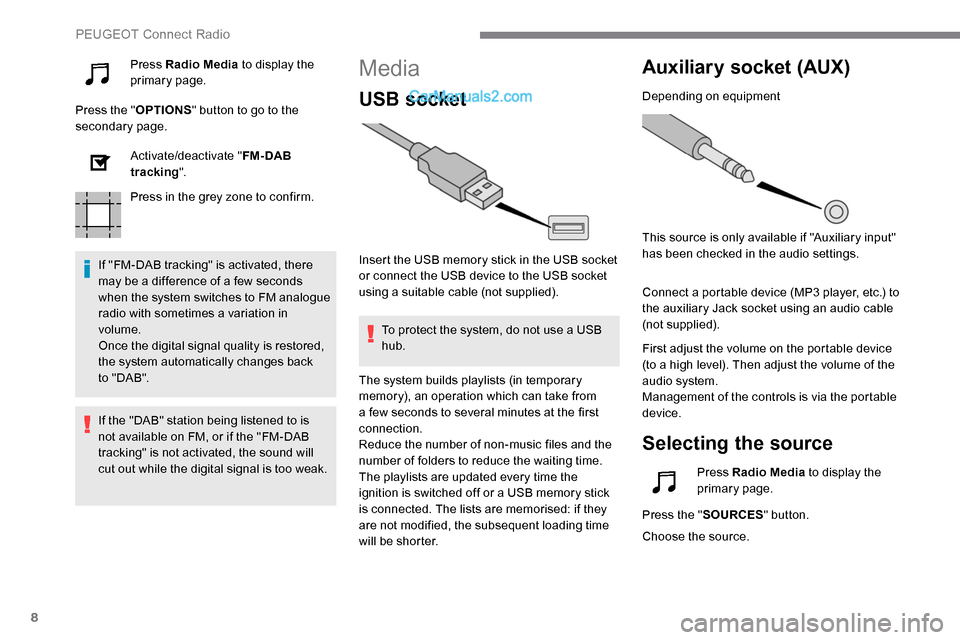
Insert the USB memory stick in the USB socket
or connect the USB device to the USB socket
using a suitable cable (not supplied). To protect the system, do not use a USB
hub.
Auxiliary socket (AUX)
Depending on equipment
This source is only available if "Auxiliary input"
has been checked in the audio settings.
Connect a portable device (MP3 player, etc.) to
the auxiliary Jack socket using an audio cable
(not supplied).
First adjust the volume on the portable device
(to a high level). Then adjust the volume of the
audio system.
Management of the controls is via the portable
device.
Selecting the source
If the "DAB" station being listened to is
not available on FM, or if the "FM-DAB
tracking" is not activated, the sound will
cut out while the digital signal is too weak. The system builds playlists (in temporary
memory), an operation which can take from
a few seconds to several minutes at the first
connection.
Reduce the number of non-music files and the
number of folders to reduce the waiting time.
The playlists are updated every time the
ignition is switched off or a USB memory stick
is connected. The lists are memorised: if they
are not modified, the subsequent loading time
will be shorter.
Press Radio Media
to display the
primary page.
Press the " SOURCES " button.
Choose the source.
PEUGEOT Connect Radio
Page 261 of 324
9
Bluetooth®streaming
Streaming allows you to listen to music from
your smartphone.
The Bluetooth profile must be activated, first
adjust the volume on the portable device (to a
high level).
Then adjust the volume of the system.
If play does not start automatically, it may be
necessary to start the audio playback from the
smartphone.
Control is from the portable device or by using
the system's touch buttons.Once connected in Streaming mode, the
smartphone is considered to be a media
source.
Connecting Apple® players
Connect the Apple® player to the USB socket
using a suitable cable (not supplied).
Play starts automatically.
Control is via the audio system. The classifications available are those of
the portable device connected (artists/
albums/genres/playlists/audio books/
podcasts). It is also possible to use a
classification structured in the form of a
library.
The default classification used is by artist.
To modify the classification used, return
to the first level of the menu then select
the desired classification (playlists for
example) and confirm to go down through
the menu to the desired track.
The version of software in the audio system
may not be compatible with the generation of
the Apple
® p l aye r. To protect the system, do not use a USB
hub.
The audio system will only play audio files
with ".wav", ".wma", ".aac", ".ogg" and ".mp3"
file extensions and with a bit rate of between
32
Kbps and 320 Kbps.
It also supports VBR (Variable Bit Rate) mode.
No other file types (".mp4", etc.) can be read.
Files of the ".wma" type should be to the wma
9 standard.
Sampling frequencies supported are 11, 22, 44
and 48 kHz.
Information and advice
The system supports USB mass storage
devices, BlackBerry® devices or Apple®
players via the USB sockets. The adapter
cable is not supplied.
Device management is via the audio
system controls.
Other devices, not recognised on
connection, must be connected to the
auxiliary socket using a Jack cable (not
supplied) or via Bluetooth streaming,
depending on compatibility.
.
PEUGEOT Connect Radio