washer Peugeot Expert 2019 Owner's Manual
[x] Cancel search | Manufacturer: PEUGEOT, Model Year: 2019, Model line: Expert, Model: Peugeot Expert 2019Pages: 324, PDF Size: 13.07 MB
Page 35 of 324
33
Unlocking/Complete or
selective unlocking
What is the purpose of
complete or selective
unlocking?
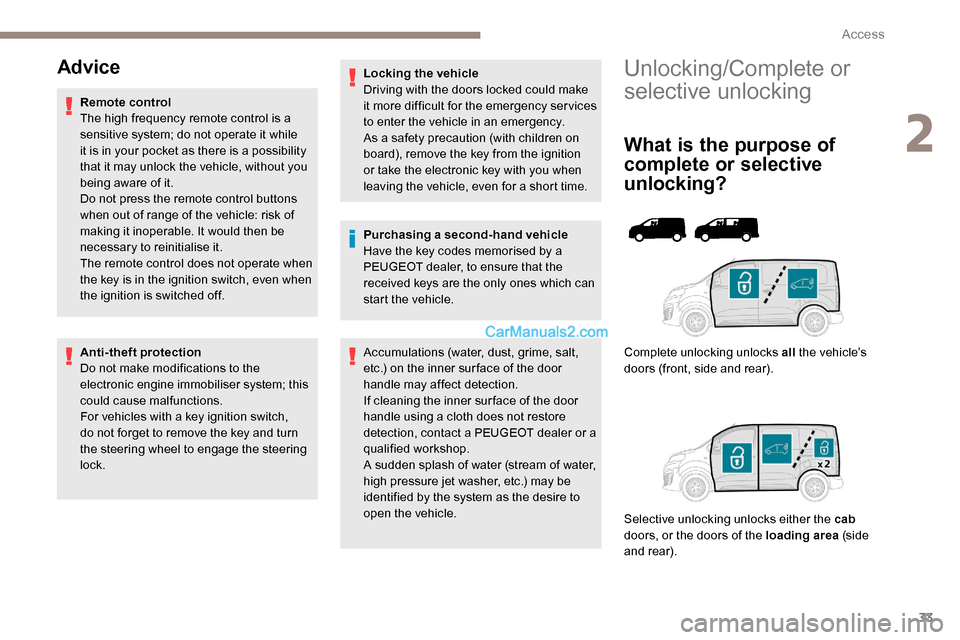
Complete unlocking unlocks all the vehicle’s
doors (front, side and rear).
Selective unlocking unlocks either the cab
doors, or the doors of the loading area (side
and rear).
Advice
Remote control
The high frequency remote control is a
sensitive system; do not operate it while
it is in your pocket as there is a possibility
that it may unlock the vehicle, without you
being aware of it.
Do not press the remote control buttons
when out of range of the vehicle: risk of
making it inoperable. It would then be
necessary to reinitialise it.
The remote control does not operate when
the key is in the ignition switch, even when
the ignition is switched off.
Anti-theft protection
Do not make modifications to the
electronic engine immobiliser system; this
could cause malfunctions.
For vehicles with a key ignition switch,
do not forget to remove the key and turn
the steering wheel to engage the steering
lock. Locking the vehicle
Driving with the doors locked could make
it more difficult for the emergency ser vices
to enter the vehicle in an emergency.
As a safety precaution (with children on
board), remove the key from the ignition
or take the electronic key with you when
leaving the vehicle, even for a short time.
Purchasing a second-hand vehicle
Have the key codes memorised by a
PEUGEOT dealer, to ensure that the
received keys are the only ones which can
start the vehicle.
Accumulations (water, dust, grime, salt,
etc.) on the inner sur face of the door
handle may affect detection.
If cleaning the inner sur face of the door
handle using a cloth does not restore
detection, contact a PEUGEOT dealer or a
qualified workshop.
A sudden splash of water (stream of water,
high pressure jet washer, etc.) may be
identified by the system as the desire to
open the vehicle.
2
Access
Page 93 of 324
91
Dual-zone automatic air
conditioning
F Press this button to demist or defrost the windscreen and side
windows as quickly as possible.
The system automatically manages the air
conditioning, air flow and air intake, and
provides optimum distribution towards the
windscreen and side windows. F
T
o turn it off, press this button
again or press “ AUTO”.
The system is reactivated with the values prior
to the deactivation.
Heated windscreen and
washer jets
Depending on country of sale.
This function heats the windscreen and washer
jets under cold conditions.
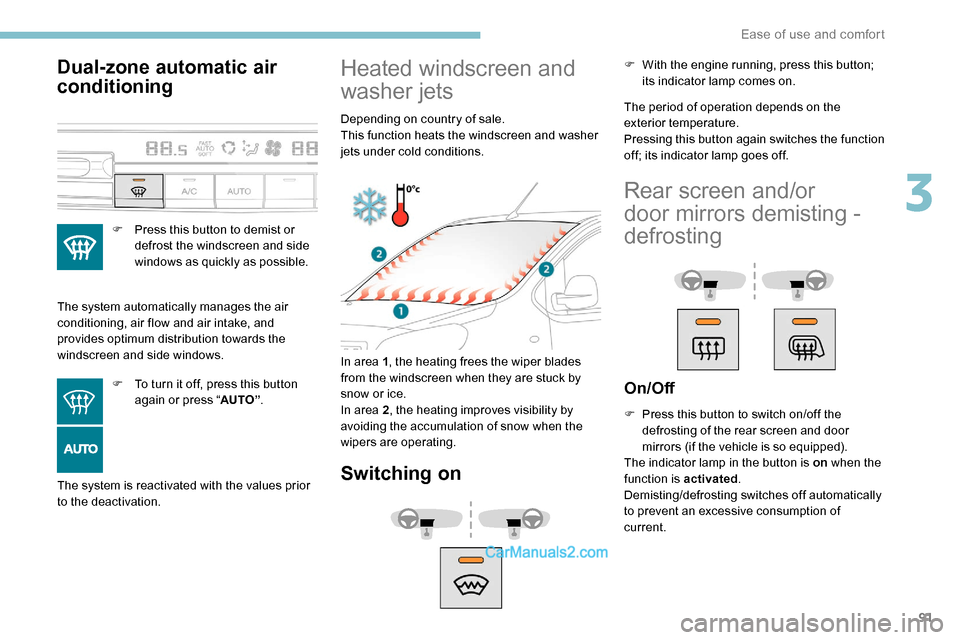
In area 1 , the heating frees the wiper blades
from the windscreen when they are stuck by
snow or ice.
In area 2 , the heating improves visibility by
avoiding the accumulation of snow when the
wipers are operating.
Switching on
The period of operation depends on the
exterior temperature.
Pressing this button again switches the function
off; its indicator lamp goes off. F
W
ith the engine running, press this button;
its indicator lamp comes on.
Rear screen and/or
door mirrors demisting -
defrosting
On/Off
F Press this button to switch on/off the defrosting of the rear screen and door
mirrors (if the vehicle is so equipped).
The indicator lamp in the button is on when the
function is activated .
Demisting/defrosting switches off automatically
to prevent an excessive consumption of
current.
3
Ease of use and comfort
Page 107 of 324
105
The screenwash then the windscreen wipers
operate for a pre-determined time.
The headlamp washers only operate when
the dipped beam headlamps are on and the
vehicle is moving.
With daytime running lamps on, to activate the
headlamp wash, position the lighting control
stalk in the dipped beam headlamps position.
On vehicles fitted with automatic air
conditioning, any action on the windscreen
wash control results in temporary closing
of the air intake to avoid odours inside the
passenger compartment.
Screenwash/headlamp wash
level low
For vehicles fitted with headlamp
washers, when the fluid reservoir
low level is reached, this warning
lamp comes on in the instrument
panel, accompanied by an audible
signal and a message.
It comes on when the ignition is switched on,
or every time the stalk is operated, until the
reservoir is refilled.
Next time you stop, refill the screenwash/
headlamp wash reservoir.
Special position of the
windscreen wipers
This maintenance position is used for cleaning
or replacement of the wiper blades. It can also
be useful, in winter (ice, snow), to release the
wiper blades from the windscreen.
To maintain the effectiveness of the flat
wiper blades, it is advisable to:
-
h
andle them with care,
-
c
lean them regularly using soapy
water,
-
a
void using them to retain cardboard
on the windscreen,
-
r
eplace them at the first signs of wear.
Before removing a front wiper
blade
F Within one minute of switching off the ignition, any operation of the wiper control
stalk will position the wiper blades vertically.
F
P
roceed with the desired operation or the
replacement of the wiper blades.
After refitting a front wiper blade
F To return the wiper blades to their initial position, switch on the ignition and operate
the wiper control stalk.
4
Lighting and visibility
Page 195 of 324
193
During the 30 minutes after topping up the
oil, the check per formed with the oil level
indicator in the instrument panel when the
ignition is switched on is not valid.
Brake fluid
The level of this fluid should be
close to the "MAX" mark. If not,
check the brake pad wear.
To know how often the brake fluid should be
replaced, refer to the manufacturer's servicing
schedule. If topping up, clean the cap before
replacing it. Use only DOT4 brake fluid
from a sealed canister.
F
A
dd more oil if necessary.
F
A
fter checking the level, carefully refit the oil
filler cap and the dipstick in its tube.
Power steering fluid
The level of this fluid should be
close to the " MAX" mark. With the
engine cold and the vehicle standing
on level ground, check this by
reading the level on the filler neck.
Engine coolant
Check the engine coolant level
regularly.
It is normal to top up this fluid
between two services.
The check and top-up must only be done with
the engine cold.
A low level presents a risk of serious damage
to the engine.
The level of this fluid should be close to the
" MAX " mark but should never exceed it.
If the level is close to or below the " MIN” mark,
it is essential to top up. Once the pressure has dropped, remove the
cap and top up to the required level.
Screen and headlamp
washer fluid
Top up the reser voir when you next
stop the vehicle.
Fluid specification
The fluid must be topped up with a ready-to-
use mixture.
In winter (temperatures below zero), a liquid
containing an agent to prevent freezing must
be used which is appropriate for the prevailing
conditions, in order to protect the elements of
the system (pump, tank, ducts, jets, etc.).
When the engine is hot, the temperature of this
fluid is regulated by the fan.
In addition, as the cooling system is
pressurised, wait at least one hour after
switching off the engine before carrying out any
work.
To avoid the risk of scalding if you need to top
up in an emergency, wrap a cloth around the
cap and unscrew the cap by two turns to allow
the pressure to drop. Filling with pure water is prohibited
under all circumstances (risk of freezing,
limestone deposits, etc.).
Diesel fuel additive (Diesel
with particle filter)
or
The minimum level in the particle
filter additive tank is indicated by
fixed illumination of this warning
lamp, accompanied by an audible
warning and a message warning that
the level of additive is too low.
7
Practical information
Page 201 of 324
199
If your vehicle's AdBlue® tank is
completely empty – which is confirmed
by the message "Top up AdBlue: Starting
impossible", you must top up with at least
5 litres.
Important: in the event of a top-up after
a breakdown because of a lack of
AdBlue, you must wait around 5 minutes
before switching on the ignition, without
opening the driver’s door, locking
the vehicle, introducing the key into
the ignition switch, or introducing
the key of the Keyless Entr y and
Star ting system into the passenger
compartment .
Switch on the ignition, then wait for
10
seconds before starting the engine.
Advice on care
General recommendations on the care and
maintenance of your vehicle are given in the
warranty and maintenance record. Observe the following recommendations to avoid damaging your vehicle:
-
D
o not clean your headlamps with a dry or abrasive cloth, nor with detergent or solvent
products. Use a sponge and soapy water or a pH neutral product.
-
W
hen using a high-pressure washer on stubborn dirt, avoid prolonged use on the
headlamps, the lamps and their edges to avoid damaging their lacquer finish and seals.
-
N
ever use an abrasive sponge to clean persistent dirt, as this may scratch the paint
sur face. Use a soft cloth with soapy water instead.
-
W
hen washing your vehicle, never clean the interior with a water jet.
-
W
hen washing your vehicle in an automatic roller-brush car wash, be sure to lock your
doors and, depending on version, remove the key and deactivate the " Hands-Free
Access " system.
-
N
ever use high-pressure washing to clean the engine compartment, in order to avoid
damaging the electrical units.
-
L
iquids carried in an open vessel (e.g. a cup or mug) could be spilt, presenting a risk of
damage on contact with the controls in the dashboard and centre console. Be careful.
Depending on version, in order to avoid damaging or unpeeling the stickers on the bodywork,
you are strongly advised against using high-pressure cleaners to wash your vehicle. It is
recommended that you wash it using a high-flow water jet and rinse the vehicle down using
demineralised water.
Only a microfibre cloth is recommended for wiping your vehicle; it must be clean and used
g e nt l y.
It is always preferable to have paint repairs carried out by a PEUGEOT dealer or a qualified
workshop.
7
Practical information
Page 212 of 324
210
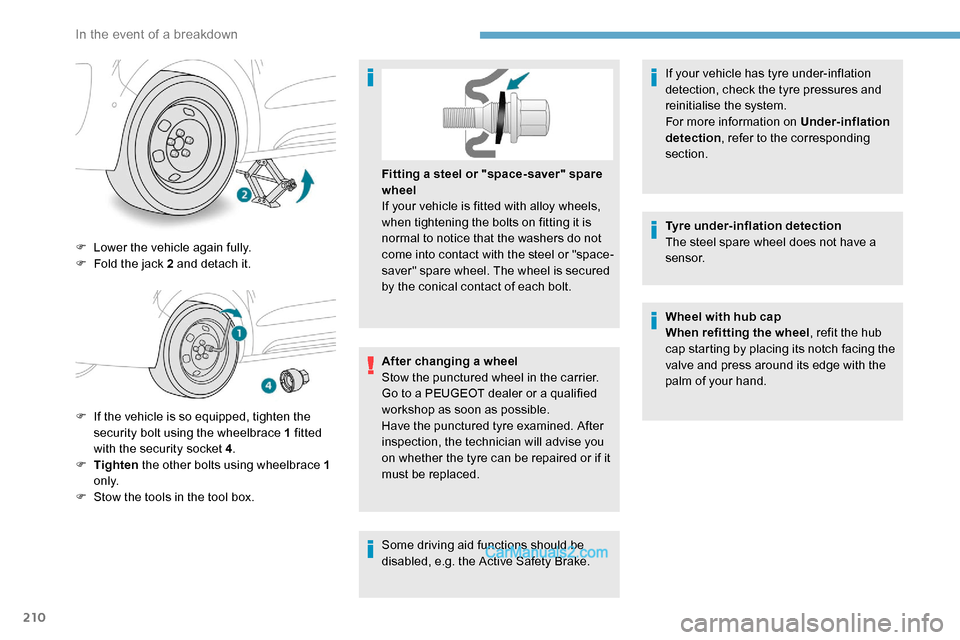
F Lower the vehicle again fully.
F F old the jack 2 and detach it.
F
I
f the vehicle is so equipped, tighten the
security bolt using the wheelbrace 1 fitted
with the security socket 4 .
F
T
ighten the other bolts using wheelbrace 1
o n l y.
F
S
tow the tools in the tool box. After changing a wheel
Stow the punctured wheel in the carrier.
Go to a PEUGEOT dealer or a qualified
workshop as soon as possible.
Have the punctured tyre examined. After
inspection, the technician will advise you
on whether the tyre can be repaired or if it
must be replaced. Fitting a steel or "space-saver" spare
wheel
If your vehicle is fitted with alloy wheels,
when tightening the bolts on fitting it is
normal to notice that the washers do not
come into contact with the steel or "space-
saver" spare wheel. The wheel is secured
by the conical contact of each bolt.
Some driving aid functions should be
disabled, e.g. the Active Safety Brake. If your vehicle has tyre under-inflation
detection, check the tyre pressures and
reinitialise the system.
For more information on Under-inflation
detection
, refer to the corresponding
section.
Tyre under-inflation detection
The steel spare wheel does not have a
sensor.
Wheel with hub cap
When refitting the wheel , refit the hub
cap starting by placing its notch facing the
valve and press around its edge with the
palm of your hand.
In the event of a breakdown
Page 213 of 324
211
Changing a bulb
The headlamps have polycarbonate
lenses with a protective coating:
F
d
o not clean them using a dr y or
abrasive cloth, nor with a detergent
or solvent product,
F
u
se a sponge and soapy water or a pH
neutral product,
F
w
hen using a high pressure washer
on persistent marks, do not keep the
lance directed towards the lamps or
their edges for too long, so as not to
damage their protective coating and
seals.
Changing a bulb must only be done with
the ignition off and after the lamp has
been switched off for several minutes -
Risk of serious burns!
F
D
o not touch the bulb directly with your
fingers, use a lint-free cloth.
It is essential only to use anti-ultraviolet
(UV) type bulbs, so as not to damage the
headlamp.
Always replace a failed bulb with a new
bulb with the same type and specification. Halogen bulbs
To ensure good quality lighting, check
that the bulb is correctly positioned in its
housing.
After changing a bulb
To refit, carry out the operations in reverse
order to removal.
Close the protective cover very carefully to
guarantee the sealing of the lamps. Opening the bonnet /Access to bulbs
With the engine warm, proceed with
caution - risk of burns!
Take care with objects or clothing that
could be caught in the blades of the
engine cooling fan - risk of strangulation!
In some weather conditions (e.g. low
temperature or humidity), the presence
of misting on the internal sur face of the
glass of the headlamps and rear lamps is
normal; it disappears after the lamps have
been on for a few minutes.
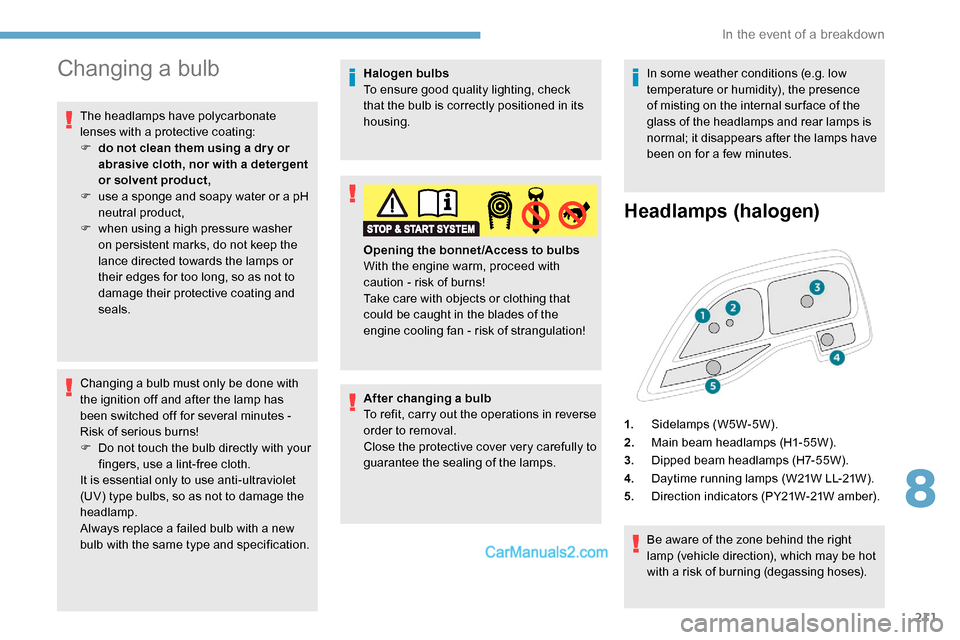
Headlamps (halogen)
Be aware of the zone behind the right
lamp (vehicle direction), which may be hot
with a risk of burning (degassing hoses).
1.
Sidelamps (W5W-5W).
2. Main beam headlamps (H1-55W).
3. Dipped beam headlamps (H7-55W).
4. Daytime running lamps (W21W LL-21W).
5. Direction indicators (PY21W-21W amber).
8
In the event of a breakdown
Page 313 of 324
237
Table of weights ............................................2 25
Table position .................................................. 55
Table, retractable sliding
...........................83-85
Tables, aircraft
................................................ 76
Tables of fuses
....................................... 217-219
Table top, working
........................................... 63
Tailgate rear screen
........................................ 50
Ta n k , f u e l
................................................ 185 -187
Technical data
............................................... 225
Temperature, coolant
................................12, 24
Textured Paint
............................................... 19 9
Third brake lamp
........................................... 215
Time (setting)
.................................................. 30
Tool box
................
................................. 201-202
To o l s
..................................................... 202, 206
Topping-up AdBlue
®...................................... 198
Total distance recorder ................................... 27
To w b a r
...............................
............................ 188
Towed loads
.......................................... 224-225
Towing another vehicle
......................... 222-223
Towing eye
.................................................... 222
Traction control (ASR)
..................... 17, 1 0 9 -11 3
Tr a i l e r
...............
............................................. 188
Trajectory control systems
..................... 10
9 -110
Triangle, warning ........................................... 200
Trip computer
............................................ 28-29
Trip distance recorder
..................................... 2
7
Ty r e s
.............................................................. 19 6
Tyre under-inflation detection
....................... 1
8, 154-155, 205, 210
T
V
U
W
Ventilation ............................... 86 - 87, 90, 92, 94
Visiopark 1 .................................................... 18 0
Under-inflation (detection)
............................
15 4
Unlocking
.......................................
31-32, 34-36
Unlocking from the inside .........................
41- 4 3
Unlocking, selective
..................................
33-36
Unlocking the doors
................................... 4
1- 42
Unlocking, total
.........................................
33-36
Updating the date
............................................ 3
0
Updating the time
...............................
.............
30
USB
.................................................................
77
Warning and indicator lamps
..................... 1
0 -11
Warning lamp, airbag
...................................... 18
W
arning lamp, braking system
..................11 -12
Warning lamp, Diesel engine pre-heater
.......18
Warning lamp, driver''s seat belt not fastened
...............................
..........115
Warning lamp, low fuel level
...........................19
Warning lamp, parking brake
..........................12
Warning lamps
................................................ 11
Warning lamp, seat belts
........................12 , 115
Warning lamp, Service ....................................13
Warnings and indicators
............................1 0 -11
Washer jets, heated
........................................ 91
Washing
........................................................ 15 8
Weights
...............
.................................. 224-225
Welcome lighting ............................................. 32
Wheel, spare
................. 1
55, 196, 206 -207, 210
Windows, rear
................................................. 82
Windscreen, heated
........................................ 91Wiper blades (changing)
.......................
105 -10 6
Wiper, rear ..................................................... 104
Wipers
.............................................
20, 103 -104
Wipers, automatic rain sensitive
...........
103 -104
.
Alphabetical index