ECU PEUGEOT EXPERT 2022 User Guide
[x] Cancel search | Manufacturer: PEUGEOT, Model Year: 2022, Model line: EXPERT, Model: PEUGEOT EXPERT 2022Pages: 324, PDF Size: 10.39 MB
Page 74 of 324
72
Ease of use and comfort
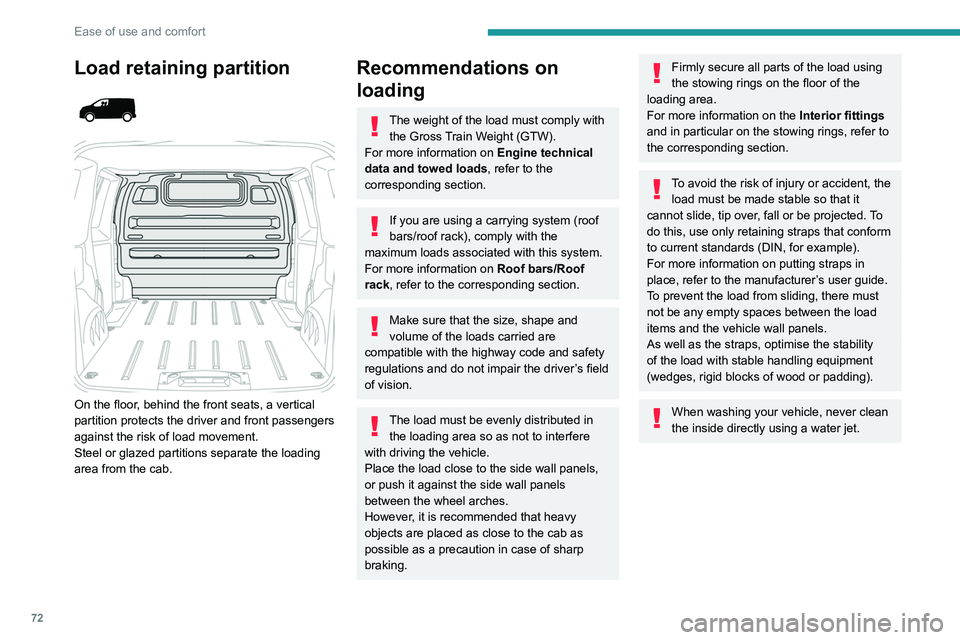
Load retaining partition
On the floor, behind the front seats, a vertical
partition protects the driver and front passengers
against the risk of load movement.
Steel or glazed partitions separate the loading
area from the cab.
Recommendations on
loading
The weight of the load must comply with the Gross Train Weight (GTW).
For more information on Engine technical
data and towed loads , refer to the
corresponding section.
If you are using a carrying system (roof
bars/roof rack), comply with the
maximum loads associated with this system.
For more information on Roof bars/Roof
rack , refer to the corresponding section.
Make sure that the size, shape and
volume of the loads carried are
compatible with the highway code and safety
regulations and do not impair the driver’s field
of vision.
The load must be evenly distributed in the loading area so as not to interfere
with driving the vehicle.
Place the load close to the side wall panels,
or push it against the side wall panels
between the wheel arches.
However, it is recommended that heavy
objects are placed as close to the cab as
possible as a precaution in case of sharp
braking.
Firmly secure all parts of the load using
the stowing rings on the floor of the
loading area.
For more information on the Interior fittings
and in particular on the stowing rings, refer to
the corresponding section.
To avoid the risk of injury or accident, the load must be made stable so that it
cannot slide, tip over, fall or be projected. To
do this, use only retaining straps that conform
to current standards (DIN, for example).
For more information on putting straps in
place, refer to the manufacturer’s user guide.
To prevent the load from sliding, there must
not be any empty spaces between the load
items and the vehicle wall panels.
As well as the straps, optimise the stability
of the load with stable handling equipment
(wedges, rigid blocks of wood or padding).
When washing your vehicle, never clean
the inside directly using a water jet.
Page 75 of 324
73
Ease of use and comfort
3Seating area fittings
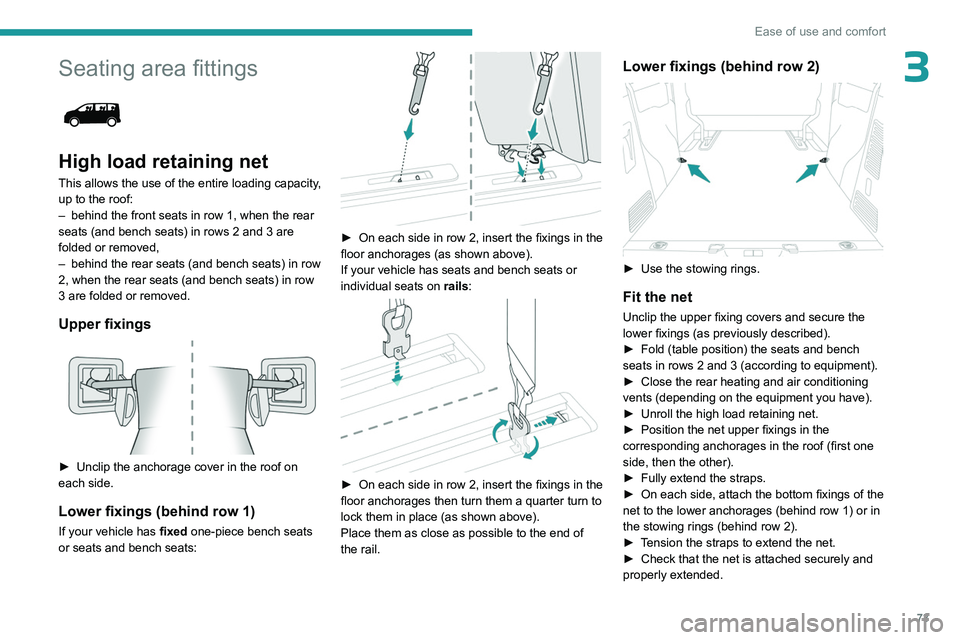
High load retaining net
This allows the use of the entire loading capacity,
up to the roof:
–
behind the front seats in row 1, when the rear
seats (and bench seats) in rows 2 and 3 are
folded or removed,
–
behind the rear seats (and bench seats) in row
2, when the rear seats (and bench seats) in row
3 are folded or removed.
Upper fixings
► Unclip the anchorage cover in the roof on
each side.
Lower fixings (behind row 1)
If your vehicle has fixed one-piece bench seats
or seats and bench seats:
► On each side in row 2, insert the fixings in the
floor anchorages (as shown above).
If your vehicle has seats and bench seats or
individual seats on rails:
► On each side in row 2, insert the fixings in the
floor anchorages then turn them a quarter turn to
lock them in place (as shown above).
Place them as close as possible to the end of
the rail.
Lower fixings (behind row 2)
► Use the stowing rings.
Fit the net
Unclip the upper fixing covers and secure the
lower fixings (as previously described).
►
Fold (table position) the seats and bench
seats in rows 2 and 3 (according to equipment).
►
Close the rear heating and air conditioning
vents (depending on the equipment you have).
►
Unroll the high load retaining net.
►
Position the net upper fixings in the
corresponding anchorages in the roof (first one
side, then the other).
►
Fully extend the straps.
►
On each side, attach the bottom fixings of the
net to the lower anchorages (behind row 1) or in
the stowing rings (behind row 2).
►
T
ension the straps to extend the net.
►
Check that the net is attached securely and
properly extended.
Page 76 of 324
74
Ease of use and comfort
Never use the ISOFIX ring provided for
fixing the strap of a child seat with Top
Tether.
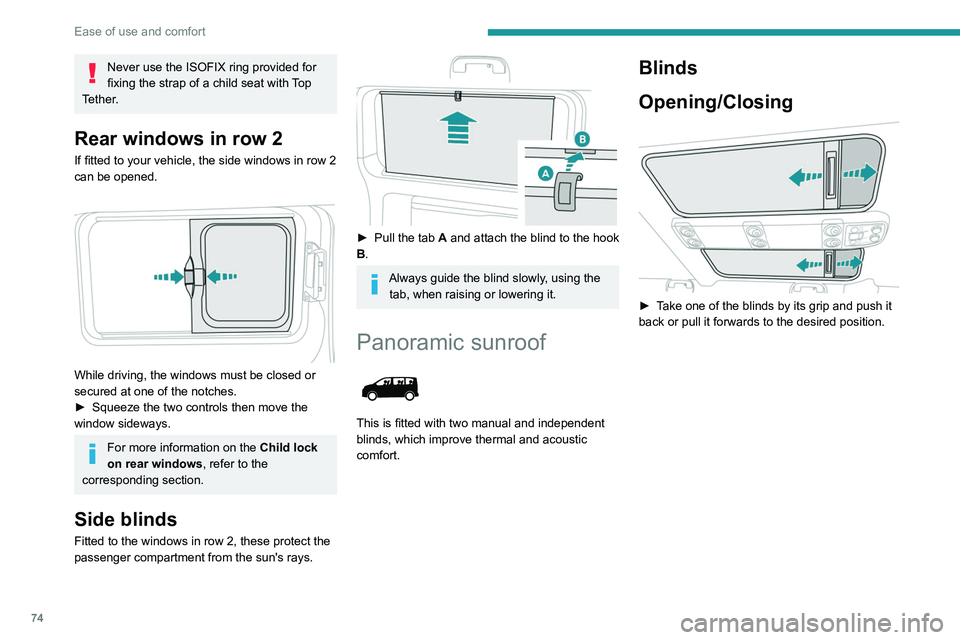
Rear windows in row 2
If fitted to your vehicle, the side windows in row 2
can be opened.
While driving, the windows must be closed or
secured at one of the notches.
►
Squeeze the two controls then move the
window sideways.
For more information on the Child lock
on rear windows , refer to the
corresponding section.
Side blinds
Fitted to the windows in row 2, these protect the
passenger compartment from the sun's rays.
► Pull the tab A and attach the blind to the hook
B.
Always guide the blind slowly, using the tab, when raising or lowering it.
Panoramic sunroof
This is fitted with two manual and independent
blinds, which improve thermal and acoustic
comfort.
Blinds
Opening/Closing
► Take one of the blinds by its grip and push it
back or pull it forwards to the desired position.
Page 77 of 324
75
Ease of use and comfort
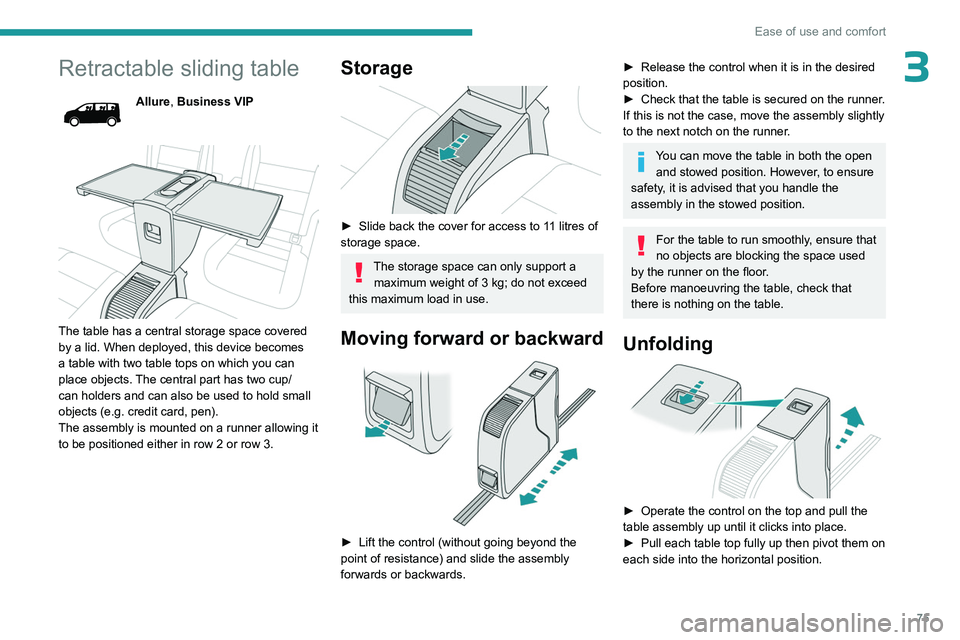
3Retractable sliding table
Allure, Business VIP
The table has a central storage space covered
by a lid. When deployed, this device becomes
a table with two table tops on which you can
place objects. The central part has two cup/
can holders and can also be used to hold small
objects (e.g. credit card, pen).
The assembly is mounted on a runner allowing it
to be positioned either in row 2 or row 3.
Storage
► Slide back the cover for access to 11 litres of
storage space.
The storage space can only support a maximum weight of 3 kg; do not exceed
this maximum load in use.
Moving forward or backward
► Lift the control (without going beyond the
point of resistance) and slide the assembly
forwards or backwards.
► Release the control when it is in the desired
position.
►
Check that the table is secured on the runner
.
If this is not the case, move the assembly slightly
to the next notch on the runner.
You can move the table in both the open and stowed position. However, to ensure
safety, it is advised that you handle the
assembly in the stowed position.
For the table to run smoothly, ensure that
no objects are blocking the space used
by the runner on the floor.
Before manoeuvring the table, check that
there is nothing on the table.
Unfolding
► Operate the control on the top and pull the
table assembly up until it clicks into place.
►
Pull each table top fully up then pivot them on
each side into the horizontal position.
Page 88 of 324
86
Ease of use and comfort
Temperature pre-conditioning (Electric)
This function allows you to programme the
temperature in the passenger compartment to
reach a pre-defined, non-modifiable temperature
(approx. 21°C) before you enter the vehicle, on
the days and at the times of your choice.
This function is available when the vehicle is
connected or not connected.
Programming
With Bluetooth® audio system
Temperature pre-conditioning is not available
with the Bluetooth® audio system.
With the Audio System with T ouch Screen
or 3D Connected Navigation system
Programming can be carried out from a
smartphone using the MYPEUGEOT APP
application.
For more information on Remote functions,
refer to the corresponding section.
With 3D Connected Navigation system
In the Applications menu:
Press " Car Apps" to display the applications
home page.
Select Temperature conditioning .
►
Press
+ to add a programme.
► Select the time of entry into the vehicle and
the desired days. Press OK.
►
Press
ON to activate this programme.
The temperature pre-conditioning sequence
begins approximately 45 minutes before the
programmed time when the vehicle is connected
(20 minutes when it is not connected) and is
maintained for 10 minutes after.
You can set multiple programmes. Each one is saved in the system.
To optimise the driving range, we recommend
starting a programme while the vehicle is
connected.
The fan noise that occurs during temperature pre-conditioning is perfectly
normal.
Operating conditions
– The function is only activated when the
ignition is switched off and the
vehicle
locked.
–
When the vehicle is not connected, the
function is only activated if the battery charge
level is greater than 50%.
–
When the vehicle is not connected and a
recurring programme is active (e.g. from Monday
to Friday), if two temperature pre-conditioning
sequences are run without the vehicle being
used, the programme will be deactivated.
Courtesy lamp(s)
Front: comes on when one of the front or
rear doors is opened (sliding side door
and depending on equipment, left-hand
side-hinged door or tailgate).
Rear or row 2 and row 3: comes on when one of
the rear doors is opened (sliding side door and
depending on equipment, left-hand side-hinged
door or tailgate).
Always lit, ignition on.
Always off.
Front
Page 107 of 324
105
Safety
5Seat belt(s) warning lamps
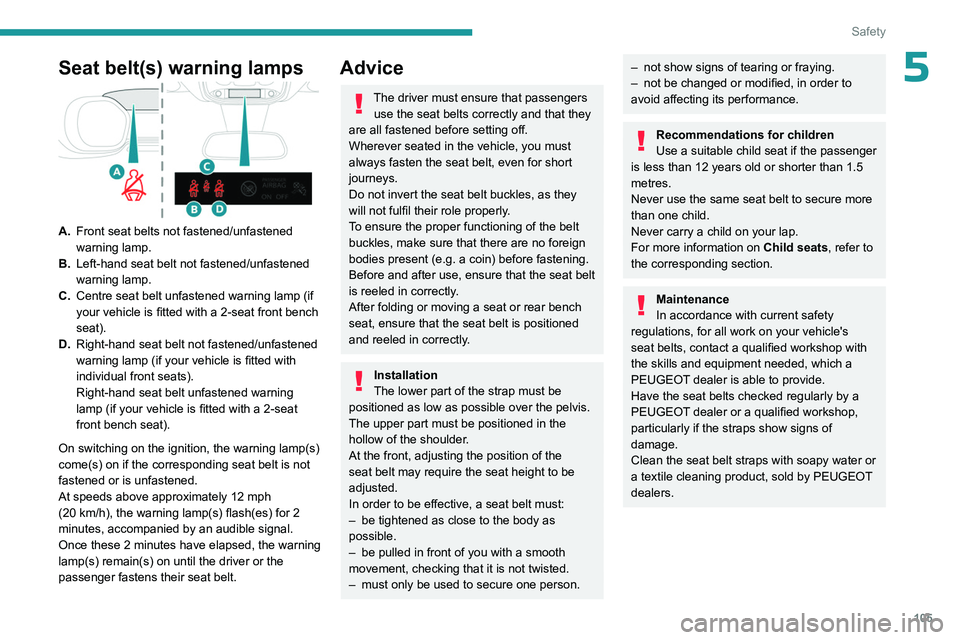
A.Front seat belts not fastened/unfastened
warning lamp.
B. Left-hand seat belt not fastened/unfastened
warning lamp.
C. Centre seat belt unfastened warning lamp (if
your vehicle is fitted with a 2-seat front bench
seat).
D. Right-hand seat belt not fastened/unfastened
warning lamp (if your vehicle is fitted with
individual front seats).
Right-hand seat belt unfastened warning
lamp (if your vehicle is fitted with a 2-seat
front bench seat).
On switching on the ignition, the warning lamp(s)
come(s) on if the corresponding seat belt is not
fastened or is unfastened.
At speeds above approximately 12 mph
(20
km/h), the warning lamp(s) flash(es) for 2
minutes, accompanied by an audible signal.
Once these 2 minutes have elapsed, the warning
lamp(s) remain(s) on until the driver or the
passenger fastens their seat belt.
Advice
The driver must ensure that passengers use the seat belts correctly and that they
are all fastened before setting off.
Wherever seated in the vehicle, you must
always fasten the seat belt, even for short
journeys.
Do not invert the seat belt buckles, as they
will not fulfil their role properly.
To ensure the proper functioning of the belt
buckles, make sure that there are no foreign
bodies present (e.g.
a coin) before fastening.
Before and after use, ensure that the seat belt
is reeled in correctly.
After folding or moving a seat or rear bench
seat, ensure that the seat belt is positioned
and reeled in correctly.
Installation
The lower part of the strap must be
positioned as low as possible over the pelvis.
The upper part must be positioned in the
hollow of the shoulder.
At the front, adjusting the position of the
seat belt may require the seat height to be
adjusted.
In order to be effective, a seat belt must:
–
be tightened as close to the body as
possible.
–
be pulled in front of you with a smooth
movement, checking that it is not twisted.
–
must only be used to secure one person.
– not show signs of tearing or fraying.
– not be changed or modified, in order to
avoid affecting its performance.
Recommendations for children
Use a suitable child seat if the passenger
is less than 12 years old or shorter than 1.5
metres.
Never use the same seat belt to secure more
than one child.
Never carry a child on your lap.
For more information on Child seats, refer to
the corresponding section.
Maintenance
In accordance with current safety
regulations, for all work on your vehicle's
seat belts, contact a qualified workshop with
the skills and equipment needed, which a
PEUGEOT
dealer is able to provide.
Have the seat belts checked regularly by a
PEUGEOT dealer or a qualified workshop,
particularly if the straps show signs of
damage.
Clean the seat belt straps with soapy water or
a textile cleaning product, sold by PEUGEOT
dealers.
Page 110 of 324
108
Safety
not fix or attach anything near or in the path of
the airbags, as this could cause injuries when
they are deployed.
Never modify the original definition of the
vehicle, particularly in the area directly around
the airbags.
Even if all of the precautions mentioned are
observed, a risk of injury or of minor burns to
the head, chest or arms cannot be ruled out
when an airbag is deployed. The bag inflates
almost instantly (within a few milliseconds)
then deflates within the same time,
discharging the hot gas via openings provided
for this purpose.
After an accident or if the vehicle has been
stolen, have the airbag systems checked.
All work must be carried out only by a
PEUGEOT dealer or a qualified workshop
Front airbags
Do not drive holding the steering wheel
by its spokes or resting your hands on the
centre part of the wheel.
Passengers must not place their feet on the
dashboard.
Do not smoke as deployment of the airbags
can cause burns or the risk of injury from a
cigarette or pipe.
Never remove or pierce the steering wheel or
hit it violently.
Do not fix or attach anything to the steering
wheel or dashboard, as this could cause
injuries when the airbags are deployed.
Lateral airbags
Use only approved seat covers
compatible with the deployment of these
airbags. For information on the range of seat
covers suitable for your vehicle, contact a
PEUGEOT dealer.
Do not fix or attach anything to the seat
backrests (e.g.
clothing) as this could cause
injuries to the chest or arm when the airbag is
deployed.
Do not sit with the upper part of the body any
nearer to the door than necessary.
The vehicle's front door panels include side
impact sensors.
A damaged door or any unauthorised or
incorrectly executed work (modification or
repair) on the front doors or their interior trim
could compromise the operation of these
sensors - risk of malfunction of the lateral
airbags!
All work must be carried out only by a
PEUGEOT dealer or a qualified workshop
Active, Allure, Business VIP
Curtain airbags
Do not fix or attach anything to the roof,
as this could cause head injuries when the
curtain airbag is deployed.
Do not remove the grab handles installed on
the roof, as these help to secure the curtain
airbags.
Child seats
The regulations on carrying children are specific to each country. Refer to the
legislation in force in your country.
For maximum safety, please observe the
following recommendations:
–
In accordance with European regulations,
all children under the age of 12 or less than
1.5 metres tall must travel in approved child
seats suited to their weight , on seats fitted with
a seat belt or ISOFIX mountings.
–
Statistically
, the safest seats in your
vehicle for carrying children are the rear
seats.
–
Children weighing less than 9 kg must
travel in the "rearward facing" position,
whether in the front or rear of the vehicle.
It is recommended that children travel
on the rear seats of the vehicle:
–
"rearward facing" up to the age of 3,
–
"forward facing" over the age of 3.
Page 111 of 324
109
Safety
5Make sure that the seat belt is correctly
positioned and tightened.
For child seats with a support leg, ensure that
the support leg is in firm and steady contact
with the floor.
An incorrectly installed child seat in a vehicle compromises the child's safety in
the event of an accident.
Ensure that there is no seat belt or seat belt
buckle under the child seat, as this could
destabilise it.
Remember to fasten the seat belts or the
child seat harness keeping the slack relative
to the child's body to a minimum, even for
short journeys.
When installing a child seat using the seat
belt, ensure that the seat belt is tightened
correctly on the child seat and that it secures
the child seat firmly on the vehicle seat. If
the passenger seat is adjustable, move it
forwards if necessary.
Remove the head restraint before
installing a child seat with a backrest on a
passenger seat.
Ensure that the head restraint is stored or
attached securely to prevent it from being
thrown around the vehicle in the event of
sharp braking. Refit the head restraint once
the child seat has been removed.
Installing a booster seat
The chest part of the seat belt must be
positioned on the child's shoulder without
touching the neck.
Ensure that the lap part of the seat belt
passes correctly over the child's thighs.
Use a booster seat with a backrest, equipped
with a belt guide at shoulder level.
Additional protections
To prevent accidental opening of the
doors and rear windows, use the "Child lock".
Take care not to open the rear windows by
more than one third.
To protect young children from the sun's rays,
fit side blinds on the rear windows.
As a safety measure, do not leave:
–
A
child alone and unsupervised inside a
vehicle.
–
A
child or an animal in a vehicle which is
exposed to the sun, with the windows closed.
–
The keys within reach of children inside the
vehicle.
Child seat at the rear
Row 2
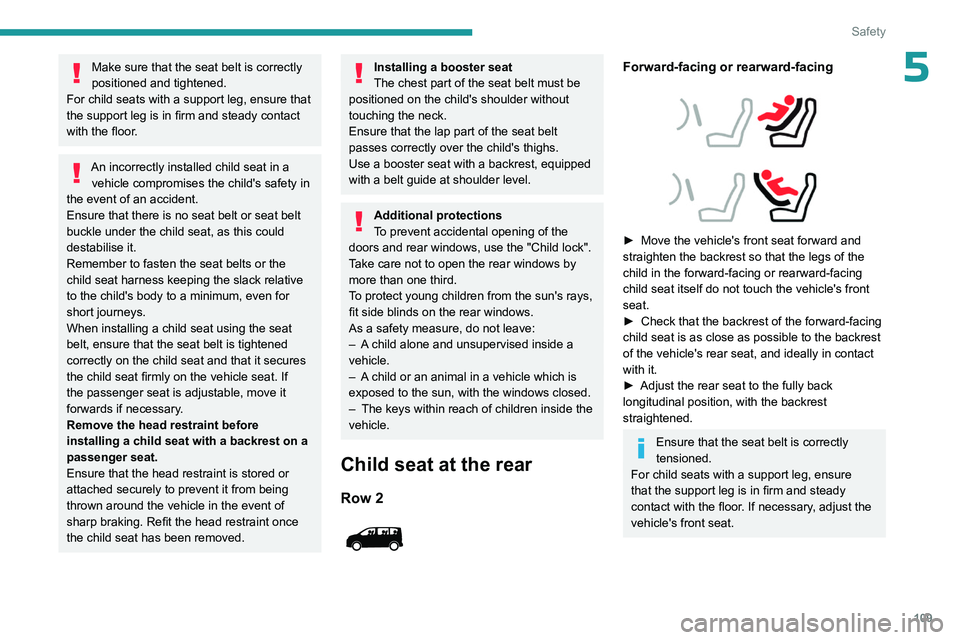
Forward-facing or rearward-facing
► Move the vehicle's front seat forward and
straighten the backrest so that the legs of the
child in the forward-facing or rearward-facing
child seat itself do not touch the vehicle's front
seat.
►
Check that the backrest of the forward-facing
child seat is as close as possible to the backrest
of the vehicle's rear seat, and ideally in contact
with it.
►
Adjust the rear seat to the fully back
longitudinal position, with the backrest
straightened.
Ensure that the seat belt is correctly
tensioned.
For child seats with a support leg, ensure
that the support leg is in firm and steady
contact with the floor. If necessary, adjust the
vehicle's front seat.
Page 113 of 324
111
Safety
5
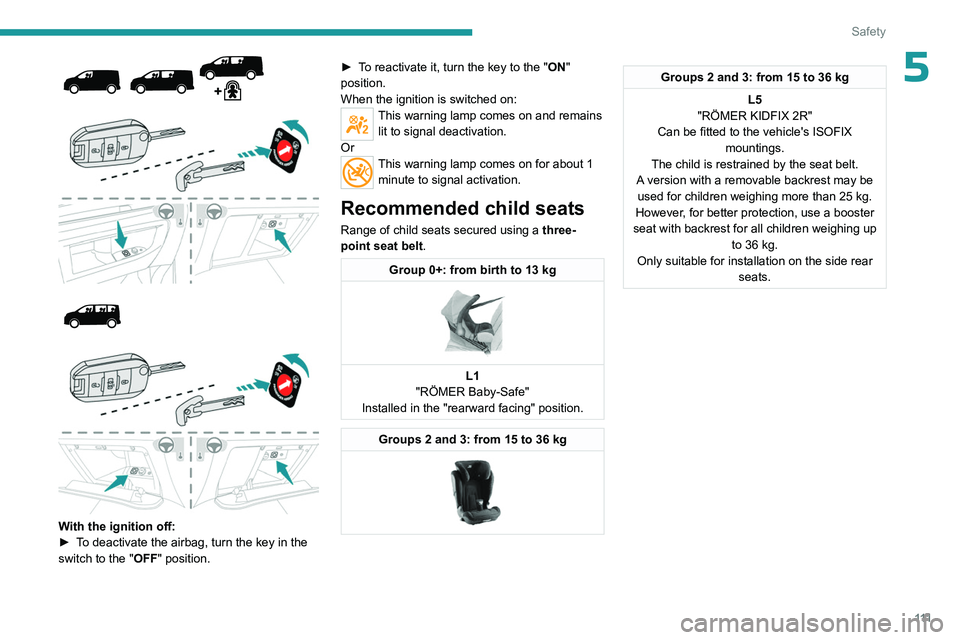
With the ignition off:
► T o deactivate the airbag, turn the key in the
switch to the "OFF " position. ►
T
o reactivate it, turn the key to the "ON"
position.
When the ignition is switched on:
This warning lamp comes on and remains lit to signal deactivation.
Or
This warning lamp comes on for about 1 minute to signal activation.
Recommended child seats
Range of child seats secured using a three-
point seat belt .
Group 0+: from birth to 13 kg
L1
"RÖMER Baby-Safe"
Installed in the "rearward facing" position.
Groups 2 and 3: from 15 to 36 kg
Groups 2 and 3: from 15 to 36 kg
L5
"RÖMER KIDFIX 2R"
Can be fitted to the vehicle's ISOFIX mountings.
The child is restrained by the seat belt.
A version with a removable backrest may be used for children weighing more than 25 kg.
However, for better protection, use a booster
seat with backrest for all children weighing up to 36 kg.
Only suitable for installation on the side rear seats.
Page 114 of 324
11 2
Safety
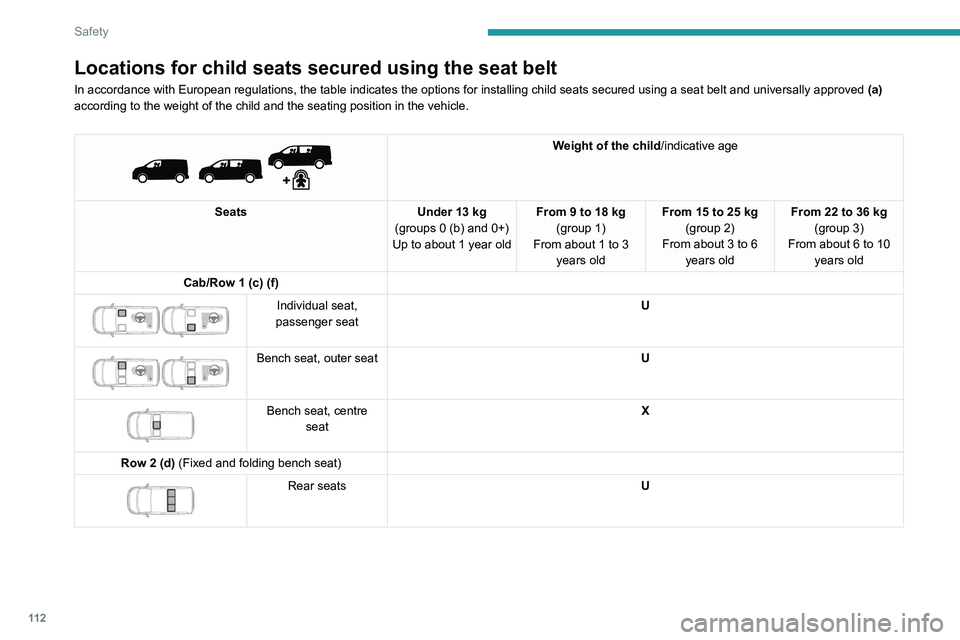
Locations for child seats secured using the seat belt
In accordance with European regulations, the table indicates the options\
for installing child seats secured using a seat belt and universally ap\
proved (a)
according to the weight of the child and the seating position in the veh\
icle.
Weight of the child /indicative age
Seats Under 13 kg
(groups 0 (b) and 0+)
Up to about 1 year old From 9 to 18 kg
(group 1)
From about
1 to 3
years old From 15 to 25 kg
(group 2)
From about
3 to 6
years old From 22 to 36 kg
(group 3)
From about
6 to 10
years old
Cab/Row 1 (c) (f)
Individual seat,
passenger seat U
Bench seat, outer seat
U
Bench seat, centre
seat X
Row 2 (d) (Fixed and folding bench seat)
Rear seats U