Peugeot Expert Dag 2001.5 User Guide
Expert Dag 2001.5
Peugeot
Peugeot
https://www.carmanualsonline.info/img/29/14203/w960_14203-0.png
Peugeot Expert Dag 2001.5 User Guide
Page 111 of 149
TABLE OF FUSES
(According to model or country)V- 2
90
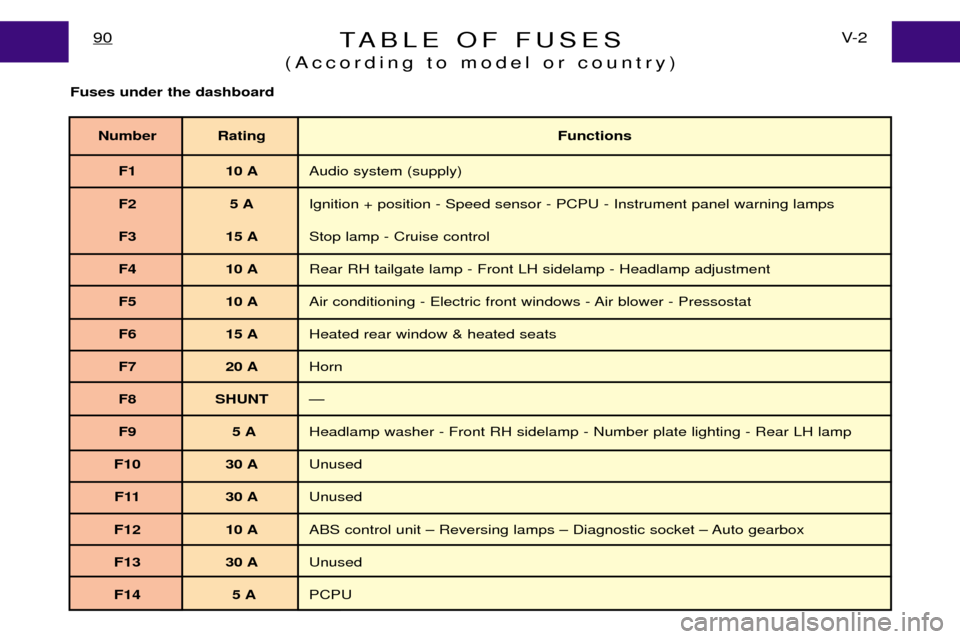
Fuses under the dashboard
Number Rating Functions
F1 10 A Audio system (supply)
F2 5 A Ignition + position - Speed sensor - PCPU - Instrument panel warning lamps
F3 15 A Stop lamp - Cruise control
F4 10 A Rear RH tailgate lamp - Front LH sidelamp - Headlamp adjustment
F5 10 A Air conditioning - Electric front windows - Air blower - Pressostat
F6 15 A Heated rear window & heated seats
F7 20 A Horn
F8 SHUNT Ñ
F9 5 A Headlamp washer - Front RH sidelamp - Number plate lighting - Rear LH lamp
F10 30 A Unused
F11 30 A Unused
F12 10 A ABS control unit Ð Reversing lamps Ð Diagnostic socket Ð Auto gearbox
F13 30 A Unused
F14 5 A PCPU
Page 114 of 149
TABLE OF FUSES
(According to model or country)93V- 2
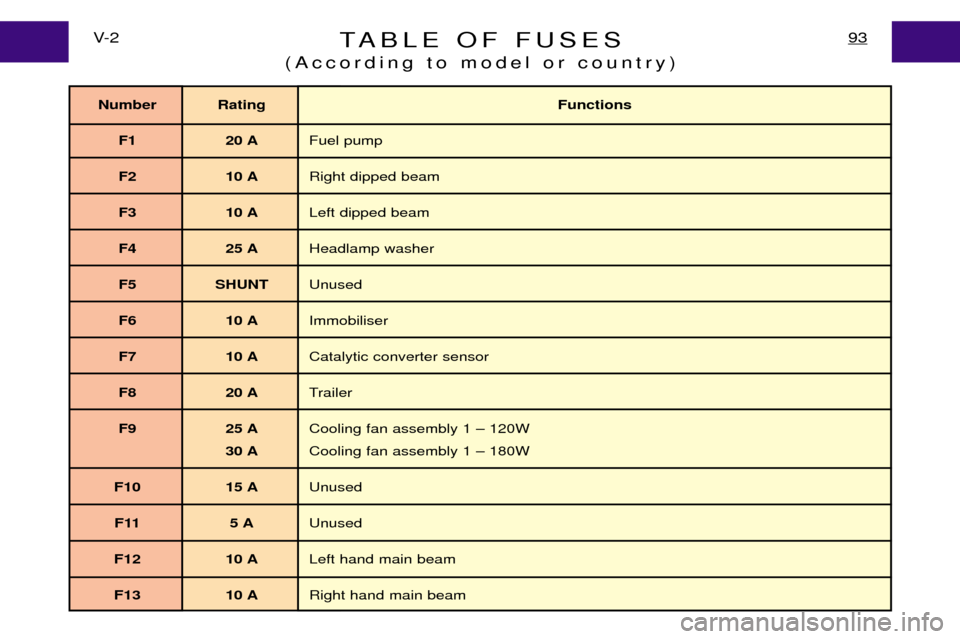
Number Rating Functions
F1 20 A Fuel pump
F2 10 A Right dipped beam
F3 10 A Left dipped beam
F4 25 A Headlamp washer
F5 SHUNT Unused
F6 10 A Immobiliser
F7 10 A Catalytic converter sensor
F8 20 A Trailer
F9 25 A Cooling fan assembly 1 Ð 120W
30 A Cooling fan assembly 1 Ð 180W
F10 15 A Unused
F11 5 A Unused
F12 10 A Left hand main beam
F13 10 A Right hand main beam
Page 116 of 149
TABLE OF FUSES
(According to model or country)95V- 2
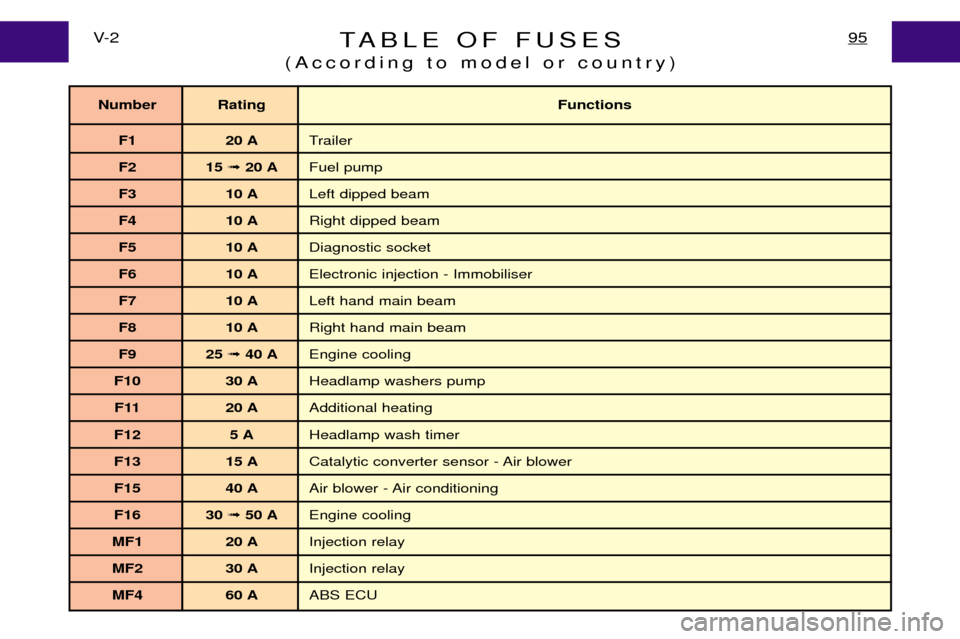
Number Rating Functions
F1 20 A Trailer
F2 15 ➟ 20 A Fuel pump
F3 10 A Left dipped beam
F4 10 A Right dipped beam
F5 10 A Diagnostic socket
F6 10 A Electronic injection - Immobiliser
F7 10 A Left hand main beam
F8 10 A Right hand main beam
F9 25 ➟ 40 A Engine cooling
F10 30 A Headlamp washers pump
F11 20 A Additional heating
F12 5 A Headlamp wash timer
F13 15 A Catalytic converter sensor - Air blower
F15 40 A Air blower - Air conditioning
F16 30 ➟ 50 A Engine cooling
MF1 20 A Injection relay
MF2 30 A Injection relay
MF4 60 A ABS ECU
Page 117 of 149
* According to model or country
BULB CHARTV- 3
96
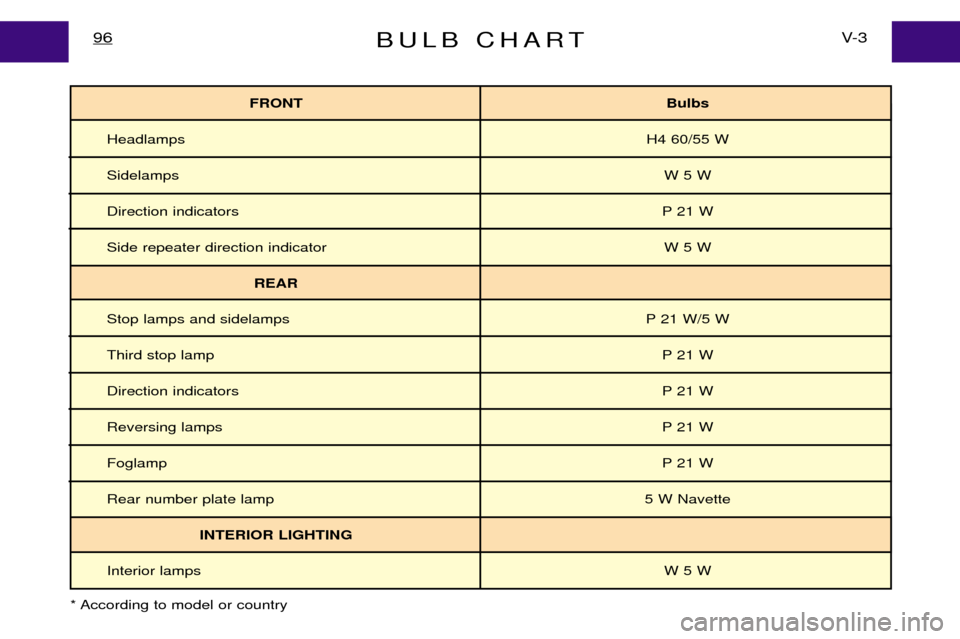
FRONT Bulbs
Headlamps H4 60/55 W
Sidelamps W 5 W
Direction indicators P 21 W
Side repeater direction indicator W 5 W
REAR
Stop lamps and sidelamps P 21 W/5 W
Third stop lamp P 21 W
Direction indicators P 21 W
Reversing lamps P 21 W
Foglamp P 21 W
Rear number plate lamp 5 W Navette
INTERIOR LIGHTING
Interior lamps W 5 W
Page 118 of 149
REPLACING BULBS*97V- 3
Beware
The halogen bulbs should not be changed until they have been off for a few minutes (risk of serious burns). Do not touch the new bulb directly withyour fingers; use a lint-free cloth. After replacing a bulb, check the correct operation of the lighting and signalling.
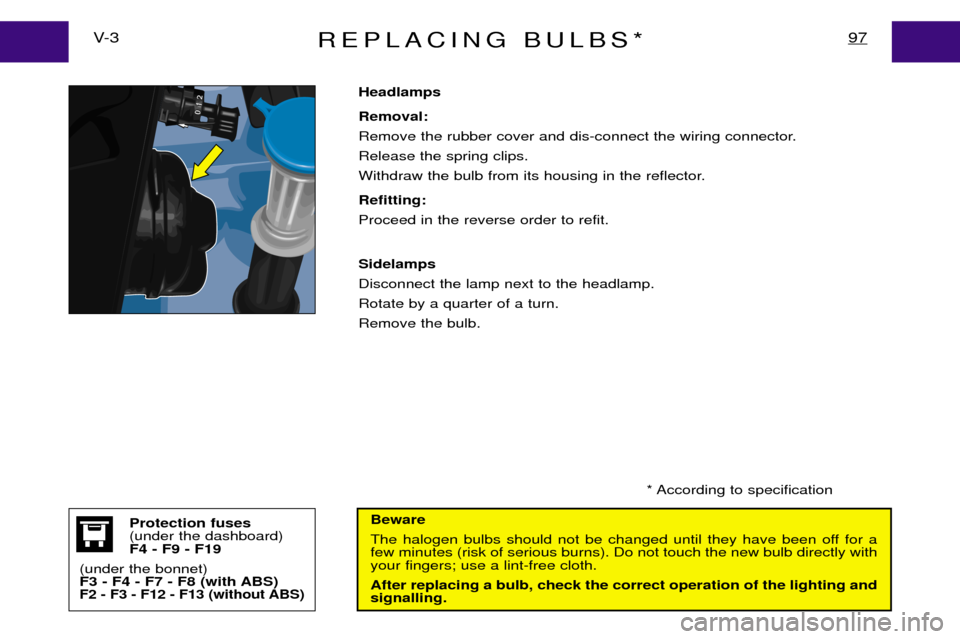
Headlamps Removal:
Remove the rubber cover and dis-connect the wiring connector.Release the spring clips.
Withdraw the bulb from its housing in the reflector. Refitting: Proceed in the reverse order to refit. Sidelamps Disconnect the lamp next to the headlamp.Rotate by a quarter of a turn.Remove the bulb.Protection fuses (under the dashboard)F4 - F9 - F19
(under the bonnet)
F3 - F4 - F7 - F8 (with ABS)
F2 - F3 - F12 - F13 (without ABS)
* According to specification
Page 120 of 149
REPLACING BULBS*99V- 3
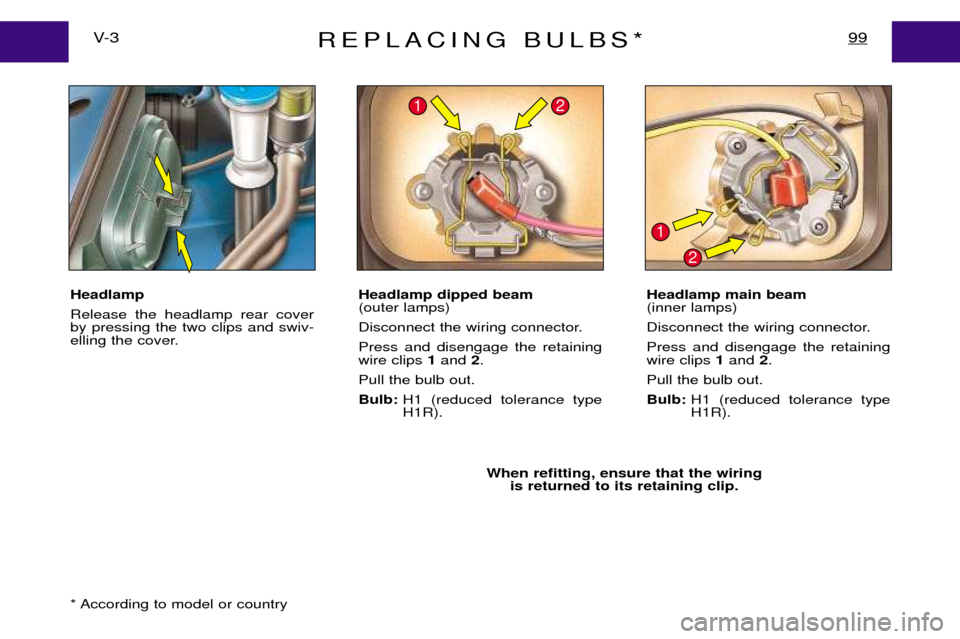
Headlamp Release the headlamp rear cover by pressing the two clips and swiv-
elling the cover.When refitting, ensure that the wiringis returned to its retaining clip.
Headlamp dipped beam (outer lamps)
Disconnect the wiring connector.Press and disengage the retaining wire clips
1and 2.
Pull the bulb out. Bulb: H1 (reduced tolerance type H1R). Headlamp main beam(inner lamps)
Disconnect the wiring connector.Press and disengage the retaining wire clips
1and 2.
Pull the bulb out. Bulb: H1 (reduced tolerance type H1R).
21
1
2
* According to model or country
Page 121 of 149
REPLACING BULBS*V- 3
100
BEWARE
The halogen bulbs should not be changed until they have been off for a few minutes (risk of serious burns). Do not touch the new bulb di- rectly with your fingers; use a lint-free cloth.
After replacing a bulb, check the correct operation of the lighting and signalling.
Badly adjusted headlamps are dangerous. Correct headlamp adjust- ment requires precision and must be carried out by a member of the dealer network in a suitably equipped workshop. Having replaced a headlamp bulb, have the alignment checked.
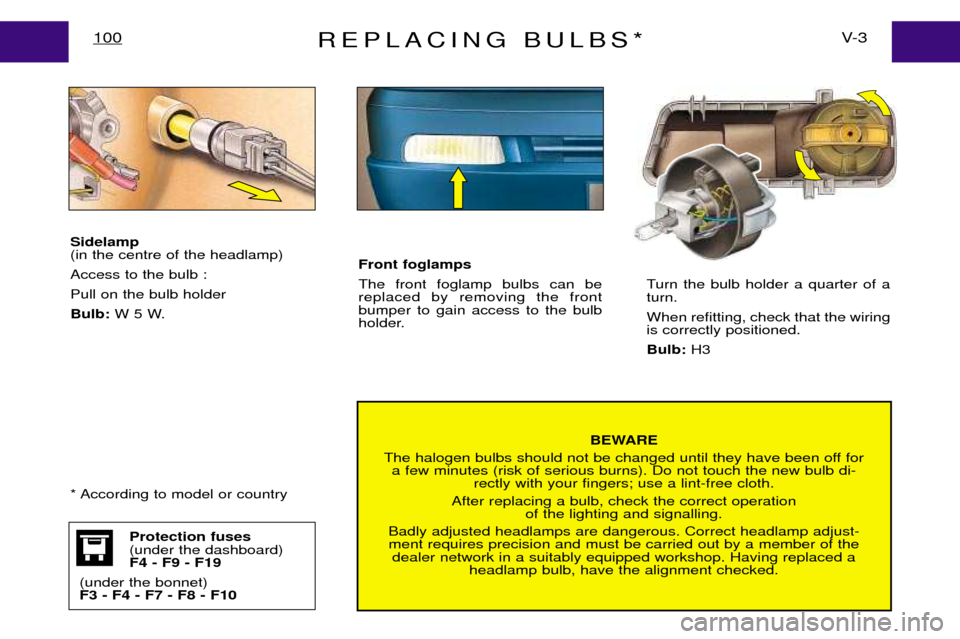
Sidelamp (in the centre of the headlamp) Access to the bulb :Pull on the bulb holderBulb:
W 5 W. Turn the bulb holder a quarter of a turn. When refitting, check that the wiring is correctly positioned. Bulb:
H3
Protection fuses (under the dashboard)F4 - F9 - F19
(under the bonnet)F3 - F4 - F7 - F8 - F10
Front foglamps The front foglamp bulbs can be replaced by removing the frontbumper to gain access to the bulb
holder.
* According to model or country
