height Peugeot Landtrek 2021 Owner's Manual
[x] Cancel search | Manufacturer: PEUGEOT, Model Year: 2021, Model line: Landtrek, Model: Peugeot Landtrek 2021Pages: 176, PDF Size: 6.04 MB
Page 4 of 176
2
Contents
■
Overview
■
Eco-driving
1Instruments
Instrument panels 7
Warning and indicator lamps 8
Total distance recorder 12
Lighting dimmer
12
Trip computer 12
Monochrome screen 13
Touch screen 14
2Access
Electronic key with remote control function
and built-in key, 16
Keyless Entry and Starting 18
Central locking 19
Back-up procedures 20
Doors 21
Tailgate 22
Alarm 22
Electric windows 24
3Ease of use and comfort
Front seats 25
2-seat front bench seat 26
Steering wheel adjustment 27
Mirrors 28
Rear bench seat 29
Heating and Ventilation 31
Heating 32
Manual air conditioning 32
Dual-zone automatic air conditioning 33
Front demisting - defrosting 35
Rear screen demisting/defrosting 35
Front fittings 35
Courtesy lamps 37
Rear fittings 38
Tipper body fittings
39
4Lighting and visibility
Exterior lighting control stalk 42
Cornering lighting 43
Direction indicators 43
Headlamp beam height adjustment 44
Automatic illumination of headlamps 44
Guide-me-home and welcome lighting 45
Wiper control stalk 45
Changing a wiper blade 46
Automatic wipers 47
5Safety
General safety recommendations 48
Hazard warning lamps 48
Horn 49
Electronic stability control (ESC) 49
Hill Assist Descent Control 51
Seat belts 52
Airbags 54
Child seats 56
Deactivating the front passenger airbag 58
ISOFIX child seats 59
Child lock 60
6Driving
Driving recommendations 61
Starting / Switching off the engine with
the key
63
Starting/Switching off the engine with
Keyless Entry and Starting
65
Manual parking brake 66
Locking the rear differential 67
4-wheel drive transmission selector 67
6-speed manual gearbox 69
Automatic gearbox 69
Driving mode 71
Hill start assist 72
Gear shift indicator 73
Tyre under-inflation detection 73
Driving and manoeuvring aids - General
recommendations
74
Speed limiter 75
Overspeed alert at 75 mph (120
km/h) 76
Cruise control - particular recommendations 76
Cruise control 77
Lane Departure Warning System 78
Parking sensors 80
Reversing camera 81
Off Road camera 82
360° camera 82
Page 7 of 176
5
Overview
2.Deactivate the Lane Departure Warning
System function
3. Headlamp beam height adjustment
4. Activate loading zone external lighting
(available only when stationary)
5. Deactivate parking sensors
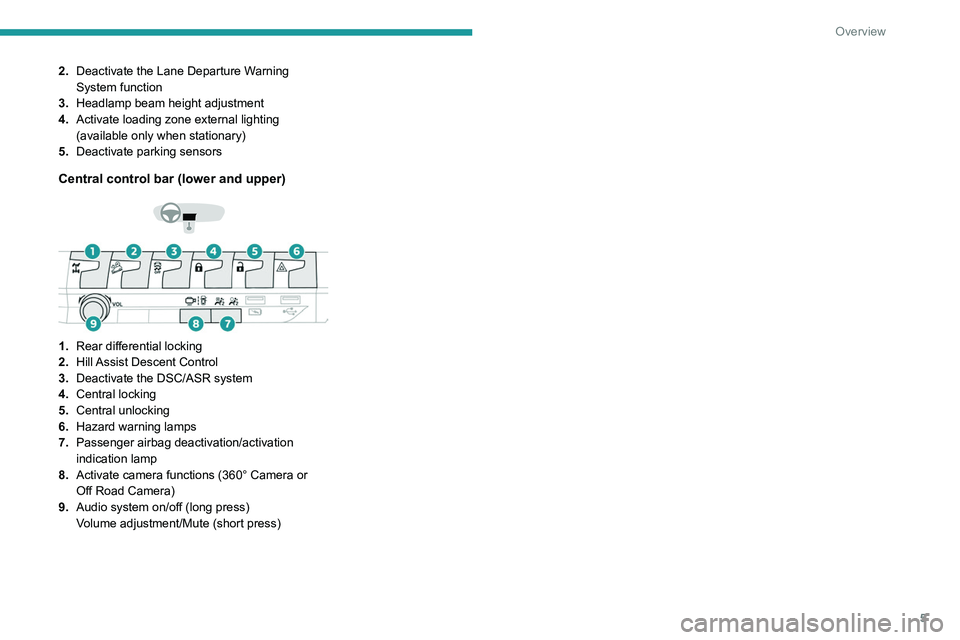
Central control bar (lower and upper)
1.Rear differential locking
2. Hill Assist Descent Control
3. Deactivate the DSC/ASR system
4. Central locking
5. Central unlocking
6. Hazard warning lamps
7. Passenger airbag deactivation/activation
indication lamp
8. Activate camera functions (360° Camera or
Off Road Camera)
9. Audio system on/off (long press)
Volume adjustment/Mute (short press)
Page 27 of 176
25
Ease of use and comfort
3Correct driving position
For safety reasons, adjustments must
only be made when the vehicle is
stationary.
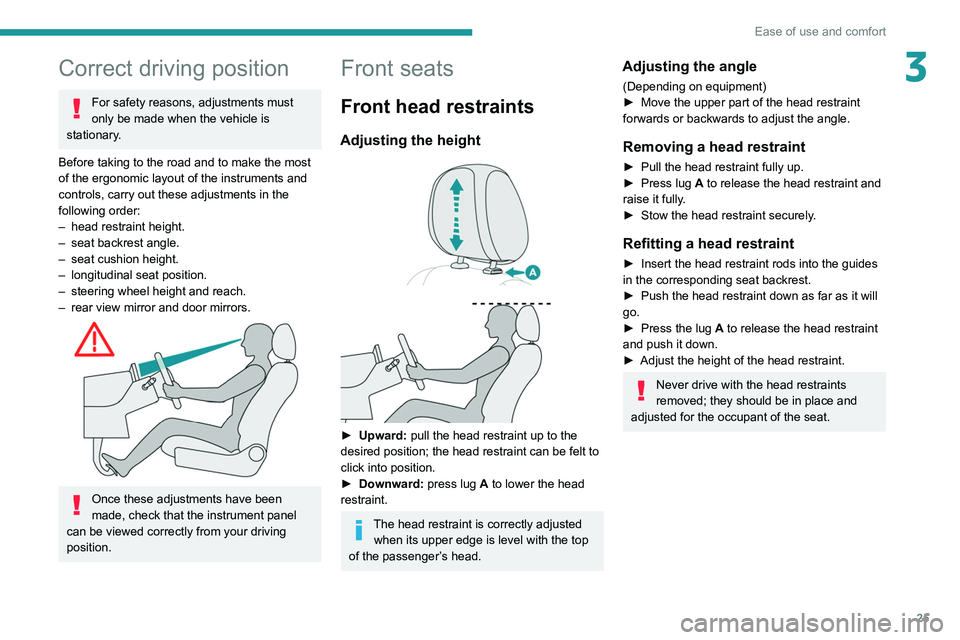
Before taking to the road and to make the most
of the ergonomic layout of the instruments and
controls, carry out these adjustments in the
following order:
–
head restraint height.
–
seat backrest angle.
–
seat cushion height.
–
longitudinal seat position.
–
steering wheel height and reach.
–
rear view mirror and door mirrors.
Once these adjustments have been
made, check that the instrument panel
can be viewed correctly from your driving
position.
Front seats
Front head restraints
Adjusting the height
► Upward: pull the head restraint up to the
desired position; the head restraint can be felt to
click into position.
►
Downward:
press lug A to lower the head
restraint.
The head restraint is correctly adjusted when its upper edge is level with the top
of the passenger’s head.
Adjusting the angle
(Depending on equipment)
► Move the upper part of the head restraint
forwards or backwards to adjust the angle.
Removing a head restraint
► Pull the head restraint fully up.
► Press lug A to release the head restraint and
raise it fully.
►
Stow the head restraint securely
.
Refitting a head restraint
► Insert the head restraint rods into the guides
in the corresponding seat backrest.
►
Push the head restraint down as far as it will
go.
►
Press the lug
A to release the head restraint
and push it down.
►
Adjust the height of the head restraint.
Never drive with the head restraints
removed; they should be in place and
adjusted for the occupant of the seat.
Page 28 of 176
26
Ease of use and comfort
The backrest of the seat located next to the
driver, once in the table position, can also be
used as an armrest and has 2 cup/can holders
and a support strap.
For more information on the Seat belts,
refer to the corresponding section.
Folding the backrests
The backrests must only be operated with the vehicle stationary.
While driving, having a passenger in the rear,
behind the front benchseat is prohibited if the
benchseat backrests are tilted.
When sharp deceleration occurs, objects
placed on the folded backrest can turn into
projectiles.
Preliminary operations:
► Lower the head restraints.
► Check that no person or object will interfere
with folding down the backrests (clothing,
luggage, etc.).
► Check that the outer seat belt is properly
tensioned along the pillars, the central belt is
stowed and the tongues of the belts are correctly
in the stowed position.
Deactivation of the front passenger
airbag is recommended.
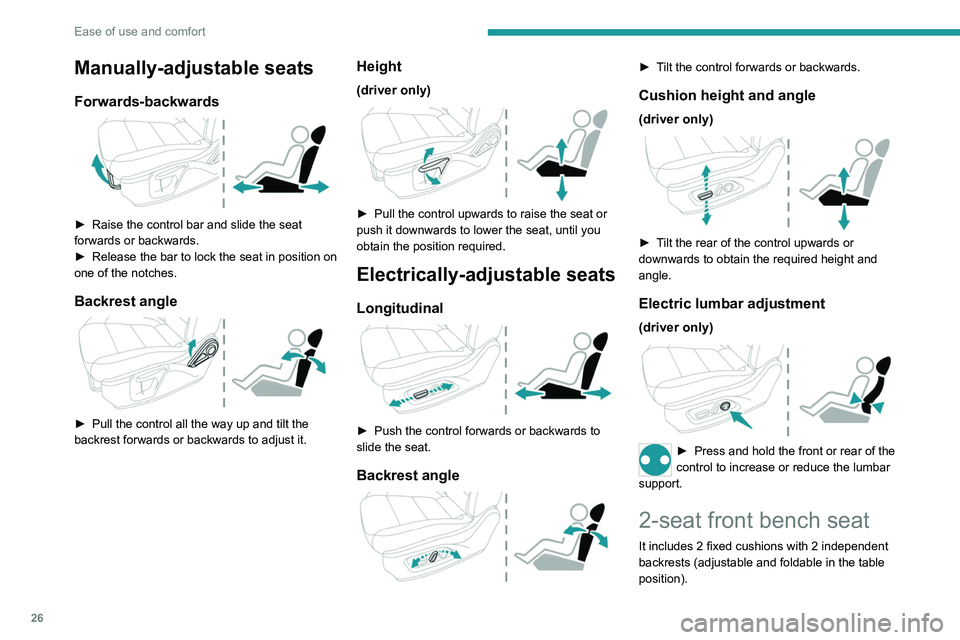
Manually-adjustable seats
Forwards-backwards
► Raise the control bar and slide the seat
forwards or backwards.
►
Release the bar to lock the seat in position on
one of the notches.
Backrest angle
► Pull the control all the way up and tilt the
backrest forwards or backwards to adjust it.
Height
(driver only)
► Pull the control upwards to raise the seat or
push it downwards to lower the seat, until you
obtain the position required.
Electrically-adjustable seats
Longitudinal
► Push the control forwards or backwards to
slide the seat.
Backrest angle
► Tilt the control forwards or backwards.
Cushion height and angle
(driver only)
► Tilt the rear of the control upwards or
downwards to obtain the required height and
angle.
Electric lumbar adjustment
(driver only)
► Press and hold the front or rear of the
control to increase or reduce the lumbar
support.
2-seat front bench seat
It includes 2 fixed cushions with 2 independent
backrests (adjustable and foldable in the table
position).
Page 30 of 176
28
Ease of use and comfort
Manual model
Day/night position
► Pull the lever to change to the anti-dazzle
"night” position.
► Push the lever to change to the normal "day"
position.
Adjustment
► Set the mirror to the normal “day” position.
Rear bench seat
Bench seat with folding cushions (giving access
to storage compartments) and split folding
backrests (2/3-1/3).
► When stationary , pull control A to release the
steering wheel.
►
Adjust the height and reach to suit your
driving position.
►
Push the control to lock the steering wheel.
For safety reasons, these adjustments
must only be carried out with the vehicle
stationary.
Mirrors
Door mirrors
As a safety measure, the mirrors should be adjusted to reduce the "blind spots".
The objects that you see in the mirrors are
in fact closer than they appear. Take this
into account in order to correctly judge the
distance of vehicles approaching from behind.
Manual adjustment
► Directly manouevre the mirror glass to adjust
the mirror concerned.
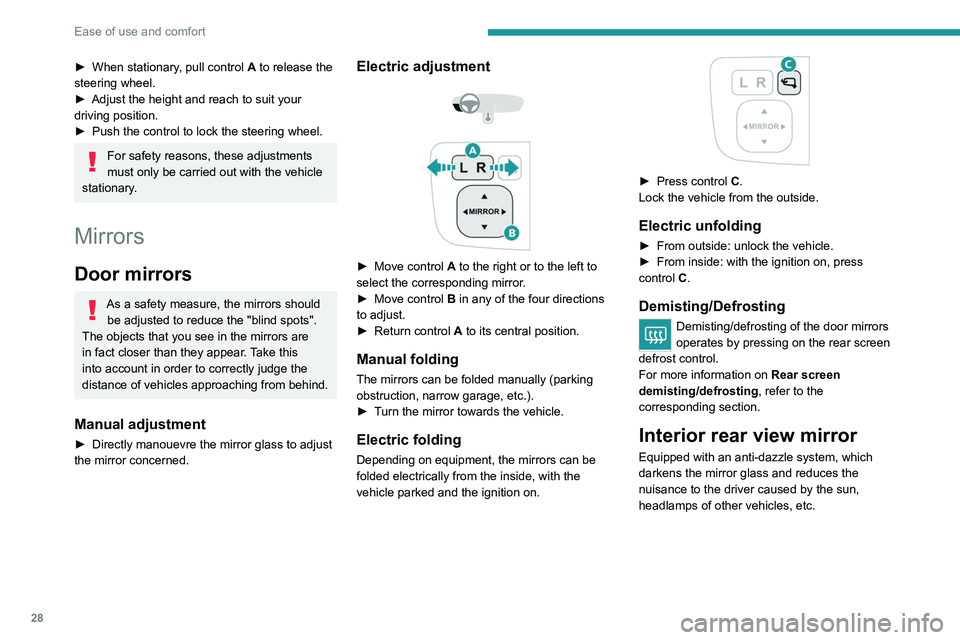
Electric adjustment
► Move control A to the right or to the left to
select the corresponding mirror.
►
Move control
B in any of the four directions
to adjust.
►
Return control A
to its central position.
Manual folding
The mirrors can be folded manually (parking
obstruction, narrow garage, etc.).
►
T
urn the mirror towards the vehicle.
Electric folding
Depending on equipment, the mirrors can be
folded electrically from the inside, with the
vehicle parked and the ignition on.
► Press control C.
Lock the vehicle from the outside.
Electric unfolding
► From outside: unlock the vehicle.
► From inside: with the ignition on, press
control
C.
Demisting/Defrosting
Demisting/defrosting of the door mirrors
operates by pressing on the rear screen
defrost control.
For more information on Rear screen
demisting/defrosting , refer to the
corresponding section.
Interior rear view mirror
Equipped with an anti-dazzle system, which
darkens the mirror glass and reduces the
nuisance to the driver caused by the sun,
headlamps of other vehicles, etc.
Page 46 of 176
44
Lighting and visibility
► Left or right: lower or raise the lighting control
stalk, beyond the point of resistance.
Parking lamps
Vehicle side marking by lighting the sidelamps
on the traffic side only.
►
Depending on version, within one minute
of switching off the ignition, move the lighting
control stalk up or down, depending which side
the traffic is on (for example, when parking on
the left, moving the lighting control stalk upwards
turns on the right-hand sidelamps).
This is confirmed by an audible signal and the
lighting of the corresponding direction indicator
lamp on the instrument panel.
►
T
o switch off the parking lamps, return the
lighting control stalk to the central position.
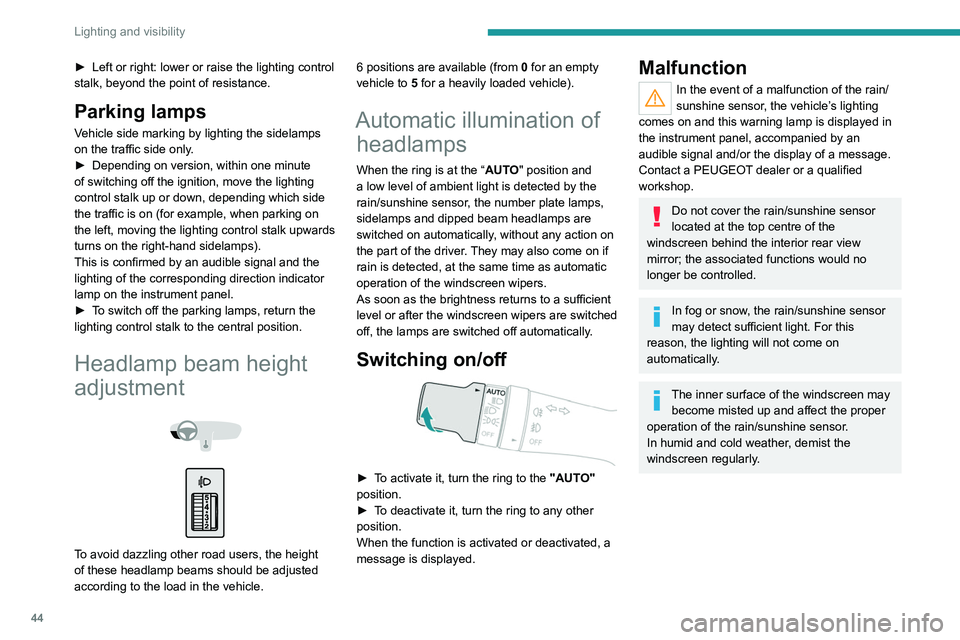
Headlamp beam height
adjustment
To avoid dazzling other road users, the height
of these headlamp beams should be adjusted
according to the load in the vehicle. 6 positions are available (from
0 for an empty
vehicle to 5 for a heavily loaded vehicle).
Automatic illumination of headlamps
When the ring is at the “AUTO" position and
a low level of ambient light is detected by the
rain/sunshine sensor, the number plate lamps,
sidelamps and dipped beam headlamps are
switched on automatically, without any action on
the part of the driver. They may also come on if
rain is detected, at the same time as automatic
operation of the windscreen wipers.
As soon as the brightness returns to a sufficient
level or after the windscreen wipers are switched
off, the lamps are switched off automatically.
Switching on/off
► To activate it, turn the ring to the "AUTO"
position.
►
T
o deactivate it, turn the ring to any other
position.
When the function is activated or deactivated, a
message is displayed.
Malfunction
In the event of a malfunction of the rain/
sunshine sensor, the vehicle’s lighting
comes on and this warning lamp is displayed in
the instrument panel, accompanied by an
audible signal and/or the display of a message.
Contact a PEUGEOT dealer or a qualified
workshop.
Do not cover the rain/sunshine sensor
located at the top centre of the
windscreen behind the interior rear view
mirror; the associated functions would no
longer be controlled.
In fog or snow, the rain/sunshine sensor
may detect sufficient light. For this
reason, the lighting will not come on
automatically.
The inner surface of the windscreen may become misted up and affect the proper
operation of the rain/sunshine sensor.
In humid and cold weather, demist the
windscreen regularly.
Guide-me-home and
welcome lighting
Guide-me-home lighting
Depending on version, when the light is poor, the
dipped beam headlamps come on automatically
when the ignition is switched off.
Guide-me-home lighting goes off automatically
after a period of time.
You can activate/deactivate this function and adjust the guide-me-home lighting
duration in the Vehicle settings touch screen
menu.
Welcome lighting
When unlocking the vehicle, this system
automatically switches on the dipped beam
headlamps and certain lights in the passenger
compartment.
DOORWhen the front courtesy lamp control is
activated, the front courtesy lamp comes
on automatically when a door is opened.
Depending on version, the front doors have sill
lighting. Each sill light automatically switches on
when a front door is opened to facilitate entry
into the vehicle at night.
You can activate/deactivate this function and adjust the welcome lighting duration
in the Vehicle settings touch screen menu.
Page 54 of 176
52
Safety
Activation of the system may cause noise in the transmission. This is perfectly
normal and has no consequence on the
behaviour of the vehicle.
On a descent, with the vehicle stationary, if the
driver releases the accelerator and brake pedals,
the system will release the brakes to set the
vehicle gradually in motion.
The brake lamps light up automatically when the
system is regulating.
If the speed exceeds 22 mph (35
km/h),
regulation is paused automatically, but the
indicator lamp in the instrument panel remains
on.
Regulation resumes automatically when the
speed falls below 22 mph (35
km/h) again, if the
slope and pedal release conditions are met.
Depress the accelerator or brake pedal again to
pause the cruise control.
Off
► Press the button until the indicator lamp on
the instrument panel goes off.
At a speed of approximately 50 mph (80 km/h),
the system is automatically deactivated and the
indicator lamp on
the instrument panel goes off.
Malfunction
If a fault occurs with the system, this
warning lamp comes on in green,
accompanied by the display of a message in the
instrument panel.
Have the system checked by a PEUGEOT
dealer or a qualified workshop.
Seat belts
Inertia reel
The seat belts are equipped with an inertia reel
which allows the strap length to automatically
adjust to your shape. The seat belt returns to its
storage automatically when it is not used.
The inertia reels are fitted with a device which
automatically locks the strap in the event of a
collision, emergency braking or if the vehicle rolls
over. It can be released by pulling the strap firmly
and then releasing it so that it reels in slightly.
Pyrotechnic pretensioning
This system improves safety in the event of a
frontal or side impact.
Depending on the severity of the impact, the
pyrotechnic pretensioning system instantly
tightens the seat belts against the body of the
occupants.
The pyrotechnic pretensioning seat belts are
enabled when the ignition is on.
Force limiter
This system reduces the pressure of the seat
belt on the chest of the occupant, thus improving
their protection.
In the event of an impact
Depending on the nature and
seriousness of the impacts, the pyrotechnic
device may trigger before and independently
of airbag deployment. Deployment of the
pretensioners is accompanied by a slight
discharge of harmless smoke and a noise,
due to the activation of the pyrotechnic
cartridge incorporated in the system.
In all cases, the airbag warning lamp comes
on.
Following an impact, have the seat belt
system checked, and if necessary replaced,
by a PEUGEOT dealer or a qualified
workshop.
Front seat belts
The front seat belts are fitted with a pyrotechnic
pretensioning system, depending on version,
and a force limiting system.
Height adjustment
► To adjust the height of the anchorage point,
squeeze control A and slide it to the notch
desired.
2-seat front bench seat
Page 55 of 176
53
Safety
5Height adjustment
► To adjust the height of the anchorage point,
squeeze control A and slide it to the notch
desired.
2-seat front bench seat
If the vehicle is fitted with a front bench seat,
ensure that each seat belt is used with its correct
buckle.
Depending on version, the centre seat is
equipped with a lap belt without inertia reel or a
three-point belt with inertia reel.
Do not interchange the driver's seat belt or
buckle with the centre seat belt or buckle.
Rear seat belts
Each of the rear seats has a three-point seat belt
with inertia reel.
The outer seats are fitted, depending on the
version, with a pyrotechnic pretensioning and
force limiting system.
Fastening
► Pull the strap, then insert the tongue into the
buckle.
►
With a 2-seat front bench seat, pull the strap
of the lap belt to eliminate play (depending on
version).
►
Check that the seat belt is fastened correctly
by pulling on the strap.
Unfastening
► Press the red button on the buckle.
► Guide the seat belt as it is reeled in.
►
With a 2-seat front bench seat, fasten the lap
belt so that it does not interfere with the driver
(depending on version).
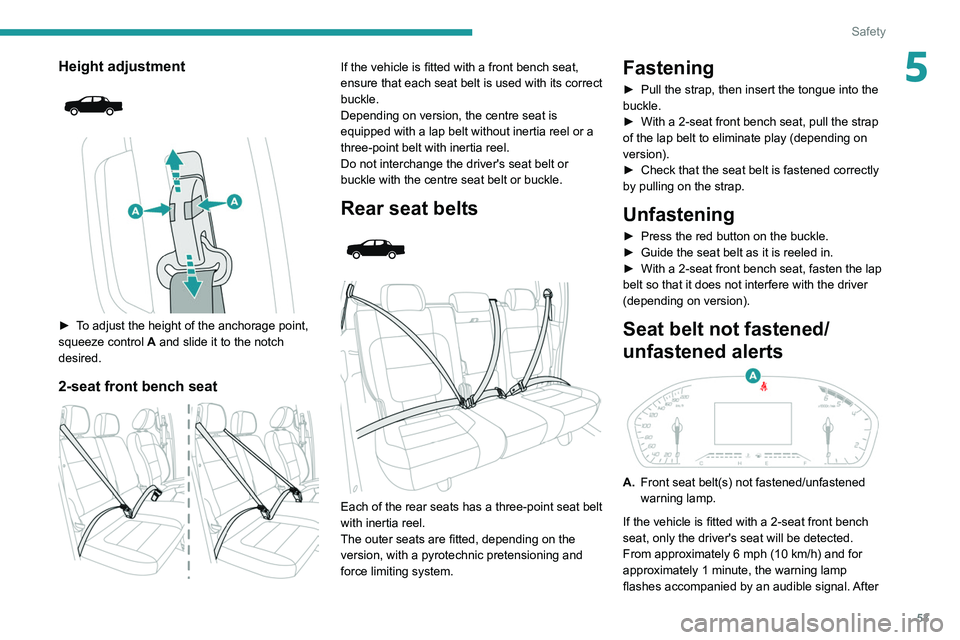
Seat belt not fastened/
unfastened alerts
A. Front seat belt(s) not fastened/unfastened
warning lamp.
If the vehicle is fitted with a 2-seat front bench
seat, only the driver's seat will be detected.
From approximately 6 mph (10 km/h) and for
approximately 1 minute, the warning lamp
flashes accompanied by an audible signal. After
Page 63 of 176
61
Driving
6Driving recommendations
► Observe the driving regulations and remain
vigilant whatever the traffic conditions.
►
Monitor your surroundings and keep your
hands on the wheel to be able to react to
anything that may happen any time.
►
Drive smoothly
, anticipate the need for
braking and maintain a longer safety distance,
especially in bad weather.
►
Stop the vehicle to carry out operations that
require close attention (such as adjustments).
►
During long trips, take a break every 2 hours.
T
o ensure the durability of the vehicle and
for safety reasons, remember that certain
precautionary measures must be taken when
driving the vehicle:
Manoeuvre cautiously, at low speed
Manoeuvre slowly.
Before turning, check that there are no obstacles
at mid-height along the sides.
Before reversing, check that there are no
obstacles, particularly at high level behind the
vehicle.
Load the vehicle correctly
Observe the Gross Train Weight.
To avoid unbalancing the vehicle, centre the
load, placing the heaviest part on the floor in
front of the rear wheels.
Observe the maximum weight for the roof
anchoring points, communicated by a PEUGEOT
dealer. Loads must be securely lashed down.
Loads that are not properly secured in the
loading bay can disturb the vehicle’s behaviour
and cause an accident.
The dimensions of the load in the loading
bay
must respect the (overall) dimensions of the
vehicle.
Drive the vehicle carefully
Take corners gently.
Anticipate the need to brake as the stopping
distance is increased, particularly on wet or icy
roads.
Be aware of the effect of side winds on the
vehicle.
Avoid rough manoeuvres; improper driving can
lead to loss of control of the vehicle.
Precautions for off-road driving
Before driving off-road:
– Check the engine oil level.
–
Check the condition of the wheels and tyres.
–
Make sure that you transport the tool kit as
well as specialised equipment adapted to the
terrain.
Driving on uneven terrain or roads increases the
risk of the vehicle being damaged and the driver
or passengers being injured. Drive carefully
according to the conditions of the conditions.
–
Fasten seat belts (even at low speed).
–
Do not hold the steering wheel on the inside
or by its spokes (risk of injury due to the wheel
spinning back).
– Do not accelerate suddenly and do not drive at
excessive speed.
–
Do not make sharp turns.
–
A
void dangerous areas and avoid hitting
obstacles.
–
Do not drive perpendicularly or turn around on
a steep slope (risk of tipping over). Go up/down
or reverse in a straight line (with reverse gear
engaged if reversing).
–
Never reverse on a steep slope in neutral or
with the clutch pedal depressed (with a manual
gearbox).
On a descent, the vehicle speed can increase
without any action on the accelerator pedal.
In this case, use the engine brake to slow the
vehicle down. If necessary
, depress the brake
pedal without using it for an extended period
(risk of overheating the braking system).
As a precautionary measure, anticipate the
arrival at the top of a slope (steep slope on the
other side or presence of obstacle).
It is recommended to clean the brakes
regularly after driving off-road. In the
event of noise or loss of braking efficiency, it
is essential to visit a PEUGEOT dealer or a
qualified workshop to have the braking
system checked.
Maintenance
Inflate to the minimum pressure indicated on the
label, or even over-inflate by 0.2 to 0.3 bar for
long journeys.
Page 64 of 176
62
Driving
joins your vehicle) approaches the maximum
permitted without exceeding it.
Tyres
► Check the tyre pressures of the towing
vehicle and of the trailer, observing the
recommended pressures.
Lighting
► Check the electrical signalling on the trailer
and the headlamp beam height of your vehicle.
If a genuine PEUGEOT towing device is
used, the rear parking sensors will be
deactivated automatically to avoid the audible
signal.
When driving
Cooling
Towing a trailer uphill causes the coolant
temperature to increase. The maximum towable
load depends on the gradient and the exterior
temperature. The fan’s cooling capacity does not
increase with engine speed.
► Reduce speed and lower the engine speed to
limit heating up.
In all cases, pay attention to the coolant
temperature.
If this warning lamp and the STOP
warning lamp come on, stop the vehicle
and switch off the engine as soon as possible.
Check and clean the vehicle after each off-road
trip.
Important!
Never leave the engine running in a
closed space without sufficient
ventilation. Internal combustion engines emit
toxic exhaust gases such as carbon
monoxide. Danger of poisoning and death!
In very severe wintry conditions
(temperature below -23°C), let the engine
run for 4 minutes before moving off, to ensure
the correct operation and durability of the
mechanical components of your vehicle
(engine and gearbox).
Never drive with the parking brake
applied . Risk of overheating and
damaging the braking system!
Do not park the vehicle or leave the
engine running on a flammable
surface (e.g. dry grass, dead leaves).The
vehicle exhaust system is very hot, even
several minutes after the engine stops. Risk
of fire!
Never leave a vehicle unattended with
the engine running. If you have to leave
your vehicle with the engine running, apply
the parking brake and put the gearbox into
neutral or position N or P (depending on the
type of gearbox).
Never leave children inside the vehicle
unsupervised.
On flooded roads
We strongly advise against driving on flooded
roads, as this could cause serious damage to
the engine or gearbox, as well as to the electrical
systems of your vehicle.
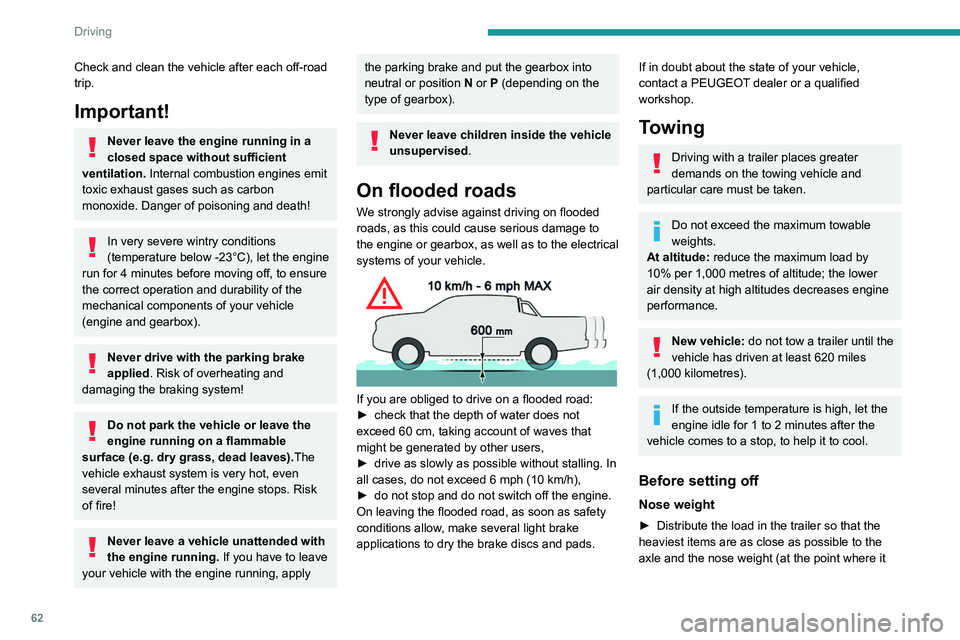
If you are obliged to drive on a flooded road:
► check that the depth of water does not
exceed 60
cm, taking account of waves that
might be generated by other users,
►
drive as slowly as possible without stalling. In
all cases, do not exceed 6 mph (10
km/h),
►
do not stop and do not switch off the engine.
On leaving the flooded road, as soon as safety
conditions allow
, make several light brake
applications to dry the brake discs and pads.
If in doubt about the state of your vehicle,
contact a PEUGEOT dealer or a qualified
workshop.
Towing
Driving with a trailer places greater
demands on the towing vehicle and
particular care must be taken.
Do not exceed the maximum towable
weights.
At altitude: reduce the maximum load by
10% per 1,000 metres of altitude; the lower
air density at high altitudes decreases engine
performance.
New vehicle: do not tow a trailer until the
vehicle has driven at least 620 miles
(1,000 kilometres).
If the outside temperature is high, let the
engine idle for 1 to 2 minutes after the
vehicle comes to a stop, to help it to cool.
Before setting off
Nose weight
► Distribute the load in the trailer so that the
heaviest items are as close as possible to the
axle and the nose weight (at the point where it