open bonnet Peugeot Landtrek 2021 Owner's Manual
[x] Cancel search | Manufacturer: PEUGEOT, Model Year: 2021, Model line: Landtrek, Model: Peugeot Landtrek 2021Pages: 176, PDF Size: 6.04 MB
Page 13 of 176
11
Instruments
1Green warning/indicator lamps
Hill Assist Descent Control
Fixed.
The system has been activated, but the
conditions for regulation are not met (gradient,
speed too high, gear engaged).
Flashing.
The function is regulating the speed of
the vehicle.
The vehicle is being braked; the brake lamps
come on during the descent.
Cruise controlFixed.
Cruise control is selected.
Manual selection.
Lane Departure Warning SystemFixed.
(white)
The function has been activated, but no lane has
been detected by the camera.
Lane departure detection is not operational.
Fixed.
(green)
The system camera has detected lanes.
The function is operational.
4-wheel drive position (high speed)
4HFlashing.
The 4-wheel driving mode ( 4x4) is
selected but not yet activated.
4HFixed.
The 4-wheel driving mode ( 4x4) is
activated. The vehicle can travel at high speed
4-wheel drive position (low speed)
4LFlashing.
The 4-wheel driving mode (
4x4) is
selected but not yet activated.
4LFixed.
The 4-wheel driving mode ( 4x4) is
activated.
The vehicle can only travel at low speed.
Direction indicatorsFlashing with audible signal.
The direction indicators are on.
Front foglampsFixed.
The front foglamps are on.
SidelampsFixed.
The lamps are on.
Dipped beam headlampsFixed.
The lamps are on.
Blue warning/indicator lamps
Main beam headlamps
Fixed.
The lamps are on.
Engine coolant
temperature indicator
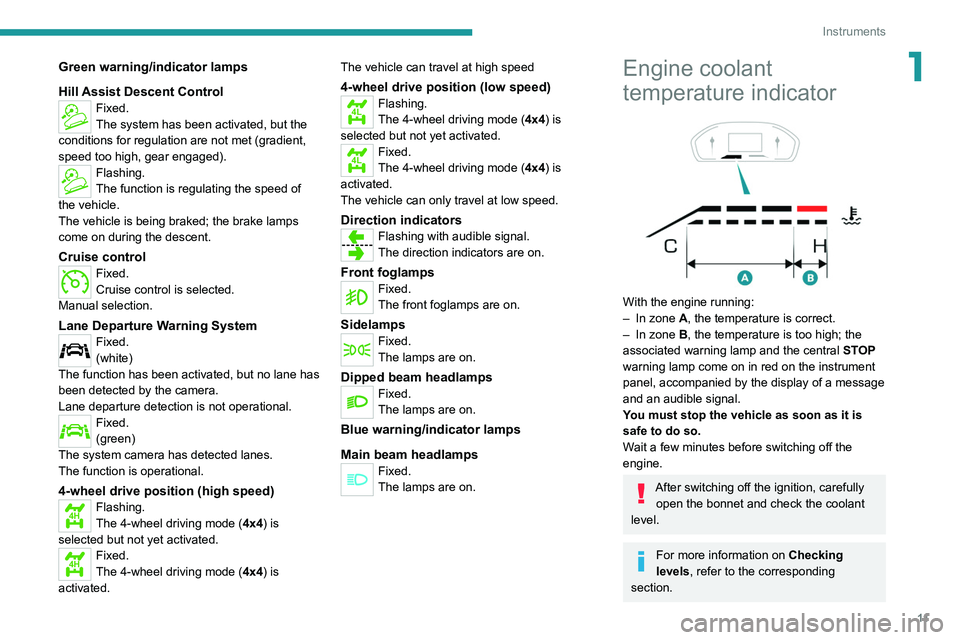
With the engine running:
– In zone A, the temperature is correct.
–
In zone
B, the temperature is too high; the
associated warning lamp and the central STOP
warning lamp come on in red on the instrument
panel, accompanied by the display of a message
and an audible signal.
You must stop the vehicle as soon as it is
safe to do so.
Wait a few minutes before switching off the
engine.
After switching off the ignition, carefully open the bonnet and check the coolant
level.
For more information on Checking
levels, refer to the corresponding
section.
Page 24 of 176

22
Access
Tailgate
Safety recommendations
Never drive with the tailgate down.
Ensure that there are no people or
obstacles present (on the ground and higher
up) when unloading.
Never place your hands near the bracket
when handling the tailgate, there is a risk of
trapping your fingers.
The loading bay tailgate is heavy, open it
carefully.
Observe the payload indicated on the
manufacturer's label present on the vehicle.
Regularly check that the suspensions are in
good condition and that the tyres are inflated
to the recommended pressure.
Spread the load evenly in the loading bay.
Opening to 90°
► Depending on version, unlock the tailgate
with the dedicated key .
►
Pull the opening handle then lower the
tailgate, supporting it until it is held in place by
the retaining brackets.
The maximum load on the tailgate is 100 kg. A heavier load could damage the
brackets.
Opening to 180°
Depending on version, it is possible to increase
the opening angle to around 180°.
►
After opening the tailgate, raise the tailgate
slightly by pulling the brackets in the opposite
direction of operation.
►
When the position is obtained, remove the
brackets from their shaft on both sides of the
tailgate.
Closing
► Raise the tailgate until the locks latch into
place.
Depending on version, if the brackets
have been detached, be sure to reinstall
them before closing the tailgate again.
Check that the 2 locks are correctly locked by
pulling the tailgate on each side.
Alarm
(Depending on version)
System which protects and provides a deterrent
against theft and break-ins.
Exterior perimeter monitoring
The system checks for opening of the vehicle.
The alarm goes off if anyone tries to open a door
or the bonnet, for example.
For all work on the alarm system, contact
a PEUGEOT dealer or a qualified
workshop.
Locking the vehicle with
alarm system
Activation
► Switch off the ignition and exit the vehicle.
► Lock the vehicle using the remote control or
with the “Keyless Entry and Starting” system.
When the monitoring system is active,
this indicator lamp flashes once per
second on the instrument panel and the direction
indicators flash for about 2 seconds.
The exterior perimeter monitoring is activated
after 5 seconds.
If an opening (door or bonnet) is not
properly closed, the vehicle is not locked,
but the exterior perimeter monitoring will be
activated after 45 seconds.
Deactivation
► Press the remote control unlocking
button.
or
► Unlock the vehicle with the Keyless Entry and
Starting system.
The monitoring system is deactivated: the
indicator lamp on the instrument panel goes off
and the direction indicators flash for about 2
seconds.
If the vehicle automatically locks itself
again (as happens if a door is not
Page 25 of 176

23
Access
2Locking the vehicle with
alarm system
Activation
► Switch off the ignition and exit the vehicle.
► Lock the vehicle using the remote control or
with the “Keyless Entry and Starting” system.
When the monitoring system is active,
this indicator lamp flashes once per
second on the instrument panel and the direction
indicators flash for about 2 seconds.
The exterior perimeter monitoring is activated
after 5 seconds.
If an opening (door or bonnet) is not
properly closed, the vehicle is not locked,
but the exterior perimeter monitoring will be
activated after 45
seconds.
Deactivation
► Press the remote control unlocking
button.
or
►
Unlock the vehicle with the Keyless Entry and
Starting system.
The monitoring system is deactivated: the
indicator lamp on the instrument panel goes off
and the direction indicators flash for about 2
seconds.
If the vehicle automatically locks itself
again (as happens if a door is not
opened within 30 seconds of unlocking), the
monitoring system is automatically
reactivated.
Triggering of the alarm
This is indicated by sounding of the siren
and flashing of the direction indicators for 25
seconds.
The flashing of the direction indicators and of
the alarm warning lamp on the instrument panel
indicate that the alarm was triggered during your
absence. When the vehicle is unlocked using the
remote control or the Keyless Entry and Starting
system, the direction indicators and the warning
lamp on the instrument panel
stop flashing.
Failure of the remote control
To deactivate the monitoring functions:
► Unlock the vehicle using the key in the
driver's door lock.
►
Open the door; the alarm is triggered.
►
Switch on the ignition and start the engine;
this stops the alarm.
The indicator lamp on the
instrument panel goes off.
Locking the vehicle without
activating the alarm
► Lock the vehicle using the key (integral to the
remote control) in the driver's door lock.
Malfunction
When the ignition is switched on, fixed
illumination of the indicator lamp on the
instrument panel indicates a system malfunction.
Have the system checked by a PEUGEOT
dealer or a qualified workshop.
Automatic activation
(Depending on version)
The system is activated automatically 2 minutes
after the last door is closed.
►
T
o avoid triggering the alarm on entering the
vehicle, first press the unlocking button on the
remote control or unlock the vehicle using the
“Keyless Entry and Starting” system.
Deactivating the alarm
► Press the remote control unlocking
button for about 4 seconds. An audible
signal is triggered and the direction indicators
flash 4 times to indicate that the alarm is
deactivated (the indicator lamp on the instrument
panel is deactivated).
►
Reactivate the alarm by pressing the
unlocking button.
Page 92 of 176

90
Practical information
Opening
► Open the left-hand front door.
► Pull the interior release lever, located at the
bottom of the dashboard, towards you.
► Tilt the exterior safety catch to the left and
raise the bonnet.
► Unclip the stay from its housing and place it
in the support slot to hold the bonnet open.
* Depending on engine.
► Fit the snow chains following the instructions
provided by the manufacturer .
►
Move off gently and drive for a few moments,
without exceeding 19
mph (30 km/h) for metal
snow chains or 31 mph (50 km/h) for plastic
snow chains.
►
Stop the vehicle and check that the snow
chains are correctly tightened.
It is strongly recommended that you
practise fitting the snow chains on a level
and dry surface before setting off.
Avoid driving with snow chains on roads that have been cleared of snow to avoid
damaging the vehicle's tyres and the road
surface. If the vehicle is fitted with alloy
wheels, check that no part of the chain or its
fixings is in contact with the wheel rim.
Always use snow chains compatible with the tyre size. Chains that are the wrong
size can damage the braking system,
suspension, bodywork and wheels.
Remove the wheel trims before installing the
snow chains.
Never exceed the maximum speed limit
stated in the snow chains user guide.
Roof bars
As a safety measure and to avoid damaging the roof, it is essential to use
transverse roof bars approved for your
vehicle.
Observe the instructions on fitting and use
contained in the guide supplied with the roof
bars.
Maximum load distributed over the roof
bars, for a loading height not exceeding
40 cm: 100
kg.
As this value may change, please verify the
maximum load quoted in the guide supplied
with the roof bars.
If the height exceeds 40 cm, adapt the speed
of the vehicle to the profile of the road to
avoid damaging the roof bars and the fixings
on the vehicle.
Be sure to refer to national legislation in order
to comply with the regulations for transporting
objects that are longer than the vehicle.
Recommendations
Distribute the load uniformly, taking care
to avoid overloading one of the sides.
Arrange the heaviest part of the load as close
as possible to the roof.
Secure the load firmly.
Drive gently: the vehicle will be more
susceptible to the effects of side winds and its
stability may be affected.
Regularly check the security and tight
fastening of the roof bars, at least before each
trip.
Remove the roof bars once they are no longer
needed.
Bonnet
When the engine is hot, handle the
exterior safety catch and the bonnet stay
with care (risk of burns), using the protected
area.
When the bonnet is open, take care not to
damage the safety catch.
Do not open the bonnet under very windy
conditions.
Cooling of the engine when stopped
The engine cooling fan may start after
the engine has been switched off.
Take care with objects or clothing that
could be caught in the blades of the fan!
Page 93 of 176

91
Practical information
7Opening
► Open the left-hand front door.
► Pull the interior release lever , located at the
bottom of the dashboard, towards you.
► Tilt the exterior safety catch to the left and
raise the bonnet.
►
Unclip the stay from its housing and place it
in the support slot to hold the bonnet open.
* Depending on engine.
Closing
► Hold the bonnet and pull out the stay from the
support slot.
►
Clip the stay in its housing.
►
Lower the bonnet and release it near the end
of its travel.
►
Pull on the bonnet to check that it is locked
correctly
.
Because of the presence of electrical
equipment under the bonnet, it is strongly
recommended that exposure to water (rain,
washing, etc.) be limited.
Engine compartment
The engine shown here is an example for
illustrative purposes only.
The locations of the following elements may
vary:
–
Air filter
.
–
Engine oil dipstick.
–
Engine oil filler cap.
–
Priming pump.
–
Degassing screw
.
Petrol engine
Diesel engine
1.Screenwash fluid reservoir
2. Engine coolant reservoir
3. Brake fluid reservoir
4. Battery
5. Power steering fluid reservoir
6. Fusebox
7. Air filter
8. Engine oil filler cap
9. Engine oil dipstick
10. Priming pump*
11 . Degassing screw*
Page 106 of 176

104
In the event of a breakdown
Warning triangle
As a safety precaution, before leaving your
vehicle to set up and install the triangle, switch
on the hazard warning lamps and put on your
high visibility vest.
Storage
Storage compartments located under each rear
bench seat cushion can store a folded triangle or
its storage box.
For more information on the Rear bench seat,
and especially on the storage compartments
under the seat cushions, refer to the
corresponding section.
Storage compartments located behind the
passenger seat or passenger bench seat
(depending on version) can store a folded
triangle or its storage box.
For more information on the Front seats or on
the Front bench seat, and in particular their
use, refer to the corresponding section.
Assembling and placing the triangle
For versions supplied with a triangle as original
equipment, refer to the illustration above.
For other versions, refer to the assembly
instructions provided with the triangle.
►
Put the triangle in place behind the vehicle,
as required by local legislation.
Fire extinguisher
(Depending on country of sale)
It should be used in an emergency, such as a
fire.
For more information on its use, refer to the label
on the fire extinguisher.
Accessing the fire extinguisher
The fire extinguisher is located under the front
passenger seat.
► Pull lever A outwards to unhook the
tightening strap.
After using the fire extinguisher, store it in a safe
place, then replace it with a new extinguisher as
soon as possible.
Never keep a fire extinguisher that has
already been used or that does not bear
its seal.
When the fire extinguisher is not used, attach
it to its support. There is a risk of movement
in the event of sudden braking or an accident.
The fire extinguisher must be replaced
approximately every 5 years; the expiry date
is written on its label.
Contact a PEUGEOT dealer or a
qualified workshop to replace the fire
extinguisher with one that has the same
specifications as the original.
Running out of fuel
(Diesel)
With Diesel engines, the fuel system must be
primed if you run out of fuel.
Before starting to prime the system, it is
essential to put at least 5 litres of Diesel into the
fuel tank.
For more information on Refuelling and
on the Engine compartment (in
particular the location of the priming pump),
refer to the corresponding section.
► Open the bonnet.
► Loosen the degassing bolt about 2 to 3 turns.
Page 107 of 176

105
In the event of a breakdown
8Never keep a fire extinguisher that has
already been used or that does not bear
its seal.
When the fire extinguisher is not used, attach
it to its support. There is a risk of movement
in the event of sudden braking or an accident.
The fire extinguisher must be replaced
approximately every 5 years; the expiry date
is written on its label.
Contact a PEUGEOT dealer or a
qualified workshop to replace the fire
extinguisher with one that has the same
specifications as the original.
Running out of fuel
(Diesel)
With Diesel engines, the fuel system must be
primed if you run out of fuel.
Before starting to prime the system, it is
essential to put at least 5 litres of Diesel into the
fuel tank.
For more information on Refuelling and
on the Engine compartment (in
particular the location of the priming pump),
refer to the corresponding section.
►
Open the bonnet.
►
Loosen the degassing bolt about 2 to 3 turns.
► Activate the priming pump until fuel
(without air) appears through the
degassing bolt.
►
Retighten the degassing bolt.
►
Operate the starter motor until the engine
starts (if the engine does not start at the first
attempt, wait around 15 seconds before trying
again).
►
If the engine does not start after a few
attempts, operate the priming pump again, then
start the engine.
►
Close the bonnet.
Tool kit
Set of tools supplied with the vehicle.
Accessing the tools
Depending on version, the tools are stored under
the rear passenger seat cushion or behind the
front passenger seat or bench seat.
To access the tools under the rear passenger
seat:
►
Open the rear passenger door
.
► Lift the right-hand rear seat cushion by pulling
the strap to unlock it, then lift up the carpet
(
unscrew the jack to take it out of its support).
To access the tools behind the passenger seat
or the passenger bench seat (depending on
version):
►
Open the passenger door
.
►
Fold down the seat backrest.
For more information on the Front bench seats
,
Rear bench seats and Front seats, and in
particular their use, refer to the corresponding
section.
Page 112 of 176

11 0
In the event of a breakdown
After changing a wheel
Visit a PEUGEOT dealer or a qualified
workshop as soon as possible to have
the tightness of the nuts and the pressure of
the spare wheel checked.
Have the punctured tyre examined. After
inspection, the technician will advise you on
whether the tyre can be repaired or if it must
be replaced.
Changing a bulb
In some weather conditions (e.g. low
temperature or humidity), misting on the
internal surface of the glass of the headlamps
and rear lamps is normal, and will disappear
after the lamps have been on for a few
minutes.
The headlamps have polycarbonate lenses with a protective coating:
►
do not clean them with a dry or
abrasive cloth, nor with detergent or
solvent products,
►
use a sponge and soapy water or a pH
neutral product,
►
when using a high-pressure washer on
persistent marks, do not keep the lance
directed towards the lamps or their edges for
too long, so as not to damage their protective
coating and seals.
Changing a bulb must only be done with
the ignition off and after the lamp has
been switched off for several minutes - risk of
serious burns!
Do not touch the bulb directly with your
fingers, use a lint-free cloth.
It is essential only to use anti-ultraviolet
(UV) type bulbs, so as not to damage the
headlamp.
Always replace a failed bulb with a new bulb
of the same type and specification.
After changing a bulb
To refit, carry out the operations in
reverse order to removal.
Close the protective cover very carefully to
guarantee the sealing of the lamps.
Light-emitting diode (LED)
headlamps and lamps
Depending on version, the affected types of
headlamps / lamps are:
–
Offset daytime running lamps.
–
Direction indicator side repeaters.
–
Rear sidelamps.
–
Third brake lamp and loading bay lighting.
For the replacement of this type of bulb,
you must contact a PEUGEOT dealer or
a qualified workshop.
Front lamps
1. A: Sidelamps (W5W)
or
B: Daytime running lamps / sidelamps (LED)
2. A: Dipped beam headlamps (H8)
or
B: Dipped beam headlamps (LED)
3. A: Main beam headlamps (HB3)
or
B: Main beam headlamps (H9)
4. Direction indicators (PY21W)
5. Foglamps (H11)
6. Daytime running lamps (PY24W)
Opening the bonnet/Accessing the
bulbs
With the engine warm, proceed with caution -
risk of burns!
Take care with objects or clothing that could
be caught in the blades of the cooling fan -
risk of strangulation!
Halogen bulbs (Hx)
To ensure good quality lighting, check
that the bulb is correctly positioned in its
housing.
Sidelamps
► Remove the protective cover by giving it a
quarter turn.
► Pull the bulb holder backwards to remove it.
► Pull out the bulb and replace it.
When refitting the bulb holder in its housing,
press until you hear a click which means it is
locked in place.
Page 143 of 176
141
Alphabetical index
Mountings, ISOFIX 59
N
Normal mode 71
O
Obstacle detection 80
Off-road camera
82
Oil change
92, 99
Oil consumption
92
OIl, engine
92, 99
On-board tools
105–106
Opening the bonnet
90–91
Opening the boot
18
Opening the doors
18, 21
Opening the windows
17
Over-speed buzzer
76
P
Pads, brake 95
Paint
103, 125
Paint colour code
125
Parking brake
66, 95
Parking sensors, audible and visual
80
Parking sensors, front
81
Parking sensors, rear
80
Plates, identification 125
Player, Apple®
129
Player, USB
129, 133–134
Port, USB
36, 129, 133–135
Pressures, tyres
95, 126
Pre-tensioning seat belts
54
Priming pump
105
Priming the fuel system
105
Protecting children
55–59
Puncture
106
R
Radio 128, 133
Reading lamps
38
Rear differential locking
67
Rear screen, demisting
35
Recharging the battery
11 8
Recirculation, air
34
Recovery
119, 121
Regeneration of the particle filter
95
Reinitialisation of the under-inflation
detection system
74
Reinitialising the remote control
21
Reminder, key in ignition
64
Reminder, lighting on
43
Remote control
16–20
Removing a wheel
107–109
Removing the mat
37
Replacing bulbs
110, 112
Replacing fuses
113–114
Replacing the air filter 94, 99
Replacing the battery
98
Replacing the Diesel filter
100
Replacing the oil filter
94, 100
Replacing the passenger compartment
filter
94, 98
Reservoir, screenwash
94
Reset trip
12
Rev counter
7
Reversing camera
75, 81
Reversing lamps
11 2
Roof bars
90
Running out of fuel (Diesel)
105
S
Safety, children 55–59
Saturation of the particle filter (Diesel)
95
Screen, monochrome
13
Screenwash
46
Screenwash, front
46
Seat angle
26
Seat belts
52–54
Seat belts, rear
53
Seat, bench front, 2-seat
26–27, 53
Seat, rear bench
29–30
Seats, electric
26
Seats, front
25–26
Seats, rear
29–30, 57
Selector, gear
70
Sensors (warnings)
75
Page 168 of 176

2
Access
Alarm
(Depending on version)
System which protects and provides a deterrent
against theft and break-ins.
Exterior perimeter monitoring
The system checks for opening of the vehicle.
The alarm goes off if anyone tries to open a door
or the bonnet, for example.
For all work on the alarm system, contact
a PEUGEOT dealer or a qualified
workshop.
Locking the vehicle with
alarm system
Activation
► Switch off the ignition and exit the vehicle.► Lock the vehicle using the remote control or with the Keyless Entry and Starting system.When the monitoring system is active,
this indicator lamp flashes once per
second on the instrument panel and the direction
indicators flash for about 2 seconds.
The exterior perimeter monitoring is activated
after 5 seconds.
If an opening (door or bonnet) is not
closed correctly, exterior perimeter
monitoring cannot be activated.
Deactivation
► Press the remote control unlocking button.
or
► Unlock the vehicle with the Keyless Entry and Starting system.
The monitoring system is deactivated: the
indicator lamp on the instrument panel goes off
and the direction indicators flash for about 2
seconds.
If the vehicle automatically locks itself
again (as happens if a door is not
opened within 30 seconds of unlocking), the
monitoring system is automatically
reactivated.