PEUGEOT LANDTREK 2022 Owners Manual
Manufacturer: PEUGEOT, Model Year: 2022, Model line: LANDTREK, Model: PEUGEOT LANDTREK 2022Pages: 164, PDF Size: 5.87 MB
Page 121 of 164
11 9
In the event of a breakdown
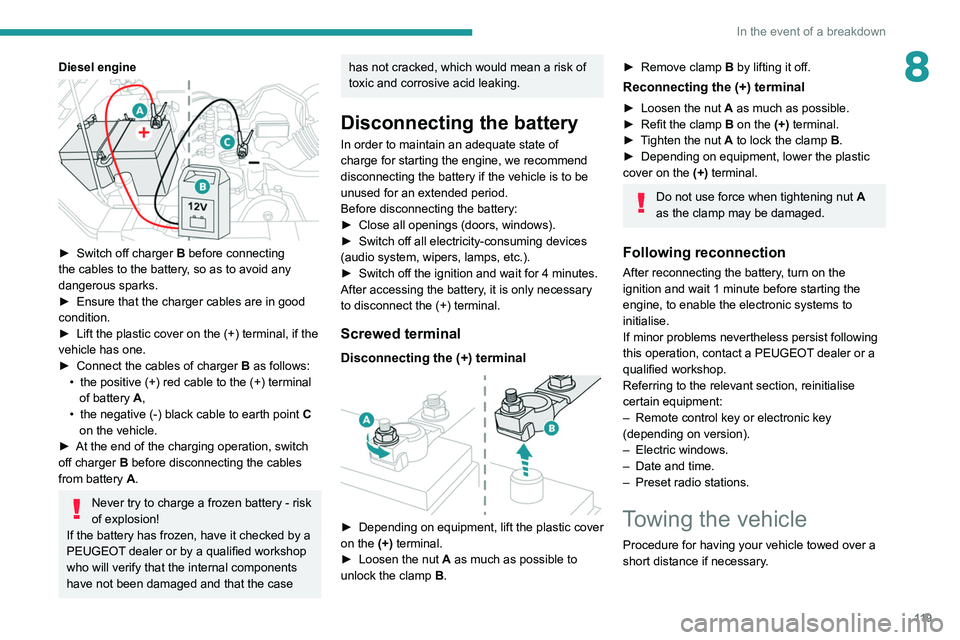
8Diesel engine
► Switch off charger B before connecting
the cables to the battery, so as to avoid any
dangerous sparks.
►
Ensure that the charger cables are in good
condition.
►
Lift the plastic cover on the (+) terminal, if the
vehicle has one.
►
Connect the cables of charger B
as follows:
•
the positive (+) red cable to the (+) terminal
of battery
A,
•
the negative (-) black cable to earth point C
on the vehicle.
►
At the end of the charging operation, switch
off charger B
before disconnecting the cables
from battery A.
Never try to charge a frozen battery - risk
of explosion!
If the battery has frozen, have it checked by a
PEUGEOT dealer or by a qualified workshop
who will verify that the internal components
have not been damaged and that the case
has not cracked, which would mean a risk of
toxic and corrosive acid leaking.
Disconnecting the battery
In order to maintain an adequate state of
charge for starting the engine, we recommend
disconnecting the battery if the vehicle is to be
unused for an extended period.
Before disconnecting the battery:
►
Close all openings (doors, windows).
►
Switch off all electricity-consuming devices
(audio system, wipers, lamps, etc.).
►
Switch off the ignition and wait for 4
minutes.
After accessing the battery, it is only necessary
to disconnect the (+) terminal.
Screwed terminal
Disconnecting the (+) terminal
► Depending on equipment, lift the plastic cover
on the (+) terminal.
►
Loosen the nut
A as much as possible to
unlock the clamp B.
► Remove clamp B by lifting it off.
Reconnecting the (+) terminal
► Loosen the nut A as much as possible.
► Refit the clamp B on the (+) terminal.
►
T
ighten the nut A to lock the clamp B.
►
Depending on equipment, lower the plastic
cover on the
(+) terminal.
Do not use force when tightening nut A
as the clamp may be damaged.
Following reconnection
After reconnecting the battery, turn on the
ignition and wait 1 minute before starting the
engine, to enable the electronic systems to
initialise.
If minor problems nevertheless persist following
this operation, contact a PEUGEOT dealer or a
qualified workshop.
Referring to the relevant section, reinitialise
certain equipment:
–
Remote control key or electronic key
(depending on version).
–
Electric windows.
–
Date and time.
–
Preset radio stations.
Towing the vehicle
Procedure for having your vehicle towed over a
short distance if necessary.
Page 122 of 164
120
In the event of a breakdown
General recommendations
Observe the legislation in force in the
country where you are driving.
Ensure that the weight of the towing vehicle is
higher than that of the towed vehicle.
The driver must remain at the wheel of the
towed vehicle and must have a valid driving
licence.
When towing a vehicle with all four wheels on
the ground, always use an approved towing
arm; rope and straps are prohibited.
The towing vehicle must move off gently.
When the vehicle is towed with its engine
off, there is no longer braking and steering
assistance.A professional towing service must be
called if:
–
Broken down on a motorway or main road.
–
Not possible to put
the gearbox into neutral,
unlock the steering, or release the parking
brake.
–
Not possible to tow a vehicle with an
automatic gearbox, with the engine running.
–
T
owing with only two wheels on the ground.
–
Four-wheel drive vehicle.
–
No approved towbar available.
Before towing the vehicle, it is essential
to put the vehicle in free-wheeling mode.
For more information on Changing to free-
wheeling , refer to the corresponding section.
With a manual gearbox, place the gear
lever in neutral.
With an automatic gearbox, place the gear
selector in position N.
Failure to adhere to this instruction may lead
to damage to some braking components and
the lack of braking assistance on restarting
the engine.
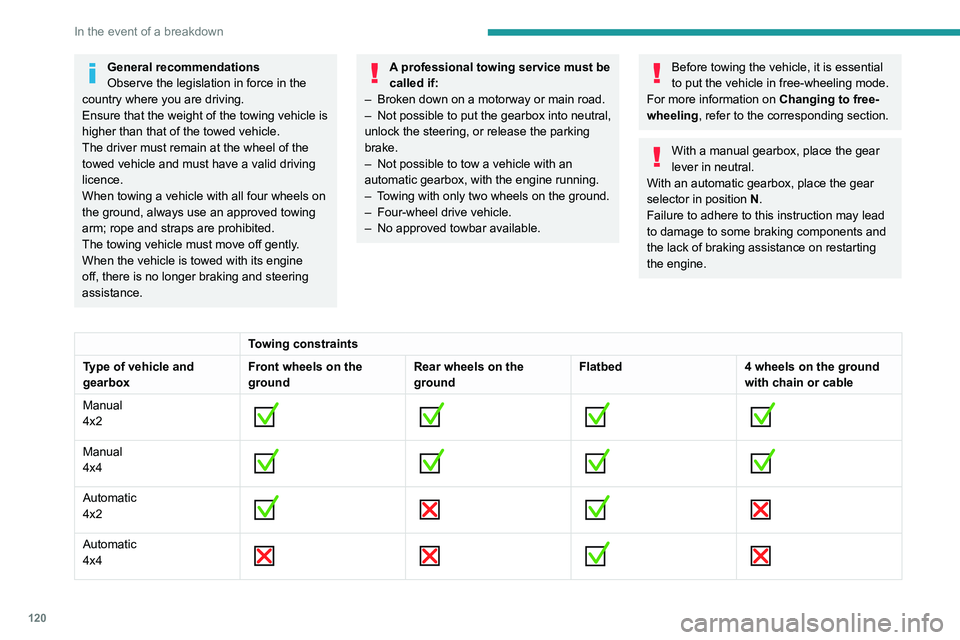
Towing constraints
Type of vehicle and
gearbox Front wheels on the
groundRear wheels on the
groundFlatbed
4 wheels on the ground
with chain or cable
Manual
4x2
Manual
4x4
Automatic
4x2
Automatic
4x4
Towing your vehicle
Access to the front hooks
The tow hooks are located under the front
bumper.
To be towed:
►
Securely install cables or chains to the tow
hooks.
► Put the gearbox into neutral.
Failure to observe this instruction could
result in damage to certain components
(braking, transmission, etc.) and to the
absence of braking assistance the next time
the engine is started.
Page 123 of 164
121
In the event of a breakdown
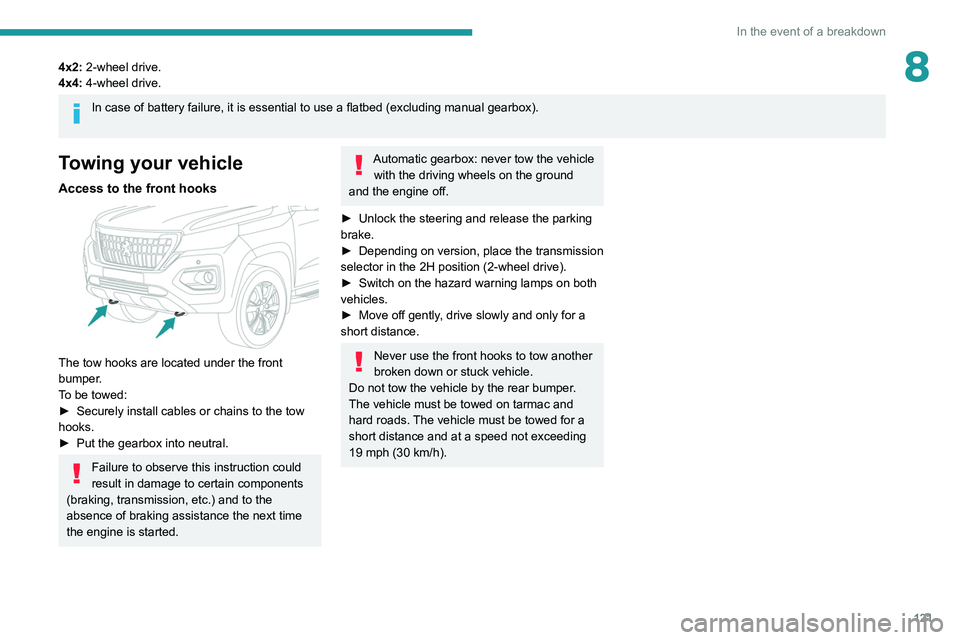
84x2: 2-wheel drive.
4x4: 4-wheel drive.
In case of battery failure, it is essential to use a flatbed (excluding manual gearbox).
Towing your vehicle
Access to the front hooks
The tow hooks are located under the front
bumper.
To be towed:
►
Securely install cables or chains to the tow
hooks.
►
Put the gearbox into neutral.
Failure to observe this instruction could
result in damage to certain components
(braking, transmission, etc.) and to the
absence of braking assistance the next time
the engine is started.
Automatic gearbox: never tow the vehicle with the driving wheels on the ground
and the engine off.
►
Unlock the steering and release the parking
brake.
►
Depending on version, place the transmission
selector in the 2H position (2-wheel drive).
►
Switch on the hazard warning lamps on both
vehicles.
►
Move off gently
, drive slowly and only for a
short distance.
Never use the front hooks to tow another
broken down or stuck vehicle.
Do not tow the vehicle by the rear bumper.
The vehicle must be towed on tarmac and
hard roads. The vehicle must be towed for a
short distance and at a speed not exceeding
19 mph (30 km/h).
Page 124 of 164
122
Technical data
Engine technical data and
towed loads
Engines
The engine characteristics are given in the
vehicle's registration document, as well as in
sales brochures.
Only the values available at the time of
publication are presented in the tables.
Contact a PEUGEOT dealer or a qualified
workshop to obtain missing values.
The maximum power corresponds to the value type-approved on a test bed, under
conditions defined by legislation.
For more information, contact a PEUGEOT
dealer or a qualified workshop.
Weights and towed loads
The weights and towed loads relating to
the vehicle are indicated on the registration
document, as well as in sales brochures.
These values are also indicated on the
manufacturer's plate or label.
For more information, contact a PEUGEOT
dealer or a qualified workshop.
The GTW (Gross Train Weight) and towed load
values indicated are valid up to a maximum
altitude of 1,000 metres. The towed load value
must be reduced by 10% for each additional
1,000 metres of altitude.
The maximum authorised nose weight
corresponds to the weight permitted on the
towball.
When exterior temperatures are high, the
vehicle performance may be limited in
order to protect the engine. When the exterior
temperature is higher than 37°C, reduce the
towed weight.
Towing even with a lightly loaded vehicle can adversely affect its road holding.
Braking distances are increased when towing
a trailer.
When using a vehicle to tow, never exceed
a speed of 62 mph (100
km/h) (observe the
local legislation in force).
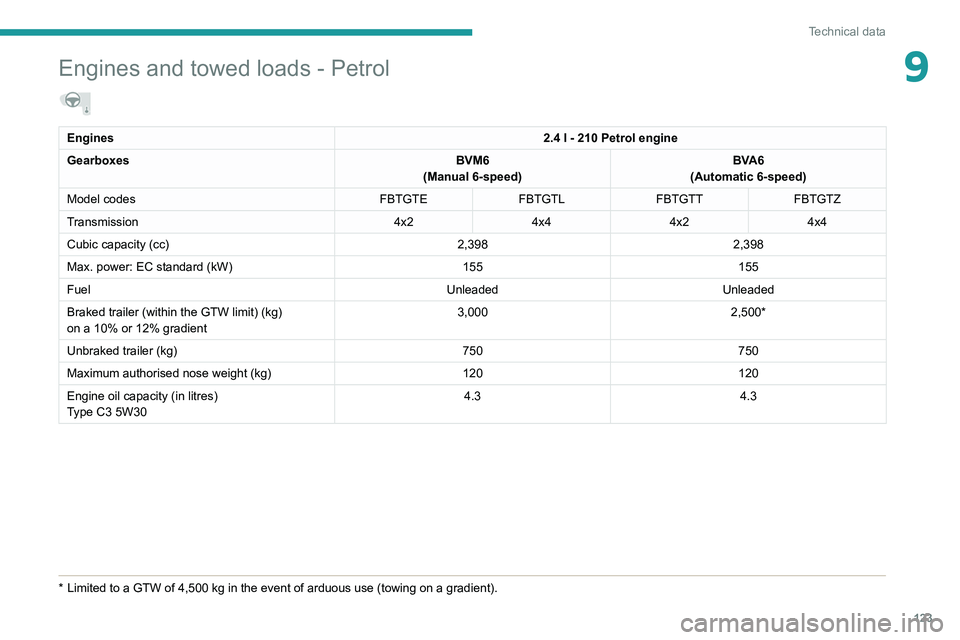
Engines and towed loads - Petrol
Engines 2.4 l - 210 Petrol engine
Gearboxes BVM6
(Manual 6-speed) BVA6
(Automatic 6-speed)
Model codes FBTGTEFBTGTLFBTGTT FBTGTZ
Transmission 4x24x44x24x4
Cubic capacity (cc) 2,3982,398
Max. power: EC standard (kW) 155155
Fuel UnleadedUnleaded
Braked trailer (within the GTW limit) (kg)
on a 10% or 12% gradient 3,000
2,500*
Unbraked trailer (kg) 750750
Maximum authorised nose weight (kg) 120120
Engine oil capacity (in litres)
Type C3 5W30 4.3
4.3
* Limited to a GTW of 4,500 kg in the event of arduous use (towing on a gradient).
Page 125 of 164
123
Technical data
9Engines and towed loads - Petrol
Engines2.4 l - 210 Petrol engine
Gearboxes BVM6
(Manual 6-speed) BVA6
(Automatic 6-speed)
Model codes FBTGTEFBTGTLFBTGTT FBTGTZ
Transmission 4x24x44x24x4
Cubic capacity (cc) 2,3982,398
Max. power: EC standard (kW) 155155
Fuel UnleadedUnleaded
Braked trailer (within the GTW limit) (kg)
on a 10% or 12% gradient 3,000
2,500*
Unbraked trailer (kg) 750750
Maximum authorised nose weight (kg) 120120
Engine oil capacity (in litres)
Type C3 5W30 4.3
4.3
* Limited to a GTW of 4,500 kg in the event of arduous use (towing on a gradient).
Page 126 of 164
124
Technical data
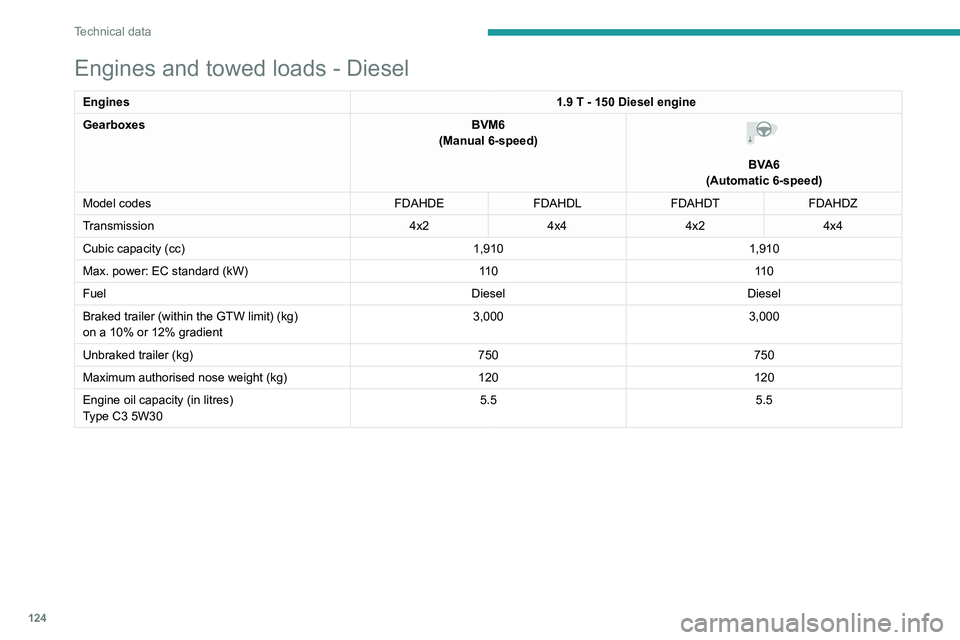
Engines and towed loads - Diesel
Engines1.9 T - 150 Diesel engine
Gearboxes BVM6
(Manual 6-speed)
BVA6
(Automatic 6-speed)
Model codes FDAHDEFDAHDLFDAHDT FDAHDZ
Transmission 4x24x44x24x4
Cubic capacity (cc) 1,9101,910
Max. power: EC standard (kW) 11 011 0
Fuel DieselDiesel
Braked trailer (within the GTW limit) (kg)
on a 10% or 12% gradient 3,000
3,000
Unbraked trailer (kg) 750750
Maximum authorised nose weight (kg) 120120
Engine oil capacity (in litres)
Type C3 5W30 5.5
5.5
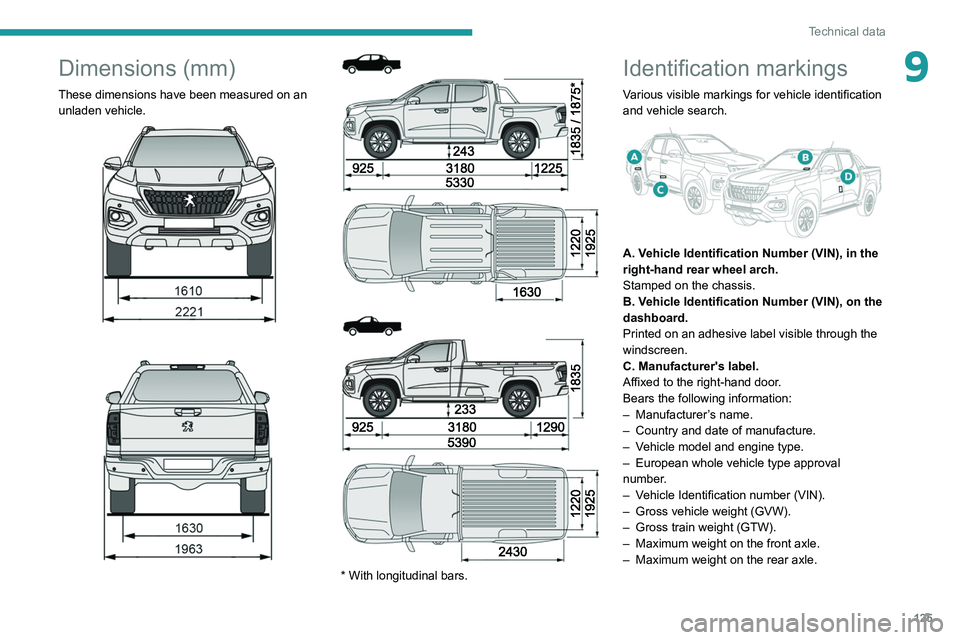
Dimensions (mm)
These dimensions have been measured on an
unladen vehicle.
Page 127 of 164
125
Technical data
9Dimensions (mm)
These dimensions have been measured on an unladen vehicle.
* With longitudinal bars.
Identification markings
Various visible markings for vehicle identification
and vehicle search.
A. Vehicle Identification Number (VIN), in the
right-hand rear wheel arch.
Stamped on the chassis.
B. Vehicle Identification Number (VIN), on the
dashboard.
Printed on an adhesive label visible through the
windscreen.
C. Manufacturer's label.
Affixed to the right-hand door.
Bears the following information:
–
Manufacturer
’s name.
–
Country and date of manufacture.
–
V
ehicle model and engine type.
–
European whole vehicle type approval
number
.
–
V
ehicle Identification number (VIN).
–
Gross vehicle weight (GVW).
–
Gross train weight (GTW).
–
Maximum weight on the front axle.
–
Maximum weight on the rear axle.
Page 128 of 164
126
Technical data
D. Tyres label.
Affixed to the left-hand door.
Bears the following information about the tyres:
–
T
yre pressures, unladen and laden.
–
T
yre specification, made up of the dimensions
and type.
–
Spare tyre inflation pressure.
The vehicle may be originally equipped with tyres with higher load and speed
indices than those indicated on the label,
without affecting tyre pressure (on cold tyres).
In the event of a change in the type of tyres,
contact a PEUGEOT dealer for the tyre fits
approved for the vehicle.
Page 129 of 164
127
Bluetooth® audio system
10Bluetooth® audio system
The different functions and settings described vary according to the version
and configuration of your vehicle.
As a safety measure and because it requires sustained attention by the driver,
the pairing of a Bluetooth
® mobile telephone
with the Bluetooth® hands-free system of your
audio system must be done with the vehicle
stationary and the ignition on.
Your audio system is coded in such a way that it will only operate in your
vehicle.
All work on the system must be carried out
exclusively by a dealer or qualified workshop,
to avoid any risk of electrocution, fire or
mechanical faults.
Menus
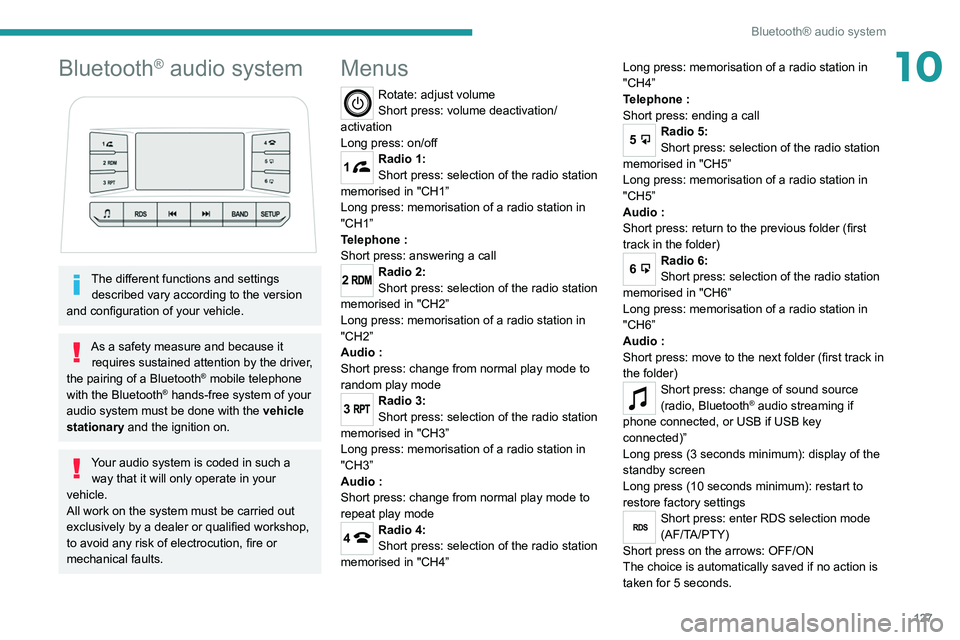
Rotate: adjust volume
Short press: volume deactivation/
activation
Long press: on/off
1Radio 1:
Short press: selection of the radio station
memorised in "CH1”
Long press: memorisation of a radio station in
"CH1”
Telephone
:
Short press: answering a call
2Radio 2:
Short press: selection of the radio station
memorised in "CH2”
Long press: memorisation of a radio station in
"CH2”
Audio
:
Short press: change from normal play mode to
random play mode
3Radio 3:
Short press: selection of the radio station
memorised in "CH3”
Long press: memorisation of a radio station in
"CH3”
Audio
:
Short press: change from normal play mode to
repeat play mode
4Radio 4:
Short press: selection of the radio station
memorised in "CH4” Long press: memorisation of a radio station in
"CH4”
Telephone
:
Short press: ending a call
5Radio 5:
Short press: selection of the radio station
memorised in "CH5”
Long press: memorisation of a radio station in
"CH5”
Audio
:
Short press: return to the previous folder (first
track in the folder)
6Radio 6:
Short press: selection of the radio station
memorised in "CH6”
Long press: memorisation of a radio station in
"CH6”
Audio
:
Short press: move to the next folder (first track in
the folder)
Short press: change of sound source
(radio, Bluetooth® audio streaming if
phone connected, or USB if USB key
connected)”
Long press (3 seconds minimum): display of the
standby screen
Long press (10 seconds minimum): restart to
restore factory settings
RDSShort press: enter RDS selection mode
(AF/TA/PTY)
Short press on the arrows: OFF/ON
The choice is automatically saved if no action is
taken for 5 seconds.
Page 130 of 164
128
Bluetooth® audio system
Media
USB socket
Insert a USB memory stick in the USB
socket.
The system changes automatically to "USB"
source and the "USB" symbol appears at the top
left of the screen.
To protect the system, do not use a USB hub.
Any additional devices connected to the system must comply with the standard
applicable to the product and/or the standard
IEC 60950-1.
When the USB socket is used, the
portable device charges automatically.
Play mode
The play modes available are:
– Normal: the tracks are played in order,
according to the classification of the selected
files.
– Random: the tracks in an album or folder are
played in a random order.
– Random on all media : all of the tracks saved
in the media are played in random order.
– Repeat: the tracks played are only those from
the current album or folder.
Radio:
Short press: Manual step-by-step search
up/down for radio stations
Long press: automatic search of a radio station
Audio
:
Short press: go to the previous/next track
Long press: fast navigation in a track
Short press: selection of the wave ranges
(FM1/FM2/FM3/AM1/AM2)
Radio/Audio:
Short press: enter configuration mode
(time, sound environment, language settings,
etc.)
Short press on the arrows: combination of
settings.
The settings are automatically saved if no action
is taken for 5 seconds.
Steering mounted controls
Change of sound source (radio,
Bluetooth® audio streaming if phone
connected, or USB if USB key connected)”.
Volume adjustment.
Telephone: ending a call.
Radio: selection of the previous radio
station (among the memorised radio stations).
Audio: go to the previous track.
Telephone: answering a call.
Radio: selection of the next radio station (among
the memorised radio stations).
Audio: go to the next track.
Radio
Selecting a station
Press this button to select the radio.
Press consecutively to select the
waveband (FM1/FM2/FM3/AM1/AM2).
Short press: manual search up/down for
radio stations
Long press: automatic search for radio stations
Memorising a station
123456
Once the radio station has been selected, press
and hold one of these buttons to save it.
RDS
The external environment (hills, buildings, tunnels, car parks,
underground, etc.) may block reception,
including in RDS
tracking mode. This is a
normal effect of the way in which radio waves
are transmitted and does not indicate any
failure of the audio system.
RDS, if activated, allows you to continue
listening to the same station by
automatically retuning to alternative
frequencies. However, in certain conditions,
RDS station tracking may not be possible
nationwide, as radio stations do not always
cover the entire country. This can explain the
loss of reception of a station during a journey.
Procedure
Press this button several times to access
the RDS mode (AF - TA - PTY).
Press these buttons to activate/deactivate
the RDS mode (AF - TA - PTY).
AF: When the alternative frequency function
is activated, the system selects the best RDS
frequency (region code) of the station being
listened to. However, in certain conditions,
following this station is not guaranteed over the
whole country, because radio stations do not
cover 100% of the area. When the reception
is weak, the frequency switches to a regional
station.
PTY: the PTY function selects a type of
programme that radio stations broadcast. All this
information is transmitted via the RDS signal on
some radios.