gearbox PEUGEOT LANDTREK 2022 Owner's Manual
[x] Cancel search | Manufacturer: PEUGEOT, Model Year: 2022, Model line: LANDTREK, Model: PEUGEOT LANDTREK 2022Pages: 164, PDF Size: 5.87 MB
Page 81 of 164
79
Driving
6Switching off the ignition cancels any
speed setting.
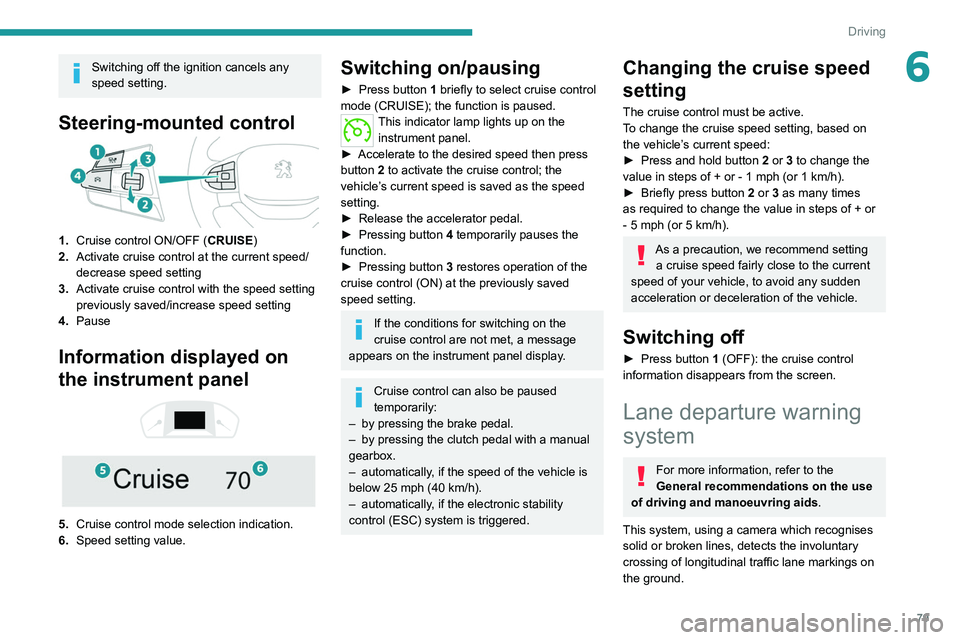
Steering-mounted control
1.Cruise control ON/OFF (CRUISE)
2. Activate cruise control at the current speed/
decrease speed setting
3. Activate cruise control with the speed setting
previously saved/increase speed setting
4. Pause
Information displayed on
the instrument panel
5. Cruise control mode selection indication.
6. Speed setting value.
Switching on/pausing
► Press button 1 briefly to select cruise control
mode (CRUISE); the function is paused.
This indicator lamp lights up on the instrument panel.
►
Accelerate to the desired speed then press
button
2 to activate the cruise control; the
vehicle’s current speed is saved as the speed
setting.
►
Release the accelerator pedal.
►
Pressing button 4
temporarily pauses the
function.
►
Pressing button 3
restores operation of the
cruise control (ON) at the previously saved
speed setting.
If the conditions for switching on the
cruise control are not met, a message
appears on the instrument panel display.
Cruise control can also be paused
temporarily:
–
by pressing the brake pedal.
–
by pressing the clutch pedal with a manual
gearbox.
–
automatically
, if the speed of the vehicle is
below 25 mph (40
km/h).
–
automatically
, if the electronic stability
control (ESC) system is triggered.
Changing the cruise speed
setting
The cruise control must be active.
To change the cruise speed setting, based on
the vehicle’s current speed:
►
Press and hold button
2
or 3 to change the
value in steps of +
or - 1 mph (or 1 km/h).
►
Briefly press button
2 or 3 as many times
as required to change the value in steps of +
or
-
5 mph (or 5 km/h).
As a precaution, we recommend setting a cruise speed fairly close to the current
speed of your vehicle, to avoid any sudden
acceleration or deceleration of the vehicle.
Switching off
► Press button 1 (OFF): the cruise control
information disappears from the screen.
Lane departure warning
system
For more information, refer to the
General recommendations on the use
of driving and manoeuvring aids .
This system, using a camera which recognises
solid or broken lines, detects the involuntary
crossing of longitudinal traffic lane markings on
the ground.
Page 86 of 164
84
Driving
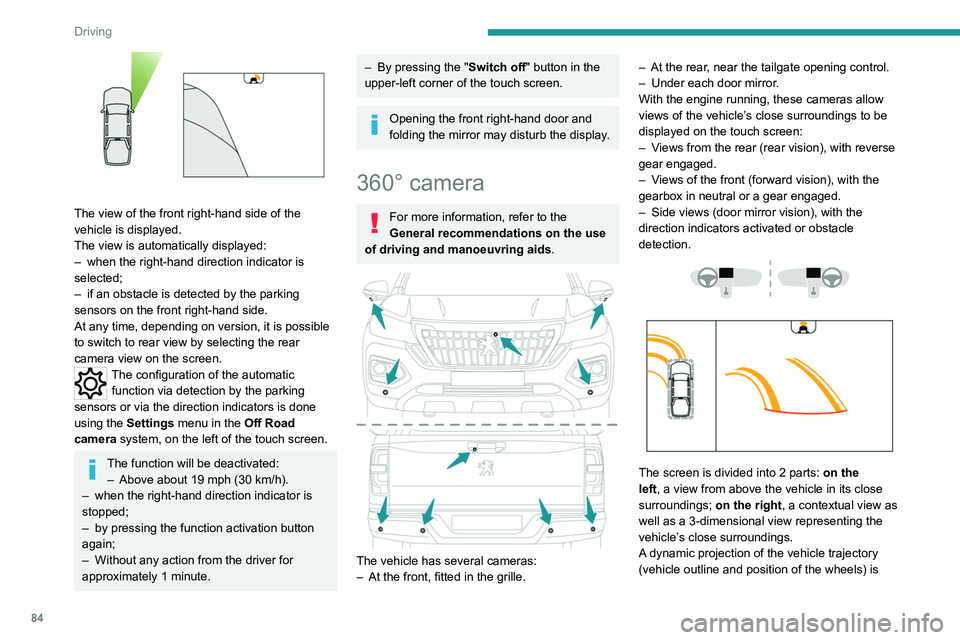
The view of the front right-hand side of the
vehicle is displayed.
The view is automatically displayed:
–
when the right-hand direction indicator is
selected;
–
if an obstacle is detected by the parking
sensors on the front right-hand side.
At any time, depending on version, it is possible
to switch to rear view by selecting the rear
camera view on the screen.
The configuration of the automatic
function via detection by the parking
sensors or via the direction indicators is done
using the
Settings menu in the Off Road
camera system, on the left of the touch screen.
The function will be deactivated:
– Above about 19 mph (30 km/h).
–
when the right-hand direction indicator is
stopped;
–
by pressing the function activation button
again;
–
Without any action from the driver for
approximately 1 minute.
– By pressing the " Switch off" button in the
upper-left corner of the touch screen.
Opening the front right-hand door and
folding the mirror may disturb the display.
360° camera
For more information, refer to the
General recommendations on the use
of driving and manoeuvring aids .
The vehicle has several cameras:
–
At the front, fitted in the grille. –
At the rear
, near the tailgate opening control.
–
Under each door mirror
.
With the engine running, these cameras allow
views of the vehicle’s close surroundings to be
displayed on the touch screen:
–
V
iews from the rear (rear vision), with reverse
gear engaged.
–
V
iews of the front (forward vision), with the
gearbox in neutral or a gear engaged.
–
Side views (door mirror vision), with the
direction indicators activated or obstacle
detection.
The screen is divided into 2 parts: on the
left, a view from above the vehicle in its close
surroundings; on the right, a contextual view as
well as a 3-dimensional view representing the
vehicle’s close surroundings.
A dynamic projection of the vehicle trajectory
(vehicle outline and position of the wheels) is
Page 88 of 164
86
Driving
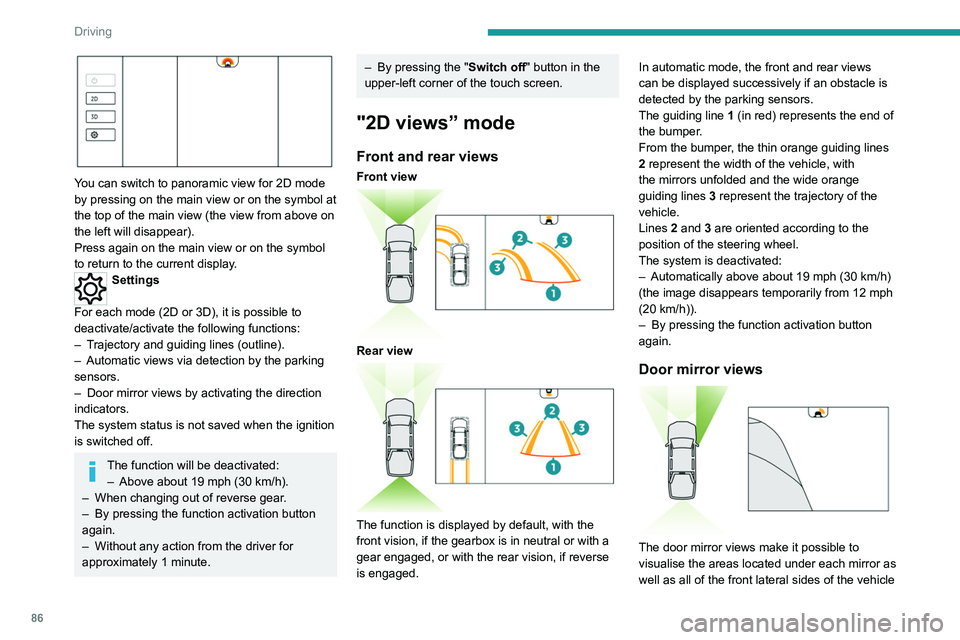
You can switch to panoramic view for 2D mode
by pressing on the main view or on the symbol at
the top of the main view (the view from above on
the left will disappear).
Press again on the main view or on the symbol
to return to the current display.
Settings
For each mode (2D or 3D), it is possible to
deactivate/activate the following functions:
–
T
rajectory and guiding lines (outline).
–
Automatic views via detection by the parking
sensors.
–
Door mirror views by activating the direction
indicators.
The system status is not saved when the ignition
is switched off.
The function will be deactivated: – Above about 19 mph (30 km/h).
–
When changing out of reverse gear
.
–
By pressing the function activation button
again.
–
Without any action from the driver for
approximately 1 minute.
– By pressing the " Switch off" button in the
upper-left corner of the touch screen.
"2D views” mode
Front and rear views
Front view
Rear view
The function is displayed by default, with the
front vision, if the gearbox is in neutral or with a
gear engaged, or with the rear vision, if reverse
is engaged. In automatic mode, the front and rear views
can be displayed successively if an obstacle is
detected by the parking sensors.
The guiding line
1 (in red) represents the end of
the bumper.
From the bumper, the thin orange guiding lines
2 represent the width of the vehicle, with
the mirrors unfolded and the wide orange
guiding lines
3 represent the trajectory of the
vehicle.
Lines 2 and 3 are oriented according to the
position of the steering wheel.
The system is deactivated:
–
Automatically above about 19 mph (30
km/h)
(the image disappears temporarily from 12 mph
(20 km/h)).
–
By pressing the function activation button
again.
Door mirror views
The door mirror views make it possible to
visualise the areas located under each mirror as
well as all of the front lateral sides of the vehicle
in order to manoeuvre the vehicle with the
surrounding obstacles.
This view is not recommended for carrying out a
complete manoeuvre.
This view is automatically available via detection
by the parking sensors or by selecting the
direction indicators (the view of the side
concerned is displayed).
“Split” front view
The "Split" front view allows the two views of the
door mirrors to be displayed simultaneously. For
more information on the Door mirror view, refer
to the corresponding section.
The views appear in the touch screen on the left-
hand side and right-hand side respectively.
This view is particularly suitable for driving
situations in narrow or rough passages.
This view is available by pressing the button for
the view from above the vehicle (located on the
left-hand side).
Page 98 of 164
96
Practical information
The start of clogging of the particle filter is indicated by the temporary lighting of this
warning lamp, accompanied by an alert
message.
As soon as the traffic conditions permit,
regenerate the filter by driving at a speed of at
least 37
mph (60 km/h) until the warning lamp
goes off.
If the warning lamp stays on, this
indicates a low Diesel additive level.
For more information on Checking levels,
refer to the corresponding section.
Following prolonged operation of the
vehicle at very low speed or at idle, you
may, in exceptional circumstances, notice
water vapour coming from the exhaust while
accelerating. These emissions have no
impact on the vehicle’s behaviour and the
environment.
New vehicle
During the first few particle filter
regeneration operations, you may notice a
"burning" smell. This is perfectly normal.
Manual gearbox
The gearbox does not require any maintenance (no oil change).
Automatic gearbox
For any information on gearbox
maintenance, contact a PEUGEOT dealer
or a qualified workshop.
Brake pads
Brake wear depends on the style of
driving, particularly in the case of vehicles
used in town, over short distances. It may be
necessary to have the condition of the brakes
checked, even between vehicle services.
Unless there is a leak in the circuit, a drop in the
brake fluid level indicates that the brake pads
are worn.
After washing the vehicle, moisture, or in wintry conditions, ice can form on the
brake discs and pads: braking efficiency may
be reduced. Gently dab the brakes to dry and
defrost them.
Brake disc wear
For information on checking brake disc
wear, contact a PEUGEOT dealer or a
qualified workshop.
Manual parking brake
If you notice excessive brake lever travel
or decreased effectiveness, the parking
brake must be adjusted, even between two
services.
This system must be checked by a PEUGEOT
dealer or a qualified workshop.
Steering wheel
Play or a loss of precision in the steering
means that this system needs to be
checked.
This system must be checked by a PEUGEOT
dealer or a qualified workshop.
Wheels and tyres
The inflation pressure of all tyres, including the spare wheel, must be
checked on "cold” tyres at least once a month.
The pressures indicated on the tyre pressure
label are valid for "cold" tyres. If you have driven
for more than 10 minutes or more than 6 miles
(10 kilometres) at over 31 mph (50
km/h), add
0.3 bar (30 kPa) to the values indicated on the
label.
The pressure difference between the left-hand
side and right-hand side tyres must not exceed
0.05 bar (5 kPa).
Under-inflation increases energy
consumption. Non-compliant tyre
pressures cause tyres to wear prematurely
and have an adverse effect on the vehicle's
road holding - risk of accident!
Driving with worn or damaged tyres reduces the
braking and road holding performance of the
vehicle. Regularly check the condition of the
Page 105 of 164
103
Practical information
7of the throttle body against any projection of
liquid (oil, water, detergent or solvent).
►
Remove grease and carbon deposits from
the surface of the main duct with a specific
"carburettor" type cleaner
.
►
Rotate the throttle valve inside the duct to
clean the seats on each side.
►
Wipe and dry the throttle body with a soft,
lint-free cloth.
If no cleaning has been done for a long
time, deposits may be difficult to remove.
Clean and wipe the throttle body
several
times with a soft, lint-free cloth.
Never immerse the throttle body in a
cleaning liquid or in an ultrasonic tank.
Never use:
–
detergents containing methyl ketone or
other highly corrosive substances as well as
household cleaning detergent;
–
cleaning products directly on the throttle
bearings as well as on the body's connector;
–
hard, sharp or abrasive tools to remove
difficult deposits. Use a soft cloth with a
suitable detergent.
Refitting the throttle body
Before refitting the throttle body, check
the condition of the seal. If it is damaged,
replace it with a new one. ►
Install the seal on the intake manifold and fit
the throttle body
B, making sure that the seal
does not fall.
For reassembly, carry out the operations in the
reverse order to those for removal. Tighten the
screws to the correct tightening torque.
Free-wheeling
In certain situations, you must allow the vehicle
to free-wheel (while being towed, on a rolling
road, in an automatic car wash, or being
transported by rail or sea freight, etc.).
The procedure differs depending on the type of
gearbox and transmission.
/
To release them
► With the vehicle stationary and the engine
running, depress the brake pedal and release
the parking brake.
►
With a manual gearbox, move the gear lever
into neutral.
►
With an automatic gearbox, select position N
.
►
For 4-wheel drive vehicles (4x4), put the
transmission selector in 2H
mode.
►
Switch the ignition off.
Advice on care and maintenance
General recommendations
Observe the following recommendations to avoid
damaging the vehicle.
Exterior
Never use a high-pressure jet wash in
the engine compartment - risk of
damaging the electrical components!
Do not wash the vehicle in bright sunshine or
extremely cold conditions.
When washing the vehicle in an
automatic roller-brush car wash, be sure
to lock the doors and, depending on version,
move the electronic key away.
When using a high-pressure washer, keep
the jet nozzle at a minimum distance of 30
cm from the vehicle (particularly on any stone
chip impacts, sensors or seals).
Promptly clean up any stains containing
chemicals liable to damage the vehicle's
paintwork (including tree resin, bird
droppings, insect secretions, pollen and tar).
Depending on the environment, clean the
vehicle frequently to remove salty deposits
(in coastal areas), soot (in industrial areas)
and mud/salts (in wet or cold areas). These
substances can be highly corrosive.
Page 111 of 164
109
In the event of a breakdown
8
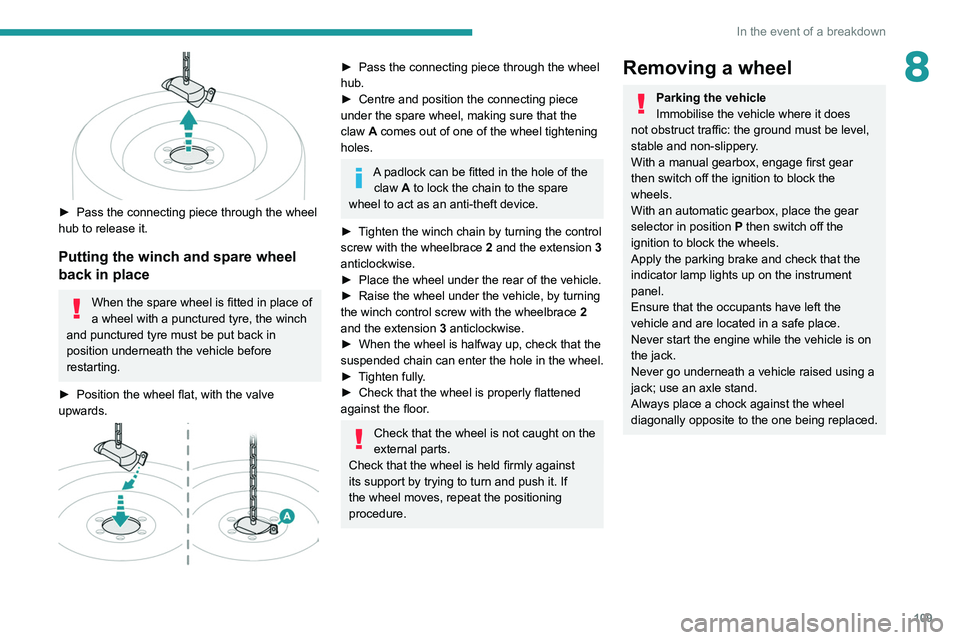
► Pass the connecting piece through the wheel
hub to release it.
Putting the winch and spare wheel
back in place
When the spare wheel is fitted in place of
a wheel with a punctured tyre, the winch
and punctured tyre must be put back in
position underneath the vehicle before
restarting.
►
Position the wheel flat, with the valve
upwards.
► Pass the connecting piece through the wheel
hub.
►
Centre and position the connecting piece
under the spare wheel, making sure that the
claw
A comes out of one of the wheel tightening
holes.
A padlock can be fitted in the hole of the claw A to lock the chain to the spare
wheel to act as an anti-theft device.
►
T
ighten the winch chain by turning the control
screw with the wheelbrace 2 and the extension 3
anticlockwise.
►
Place the wheel under the rear of the vehicle.
►
Raise the wheel under the vehicle, by turning
the winch control screw with the wheelbrace 2
and the extension 3 anticlockwise.
►
When the wheel is halfway up, check that the
suspended
chain can enter the hole in the wheel.
►
T
ighten fully.
►
Check that the wheel is properly flattened
against the floor
.
Check that the wheel is not caught on the
external parts.
Check that the wheel is held firmly against
its support by trying to turn and push it. If
the wheel moves, repeat the positioning
procedure.
Removing a wheel
Parking the vehicle
Immobilise the vehicle where it does
not obstruct traffic: the ground must be level,
stable and non-slippery.
With a manual gearbox, engage first gear
then switch off the ignition to block the
wheels.
With an automatic gearbox, place the gear
selector in position P then switch off the
ignition to block the wheels.
Apply the parking brake and check that the
indicator lamp lights up on the instrument
panel.
Ensure that the occupants have left the
vehicle and are located in a safe place.
Never start the engine while the vehicle is on
the jack.
Never go underneath a vehicle raised using a
jack; use an axle stand.
Always place a chock against the wheel
diagonally opposite to the one being replaced.
Page 120 of 164
11 8
In the event of a breakdown
Diesel engine
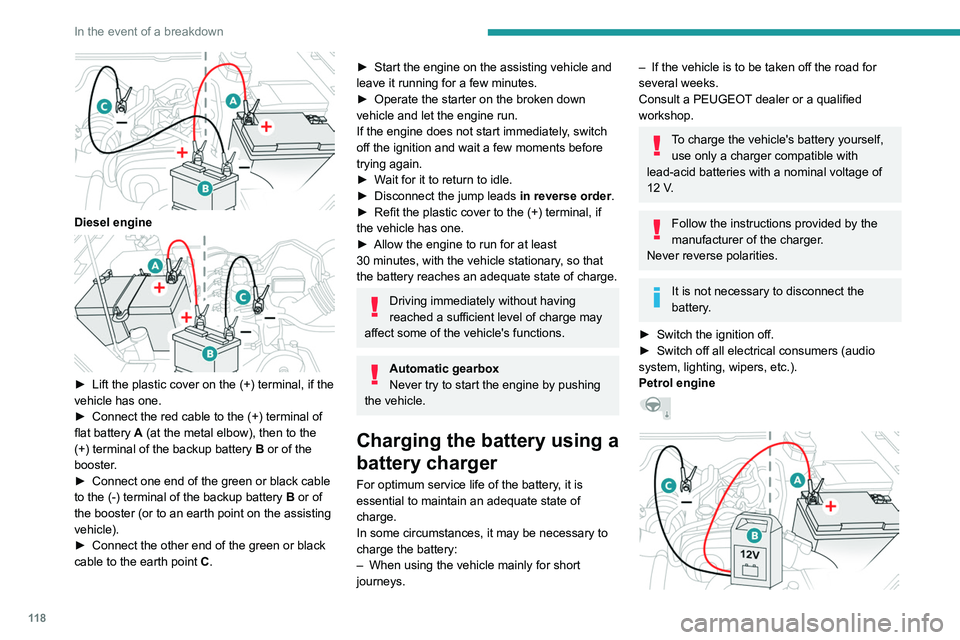
► Lift the plastic cover on the (+) terminal, if the
vehicle has one.
►
Connect the red cable to the (+) terminal of
flat battery
A (at the metal elbow), then to the
(+) terminal of the backup battery
B or of the
booster.
►
Connect one end of the green or black cable
to the (-) terminal of the backup battery
B or of
the booster (or to an earth point on the assisting
vehicle).
►
Connect the other end of the green or black
cable to the earth point
C
.
► Start the engine on the assisting vehicle and
leave it running for a few minutes.
►
Operate the starter on the broken down
vehicle and let the engine run.
If the engine does not start immediately
, switch
off the ignition and wait a few moments before
trying again.
►
W
ait for it to return to idle.
►
Disconnect the jump leads in reverse order.
►
Refit the plastic cover to the (+) terminal, if
the vehicle has one.
►
Allow the engine to run for at least
30
minutes, with the vehicle stationary, so that
the battery reaches an adequate state of charge.
Driving immediately without having
reached a sufficient level of charge may
affect some of the vehicle's functions.
Automatic gearbox
Never try to start the engine by pushing
the vehicle.
Charging the battery using a
battery charger
For optimum service life of the battery, it is
essential to maintain an adequate state of
charge.
In some circumstances, it may be necessary to
charge the battery:
–
When using the vehicle mainly for short
journeys.
– If the vehicle is to be taken off the road for
several weeks.
Consult a PEUGEOT
dealer or a qualified
workshop.
To charge the vehicle's battery yourself, use only a charger compatible with
lead-acid batteries with a nominal voltage of
12
V.
Follow the instructions provided by the
manufacturer of the charger.
Never reverse polarities.
It is not necessary to disconnect the
battery.
►
Switch the ignition off.
►
Switch off all electrical consumers (audio
system, lighting, wipers, etc.).
Petrol engine
Diesel engine
► Switch off charger B before connecting
the cables to the battery, so as to avoid any
dangerous sparks.
► Ensure that the charger cables are in good
condition.
► Lift the plastic cover on the (+) terminal, if the
vehicle has one.
► Connect the cables of charger B as follows:
• the positive (+) red cable to the (+) terminal
of battery A,
• the negative (-) black cable to earth point C
on the vehicle.
► At the end of the charging operation, switch
off charger B before disconnecting the cables
from battery A.
Never try to charge a frozen battery - risk
of explosion!
If the battery has frozen, have it checked by a
PEUGEOT dealer or by a qualified workshop
who will verify that the internal components
have not been damaged and that the case
Page 122 of 164
120
In the event of a breakdown
General recommendations
Observe the legislation in force in the
country where you are driving.
Ensure that the weight of the towing vehicle is
higher than that of the towed vehicle.
The driver must remain at the wheel of the
towed vehicle and must have a valid driving
licence.
When towing a vehicle with all four wheels on
the ground, always use an approved towing
arm; rope and straps are prohibited.
The towing vehicle must move off gently.
When the vehicle is towed with its engine
off, there is no longer braking and steering
assistance.A professional towing service must be
called if:
–
Broken down on a motorway or main road.
–
Not possible to put
the gearbox into neutral,
unlock the steering, or release the parking
brake.
–
Not possible to tow a vehicle with an
automatic gearbox, with the engine running.
–
T
owing with only two wheels on the ground.
–
Four-wheel drive vehicle.
–
No approved towbar available.
Before towing the vehicle, it is essential
to put the vehicle in free-wheeling mode.
For more information on Changing to free-
wheeling , refer to the corresponding section.
With a manual gearbox, place the gear
lever in neutral.
With an automatic gearbox, place the gear
selector in position N.
Failure to adhere to this instruction may lead
to damage to some braking components and
the lack of braking assistance on restarting
the engine.
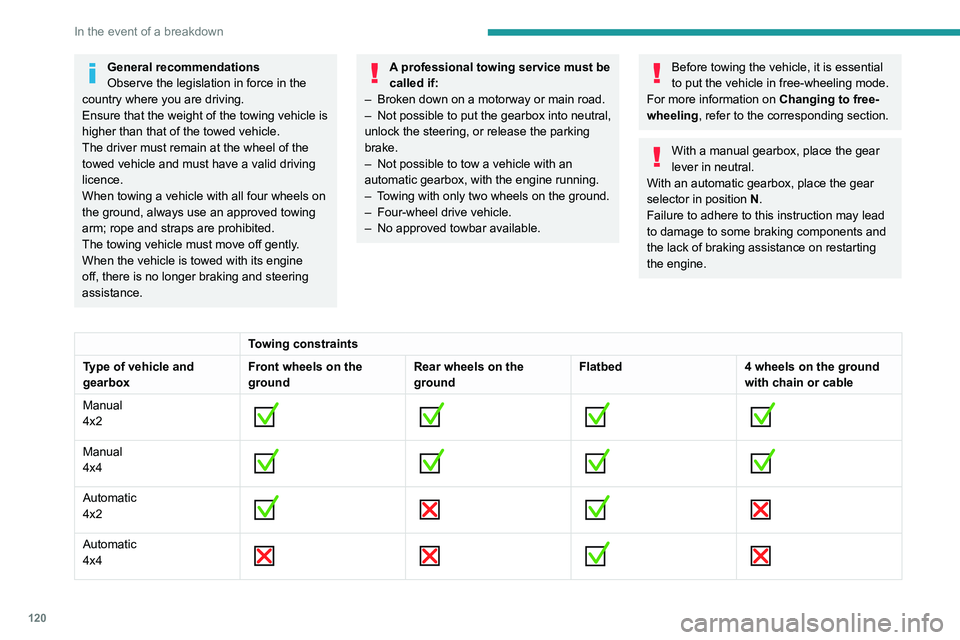
Towing constraints
Type of vehicle and
gearbox Front wheels on the
groundRear wheels on the
groundFlatbed
4 wheels on the ground
with chain or cable
Manual
4x2
Manual
4x4
Automatic
4x2
Automatic
4x4
Towing your vehicle
Access to the front hooks
The tow hooks are located under the front
bumper.
To be towed:
►
Securely install cables or chains to the tow
hooks.
► Put the gearbox into neutral.
Failure to observe this instruction could
result in damage to certain components
(braking, transmission, etc.) and to the
absence of braking assistance the next time
the engine is started.
Page 123 of 164
121
In the event of a breakdown
84x2: 2-wheel drive.
4x4: 4-wheel drive.
In case of battery failure, it is essential to use a flatbed (excluding manual gearbox).
Towing your vehicle
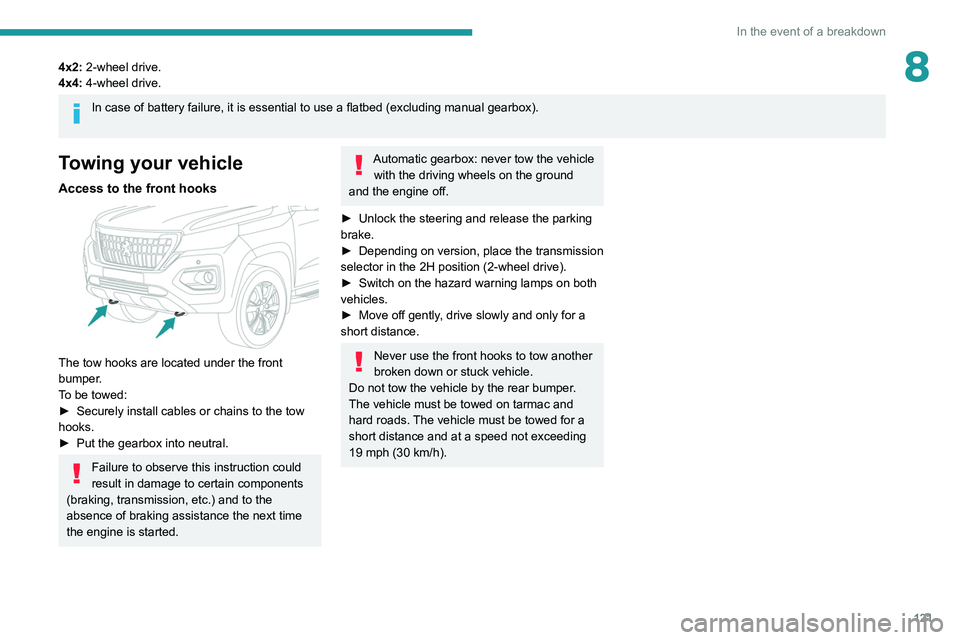
Access to the front hooks
The tow hooks are located under the front
bumper.
To be towed:
►
Securely install cables or chains to the tow
hooks.
►
Put the gearbox into neutral.
Failure to observe this instruction could
result in damage to certain components
(braking, transmission, etc.) and to the
absence of braking assistance the next time
the engine is started.
Automatic gearbox: never tow the vehicle with the driving wheels on the ground
and the engine off.
►
Unlock the steering and release the parking
brake.
►
Depending on version, place the transmission
selector in the 2H position (2-wheel drive).
►
Switch on the hazard warning lamps on both
vehicles.
►
Move off gently
, drive slowly and only for a
short distance.
Never use the front hooks to tow another
broken down or stuck vehicle.
Do not tow the vehicle by the rear bumper.
The vehicle must be towed on tarmac and
hard roads. The vehicle must be towed for a
short distance and at a speed not exceeding
19 mph (30 km/h).
Page 124 of 164
122
Technical data
Engine technical data and
towed loads
Engines
The engine characteristics are given in the
vehicle's registration document, as well as in
sales brochures.
Only the values available at the time of
publication are presented in the tables.
Contact a PEUGEOT dealer or a qualified
workshop to obtain missing values.
The maximum power corresponds to the value type-approved on a test bed, under
conditions defined by legislation.
For more information, contact a PEUGEOT
dealer or a qualified workshop.
Weights and towed loads
The weights and towed loads relating to
the vehicle are indicated on the registration
document, as well as in sales brochures.
These values are also indicated on the
manufacturer's plate or label.
For more information, contact a PEUGEOT
dealer or a qualified workshop.
The GTW (Gross Train Weight) and towed load
values indicated are valid up to a maximum
altitude of 1,000 metres. The towed load value
must be reduced by 10% for each additional
1,000 metres of altitude.
The maximum authorised nose weight
corresponds to the weight permitted on the
towball.
When exterior temperatures are high, the
vehicle performance may be limited in
order to protect the engine. When the exterior
temperature is higher than 37°C, reduce the
towed weight.
Towing even with a lightly loaded vehicle can adversely affect its road holding.
Braking distances are increased when towing
a trailer.
When using a vehicle to tow, never exceed
a speed of 62 mph (100
km/h) (observe the
local legislation in force).
Engines and towed loads - Petrol
Engines 2.4 l - 210 Petrol engine
Gearboxes BVM6
(Manual 6-speed) BVA6
(Automatic 6-speed)
Model codes FBTGTEFBTGTLFBTGTT FBTGTZ
Transmission 4x24x44x24x4
Cubic capacity (cc) 2,3982,398
Max. power: EC standard (kW) 155155
Fuel UnleadedUnleaded
Braked trailer (within the GTW limit) (kg)
on a 10% or 12% gradient 3,000
2,500*
Unbraked trailer (kg) 750750
Maximum authorised nose weight (kg) 120120
Engine oil capacity (in litres)
Type C3 5W30 4.3
4.3
* Limited to a GTW of 4,500 kg in the event of arduous use (towing on a gradient).