fuse PEUGEOT LANDTREK 2022 Owners Manual
[x] Cancel search | Manufacturer: PEUGEOT, Model Year: 2022, Model line: LANDTREK, Model: PEUGEOT LANDTREK 2022Pages: 164, PDF Size: 5.87 MB
Page 5 of 164
3
Contents
Checks 95
Maintenance 97
Free-wheeling 103
Advice on care and maintenance 103
8In the event of a breakdownWarning triangle 106
Fire extinguisher 106
Running out of fuel (Diesel) 107
Tool kit 107
Spare wheel 108
Changing a bulb 11 2
Fuses 11 6
12
V battery 11 6
Towing the vehicle 11 9
9Technical dataEngine technical data and towed loads 122
Petrol engines 123
Diesel engines 124
Dimensions 125
Identification markings 125
10Bluetooth® audio systemMenus 127
Steering mounted controls 128
Radio 128
Media 129
Telephone 129
11Peugeot Connect 10" TouchscreenFirst steps 131
Steering mounted controls 131
Menus 132
Navigation 133
Radio 133
Music player 133
Telephone 134
Applications 135
Settings 136
12Event data recorders
■
Alphabetical index
Page 51 of 164
49
Safety
5General safety
recommendations
On and off-road driving
This commercial and all-terrain type
vehicle can be driven on roads and rough
terrain. The higher ground clearance and
centre of gravity make this vehicle more
likely to tip over. Refer to the Driving
recommendations.
Do not remove the labels attached in
different places on your vehicle. They
include safety warnings as well as
identification information for the vehicle.
For all work on your vehicle, use a
qualified workshop that has the technical
information, skills and equipment required, all
of which a PEUGEOT dealer is able to
provide.
Depending on country regulations,
certain safety equipment may be
mandatory: high visibility safety vests,
warning triangles, breathalysers, spare bulbs,
spare fuses, fire extinguisher, first aid kit, mud
flaps at the rear of the vehicle, etc.
Installing electrical accessories:
– The fitting of electrical equipment or
accessories not approved by PEUGEOT
may
cause excessive current consumption and
faults and failures with the electrical system
of your vehicle. Contact a PEUGEOT dealer
for information on the range of approved
accessories.
–
As a safety measure, access to the
diagnostic socket, used for the vehicle's
electronic systems, is reserved strictly for
PEUGEOT
dealers or qualified workshops,
equipped with the special tools required (risk
of malfunctions of the vehicle's electronic
systems that could cause breakdowns or
serious accidents). The Manufacturer cannot
be held responsible if this advice is not
followed.
–
Any modification or adaptation not intended
or authorised by PEUGEOT
or carried out
without meeting the technical requirements
defined by the Manufacturer will result in the
suspension of the commercial warranty.
Installation of accessory radio
communication transmitters
Before installing a radio communication
transmitter with an external aerial, you must
without fail contact a PEUGEOT dealer for
the specification of transmitters which can
be fitted (frequency, maximum power, aerial
position, specific installation requirements),
in line with the Vehicle Electromagnetic
Compatibility Directive (2004/104/EC).
Declarations of conformity for radio
equipment
The relevant certificates are available on the
http://public.servicebox.peugeot.com/APddb/
website.
Operating speed thresholds
The speed threshold values, for the
operation of certain systems, are given for
information purposes only. The thresholds
may be different under actual conditions of
use of the vehicle.
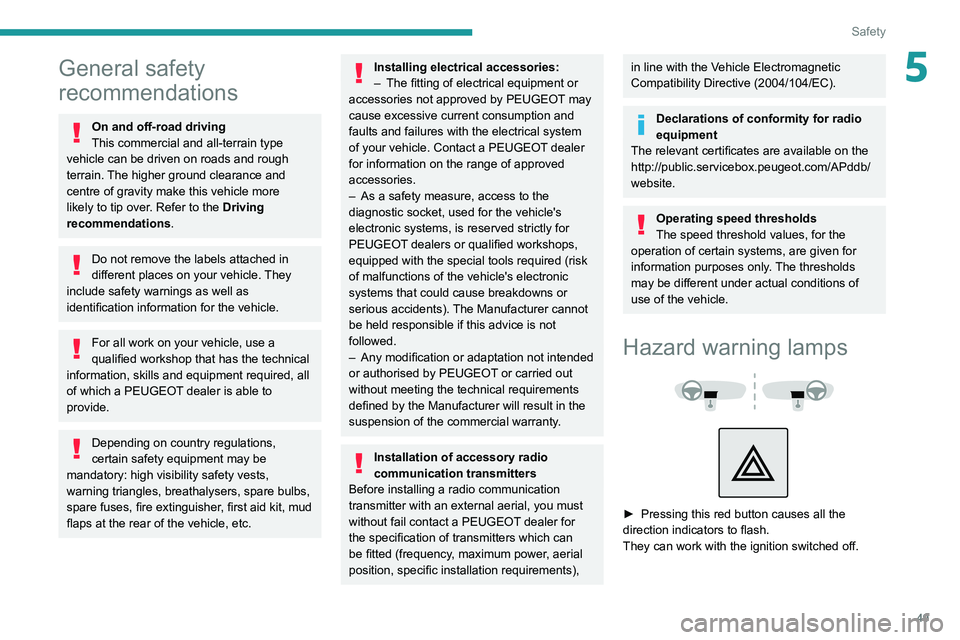
Hazard warning lamps
► Pressing this red button causes all the
direction indicators to flash.
They can work with the ignition switched off.
Page 94 of 164
92
Practical information
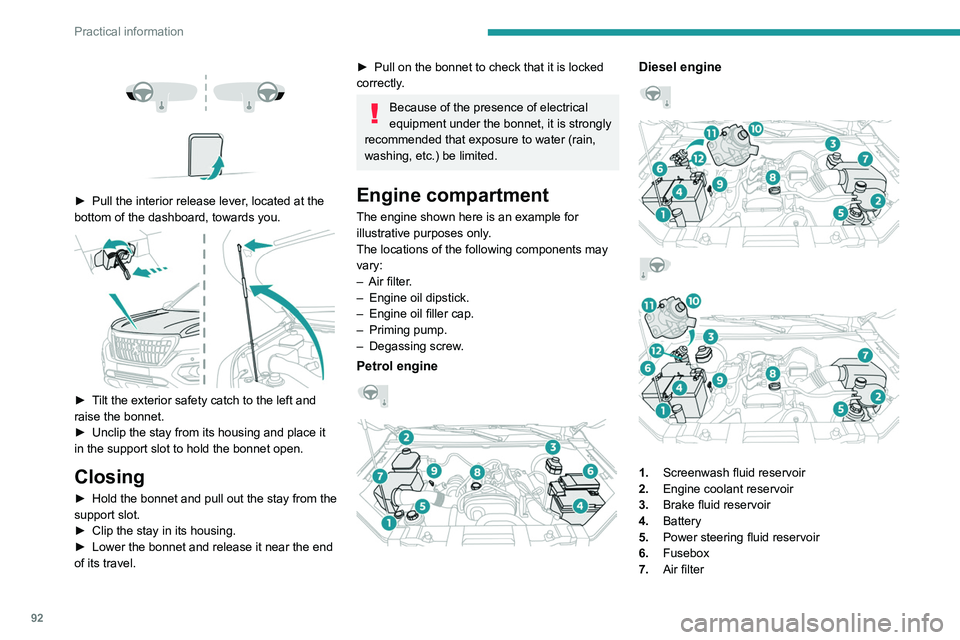
► Pull the interior release lever , located at the
bottom of the dashboard, towards you.
► Tilt the exterior safety catch to the left and
raise the bonnet.
►
Unclip the stay from its housing and place it
in the support slot to hold the bonnet open.
Closing
► Hold the bonnet and pull out the stay from the
support slot.
►
Clip the stay in its housing.
►
Lower the bonnet and release it near the end
of its travel.
► Pull on the bonnet to check that it is locked
correctly .
Because of the presence of electrical
equipment under the bonnet, it is strongly
recommended that exposure to water (rain,
washing, etc.) be limited.
Engine compartment
The engine shown here is an example for
illustrative purposes only.
The locations of the following components may
vary:
–
Air filter
.
–
Engine oil dipstick.
–
Engine oil filler cap.
–
Priming pump.
–
Degassing screw
.
Petrol engine
Diesel engine
1. Screenwash fluid reservoir
2. Engine coolant reservoir
3. Brake fluid reservoir
4. Battery
5. Power steering fluid reservoir
6. Fusebox
7. Air filter
8.Engine oil filler cap
9. Engine oil dipstick
10. Priming pump*
11 . Degassing screw*
12. Fuel filter*
Diesel fuel system
This system is under very high pressure.
All work must be carried out only by a
PEUGEOT dealer or a qualified workshop
Checking levels
Check all of the following levels regularly in
accordance with the manufacturer's service
schedule. Top them up if required, unless
otherwise indicated.
If a level drops significantly, have the
corresponding system checked by a PEUGEOT
dealer or a qualified workshop.
The fluids must comply with the manufacturer's requirements and with
the vehicle's engine.
Take care when working under the bonnet, as certain areas of the engine
may be extremely hot (risk of burns) and the
cooling fan could start at any time (even with
the ignition off).
* Depending on engine.
Page 118 of 164
11 6
In the event of a breakdown
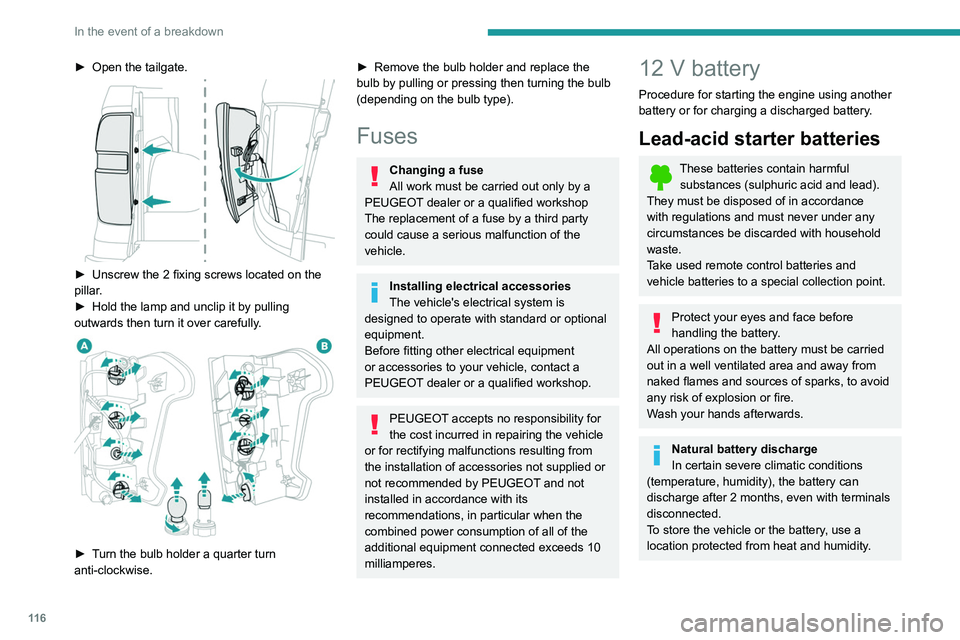
► Open the tailgate.
► Unscrew the 2 fixing screws located on the
pillar .
►
Hold the lamp and unclip it by pulling
outwards then turn it over carefully
.
► Turn the bulb holder a quarter turn
anti-clockwise.
► Remove the bulb holder and replace the
bulb by pulling or pressing then turning the bulb
(depending on the bulb type).
Fuses
Changing a fuse
All work must be carried out only by a
PEUGEOT dealer or a qualified workshop
The replacement of a fuse by a third party
could cause a serious malfunction of the
vehicle.
Installing electrical accessories
The vehicle's electrical system is
designed to operate with standard or optional
equipment.
Before fitting other electrical equipment
or accessories to your vehicle, contact a
PEUGEOT dealer or a qualified workshop.
PEUGEOT accepts no responsibility for
the cost incurred in repairing the vehicle
or for rectifying malfunctions resulting from
the installation of accessories not supplied or
not recommended by PEUGEOT and not
installed in accordance with its
recommendations, in particular when the
combined power consumption of all of the
additional equipment connected exceeds 10
milliamperes.
12 V battery
Procedure for starting the engine using another
battery or for charging a discharged battery.
Lead-acid starter batteries
These batteries contain harmful substances (sulphuric acid and lead).
They must be disposed of in accordance
with regulations and must never under any
circumstances be discarded with household
waste.
Take used remote control batteries and
vehicle batteries to a special collection point.
Protect your eyes and face before
handling the battery.
All operations on the battery must be carried
out in a well ventilated area and away from
naked flames and sources of sparks, to avoid
any risk of explosion or fire.
Wash your hands afterwards.
Natural battery discharge
In certain severe climatic conditions
(temperature, humidity), the battery can
discharge after 2 months, even with terminals
disconnected.
To store the vehicle or the battery, use a
location protected from heat and humidity.
Battery power loss
A battery can be discharged due to
power losses:
– Continuous electrical consumption of a
component (e.g. alarm, anti-theft device).
– Device powered up when the engine is off
(e.g. audio system, USB charger).
– Electrical leakage due to poor insulation of
electrical components.
If the power loss cannot be located, contact a
PEUGEOT dealer or a qualified workshop to
have the vehicle's electrical system checked.
Battery charge check
For batteries with a charge status
indicator, read the value indicated on the
battery directly.
For other types of batteries, the check can be
carried out with a voltmeter:
► Connect the voltmeter to the battery
terminals (respect the polarities).
► Read the voltage value.
► Turn the main beam headlamps on.
If the battery voltage remains at or above 10
V without rapidly decreasing, the charge is
correct.
If the battery voltage drops quickly or is less
than 10 V, the battery must be recharged or
replaced.
Accessing the battery
The battery is located under the bonnet.
Page 133 of 164
131
Peugeot Connect 10" Touchscreen
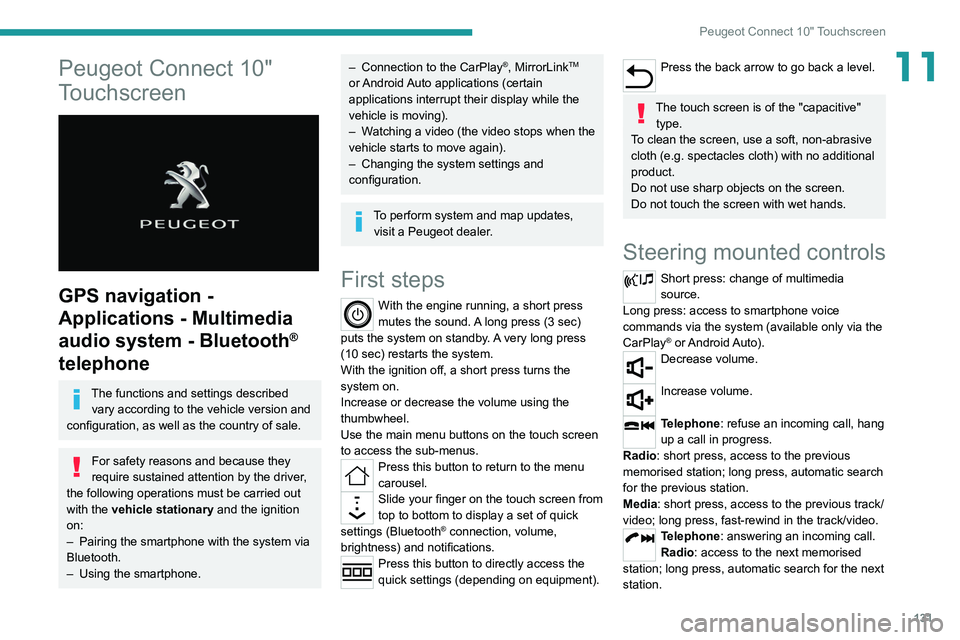
11Peugeot Connect 10"
Touchscreen
GPS navigation -
Applications - Multimedia
audio system - Bluetooth
®
telephone
The functions and settings described
vary according to the vehicle version and
configuration, as well as the country of sale.
For safety reasons and because they
require sustained attention by the driver,
the following operations must be carried out
with the vehicle stationary and the ignition
on:
–
Pairing the smartphone with the system via
Bluetooth.
–
Using the smartphone.
– Connection to the CarPlay®, MirrorLinkTM
or Android Auto applications (certain
applications interrupt their display while the
vehicle is moving).
–
W
atching a video (the video stops when the
vehicle starts to move again).
–
Changing the system settings and
configuration.
To perform system and map updates, visit a Peugeot dealer.
First steps
With the engine running, a short press
mutes the sound. A long press (3 sec)
puts the system on standby. A very long press
(10 sec) restarts the system.
With the ignition off, a short press turns the
system on.
Increase or decrease the volume using the
thumbwheel.
Use the main menu buttons on the touch screen
to access the sub-menus.
Press this button to return to the menu
carousel.
Slide your finger on the touch screen from
top to bottom to display a set of quick
settings (Bluetooth
® connection, volume,
brightness) and notifications.
Press this button to directly access the
quick settings (depending on equipment).
Press the back arrow to go back a level.
The touch screen is of the "capacitive" type.
To clean the screen, use a soft, non-abrasive
cloth (e.g. spectacles cloth) with no additional
product.
Do not use sharp objects on the screen.
Do not touch the screen with wet hands.
Steering mounted controls
Short press: change of multimedia
source.
Long press: access to smartphone voice
commands via the system (available only via the
CarPlay
® or Android Auto).Decrease volume.
Increase volume.
Telephone: refuse an incoming call, hang
up a call in progress.
Radio: short press, access to the previous
memorised station; long press, automatic search
for the previous station.
Media: short press, access to the previous track/
video; long press, fast-rewind in the track/video.
Telephone: answering an incoming call.
Radio: access to the next memorised
station; long press, automatic search for the next
station.
Page 136 of 164
134
Peugeot Connect 10" Touchscreen
Deleting a telephone
In the list of paired telephones, press the
bin next to the telephone to be deleted.
Receiving a call
An incoming call is announced by a ring and a
display overlaid on the screen.
Accepting the call
Press this button on the steering-mounted
controls to answer the call.
Or
Select "Answer" on the touch screen.
Refusing the call
Press this button on the steering-mounted
controls to refuse the call.
Or
Select "End call" on the touch screen.
Making a call
Using the telephone is strongly
discouraged while driving.
Park the vehicle.
Make the call using the steering-mounted
controls.
Calling a new number
Press Telephone to display the main
page.
Select a source:"USB" to play files from a USB stick.
"Local" to play locally stored files.
"BT" to play audio streaming files.
Streaming allows you to listen to the
audio feed from your smartphone.
The Bluetooth profile must be activated.
If play does not start automatically, it may be
necessary to start the audio playback from
the smartphone.
Control is from the portable device or by using
the system's touch buttons.
Once connected in streaming mode, the
smartphone is considered to be a media
source.
USB port
Insert the USB memory stick into the USB
port or connect the USB device to the
USB port using a suitable cable (not supplied).
To protect the system, do not use a USB hub.
The system builds playlists (in temporary
memory); this operation can take from a
few seconds to several minutes at the first
connection.
Reduce the number of non-music files and the
number of folders to reduce the waiting time.
Playlists are updated whenever the ignition
is switched off or a USB memory stick is
connected. The audio system memorises these
lists, which will subsequently load faster if they
have not been changed.
Telephone
Pairing a Bluetooth®
telephone
As a safety measure and because it
requires sustained attention by the driver,
the pairing of a Bluetooth
® mobile telephone
with the Bluetooth® hands-free system of your
audio system must be done with the vehicle
stationary and the ignition on.
Activate the telephone's Bluetooth®
function and ensure that it is "visible to
all" (telephone configuration).
The services available depend on the network, the SIM card and the
compatibility of the Bluetooth
® devices used.
Refer to your telephone’s user guide and your
service provider to check which services you
are able to access.
Procedure from the telephone
Select the system name in the list of
detected devices.
The connection is made automatically.
If the pairing procedure fails, we
recommend deactivating and then
reactivating the Bluetooth
® function on the
telephone.
Procedure from the system
Press Telephone to display the primary
page.
Press "BT settings" .
Activate the Bluetooth connection.
Press “Available devices”.
The list of telephones detected is
displayed.
Select the name of the telephone in the list.
Automatic reconnection
On return to the vehicle, if the last telephone
connected is present again, it is automatically
recognised and within about 30 seconds
of switching on the ignition, the pairing is
established automatically (with Bluetooth
activated).
Page 137 of 164
135
Peugeot Connect 10" Touchscreen
11Deleting a telephone
In the list of paired telephones, press the
bin next to the telephone to be deleted.
Receiving a call
An incoming call is announced by a ring and a
display overlaid on the screen.
Accepting the call
Press this button on the steering-mounted
controls to answer the call.
Or
Select "Answer" on the touch screen.
Refusing the call
Press this button on the steering-mounted
controls to refuse the call.
Or
Select "End call" on the touch screen.
Making a call
Using the telephone is strongly
discouraged while driving.
Park the vehicle.
Make the call using the steering-mounted
controls.
Calling a new number
Press Telephone to display the main
page.
Press Call then enter the number using
the numeric keypad.
Press this button to make the call.
Calling a contact
Press Telephone to display the main
page.
Select "Contacts".
Search then select the desired contact in the
displayed list.
Press this button to call.
Calling a recently used
number
Press Telephone to display the main
page.
Select "Call".
The list of last numbers dialled is displayed on
the right of the screen.
Select the contact.
It is always possible to make a call
directly from the telephone; as a safety
measure, first park the vehicle.
Applications
USB ports
Depending on equipment, for more information
on the USB ports compatible with CarPlay®,
MirrorLinkTM or Android Auto applications, refer
to the "Ease of use and comfort" section.
For the list of suitable smartphones, visit
the Brand's national website.
Synchronising a smartphone enables
users to display applications that support
the smartphone’s MirrorLinkCarPlay
®, TM or
Android Auto
technology on the vehicle’s
screen. For CarPlay
® technology, the
CarPlay® function must first be activated on
the smartphone.
Unlock the smartphone for the communication
process between the smartphone and the
system to work.
As principles and standards are constantly
changing, we recommend keeping the
smartphone's operating system up-to-
date, together with the date and time on
the smartphone and the system.
Connectivity
Press on one the CarPlay®, MirrorLinkTM
or Android Auto
menus
to access the
corresponding functions.
CarPlay® smartphone
connection
Depending on country.
Page 143 of 164
141
Alphabetical index
4x4 transmission selector 69
360° camera
84
A
ABS 50
Accessories
49
Additive, Diesel
95
Adjusting headlamp beam height
45
Adjusting headlamps
45
Adjusting head restraints
26
Adjusting seat
26–27
Adjusting the air distribution
35
Adjusting the air flow
35
Adjusting the date
13, 137
Adjusting the height and reach
of the steering wheel
28
Adjusting the seat angle
27
Adjusting the seat belt height
54
Adjusting the temperature
35
Adjusting the time
13, 137
Advice on care and maintenance
103
Advice on driving
6, 62–63
Airbags
55–57, 59
Airbags, curtain
56–57
Airbags, front
56–57, 60
Airbags, lateral
56–57
Air conditioning
32, 34, 35
Air conditioning, automatic
36
Air conditioning, dual-zone automatic
34–36
Air conditioning, manual
33, 36
Air intake 35
Air vents
32
Alarm
23
Android Auto connection
136
Anti-lock braking system (ABS)
50
Antitheft / Immobiliser
17
Apple CarPlay connection
135
Area, loading
41
Armrest, front
38
Armrest, rear
39
Assistance, emergency braking
50
Audible warning
50
Audio streaming (Bluetooth)
129
B
Battery 99
Battery, 12 V
95, 99, 116–119
Battery, charging
118–119
Battery, remote control
20–21
Bluetooth (hands-free)
129–130
Bluetooth (telephone)
135
Bodywork
104
Bonnet
91–92
Brake discs
96
Brake lamps
11 5
Brakes
96
Braking assistance system
50
Bulbs
11 3
Bulbs (changing)
112, 115
C
Capacity, fuel tank 89
Cap, fuel filler
89
Care of the bodywork
104
Central locking
17, 19
Changing a bulb
112, 115
Changing a fuse
11 6
Changing a wheel
107–109
Changing a wiper blade
47
Changing the engine oil
101
Changing the remote control battery
20
Checking the levels
93–95
Checks
92, 95–97
Checks, routine
95–96, 98
Child lock
61
Children
55, 60
Children (safety)
61
Child seats
55, 58–59
Child seats, ISOFIX
60
Cigar lighter
37
Cleaning (advice)
102–104
Cleaning the engine throttle housing
102
Closing the boot
18, 23
Closing the doors
18–19, 22
Configuration, vehicle
13–15
Connection, Bluetooth
130, 135
Connection, MirrorLink
136
Connectivity
135
Control, emergency door
20
Control stalk, lighting
43, 45
Control stalk, wipers
46, 48
Page 144 of 164
142
Alphabetical index
Courtesy lamp, rear 39
Courtesy lamps
39
Cruise control
78–79
Cup holder
37
D
Date (setting) 13, 137
Daytime running lamps
44, 112
Deactivating the passenger airbag
56, 59–60
Defrosting
29, 36
Defrosting, front
36
Demisting
29, 36
Demisting, front
36
Demisting, rear
36
Demisting, rear screen
36
Dials and gauges
7
Dimensions
125
Dipstick
93
Direction indicators
45, 112, 114–115
Display screen, instrument panel
7
Door pockets
37
Doors
22
Driving
62–63
Driving aids camera (warnings)
76
Driving aids (recommendations)
76
Driving economically
6
Dynamic stability control (DSC)
50–51
E
EBFD 50
Eco-driving (advice)
6
ECO mode
73
Electric windows
24
Electronic brake force distribution (EBFD)
50
Emergency braking assistance (EBA)
50
Emergency switching off
67
Emergency warning lamps
49, 106
Engine
97
Engine compartment
92
Engine, Diesel
89, 92, 107, 124
Engine, petrol
92, 123
Engines
122–124
Environment
6, 21
ESC (electronic stability control)
50
Extinguisher
106
F
Filling the fuel tank 89
Filter, air
95, 100
Filter, Diesel fuel
102
Filter, oil
95, 101
Filter, particle
95
Filter, passenger compartment
32, 95, 99
Fitting a wheel
109, 111
Fitting roof bars
91
Fittings, front
37
Fittings, interior
37–38
Fittings, rear 39–40
Flap, fuel filler
89
Flashing indicators
45, 114
Floor storage compartment
31
Fluid, brake
94
Fluid, engine coolant
94
Fluid, power steering
94
Foglamps, front
43–44, 112, 115
Foglamps, rear
43
Folding bench seat
31
Folding the rear seat backrest
28
Folding the rear seats
30
Front map reading lights
39
Fuel
6, 89
Fuel consumption
6
Fuel tank
89
Fuses
11 6
G
Gauge, fuel 89
Gearbox, automatic
71, 74, 96, 118
Gearbox, manual
70–71, 74, 96
Gear lever, manual gearbox
70–71
Gear shift indicator ~
Gear efficiency indicator
74
Glove box
37
Grab handles
37
Page 146 of 164
144
Alphabetical index
N
Normal mode 73
O
Obstacle detection 81
Off-road camera
83
Oil change
93, 101
Oil consumption
93
OIl, engine
93, 101
On-board tools
107–108
Opening the bonnet
91
Opening the boot
18
Opening the doors
18, 22
Opening the windows
16
Over-speed buzzer
78
P
Pads, brake 96
Paint
104, 125
Paint colour code
125
Parking brake
68, 96
Parking sensors, audible and visual
81
Parking sensors, front
82
Parking sensors, rear
82
Plates, identification
125
Player, Apple®
129
Player, USB
129, 133–134
Port, USB 37, 129, 133–135
Pressures, tyres
96, 126
Pre-tensioning seat belts
55
Priming pump
107
Priming the fuel system
107
Protecting children
56, 58–60
Puncture
108
R
Radio 128, 133
Reading lamps
39
Rear differential locking
68
Rear screen, demisting
36
Recharging the battery
118–119
Recirculation, air
35
Recovery
119–121
Recovery of the vehicle
119
Regeneration of the particle filter
95
Reinitialisation of the under-inflation
detection system
75
Reinitialising the remote control
21
Reminder, key in ignition
66
Reminder, lighting on
44
Remote control
16–20
Removing a wheel
109, 111
Removing the mat
38
Replacing bulbs
112, 115
Replacing fuses
11 6
Replacing the air filter
95, 100
Replacing the battery
99
Replacing the Diesel filter 102
Replacing the oil filter
95, 101
Replacing the passenger
compartment filter
95, 99
Reservoir, screenwash
95
Reset trip
12
Rev counter
7
Reversing camera
76, 83
Reversing lamps
11 5
Roof bars
91
Running out of fuel (Diesel)
107
S
Safety, children 56, 58–60
Saturation of the particle filter (Diesel)
95
Screen, monochrome
13
Screenwash
47
Screenwash, front
47
Seat angle
27
Seat belts
53–55
Seat belts, rear
54
Seat, bench front, 2-seat
27–28, 54
Seat, rear bench
30–31
Seats, electric
27
Seats, front
26–27
Seats, rear
30, 58
Selector, gear
71
Sensors (warnings)
76
Serial number, vehicle
125
Servicing
95, 97