door lock Peugeot Partner 2011 Owner's Manual - RHD (UK, Australia)
[x] Cancel search | Manufacturer: PEUGEOT, Model Year: 2011, Model line: Partner, Model: Peugeot Partner 2011Pages: 200, PDF Size: 7.41 MB
Page 4 of 200
2
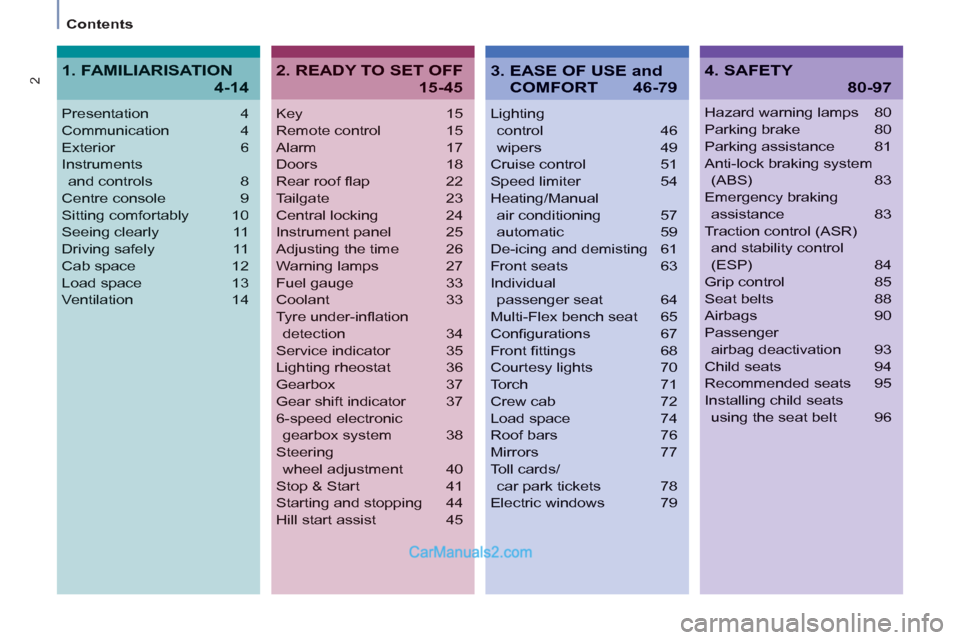
Contents
Key 15
Remote control 15
Alarm 17
Doors 18
Rear roof fl ap 22
Tailgate 23
Central locking 24
Instrument panel 25
Adjusting the time 26
Warning lamps 27
Fuel gauge 33
Coolant 33
Tyre under-infl ation
detection 34
Service indicator 35
Lighting rheostat 36
Gearbox 37
Gear shift indicator 37
6-speed electronic
gearbox system 38
Steering
wheel adjustment 40
Stop & Start 41
Starting and stopping 44
Hill start assist 45
Lighting
control 46
wipers 49
Cruise control 51
Speed limiter 54
Heating/Manual
air conditioning 57
automatic 59
De-icing and demisting 61
Front seats 63
Individual
passenger seat 64
Multi-Flex bench seat 65
Confi gurations 67
Front fi ttings 68
Courtesy lights 70
Torch 71
Crew cab 72
Load space 74
Roof bars 76
Mirrors 77
Toll cards/
car park tickets 78
Electric windows 79
Presentation4
Communication4
Exterior 6
Instruments
and controls8
Centre console9
Sitting comfortably 10
Seeing clearly 11
Driving safely 11
Cab space 12
Load space 13
Ventilation 14
Hazard warning lamps 80
Parking brake 80
Parking assistance 81
Anti-lock braking system
(ABS) 83
Emergency braking
assistance 83
Traction control (ASR)
and stability control
(ESP) 84
Grip control 85
Seat belts 88
Airbags 90
Passenger
airbag deactivation 93
Child seats 94
Recommended seats 95
Installing child seats
using the seat belt 96
2. READY TO SET OFF
15-45
4. SAFETY
80-97
1. FAMILIARISATION
4-14
3. EASE OF USE and
COMFORT 46-79
Page 8 of 200

6
5
2b
2a
4
2a
6
2b
5
4
6
Exterior
15
102 99
Key
:
chapter identifi cation
: page identifi cation
19
Key - Remote control
Selective unlocking of the cab
and load space.
Locking of the load space only.
Complete locking of the vehicle.
Opening the bonnet
Take care when working under
the bonnet.
Raise the bonnet slightly by
reaching in with a fl at hand, palm
down, to make access to the
lever easier. Engage the base of
the stay in the hole provided to
hold the bonnet open.
Fix the stay in its location,
identifi ed by a sticker on the left-
hand side panel of the vehicle.
Sliding side door
Pull the handle towards you
then towards the rear and open
the door, guiding the rearward
movement until the point of
resistance has been passed.
Professional equipment -
Accessories 85
Grip control
The Grip control anti-slip system
improves the road-holding of
your vehicle in snow, mud and
sand.
Page 9 of 200

4
2c
2e
7b
7a
2d8
2e
7b
2c
7a4
2d
8
7
1
FAMILIARISATION
20
22
Rear roof fl ap
The rear roof fl ap is only
compatible with the hinged doors.
Changing bulbs
11 7 11 2
Spare wheel
Hinged rear doors
Tailgate and rear screen
The tools are located under
the right-hand seat.
Raise the carrier with the
wheel fl ush against the fl oor.
23 Asymmetrical (2/3 - 1/3).
This lock makes it possible
to keep the large door closed
and drive with the small door
open.
This control permits opening
to approximately 180°.
Useable dimensions
128
Parking sensors
81
Exterior
Page 14 of 200

33
3
3
12
Interior
CAB SPACE
65
66
66
- folded position, allows long load of up to 3 ms to be
carried inside the vehicle, with the doors closed,
65
Outer seat
Multi-Flex bench seat
Centre seat
A storage space under the seat cushion can
be made secure by fi tting a padlock (not
supplied).
- foldaway position: allows high loads to be
carried in the cab.
Page 17 of 200

15
Access
READY TO SET OFF
2
KEY
This locks and unlocks the locks on the
vehicle and starts the engine.
ACCESS
Security of use
REMOTE CONTROL
Unlocking
Unlocking the load space
Central locking
Press this button to lock the
vehicle completely.
The direction indicators fl ash once.
If one of the doors is open
(transportation of long loads) or is not
closed correctly, the central locking will
not work.
Deadlocking
A second press
on the closed
padlock on the remote control within
fi ve seconds after locking changes the
locking to deadlocking.
This is confi rmed by fi xed lighting
of the direction indicators for
approximately two seconds.
Deadlocking renders the exterior
and interior door opening handles
inoperative: do not leave anyone inside
the vehicle when it is deadlocked.
If deadlocking is activated from inside
the vehicle using the remote control,
it will change to normal locking when
the vehicle is started. To unlock the load space only:
Press this control to unlock
the load space, the front
doors alone remain locked. Press this control to lock the
vehicle completely. Press this button to unlock all
of the rear doors.
Press this button once to
unlock the front doors.
Press this button again
to unlock your vehicle
completely.
The direction indicators fl ash twice.
Page 19 of 200

17
Access
READY TO SET OFF
2
When purchasing a second-hand
vehicle:
- have the keys memorised by a
PEUGEOT dealer to ensure that
the keys in your possession are
the only ones which can start the
vehicle.
Good practice
Do not make any modifi cations to the
electronic immobiliser system.
Operating the remote control, even
when it is in your pocket, may result in
involuntary unlocking of the doors.
The simultaneous use of other
high frequency equipment (mobile
telephones, domestic alarms…), may
interfere with the operation of the
remote control temporarily.
ELECTRONIC
IMMOBILISER
All of the keys contain an electronic
immobiliser device.
This device locks the engine supply
system. It is activated automatically
when the key is removed from the
ignition.
After the ignition is switched on, a
dialogue is established between the key
and the electronic immobiliser system.
The metal part of the key must be
unfolded correctly for correct dialogue
to take place.
If you lose your keys
Visit a PEUGEOT dealer with the
vehicle's V5 registration document and
your identifi cation document.
A PEUGEOT dealer will be able
to retrieve the key code and
the transponder code so that a
replacement key can be ordered.
The remote control does not operate
while the key is in the ignition, even if
the ignition is off.
As a safety precaution (with children
on board), remove the key from the
ignition when leaving the vehicle, even
for a short time. ALARM
If fi tted on your vehicle, this provides
two types of protection:
- exterior protection: it sounds if a
front/rear door or the bonnet is
opened.
-
interior protection: it sounds if the volume
inside the passenger compartment
changes (breaking of a window or a
movement inside the vehicle).
If your vehicle is fi tted with a separation
partition, the interior protection is not
active in the load space.
Locking the vehicle with
complete alarm
Setting the alarm
- Switch off the ignition and get out of
the vehicle.
- Set the alarm within fi ve minutes of
getting out of the vehicle, by locking
or deadlocking using the remote
control. The red diode, located
on the button, fl ashes once per
second.
Page 20 of 200

18
Access
FRONT DOORS
From the inside
Use the door opening control to unlock
and open the door concerned.
From the outside
Use the remote control to lock/unlock
the vehicle.
Insert the metal part of the key in the
lock on the driver's side if the remote
control does not work.
Triggering
The siren sounds, the direction indicators
fl ash for approximately 30 seconds and
the red diode fl ashes rapidly.
- To switch it off, insert the key and
switch on the ignition.
When the alarm has been triggered ten
times in succession (when triggered
for the eleventh time) it is deactivated.
Repeat the rules for setting the alarm.
Locking the vehicle without
alarm
- Insert the key in the lock on the
driver’s door and lock it.
Do not set the alarm when washing
your vehicle.
Failure of the remote control
When the alarm is set but the remote
control does not operate:
- Unlock the doors with the key and
open the door. The alarm is triggered.
- Switch on the ignition in the
next ten seconds. The alarm is
disarmed.
Incorrect operation
When the ignition is switched on, if the
red diode remains on for ten seconds,
there is a fault in the siren connection.
Contact a PEUGEOT dealer to have
the system checked.
Automatic setting of the alarm
Depending on the country in which
the vehicle is sold, the alarm is set
automatically approximately 2 minutes
after the last door is closed.
To prevent triggering of the alarm when
a door is opened, it is imperative to
press the remote control unlocking
button again.
Do not make any modifi cations
to the alarm system as this could
cause faults.
Locking the vehicle with
exterior protection only
If, while you are away from the vehicle,
you wish to leave a window partially
open or a pet inside the vehicle, you
should choose exterior protection only.
- Switch off the ignition.
- In the next ten seconds,
press the button until
the red diode is on
continuously.
- Get out of the vehicle.
- Within the next fi ve minutes, set
the alarm by locking or deadlocking
using the remote control (the red
diode fl ashes once a second).
Disarming
- Unlock the vehicle with the remote
control or switch on the ignition, the
red diode goes out.
Page 21 of 200

19
Access
READY TO SET OFF
2
From the inside
Unlock and open the side door using
this handle, guiding the rearward
sliding to the point of resistance. Pass
this point to hold the door open.
Good practice
Take care not to block the guide space
on the fl oor to allow the door to slide
correctly.
If your vehicle is parked on a slope,
guide the sliding of the side door. In
fact, the door could open or close more
rapidly due to the slope of the ground
and could cause injury.
For safety and operation reasons, do
not drive with the sliding side door open.
SLIDING SIDE DOOR
From the outside
Pull the handle towards you then
towards the rear and open the side
door, guiding the rearward sliding to
beyond the point of resistance to hold
it open.
Operation in the event of a
battery failure
Front and side passenger doors
In the event of a malfunction of the
battery or of the central locking, use
the lock to lock the doors mechanically.
)
To open the door and get out of the
vehicle, pull the interior control.
)
To lock the door, insert the key in the
lock, located on the edge of the door,
then turn it one eighth of a turn
.
Driver’s door
)
Insert the key in the lock, then turn
it to the right to lock or to the left to
unlock.
Page 22 of 200

Access
Practice
It is possible to drive with the right-hand
door open to make the transportation of
long loads easier. The left-hand door is
kept closed by the distinctive "yellow"
lock, positioned at the base of the door.
This closed door must not be used as a
load retainer.
Driving with the right-hand door open
is a special dispensation. Comply with
the usual safety indications to attract
the attention of other drivers.
HINGED REAR DOORS
From outside
Pull the lever to open the right-hand
door.
To close, start with the right-hand door
then close the left-hand door.
To open, pull the handle towards you. The hinged rear doors are
asymmetrical (2/3 - 1/3), with the
smaller door on the right.
They are fi tted with a central lock.
With the roof rear fl ap, the rear
bumper has been strengthened to
serve as a footrest on accessing
the vehicle.
Page 24 of 200

22
Access
REAR ROOF FLAP
This rear roof fl ap is only compatible
with the hinged doors.
To open the rear roof fl ap:
- raise the black paddle of the toggle,
- relieve the toggle by pressing the
rear roof fl ap (downwards) then
release the hook,
- lift the rear roof fl ap,
- pass the point of resistance to
secure the rear roof fl ap using the
support struts.
Support bar
A support bar is provided for
transporting long loads, after opening
the rear roof fl ap.
Fold back the support bar by lifting
the lever.
Support it to the door pillar.
Support the long loads to be
transported, lift them and reposition
the support bar with one hand.
Ensure that it is secured correctly by
pressing the handle downwards past
the point of resistance and secure the
loads fi rmly. The rear bumper has been
strengthened to serve as a
footrest on entering the vehicle.
Never drive without the support
bar in place.
The rear doors only lock when the
support bar is installed.
When the rear roof fl ap is open, take
care when driving where height is
restricted.
Never rest loads directly on the rear
doors.
Comply with the usual indications,
to attract the attention of other drivers. The side supports can be used as
hooking points.
- lower the black paddle to secure
the rear roof fl ap.
Securing the rear roof fl ap places it
on the seal correctly and guarantees
sealing without noise.
To close the rear roof fl ap:
- check that the support bar is
secured correctly,
- lower the rear roof fl ap,
- while pressing the rear roof fl ap
(downwards), take hold of the
two loops of the spring then place
the hook in its housing,