door lock Peugeot Partner 2017 Owner's Manual - RHD (UK, Australia)
[x] Cancel search | Manufacturer: PEUGEOT, Model Year: 2017, Model line: Partner, Model: Peugeot Partner 2017Pages: 260, PDF Size: 9.05 MB
Page 4 of 260
2
Contents
Partner-2-VU_en_Chap00a_Sommaire_ed02-2016
Key 18
Remote control 18
Alarm
20
Doors
21
Rear roof flap
25
T
ailgate 26
Central locking
27
Instrument panel
28
Date and time
29
W
arning lamps
32
Fuel gauge
40
Coolant
40
Under-inflation detection
41
Service indicator
43
Lighting dimmer
44
Steering wheel
adjustment
45
Manual gearbox
45
Gear shift indicator
46
6-speed electronic
gearbox
47
Stop & Start
49
Starting and stopping
52
Hill start assist
53
Driving recommendations
5
4Lighting
55
Wipers
58
T
rip computer
60
Cruise control
61
Speed limiter
64
Heating /
Air conditioning
manual
67
digital
69
Demisting and defrosting
7
2
Front seats
74
Individual passenger seat
7
5
Multi-Flex bench seat
76
Configurations
78
Front fittings
79
Courtesy lamps
81
Crew cab
82
Load space
84
Roof bars
86
Mirrors
87
Electric windows
89
3.
18-54
READY TO GO
5.
90-117
SAFETY
Exterior 5
Interior 6
left hand drive
6 right hand drive
7
Instruments and controls
8 left hand drive
8 right hand drive
10
T
echnical data - Maintenance
12
1.
4-14
OVERVIEW
General safety
recommendations 90
Horn
91
Hazard warning lamps
91
Parking brake
91
Parking sensors
92
Reversing camera
94
Anti-lock braking system (ABS)
95
EBA 95
ASR and DSC
96
Grip control
97
Active City Brake
99
Seat belts
103
Airbags
105
Carrying children
109
Deactivating the passenger's front
airbag
1
11
Recommended seats
1
14
Installation
1
15
4.
55-89
EASE OF USE and
COMFORT
2.
15-17
ECO-DRIVING
Environment 15
Eco-driving 16
The "Visual Search" (visual
index) section assists
you in finding the controls
and functions and their
associated page numbers
on the schematic outlines of
the vehicle.
Instruments and controls
left hand drive
13 right hand drive
14
Page 7 of 260
5
Location
Partner-2-VU_en_Chap01_vue-ensemble_ed02-2016
ExTERIOR
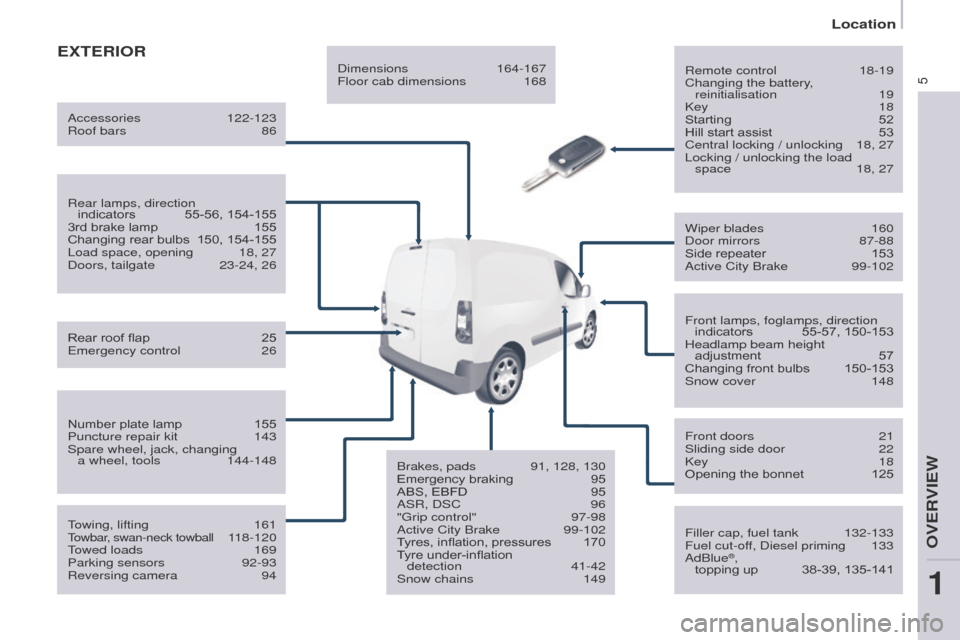
Remote control 18-19
Changing the battery ,
reinitialisation
19
Key
18
Starting
52
Hill start assist
53
Central locking / unlocking
18, 27
Locking / unlocking the load
space
18, 27
Filler cap, fuel tank
132-133
Fuel cut-of
f, Diesel priming
133
AdBlue®,
topping up 38-39, 135-141
Wiper blades
160
Door mirrors
87-88
Side repeater
153
Active City Brake
99-102
Front lamps, foglamps, direction indicators
55-57, 150-153
Headlamp beam height adjustment
57
Changing front bulbs
150-153
Snow cover
148
Front doors
21
Sliding side door
22
Key
18
Opening the bonnet
125
T
owing, lifting
161Towbar, swan-neck towball 118-120
T
owed loads
169
Parking sensors
92-93
Reversing camera
94
Number plate lamp
155
Puncture repair kit
143
Spare wheel, jack, changing a
wheel, tools
144-148
Rear lamps, direction
indicators
55-56, 154-155
3rd brake lamp
155
Changing rear bulbs
150, 154-155
Load space, opening
18, 27
Doors, tailgate
23-24, 26
Accessories
122-123
Roof bars
86
Rear roof flap
25
Emergency control
26 Dimensions
164-167
Floor cab dimensions
168
Brakes, pads
91, 128, 130
Emergency braking
95
ABS, EBFD
95
ASR, DSC
96
"Grip control"
97-98
Active City Brake
99-102
T yres, inflation, pressures 170
T
yre under-inflation detection
41-42
Snow chains
149
1
OVERVIEW
Page 15 of 260
13
Partner-2-VU_en_Chap01_vue-ensemble_ed02-2016
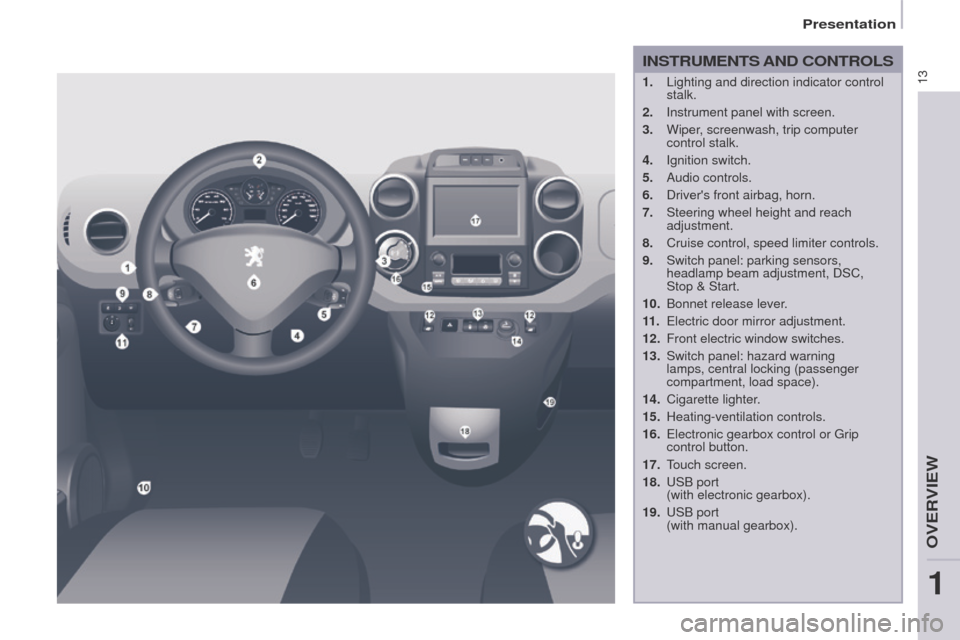
INSTRUMENTS AND CONTROLS
1. Lighting and direction indicator control
stalk.
2.
Instrument panel with screen.
3.
Wiper
, screenwash, trip computer
control stalk.
4.
Ignition switch.
5.
Audio controls.
6.
Driver's front airbag, horn.
7.
Steering wheel height and reach
adjustment.
8.
Cruise control, speed limiter controls.
9.
Switch panel: parking sensors,
headlamp beam adjustment, DSC,
Stop
& Start.
10.
Bonnet release lever
.
11 .
Electric door mirror adjustment.
12.
Front electric window switches.
13.
Switch panel: hazard warning
lamps, central locking (passenger
compartment, load space).
14.
Cigarette lighter
.
15.
Heating-ventilation controls.
16.
Electronic gearbox control or Grip
control button.
17.
T
ouch screen.
18.
USB port
(with electronic gearbox).
19.
USB port
(with manual gearbox).
1
OVERVIEW
Presentation
Page 16 of 260
14
Partner-2-VU_en_Chap01_vue-ensemble_ed02-2016
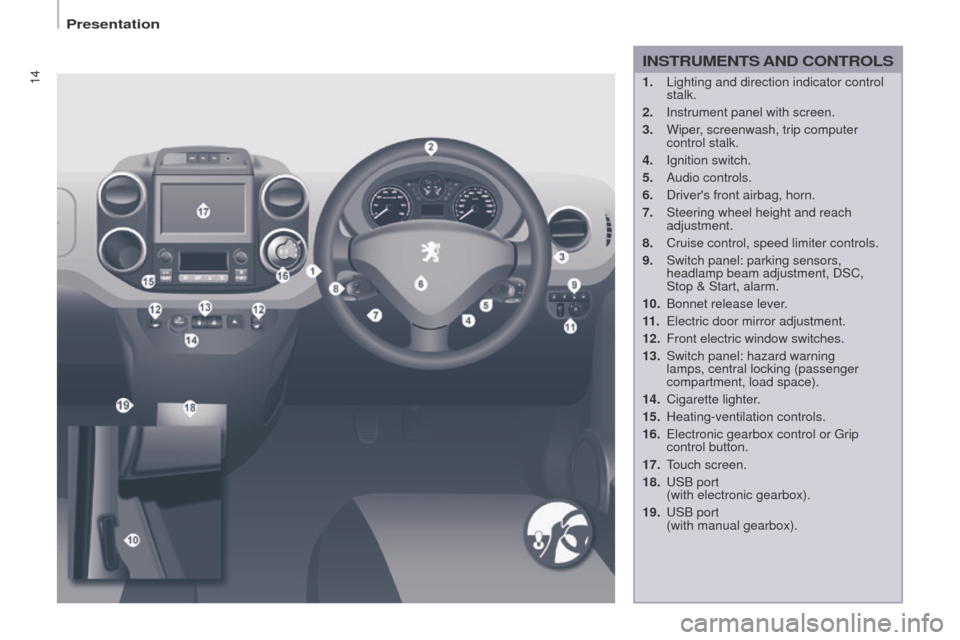
1. Lighting and direction indicator control
stalk.
2.
Instrument panel with screen.
3.
Wiper
, screenwash, trip computer
control stalk.
4.
Ignition switch.
5.
Audio controls.
6.
Driver's front airbag, horn.
7.
Steering wheel height and reach
adjustment.
8.
Cruise control, speed limiter controls.
9.
Switch panel: parking sensors,
headlamp beam adjustment, DSC,
Stop & Start, alarm.
10.
Bonnet release lever
.
11 .
Electric door mirror adjustment.
12.
Front electric window switches.
13.
Switch panel: hazard warning
lamps, central locking (passenger
compartment, load space).
14.
Cigarette lighter
.
15.
Heating-ventilation controls.
16.
Electronic gearbox control or Grip
control button.
17.
T
ouch screen.
18.
USB port
(with electronic gearbox).
19.
USB port
(with manual gearbox).
INSTRUMENTS AND CONTROLS
Presentation
Page 20 of 260
18
Access
Partner-2-VU_en_Chap03_Pret-a-partir_ed02-2016
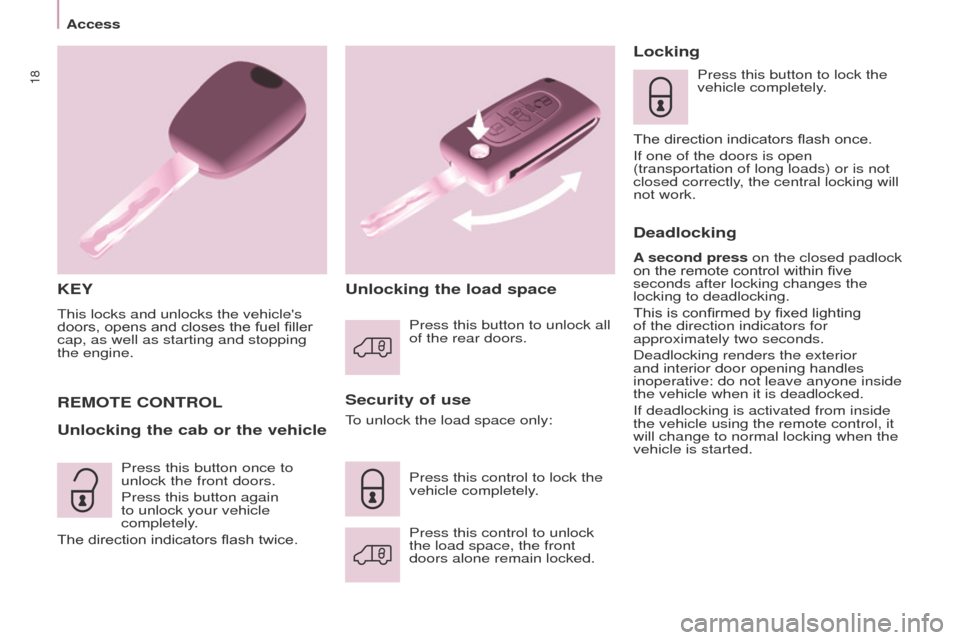
KEY
This locks and unlocks the vehicle's
doors, opens and closes the fuel filler
cap, as well as starting and stopping
the engine.
Security of use
R
EMOTE
CONTROL
Unlocking the cab or the vehicle Unlocking the load spaceLocking
Press this button to lock the
vehicle completely.
The direction indicators flash once.
If one of the doors is open
(transportation of long loads) or is not
closed correctly, the central locking will
not work.
Deadlocking
A second press on the closed padlock
on the remote control within five
seconds after locking changes the
locking to deadlocking.
This is confirmed by fixed lighting
of the direction indicators for
approximately two seconds.
Deadlocking renders the exterior
and interior door opening handles
inoperative: do not leave anyone inside
the vehicle when it is deadlocked.
If deadlocking is activated from inside
the vehicle using the remote control, it
will change to normal locking when the
vehicle is started.
To unlock the load space only:
Press this control to unlock
the load space, the front
doors alone remain locked. Press this control to lock the
vehicle completely. Press this button to unlock all
of the rear doors.
Press this button once to
unlock the front doors.
Press this button again
to unlock your vehicle
completely.
The direction indicators flash twice.
Page 22 of 260
20
Access
Partner-2-VU_en_Chap03_Pret-a-partir_ed02-2016
Good practice
Do not make any modifications to the
electronic immobiliser system.
Operating the remote control, even
when it is in your pocket, may result in
involuntary unlocking of the doors.
The simultaneous use of other
high frequency equipment (mobile
telephones, domestic alarms…), may
interfere with the operation of the
remote control temporarily.
The remote control does not operate
while the key is in the ignition, even if
the ignition is off.
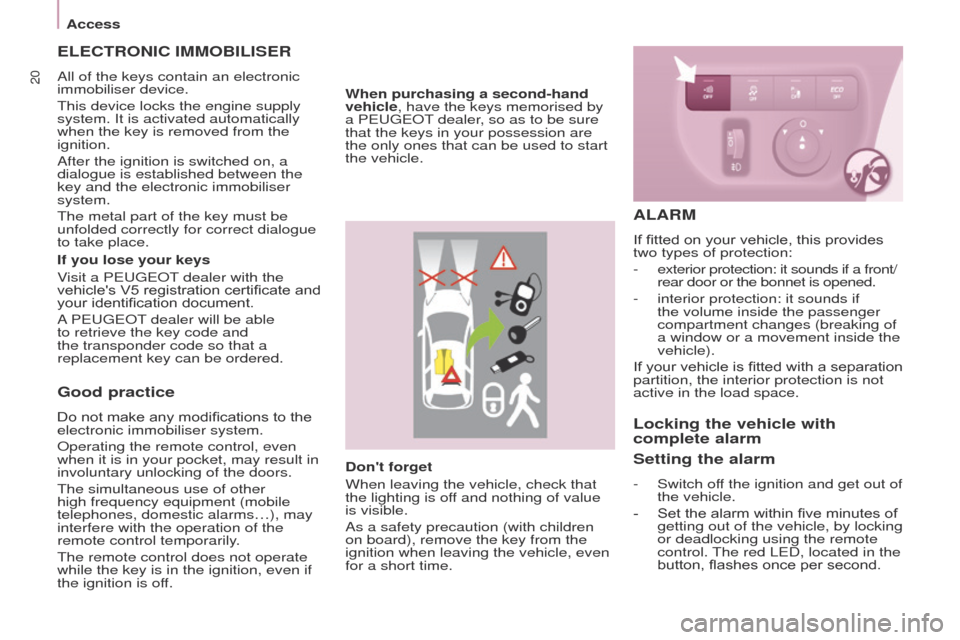
ELECTRONIC IMMOBILISER
All of the keys contain an electronic
immobiliser device.
This device locks the engine supply
system. It is activated automatically
when the key is removed from the
ignition.
After the ignition is switched on, a
dialogue is established between the
key and the electronic immobiliser
system.
The metal part of the key must be
unfolded correctly for correct dialogue
to take place.
If you lose your keys
Visit a PEUGEOT dealer with the
vehicle's V5 registration certificate and
your identification document.
A PEUGEOT dealer will be able
to retrieve the key code and
the transponder code so that a
replacement key can be ordered.Don't forget
When leaving the vehicle, check that
the lighting is off and nothing of value
is visible.
As a safety precaution (with children
on board), remove the key from the
ignition when leaving the vehicle, even
for a short time.
When purchasing a second-hand
vehicle, have the keys memorised by
a PEUGEOT dealer, so as to be sure
that the keys in your possession are
the only ones that can be used to start
the vehicle.
ALARM
If fitted on your vehicle, this provides
two types of protection:
-
exterior protection: it sounds if a front/
rear door or the bonnet is opened.
-
interior protection: it sounds if
the volume inside the passenger
compartment changes (breaking of
a window or a movement inside the
vehicle).
If
your vehicle is fitted with a separation
partition, the interior protection is not
active in the load space.
Locking the vehicle with
complete alarm
Setting the alarm
- Switch of f the ignition and get out of
the vehicle.
-
Set the alarm within five minutes of
getting out of the vehicle, by locking
or deadlocking using the remote
control.
The red LED, located in the
button, flashes once per second.
Page 23 of 260

21
Access
Partner-2-VU_en_Chap03_Pret-a-partir_ed02-2016
FRONT DOORS
From the inside
Use the door opening control to unlock
and open the door concerned.
From the outside
Use the remote control to lock/unlock
the vehicle.
Insert the metal part of the key in the
lock on the driver's side if the remote
control does not work.
Disarming
- Unlock the vehicle with the remote
control or switch on the ignition, the
red LED goes off.
Locking the vehicle with
exterior protection only
If, while you are away from the vehicle,
you wish to leave a window partially
open or a pet inside the vehicle, you
should choose exterior protection only.
-
Switch of
f the ignition.
Triggering
The siren sounds, the direction indicators
flash for approximately 30 seconds and
the red LED flashes rapidly.
-
T
o switch it off, insert the key and
switch on the ignition.
When the alarm has been triggered ten
times in succession (when triggered
for the eleventh time) it is deactivated.
Repeat the procedure for setting the
alarm.
Locking the vehicle without
alarm
- Insert the key in the lock on the
driver's door and lock it.
Do not set the alarm when washing
your vehicle.
Failure of the remote control
When the alarm is set but the remote
control does not operate:
-
Unlock the doors with the key and
open the door. The alarm is triggered.
-
Switch on the ignition in the
next ten seconds.
The alarm is
disarmed.
Incorrect operation
When the ignition is switched on, if the
red LED remains on for ten seconds,
there is a fault in the siren connection.
Contact a PEUGEOT dealer to have
the system checked.
Automatic setting of the alarm
Depending on the country in which
the vehicle is sold, the alarm is set
automatically approximately 2 minutes
after the last door is closed.
To prevent triggering of the alarm when
a door is opened, you have to press
the remote control unlocking button
again.
-
In the next ten seconds,
press the button until
the red LED is on
continuously
.
-
Get out of the vehicle.
-
Within the next five minutes, set
the alarm by locking or deadlocking
using the remote control (the red
LED flashes once a second).
Do not make any modifications
to the alarm system as this could
cause faults.
READY TO GO
3
Page 24 of 260
22
Access
Partner-2-VU_en_Chap03_Pret-a-partir_ed02-2016
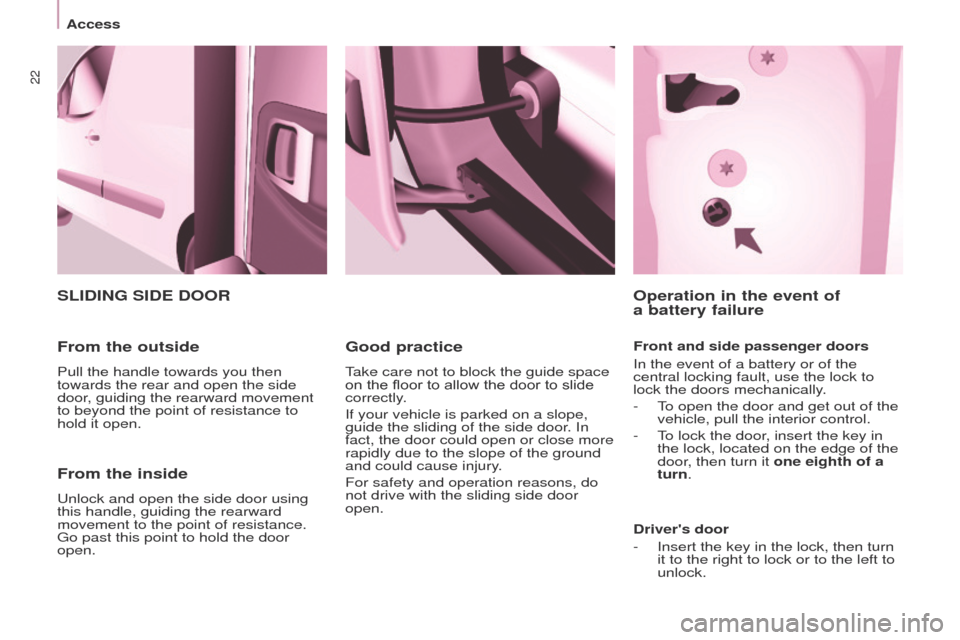
From the inside
Unlock and open the side door using
this handle, guiding the rearward
movement to the point of resistance.
Go past this point to hold the door
open.
Good practice
Take care not to block the guide space
on the floor to allow the door to slide
correctly.
If your vehicle is parked on a slope,
guide the sliding of the side door. In
fact, the door could open or close more
rapidly due to the slope of the ground
and could cause injury.
For safety and operation reasons, do
not drive with the sliding side door
open.
SLIDING SIDE DOOR
From the outside
Pull the handle towards you then
towards the rear and open the side
door, guiding the rearward movement
to beyond the point of resistance to
hold it open.
Operation in the event of
a battery failure
Front and side passenger doors
In the event of a battery or of the
central locking fault, use the lock to
lock the doors mechanically.
-
T
o open the door and get out of the
vehicle, pull the interior control.
-
T
o lock the door, insert the key in
the lock, located on the edge of the
door, then turn it one eighth of a
turn.
Driver's door
-
Insert the key in the lock, then turn
it to the right to lock or to the left to
unlock.
Page 25 of 260
23
Access
Partner-2-VU_en_Chap03_Pret-a-partir_ed02-2016
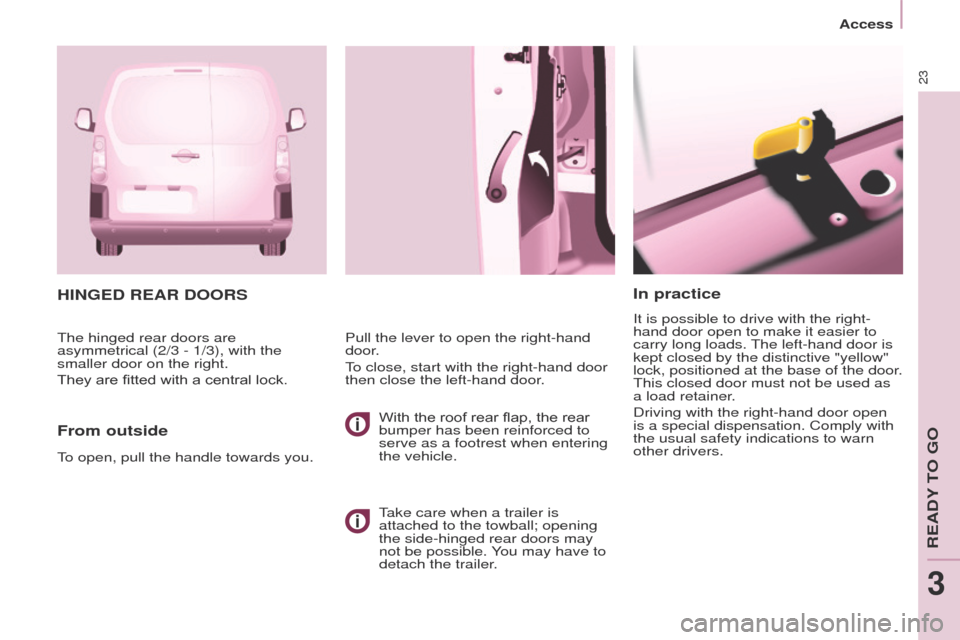
In practice
It is possible to drive with the right-
hand door open to make it easier to
carry long loads. The left-hand door is
kept closed by the distinctive "yellow"
lock, positioned at the base of the door.
This closed door must not be used as
a load retainer.
Driving with the right-hand door open
is a special dispensation. Comply with
the usual safety indications to warn
other drivers.
HINGED REAR DOORS
From outside
Pull the lever to open the right-hand
door.
To close, start with the right-hand door
then close the left-hand door.
To open, pull the handle towards you. The hinged rear doors are
asymmetrical (2/3 - 1/3), with the
smaller door on the right.
They are fitted with a central lock. With the roof rear flap, the rear
bumper has been reinforced to
serve as a footrest when entering
the vehicle.
Take care when a trailer is
attached to the towball; opening
the side-hinged rear doors may
not be possible. You may have to
detach the trailer.
READY TO GO
3
Page 27 of 260
25
Access
Partner-2-VU_en_Chap03_Pret-a-partir_ed02-2016
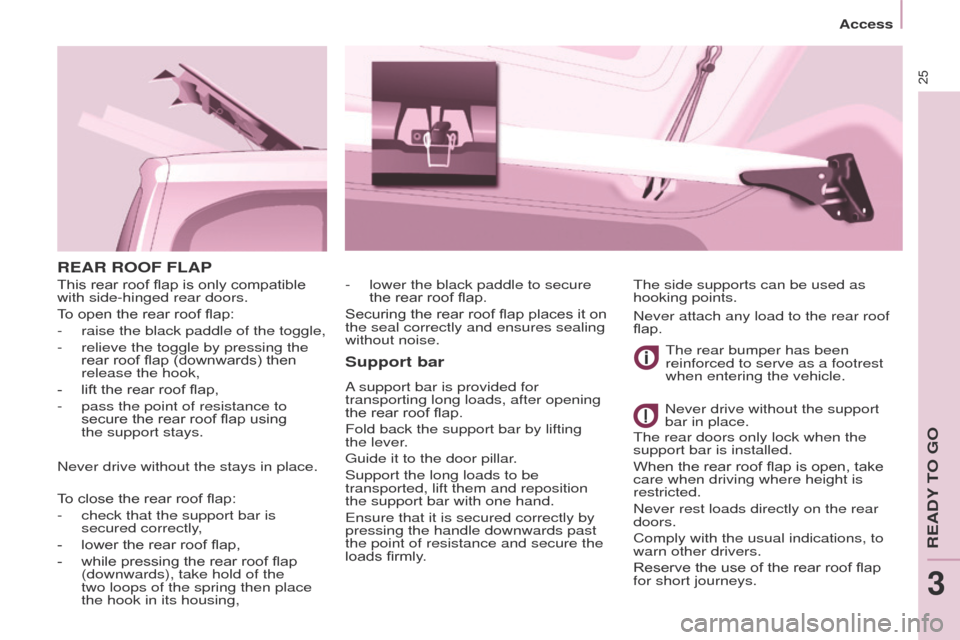
REAR ROOF FLAP
Support bar
A support bar is provided for
transporting long loads, after opening
the rear roof flap.
Fold back the support bar by lifting
the lever.
Guide it to the door pillar.
Support the long loads to be
transported, lift them and reposition
the
support bar with one hand.
Ensure that it is secured correctly by
pressing the handle downwards past
the point of resistance and secure the
loads firmly. The rear bumper has been
reinforced to serve as a footrest
when entering the vehicle.
Never drive without the support
bar in place.
The side supports can be used as
hooking points.
-
lower the black paddle to secure
the rear roof flap.
Securing the rear roof flap places it on
the seal correctly and ensures sealing
without noise.
T
o close the rear roof flap:
-
check that the support bar is
secured correctly
,
-
lower the rear roof flap,
-
while pressing the rear roof flap
(downwards), take hold of the
two
loops of the spring then place
the hook in its housing,
This rear roof flap is only compatible
with side-hinged rear doors.
To open the rear roof flap:
-
raise the black paddle of the toggle,
-
relieve the toggle by pressing the
rear roof flap (downwards) then
release the hook,
-
lift the rear roof flap,
-
pass the point of resistance to
secure the rear roof flap using
the
support stays.
Never drive without the stays in place. Never attach any load to the rear roof
flap.
The rear doors only lock when the
support bar is installed.
When the rear roof flap is open, take
care when driving where height is
restricted.
Never rest loads directly on the rear
doors.
Comply with the usual indications, to
warn other drivers.
Reserve the use of the rear roof flap
for short journeys.
READY TO GO
3