window Peugeot Partner 2019 User Guide
[x] Cancel search | Manufacturer: PEUGEOT, Model Year: 2019, Model line: Partner, Model: Peugeot Partner 2019Pages: 312, PDF Size: 9.56 MB
Page 58 of 312
56
Always remove the key when leaving the
vehicle, even for a short time.
In the event of contact during operation
of the windows, you must reverse the
movement of the window. To do this, press
the control concerned.
When operating the passenger electric
window controls, the driver must ensure
that no one is preventing correct closing of
the windows.
The driver must ensure that the
passengers use the electric windows
c o r r e c t l y.
Be aware of children when operating the
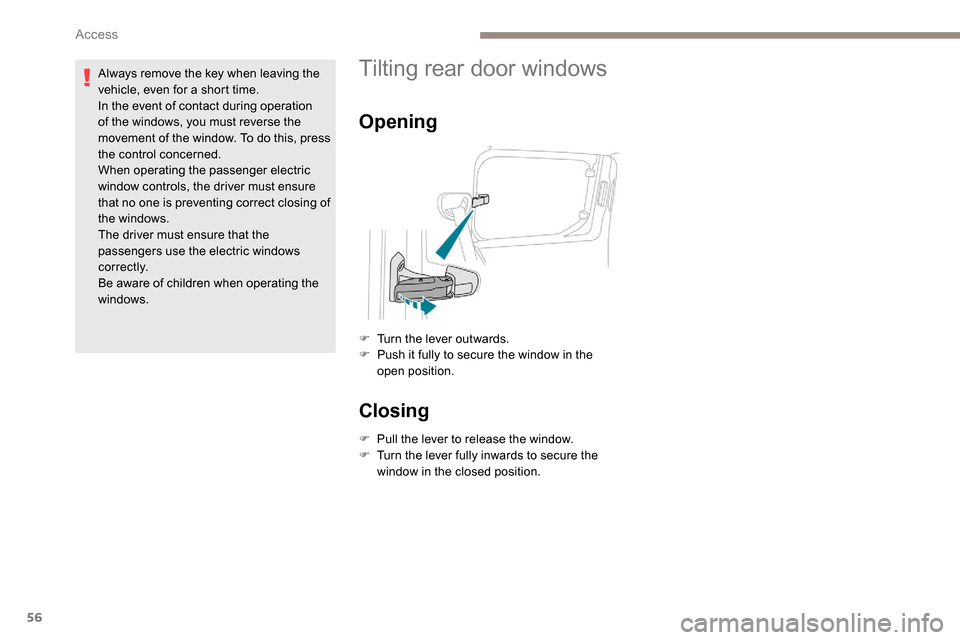
windows.Tilting rear door windows
Opening
F Turn the lever outwards.
F P ush it fully to secure the window in the
open position.
Closing
F Pull the lever to release the window.
F T urn the lever fully inwards to secure the
window in the closed position.
Access
Page 77 of 312
75
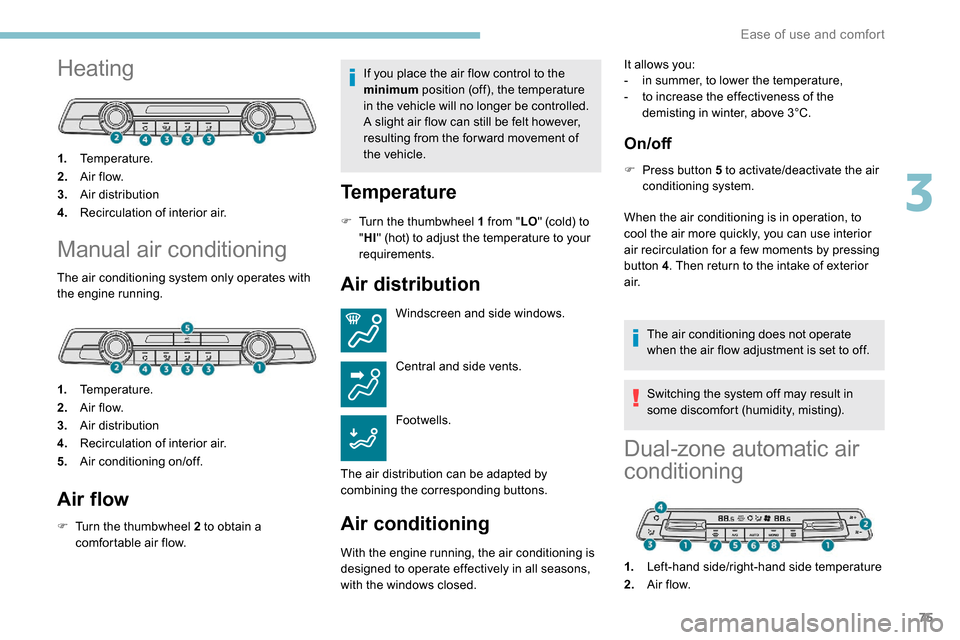
Heating
1.Temperature.
2. A ir f low.
3. Air distribution
4. Recirculation of interior air.
Manual air conditioning
The air conditioning system only operates with
the engine running.
1.Temperature.
2. A ir f low.
3. Air distribution
4. Recirculation of interior air.
5. Air conditioning on/off.
Air flow
F Turn the thumbwheel 2 to obtain a
comfortable air flow. If you place the air flow control to the
minimum
position (off), the temperature
in the vehicle will no longer be controlled.
A slight air flow can still be felt however,
resulting from the for ward movement of
the vehicle.
Temperature
F Turn the thumbwheel 1 from " LO" (cold) to
" HI " (hot) to adjust the temperature to your
requirements.
Air distribution
Windscreen and side windows.
Central and side vents.
Footwells.
The air distribution can be adapted by
combining the corresponding buttons.
Air conditioning
With the engine running, the air conditioning is
designed to operate effectively in all seasons,
with the windows closed. It allows you:
-
i
n summer, to lower the temperature,
-
t
o increase the effectiveness of the
demisting in winter, above 3°C.
On/off
F Press button 5 to activate/deactivate the air conditioning system.
When the air conditioning is in operation, to
cool the air more quickly, you can use interior
air recirculation for a few moments by pressing
button 4 . Then return to the intake of exterior
a i r.
The air conditioning does not operate
when the air flow adjustment is set to off.
Switching the system off may result in
some discomfort (humidity, misting).
Dual-zone automatic air
conditioning
1.Left-hand side/right-hand side temperature
2. A ir f low.
3
Ease of use and comfort
Page 78 of 312
76
Automatic comfort mode
F Press the "AUTO" button 6 su c c e s s i ve l y.
The active mode appears in the display screen,
as described below: Provides soft and quiet operation by
limiting air flow.
Offers the best compromise between
a comfortable temperature and quiet
operation.
Provides dynamic and effective air
f low.
When the engine is cold, the air flow will
only reach its optimum level gradually
to prevent too much cold air being
distributed.
In cold weather, it favours the distribution
of warm air to the windscreen, the side
windows and the footwells only.
Manual mode
If you wish, you can make a different choice
from that offered by the system by changing
a setting. The other functions will still be
automatically managed.
The " AUTO " symbol disappears if you change
a setting.
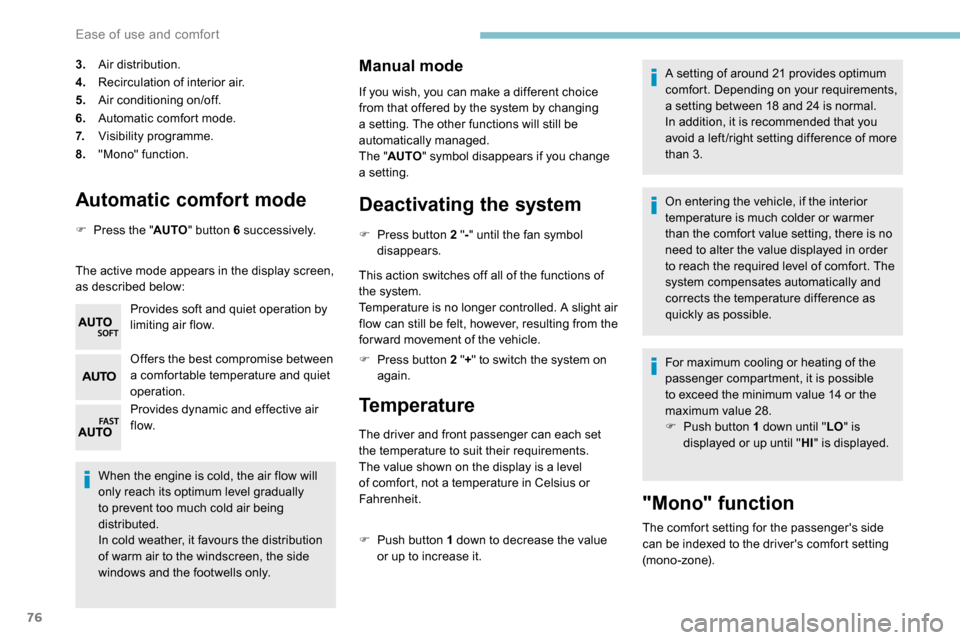
3.
Air distribution.
4. Recirculation of interior air.
5. Air conditioning on/off.
6. Automatic comfort mode.
7. Visibility programme.
8. "Mono" function.
Deactivating the system
F Press button 2 " -" until the fan symbol
disappears.
This action switches off all of the functions of
the system.
Temperature is no longer controlled. A slight air
flow can still be felt, however, resulting from the
for ward movement of the vehicle.
F
P
ress button 2 " +" to switch the system on
again.
Temperature
The driver and front passenger can each set
the temperature to suit their requirements.
The value shown on the display is a level
of comfort, not a temperature in Celsius or
Fahrenheit.
F
P
ush button 1 down to decrease the value
or up to increase it. A setting of around 21 provides optimum
comfort. Depending on your requirements,
a setting between 18 and 24 is normal.
In addition, it is recommended that you
avoid a left /right setting difference of more
than 3.
On entering the vehicle, if the interior
temperature is much colder or warmer
than the comfort value setting, there is no
need to alter the value displayed in order
to reach the required level of comfort. The
system compensates automatically and
corrects the temperature difference as
quickly as possible.
For maximum cooling or heating of the
passenger compartment, it is possible
to exceed the minimum value 14 or the
maximum value 28.
F
P ush button 1 down until "
LO" is
displayed or up until " HI" is displayed.
"Mono" function
The comfort setting for the passenger's side
can be indexed to the driver's comfort setting
(mono-zone).
Ease of use and comfort
Page 79 of 312
77
F Press corresponding button 8 to activate/deactivate the function.
The indicator lamp in the button is on when the
function is activated.
The function is deactivated automatically if a
passenger uses the temperature control.
Visibility programme
F Press " Visibility" button 7 to demist or
defrost the windscreen and side windows
more quickly.
The system automatically manages the air
conditioning, air flow and air intake, and
provides optimum distribution towards the
windscreen and side windows.
F
P
ress " Visibility " button 8 again to stop the
programme.
Or
F
P
ress " AUTO " button 6 to return to the
automatic comfort programme.
Air conditioning
With the engine running, the air conditioning is
designed to operate effectively in all seasons,
with the windows closed.
It allows you:
-
i
n summer, to lower the temperature,
-
t
o increase the effectiveness of the
demisting in winter, above 3°C.
On/off
F Press button 5 to activate/deactivate the air conditioning system.
When the air conditioning is in operation, to
cool the air more quickly, you can use interior
air recirculation for a few moments by pressing
button 4 . Then return to the intake of exterior
a i r.
The air conditioning does not operate
when the air flow adjustment is set to off.
Switching the system off may result in
some discomfort (humidity, misting).
Air distribution
F Press button 3 successively to direct the air flow towards:
-
t
he windscreen, the side windows and the
footwells,
-
t
he footwells.
-
t
he central vents, the side vents and the
footwells,
-
t
he windscreen, the side windows, the
central vents, the side vents and the
footwells,
-
t
he central and side vents,
-
t
he windscreen and side windows
(demisting or defrosting).
Air flow
F Press buttons 2 to increase/decrease the air f low.
The symbol for air flow (a fan) appears. It is
filled in or emptied progressively according to
the value requested.
Recirculation of interior air
The intake of exterior air prevents the formation
of mist on the windscreen and side windows.
Recirculation of the interior air isolates the
passenger compartment from exterior odours
and fumes.
This allows hot or cold air to be delivered
more quickly when required.
F
P
ress button 4 to recirculate the interior air/
permit the intake of exterior air.
Avoid prolonged use of recirculation
of the interior air – risk of misting and
deterioration of air quality!
3
Ease of use and comfort
Page 80 of 312
78
Front demist – defrost
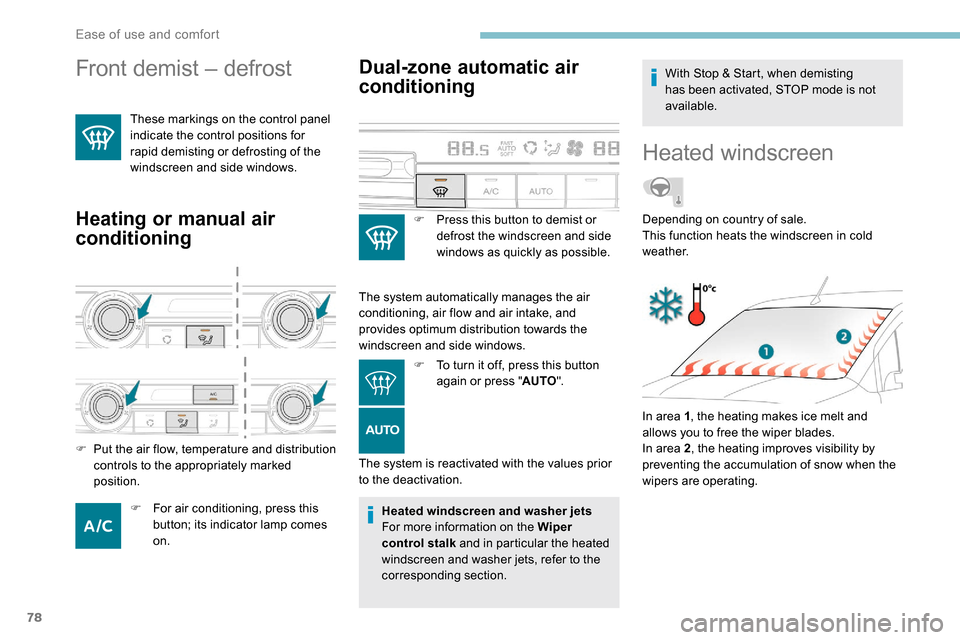
These markings on the control panel
indicate the control positions for
rapid demisting or defrosting of the
windscreen and side windows.
Heating or manual air
conditioning
F For air conditioning, press this button; its indicator lamp comes
on.
Dual-zone automatic air
conditioning
F Press this button to demist or defrost the windscreen and side
windows as quickly as possible.
The system automatically manages the air
conditioning, air flow and air intake, and
provides optimum distribution towards the
windscreen and side windows. F
T
o turn it off, press this button
again or press " AUTO".
The system is reactivated with the values prior
to the deactivation.
F
P
ut the air flow, temperature and distribution
controls to the appropriately marked
position.
Heated windscreen and washer jets
For more information on the Wiper
control stalk and in particular the heated
windscreen and washer jets, refer to the
corresponding section. With Stop & Start, when demisting
has been activated, STOP mode is not
available.
Heated windscreen
In area 1
, the heating makes ice melt and
allows you to free the wiper blades.
In area 2 , the heating improves visibility by
preventing the accumulation of snow when the
wipers are operating. Depending on country of sale.
This function heats the windscreen in cold
weather.
Ease of use and comfort
Page 95 of 312
93
To maintain the effectiveness of the wiper
blades, it is advisable to:
-
h
andle them with care,
-
c
lean them regularly using soapy
water,
-
a
void using them to retain cardboard
on the windscreen,
-
r
eplace them at the first signs of wear.
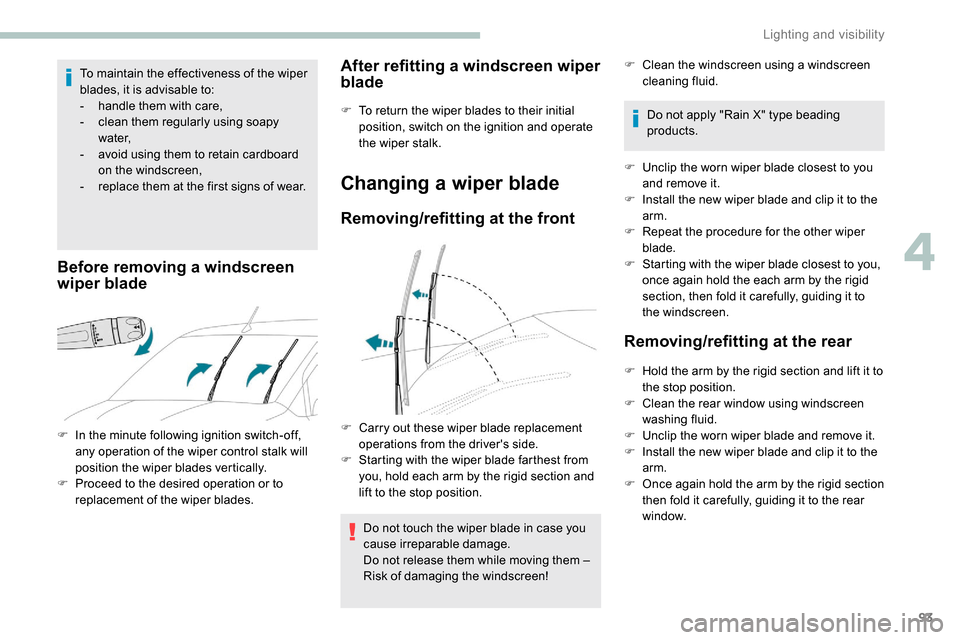
Before removing a windscreen
wiper blade
F In the minute following ignition switch-off, any operation of the wiper control stalk will
position the wiper blades vertically.
F
P
roceed to the desired operation or to
replacement of the wiper blades.
After refitting a windscreen wiper
blade
F To return the wiper blades to their initial position, switch on the ignition and operate
the wiper stalk.
Changing a wiper blade
Removing/refitting at the front
Do not touch the wiper blade in case you
cause irreparable damage.
Do not release them while moving them –
Risk of damaging the windscreen! F
C
lean the windscreen using a windscreen
cleaning fluid.
Do not apply "Rain X" type beading
products.
F
U
nclip the worn wiper blade closest to you
and remove it.
F
I
nstall the new wiper blade and clip it to the
arm.
F
R
epeat the procedure for the other wiper
blade.
F
S
tarting with the wiper blade closest to you,
once again hold the each arm by the rigid
section, then fold it carefully, guiding it to
the windscreen.
Removing/refitting at the rear
F Hold the arm by the rigid section and lift it to the stop position.
F
C
lean the rear window using windscreen
washing fluid.
F
U
nclip the worn wiper blade and remove it.
F
I
nstall the new wiper blade and clip it to the
arm.
F
O
nce again hold the arm by the rigid section
then fold it carefully, guiding it to the rear
window.
F
C
arry out these wiper blade replacement
operations from the driver's side.
F
S
tarting with the wiper blade farthest from
you, hold each arm by the rigid section and
lift to the stop position.
4
Lighting and visibility
Page 109 of 312
107
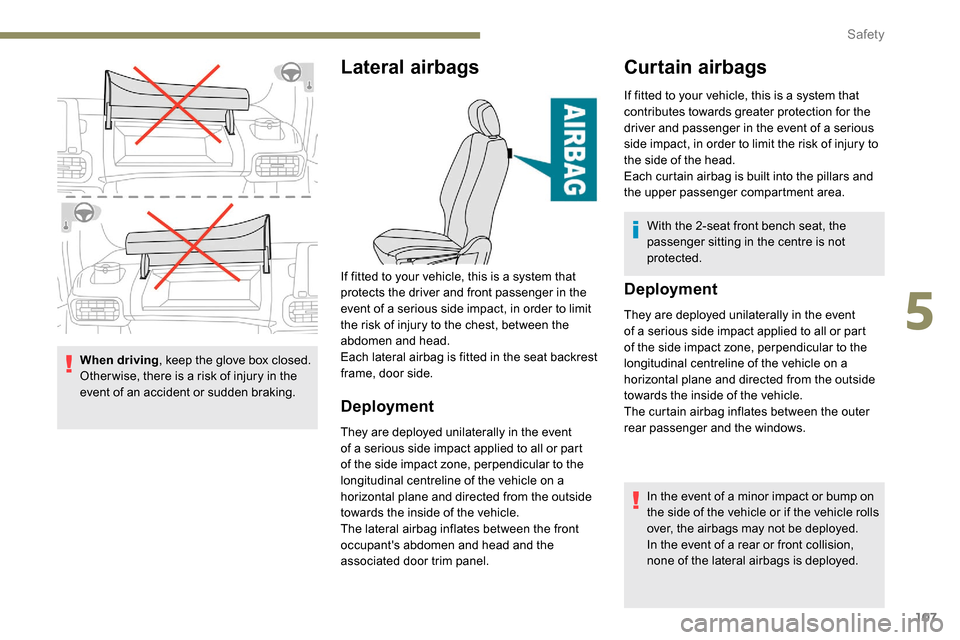
When driving, keep the glove box closed.
Other wise, there is a risk of injury in the
event of an accident or sudden braking.
Lateral airbags
Deployment
They are deployed unilaterally in the event
of a serious side impact applied to all or part
of the side impact zone, perpendicular to the
longitudinal centreline of the vehicle on a
horizontal plane and directed from the outside
towards the inside of the vehicle.
The lateral airbag inflates between the front
occupant's abdomen and head and the
associated door trim panel.
Deployment
They are deployed unilaterally in the event
of a serious side impact applied to all or part
of the side impact zone, perpendicular to the
longitudinal centreline of the vehicle on a
horizontal plane and directed from the outside
towards the inside of the vehicle.
The curtain airbag inflates between the outer
rear passenger and the windows.
In the event of a minor impact or bump on
the side of the vehicle or if the vehicle rolls
over, the airbags may not be deployed.
In the event of a rear or front collision,
none of the lateral airbags is deployed.
Curtain airbags
If fitted to your vehicle, this is a system that
contributes towards greater protection for the
driver and passenger in the event of a serious
side impact, in order to limit the risk of injury to
the side of the head.
Each curtain airbag is built into the pillars and
the upper passenger compartment area.With the 2-seat front bench seat, the
passenger sitting in the centre is not
protected.
If fitted to your vehicle, this is a system that
protects the driver and front passenger in the
event of a serious side impact, in order to limit
the risk of injury to the chest, between the
abdomen and head.
Each lateral airbag is fitted in the seat backrest
frame, door side.
5
Safety
Page 115 of 312
113
Advice
An incorrectly installed child seat
compromises the child's safety in the
event of an accident.
Ensure that there is no seat belt or seat
belt buckle under the child seat, as this
could destabilise it.
Remember to fasten the seat belts or the
child seat harnesses keeping the slack
relative to the child's body to a minimum,
even for short journeys.
When installing a child seat using the seat
belt, ensure that the seat belt is tightened
correctly on the child seat and that it
secures the child seat firmly on the seat
of your vehicle. If your passenger seat is
adjustable, move it forwards if necessary.
The head restraint must be removed
before installing a child seat with a
backrest on a passenger seat.
Ensure that the head restraint is stored or
attached securely to prevent it from being
thrown around the vehicle in the event
of sharp braking. Refit the head restraint
once the child seat has been removed.Children in the front
Deactivate the front passenger airbag
when a rear ward facing child seat is
installed on the front passenger seat.
Otherwise, the child would risk being
seriously injured or killed if the airbag
were deployed.Installing a booster seat
The chest part of the seat belt must be
positioned on the child's shoulder without
touching the neck.
Ensure that the lap part of the seat belt
passes correctly over the child's thighs.
We recommend using a booster seat with
a backrest equipped with a belt guide at
shoulder level.
Additional protections
To prevent accidental opening of the doors
and rear windows, use the child lock.
Take care not to open the rear windows by
more than one third.
To protect young children from the rays
of the sun, fit side blinds on the rear
windows.
As a safety precaution, do not leave:
-
a c
hild or children alone and
unattended in a vehicle,
-
a c
hild or an animal in a vehicle
which is exposed to the sun, with the
windows closed,
-
t
he keys within reach of children inside
the vehicle.
Children in the rear
In the rear seats, always leave sufficient
space between the front seat and:
-
a r
ear ward facing child seat,
-
t
he child's feet for a child seat fitted
forward facing.
To do this, move the front seat for wards
and, if necessary, move its backrest into
the upright position.
For optimal installation of the forward
facing child seat, verify that its backrest is
as close as possible to the backrest of the
vehicle seat, if possible in contact with it.
5
Safety
Page 163 of 312
161
Adjusting the audible signalOn versions equipped with
PEUGEOT Connect Radio,
pressing this button opens the
audible signal volume adjustment
window.
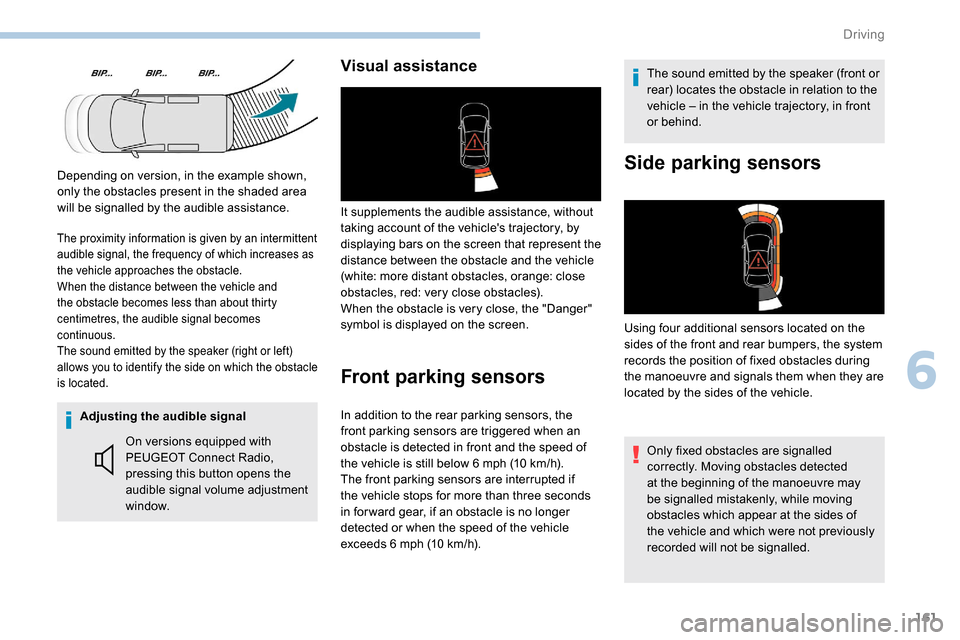
Visual assistance
It supplements the audible assistance, without
taking account of the vehicle's trajectory, by
displaying bars on the screen that represent the
distance between the obstacle and the vehicle
(white: more distant obstacles, orange: close
obstacles, red: very close obstacles).
When the obstacle is very close, the "Danger"
symbol is displayed on the screen.
Front parking sensors
The sound emitted by the speaker (front or
rear) locates the obstacle in relation to the
vehicle – in the vehicle trajectory, in front
or behind.
In addition to the rear parking sensors, the
front parking sensors are triggered when an
obstacle is detected in front and the speed of
the vehicle is still below 6
mph (10
km/h).
The front parking sensors are interrupted if
the vehicle stops for more than three seconds
in for ward gear, if an obstacle is no longer
detected or when the speed of the vehicle
exceeds 6
mph (10
km/h).
Side parking sensors
Using four additional sensors located on the
sides of the front and rear bumpers, the system
records the position of fixed obstacles during
the manoeuvre and signals them when they are
located by the sides of the vehicle.
The proximity information is given by an intermittent
audible signal, the frequency of which increases as
the vehicle approaches the obstacle.
When the distance between the vehicle and
the obstacle becomes less than about thirty
centimetres, the audible signal becomes
continuous.
The sound emitted by the speaker (right or left)
allows you to identify the side on which the obstacle
is located.
Only fixed obstacles are signalled
correctly. Moving obstacles detected
at the beginning of the manoeuvre may
be signalled mistakenly, while moving
obstacles which appear at the sides of
the vehicle and which were not previously
recorded will not be signalled.
Depending on version, in the example shown,
only the obstacles present in the shaded area
will be signalled by the audible assistance.
6
Driving
Page 207 of 312
205
Charging the battery using
a battery charger
For optimum ser vice life of the battery, it is
essential to maintain an adequate state of
charge.
In some circumstances it may be necessary to
charge the battery:
-
i
f you only use your vehicle for short
journeys,
-
i
f the vehicle is to be taken off the road for
several weeks.
Contact a PEUGEOT dealer or a qualified
workshop.
If you plan to charge your vehicle's battery
yourself, use only a charger compatible
with lead-acid batteries with a nominal
voltage of 12
V.
Follow the instructions provided by the
manufacturer of the charger.
Never reverse polarities.
It is not necessary to disconnect the
battery.
F
S
witch off the ignition.
F
S
witch off all electrical consumers (audio
system, lamps, wipers, etc.). Never try to charge a frozen battery – risk
of explosion!
If the battery has frozen, have it checked
by a PEUGEOT dealer or by a qualified
workshop who will check that the internal
components have not been damaged and
that the container has not cracked, which
would mean a risk of toxic and corrosive
acid leaking.
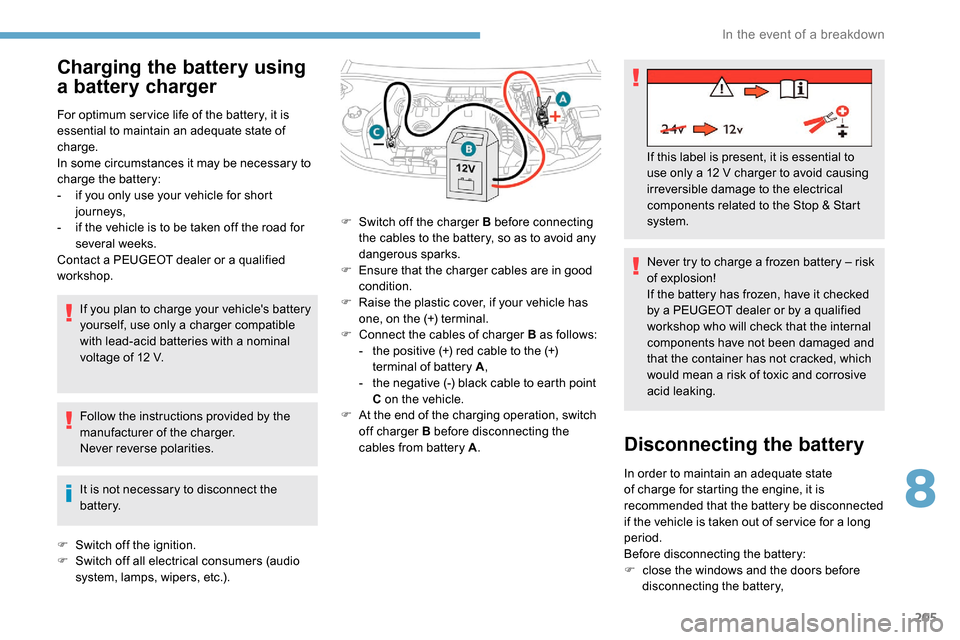
F
S
witch off the charger B before connecting
the cables to the battery, so as to avoid any
dangerous sparks.
F
E
nsure that the charger cables are in good
condition.
F
R
aise the plastic cover, if your vehicle has
one, on the (+) terminal.
F
C
onnect the cables of charger B as follows:
-
t
he positive (+) red cable to the (+)
terminal of battery A ,
-
t
he negative (-) black cable to earth point
C on the vehicle.
F
A
t the end of the charging operation, switch
off charger B before disconnecting the
cables from battery A . If this label is present, it is essential to
use only a 12
V charger to avoid causing
irreversible damage to the electrical
components related to the Stop & Start
system.
Disconnecting the battery
In order to maintain an adequate state
of charge for starting the engine, it is
recommended that the battery be disconnected
if the vehicle is taken out of ser vice for a long
period.
Before disconnecting the battery:
F
c
lose the windows and the doors before
disconnecting the battery,
8
In the event of a breakdown