tool kit Peugeot Partner 2020 Owner's Manual
[x] Cancel search | Manufacturer: PEUGEOT, Model Year: 2020, Model line: Partner, Model: Peugeot Partner 2020Pages: 260, PDF Size: 7.76 MB
Page 5 of 260
3
Contents
bit.ly/helpPSA
Parking sensors 127
Reversing Camera 129
Surround Rear Vision 130
7Practical information
Compatibility of fuels 134
Refuelling 134
Misfuel prevention (Diesel) 135
Snow chains 136
Towing device 136
Overload indicator 138
Energy economy mode 139
Roof bars / Roof rack 140
Bonnet 141
Engine compartment 141
Checking levels 142
Speed checks 144
AdBlue® (BlueHDi) 146
Free-wheeling 148
Advice on care and maintenance 148
8In the event of a breakdown
Running out of fuel (Diesel) 150
Tool kit 150
Temporary puncture repair kit 151
Spare wheel 153
Changing a bulb 156
Changing a fuse 161
12
V battery 163
Towing 167
9Technical data
Dimensions 169
Engine technical data and towed loads 173
Identification markings 176
10Bluetooth® audio system
First steps 177
Steering mounted controls 177
Menus 178
Radio 179
DAB (Digital Audio Broadcasting) radio 180
Media 181
Telephone 183
Frequently asked questions 186
11PEUGEOT Connect Radio
First steps 189
Steering mounted controls 190
Menus 191
Applications 192
Radio 192
DAB (Digital Audio Broadcasting) radio 194
Media 194
Telephone 196
Settings 199
Frequently asked questions 201
12PEUGEOT Connect Nav
First steps 203
Steering mounted controls 204
Menus 204
Voice commands 206
Navigation 209
Connected navigation 212
Applications 214
Radio 217
DAB (Digital Audio Broadcasting) radio 218
Media 219
Telephone 220
Settings 223
Frequently asked questions 224
■
Alphabetical index
Access to additional videos
Page 73 of 260

71
Safety
5General safety
recommendations
Do not remove the labels attached in
different places on your vehicle. They
include safety warnings as well as
identification information for the vehicle.
For all work on your vehicle, use a
qualified workshop that has the technical
information, skills and equipment required, all
of which a PEUGEOT dealer is able to
provide.
Depending on country regulations,
certain safety equipment may be
mandatory: high visibility safety vests,
warning triangles, breathalysers, spare bulbs,
spare fuses, fire extinguisher, first aid kit, mud
flaps at the rear of the vehicle, etc.
Installing electrical accessories:
– The fitting of electrical equipment or
accessories not approved by PEUGEOT
may
cause excessive current consumption and
faults and failures with the electrical system
of your vehicle. Contact a PEUGEOT dealer
for information on the range of approved
accessories.
* In accordance with the general conditions of use of the service, available from dealers an\
d subject to technological and technical limitations.
– As a safety measure, access to the
diagnostic socket, used for the vehicle's
electronic systems, is reserved strictly for
PEUGEOT
dealers or qualified workshops,
equipped with the special tools required (risk
of malfunctions of the vehicle's electronic
systems that could cause breakdowns or
serious accidents). The Manufacturer cannot
be held responsible if this advice is not
followed.
–
Any modification or adaptation not intended
or authorised by PEUGEOT
or carried out
without meeting the technical requirements
defined by the Manufacturer will result in the
suspension of the commercial warranty.
Installation of accessory radio
communication transmitters
Before installing a radio communication
transmitter with an external aerial, you must
without fail contact a PEUGEOT dealer for
the specification of transmitters which can
be fitted (frequency, maximum power, aerial
position, specific installation requirements),
in line with the Vehicle Electromagnetic
Compatibility Directive (2004/104/EC).
Declarations of conformity for radio
equipment
The relevant certificates are available on the
http://public.servicebox.peugeot.com/APddb/
website.
Emergency or assistance
call (type 1)
Peugeot Connect SOS
► In an emergency , press button 1 for more
than 2 seconds.
The lighting of the indicator lamp and a voice
message confirm that the call has been made to
the “Peugeot Connect SOS” call centre.*.
►
Pressing again immediately cancels the
request.
The lamp remains lit until the call is ended.
"Peugeot Connect SOS" immediately geolocates
your vehicle and contacts you in your
Page 152 of 260
150
In the event of a breakdown
Running out of fuel
(Diesel)
On vehicles fitted with Diesel engines, the fuel
system must be primed if you run out of fuel.
If the engine does not start first time, do not keep
trying, but start the procedure again from the
beginning.
For more information on Misfuel
prevention (Diesel), refer to the
corresponding section.
With 1.6 BlueHDi (Euro 6.1)
► Switch on the ignition (without starting the
engine).
►
W
ait around 6 seconds and switch off the
ignition.
►
Repeat the operation 10
times.
►
Operate the starter motor to start the engine.
If the engine does not start at the first attempt,
do not keep trying, but restart the procedure.
With 1.5 BlueHDi (Euro 6.2/6.3)
► Switch on the ignition (without starting the
engine).
►
W
ait around 1 minute and switch off the
ignition.
►
Operate the starter motor to start the engine.
If the engine does not start at the first attempt,
do not keep trying, but restart the procedure.
Non-BlueHDi engines
► Open the bonnet and then, if necessary ,
unclip the cover to access the priming pump.
► Operate the priming pump repeatedly
until resistance is felt (resistance may be
felt at the first press).
►
Operate the starter motor to start the engine
(if the engine does not start at the first attempt,
wait around 15 seconds before trying again).
►
If the engine does not start after a few
attempts, operate the priming pump again, then
the starter motor
.
►
Put the cover back in place and clip it in, then
close the bonnet.
Tool kit
► For easier access, move the seat(s) forward.
Accessing the tools
With a temporary puncture repair kit
The kit is located under the right-hand front seat.
With spare wheel
The jack is located under the right-hand front
seat.
The tools are located under the left-hand front
seat.
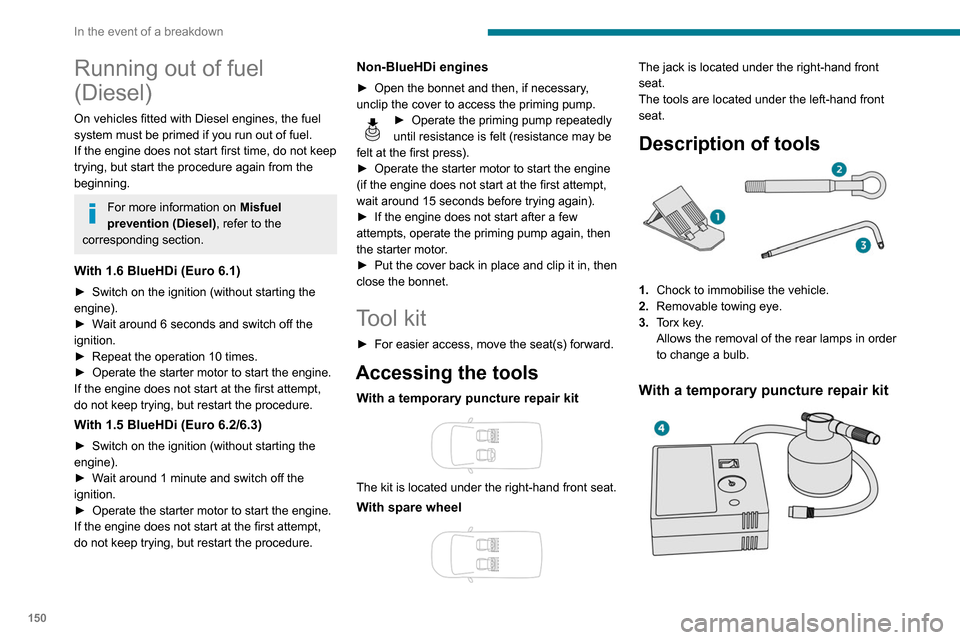
Description of tools
1. Chock to immobilise the vehicle.
2. Removable towing eye.
3. Torx key.
Allows the removal of the rear lamps in order
to change a bulb.
With a temporary puncture repair kit
4.12 V compressor with a cartridge of sealant
and a speed limit sticker
For temporary repair of a tyre and to adjust
the tyre pressure.
For more information about the Temporary
puncture repair kit, refer to the corresponding
section.
With spare wheel
5. Wheelbrace.
For removing the wheel bolts and raising/
lowering the jack.
6. Jack.
Used to raise the vehicle.
7. Wheel bolt cover/wheel trim removal tool
(depending on equipment).
If present on the vehicle, used to remove
the wheel bolt covers on alloy wheels or the
wheel trim on steel wheels.
Page 153 of 260
151
In the event of a breakdown
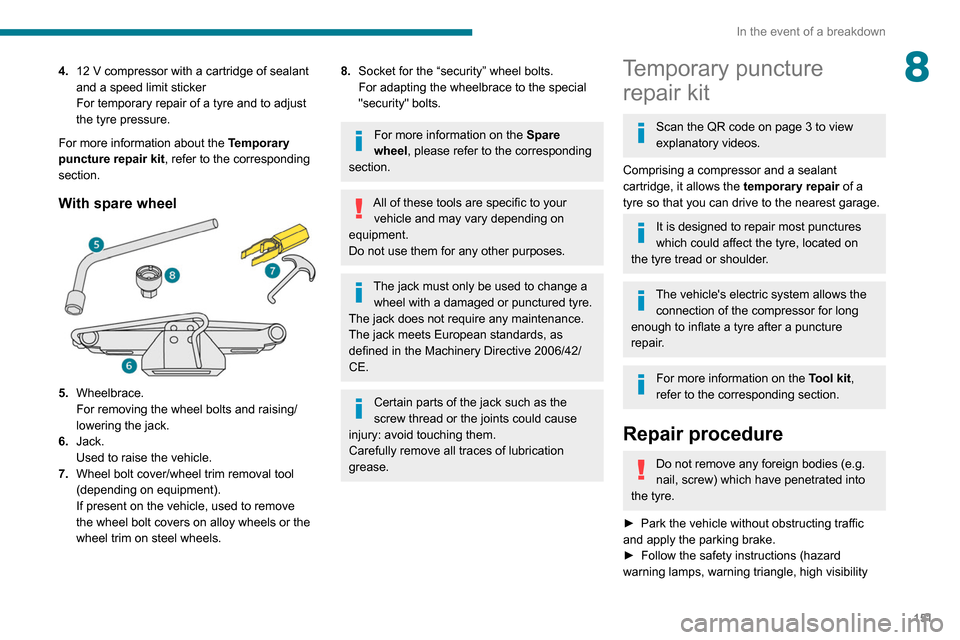
84.12 V compressor with a cartridge of sealant
and a speed limit sticker
For temporary repair of a tyre and to adjust
the tyre pressure.
For more information about the Temporary
puncture repair kit, refer to the corresponding
section.
With spare wheel
5. Wheelbrace.
For removing the wheel bolts and raising/
lowering the jack.
6. Jack.
Used to raise the vehicle.
7. Wheel bolt cover/wheel trim removal tool
(depending on equipment).
If present on the vehicle, used to remove
the wheel bolt covers on alloy wheels or the
wheel trim on steel wheels.
8.Socket for the “security” wheel bolts.
For adapting the wheelbrace to the special
"security" bolts.
For more information on the Spare
wheel, please refer to the corresponding
section.
All of these tools are specific to your vehicle and may vary depending on
equipment.
Do not use them for any other purposes.
The jack must only be used to change a wheel with a damaged or punctured tyre.
The jack does not require any maintenance.
The jack meets European standards, as
defined in the Machinery Directive 2006/42/
CE.
Certain parts of the jack such as the
screw thread or the joints could cause
injury: avoid touching them.
Carefully remove all traces of lubrication
grease.
Temporary puncture repair kit
Scan the QR code on page 3 to view
explanatory videos.
Comprising a compressor and a sealant
cartridge, it allows the temporary repair of a
tyre so that you can drive to the nearest garage.
It is designed to repair most punctures
which could affect the tyre, located on
the tyre tread or shoulder.
The vehicle's electric system allows the connection of the compressor for long
enough to inflate a tyre after a puncture
repair.
For more information on the Tool kit,
refer to the corresponding section.
Repair procedure
Do not remove any foreign bodies (e.g.
nail, screw) which have penetrated into
the tyre.
►
Park the vehicle without obstructing traffic
and apply the parking brake.
►
Follow the safety instructions (hazard
warning lamps, warning triangle, high visibility
Page 155 of 260
153
In the event of a breakdown
8With a tyre repaired using this type of kit,
do not exceed a speed of 50 mph
(80
km/h) and do not drive more than
125
miles (200 km).
Contact a PEUGEOT dealer or a qualified
workshop to have the tyre changed.
Checking / adjusting tyre
pressures
The compressor can be used, without injecting
sealant, to check and, if necessary, adjust the
tyre pressures.
►
Remove the valve cap from the tyre and keep
it in a clean place.
►
Uncoil
the pipe stowed under the compressor.
►
Screw the pipe onto the valve and tighten
firmly
.
►
Check that the compressor switch is in
position " O
".
►
Fully uncoil the electric cable stowed under
the compressor
.
►
Connect the compressor's electric plug to the
vehicle's 12
V socket.
►
Switch on the ignition.
Only the 12 V socket located at the front
of the vehicle can be used to power the
compressor .
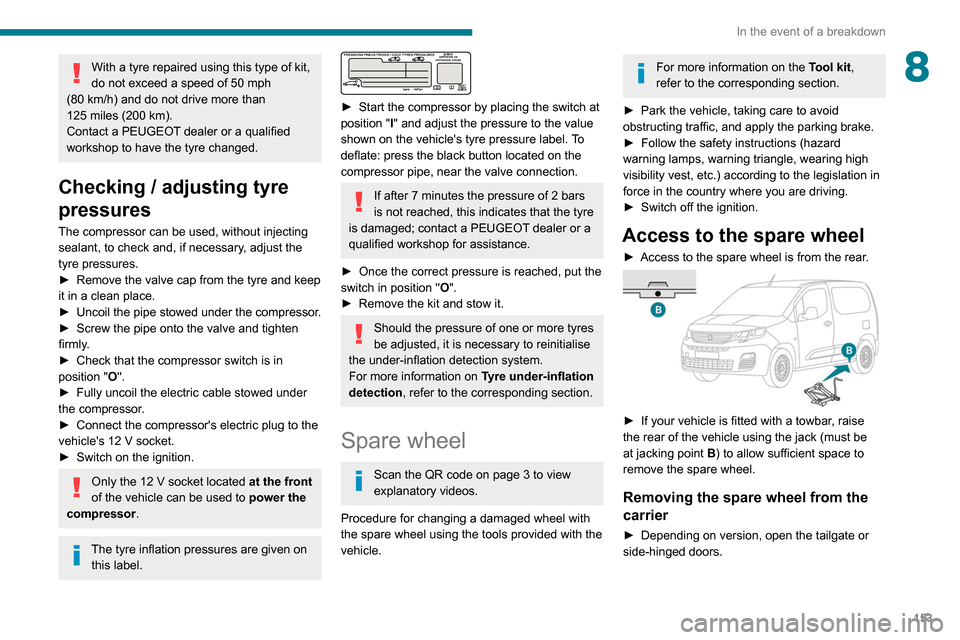
The tyre inflation pressures are given on
this label.
► Start the compressor by placing the switch at
position " I
" and adjust the pressure to the value
shown on the vehicle's tyre pressure label. To
deflate: press the black button located on the
compressor pipe, near the valve connection.
If after 7 minutes the pressure of 2 bars
is not reached, this indicates that the tyre
is damaged; contact a PEUGEOT
dealer or a
qualified workshop for assistance.
►
Once the correct pressure is reached, put the
switch in position " O
".
►
Remove the kit and stow it.
Should the pressure of one or more tyres
be adjusted, it is necessary to reinitialise
the under-inflation detection system.
For more information on Tyre under-inflation
detection, refer to the corresponding section.
Spare wheel
Scan the QR code on page 3 to view
explanatory videos.
Procedure for changing a damaged wheel with
the spare wheel using the tools provided with the
vehicle.
For more information on the Tool kit,
refer to the corresponding section.
►
Park the vehicle, taking care to avoid
obstructing traffic, and apply the parking brake.
►
Follow the safety instructions (hazard
warning lamps, warning triangle, wearing high
visibility vest, etc.) according to the legislation in
force in the country where you are driving.
►
Switch off the ignition.
Access to the spare wheel
► Access to the spare wheel is from the rear .
► If your vehicle is fitted with a towbar, raise
the rear of the vehicle using the jack (must be
at jacking point B) to allow sufficient space to
remove the spare wheel.
Removing the spare wheel from the
carrier
► Depending on version, open the tailgate or
side-hinged doors.
Page 162 of 260
160
In the event of a breakdown
Rear lamps
For more information on Changing a bulb
and, in particular, the types of bulb, refer to the
corresponding section.
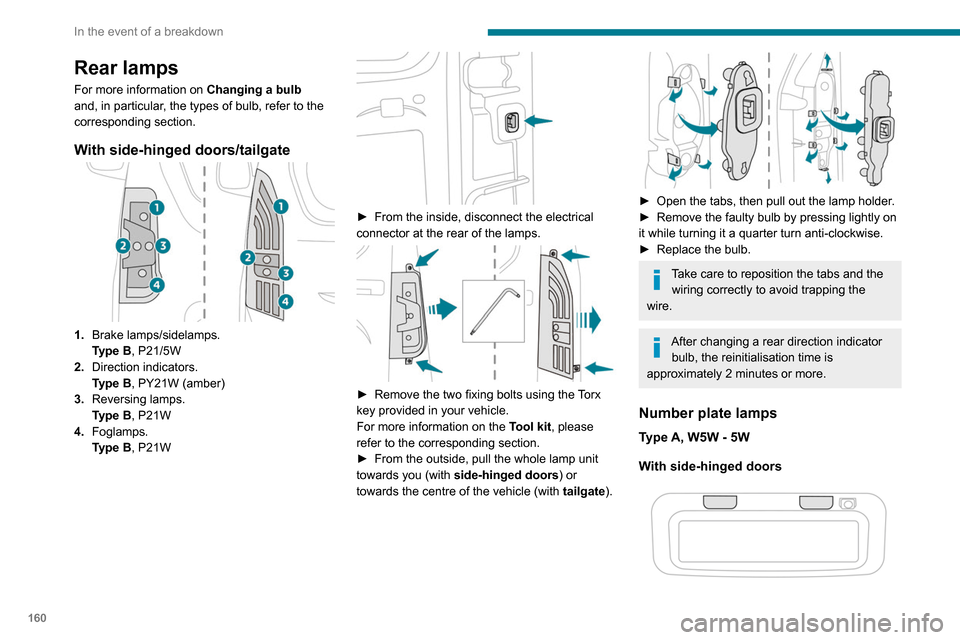
With side-hinged doors/tailgate
1. Brake lamps/sidelamps.
Type
B, P21/5W
2. Direction indicators.
Type
B, PY21W (amber)
3. Reversing lamps.
Type
B, P21W
4. Foglamps.
Type
B, P21W
► From the inside, disconnect the electrical
connector at the rear of the lamps.
► Remove the two fixing bolts using the Torx
key provided in your vehicle.
For more information on the Tool kit, please
refer to the corresponding section.
►
From the outside, pull the whole lamp unit
towards you (with side-hinged doors ) or
towards the centre of the vehicle (with tailgate
).
► Open the tabs, then pull out the lamp holder .
► Remove the faulty bulb by pressing lightly on
it while turning it a quarter turn anti-clockwise.
►
Replace the bulb.
Take care to reposition the tabs and the wiring correctly to avoid trapping the
wire.
After changing a rear direction indicator bulb, the reinitialisation time is
approximately 2 minutes or more.
Number plate lamps
Type A, W5W - 5W
With side-hinged doors
► Unclip the interior trim.
► Disconnect the connector by moving aside
its tab.
► Turn the bulb holder a quarter turn
anti-clockwise.
► Change the bulb.
► Put the bulb holder back in place and
reconnect the connector.
► Put the trim back in place.
With tailgate
► Remove the plastic lens using a screwdriver.
► Change the bulb.
► Refit the plastic lens and press on it.
Third brake lamp
Type A, W16W - 16W
– Unscrew the two nuts.
Page 170 of 260
168
In the event of a breakdown
Access to the eye
For more information on the Tool kit,
refer to the corresponding section.
With a manual gearbox, move the gear
lever into neutral.
With an automatic gearbox, place the gear
selector into position N.
Failure to adhere to this instruction may lead
to damage to braking system components
and the lack of braking assistance on
restarting the engine.
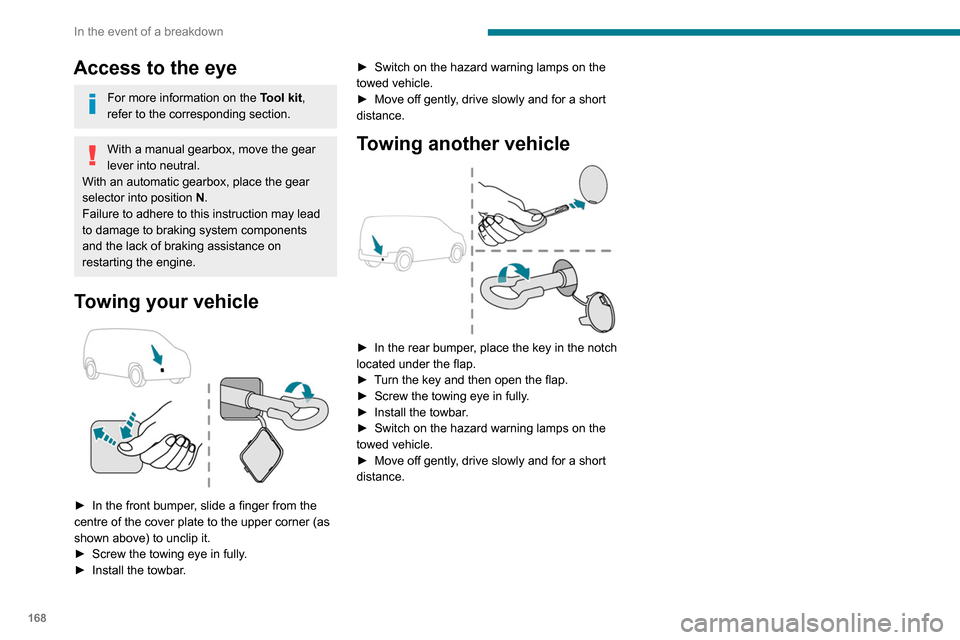
Towing your vehicle
► In the front bumper , slide a finger from the
centre of the cover plate to the upper corner (as
shown above) to unclip it.
►
Screw the towing eye in fully
.
►
Install the towbar
. ►
Switch on the hazard warning lamps on the
towed vehicle.
►
Move off gently
, drive slowly and for a short
distance.
Towing another vehicle
► In the rear bumper , place the key in the notch
located under the flap.
►
T
urn the key and then open the flap.
►
Screw the towing eye in fully
.
►
Install the towbar
.
►
Switch on the hazard warning lamps on the
towed vehicle.
►
Move off gently
, drive slowly and for a short
distance.