wheel bolts Peugeot Partner Tepee 2015 Owner's Manual
[x] Cancel search | Manufacturer: PEUGEOT, Model Year: 2015, Model line: Partner Tepee, Model: Peugeot Partner Tepee 2015Pages: 276, PDF Size: 12.76 MB
Page 139 of 276
137
Partner_2_VP_en_Chap06_Accessoire_ed02-2014
OTHER ACCESSORIES
these accessories and parts, having
been tested and approved for reliability
and safety
, are all adapted to your
vehicle. A wide range of recommended
accessories and genuine parts is
available.
A further range is also available,
structured around comfort, leisure and
maintenance:
Anti-theft alarm, window etching, first
aid kit, high visibility vest, front and
rear parking sensors, warning triangle,
security bolts for alloy wheels, ...
Seat covers compatible with airbags
for the front seats, bench seat, rubber
mats, carpet mats, snow chains, blinds,
tailgate bicycle carrier, ...
to prevent the mat from becoming
caught under the pedals:
-
ensure that the mat and its fixings
are positioned correctly
,
-
never fit one mat on top of another
.Audio equipment, hands-free kit,
speakers, CD changer, satellite
navigation system, u
SB box, Video kit, ...
Regardless of the audio and telematic
equipment offered on the market, the
technical constraints associated with
the fitting of equipment of these product
groups mean that the special features
of the equipment and its compatibility
with the capacities of your vehicle's
standard equipment must be taken into
account. Please ask a P
euge O t
dealer
for more information before fitting such
equipment.
Maximum weights on bars
-
t
ransverse bars on longitudinal
bars: 75 Kg (these bars are not
compatible with the Zénith roof). Installing radiocommunication
transmitters
Y
ou are advised to contact a
P
euge O t
dealer before installin
g
accessory radiocommunication
transmitters with external aerial on
your vehicle.
t
he P euge O t dealer network
will inform you of the specification
(frequency band, maximum output
power, aerial position, specific
conditions of installation) of the
transmitters which can be fitted, in
accordance with the Motor Vehicle
e
lectromagnetic Compatibility Directive
(2004/104/
e C).
Front mud flaps, rear mud flaps,
15/17 inch alloy wheels, wheelarch
trim, leather steering wheel, ...
Screenwash, interior and exterior
cleaning and maintenance products,
spare bulbs, ...
equipment
ACCeSSORIeS
6
Page 164 of 276
162
Partner_2_VP_en_Chap08_Aide-rapide_ed02-2014
4. Procedure
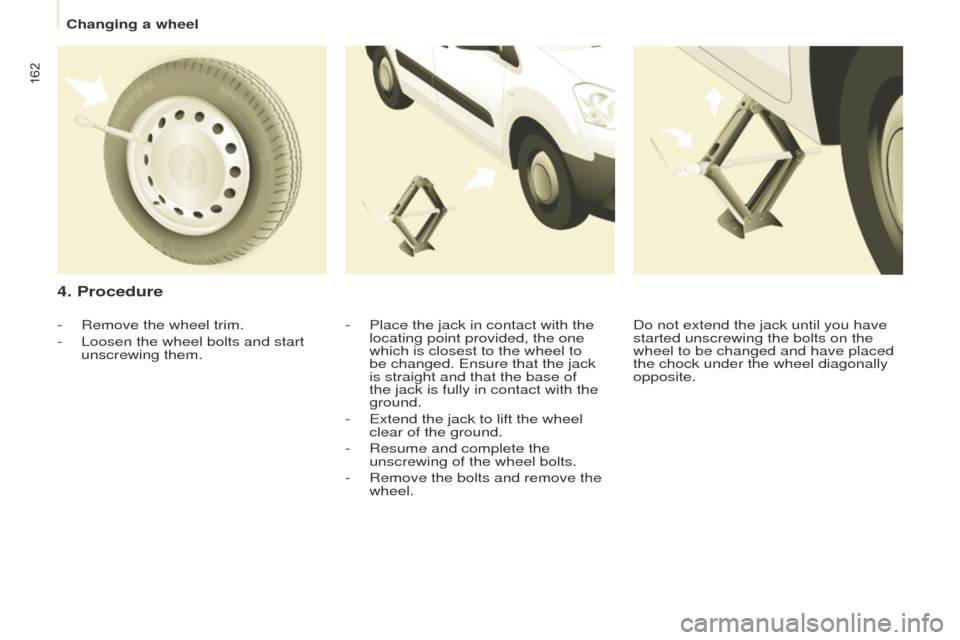
- Place the jack in contact with the
locating point provided, the one
which is closest to the wheel to
be changed. e nsure that the jack
is straight and that the base of
the jack is fully in contact with the
ground.
-
e xtend the jack to lift the wheel
clear of the ground.
-
Resume and complete the
unscrewing of the wheel bolts.
-
Remove the bolts and remove the
wheel.
-
Remove the wheel trim.
-
Loosen the wheel bolts and start
unscrewing them. Do not extend the jack until you have
started unscrewing the bolts on the
wheel to be changed and have placed
the chock under the wheel diagonally
opposite.
Changing a wheel
Page 165 of 276
163
Partner_2_VP_en_Chap08_Aide-rapide_ed02-2014
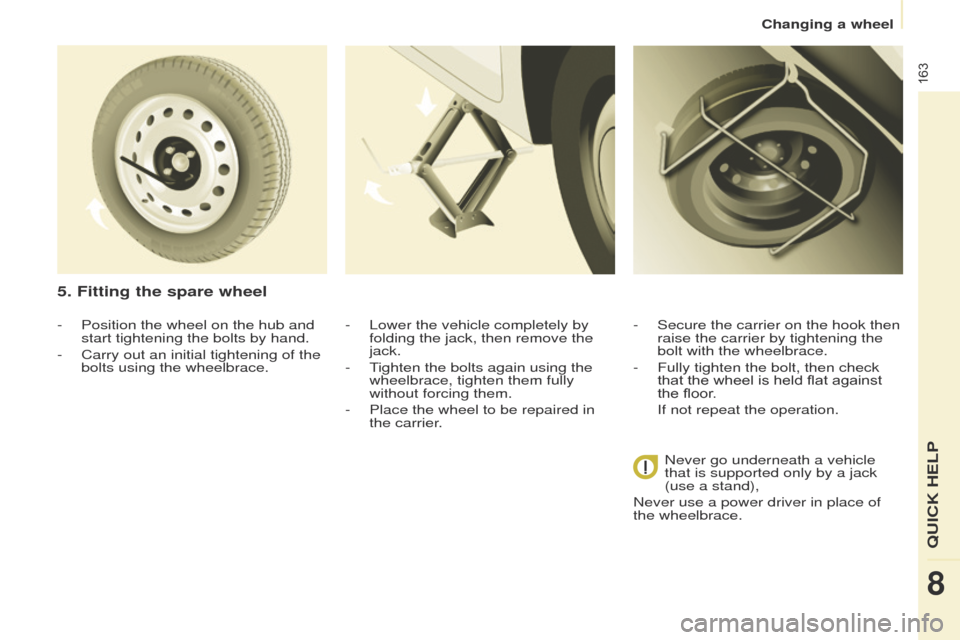
- Position the wheel on the hub and
start tightening the bolts by hand.
-
Carry out an initial tightening of the
bolts using the wheelbrace.
5. Fitting the spare wheel
- Lower the vehicle completely by
folding the jack, then remove the
jack.
-
t
ighten the bolts again using the
wheelbrace, tighten them fully
without forcing them.
-
Place the wheel to be repaired in
the carrier
. -
Secure the carrier on the hook then
raise the carrier by tightening the
bolt with the wheelbrace.
-
Fully tighten the bolt, then check
that the wheel is held flat against
the floor
.
If not repeat the operation.Never go underneath a vehicle
that is supported only by a jack
(use a stand),
Never use a power driver in place of
the wheelbrace.
Changing a wheel
QuICK HeLP
8
Page 166 of 276
164
Partner_2_VP_en_Chap08_Aide-rapide_ed02-2014
FITTING THE WHEEL TRIM
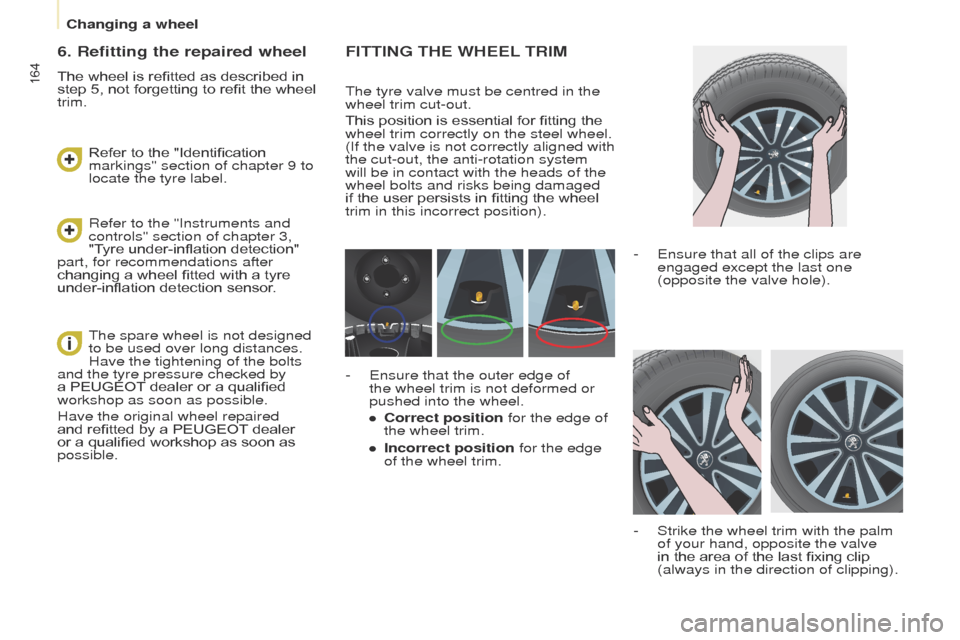
the tyre valve must be centred in the
wheel trim cut-out.
This position is essential for fitting the
wheel trim correctly on the steel wheel.
(If
the valve is not correctly aligned with
the cut-out, the anti-rotation system
will be in contact with the heads of the
wheel bolts and risks being damaged
if the user persists in fitting the wheel
trim in this incorrect position).
-
e nsure that all of the clips are
engaged except the last one
(opposite the valve hole).
-
Strike the wheel trim with the palm
of your hand, opposite the valve
in the area of the last fixing clip
(always in the direction of clipping).
-
e nsure that the outer edge of
the wheel trim is not deformed or
pushed into the wheel.
●
Correct position
for the edge of
the wheel trim.
●
Incorrect position
for the edge
of the wheel trim.
6. Refitting the repaired wheel
The wheel is refitted as described in
step 5, not forgetting to refit the wheel
trim.
Refer to the "Instruments and
controls" section of chapter 3,
"Tyre under-inflation detection"
part, for recommendations after
changing a wheel fitted with a tyre
under-inflation detection sensor. Refer to the "Identification
markings" section of chapter 9 to
locate the tyre label.
t
he spare wheel is not designed
to be used over long distances.
Have the tightening of the bolts
and the tyre pressure checked by
a PEUGEOT dealer or a qualified
workshop as soon as possible.
Have the original wheel repaired
and refitted by a PEUGEOT dealer
or a qualified workshop as soon as
possible.
Changing a wheel
Page 173 of 276
171
Partner_2_VP_en_Chap08_Aide-rapide_ed02-2014
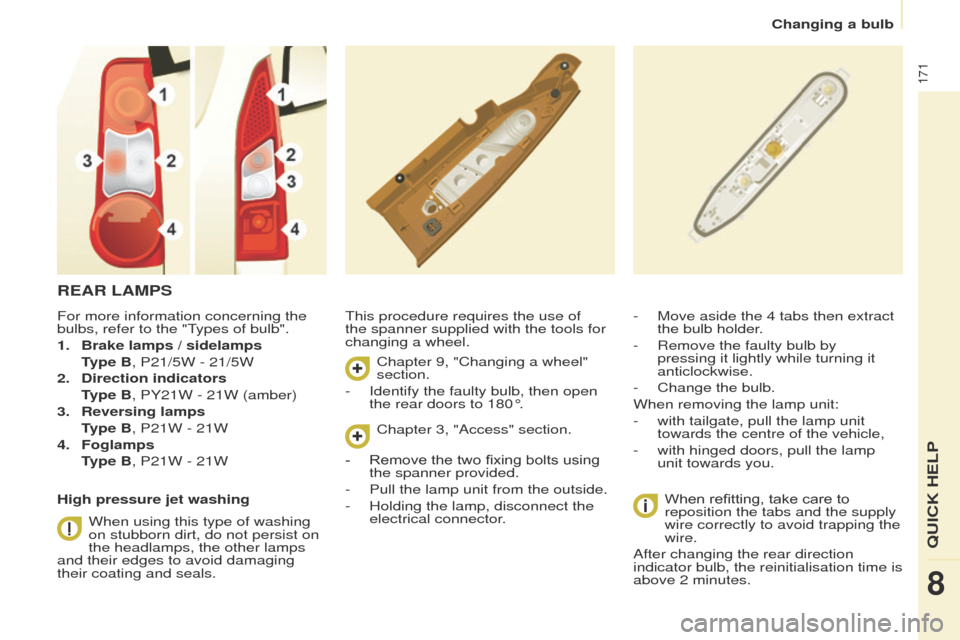
REAR LAMPS
this procedure requires the use of
the spanner supplied with the tools for
changing a wheel.
When refitting, take care to
reposition the tabs and the supply
wire correctly to avoid trapping the
wire.
After changing the rear direction
indicator bulb, the reinitialisation time is
above 2 minutes. - Move aside the 4 tabs then extract
the bulb holder
.
-
Remove the faulty bulb by
pressing it lightly while turning it
anticlockwise.
-
Change the bulb.
When removing the lamp unit:
-
with tailgate, pull the lamp unit
towards the centre of the vehicle,
-
with hinged doors, pull the lamp
unit towards you.
For more information concerning the
bulbs, refer to the "
types of bulb".
1.
Brake lamps / sidelamps
T
ype B, P21/5W - 21/5W
2.
Direction indicators
T
ype B, PY21W - 21W (amber)
3.
Reversing lamps
T
ype B, P21W - 21W
4.
Foglamps
T
ype B, P21W - 21W
High pressure jet washing When using this type of washing
on stubborn dirt, do not persist on
the headlamps, the other lamps
and their edges to avoid damaging
their coating and seals. Chapter 9, "Changing a wheel"
section.
-
Identify the faulty bulb, then open
the rear doors to 180°. Chapter 3, "Access" section.
-
Remove the two fixing bolts using
the spanner provided.
-
Pull the lamp unit from the outside.
-
Holding the lamp, disconnect the
electrical connector
.
Changing a bulb
QuICK HeLP
8