seats Peugeot Partner Tepee 2017 Owner's Guide
[x] Cancel search | Manufacturer: PEUGEOT, Model Year: 2017, Model line: Partner Tepee, Model: Peugeot Partner Tepee 2017Pages: 292, PDF Size: 10.49 MB
Page 93 of 292
91
Partner2VP_en_Chap04_Ergonomie_ed02-2016Partner2VP_en_Chap04_Ergonomie_ed02-2016
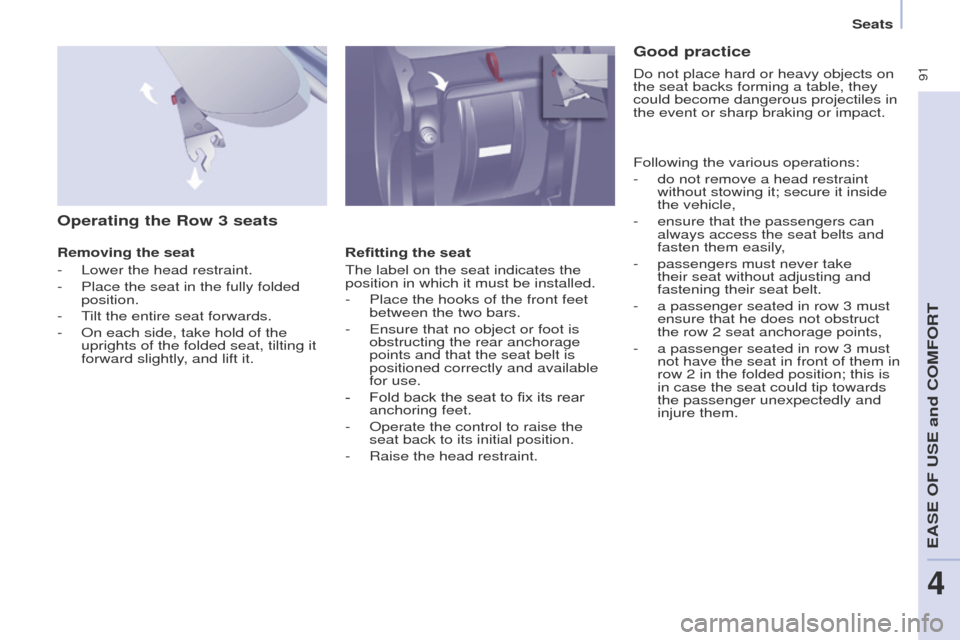
Operating the Row 3 seats
Removing the seat
-
Lower the head restraint.
-
Place the seat in the fully folded
position.
-
T
ilt the entire seat forwards.
-
On each side, take hold of the
uprights of the folded seat, tilting it
forward slightly
, and lift it. Refitting the seat
The label on the seat indicates the
position in which it must be installed.
-
Place the hooks of the front feet
between the two bars.
-
Ensure that no object or foot is
obstructing the rear anchorage
points and that the seat belt is
positioned correctly and available
for use.
-
Fold back the seat to fix its rear
anchoring feet.
-
Operate the control to raise the
seat back to its initial position.
-
Raise the head restraint.
Good practice
Following the various operations:
-
do not remove a head restraint
without stowing it; secure it inside
the vehicle,
-
ensure that the passengers can
always access the seat belts and
fasten them easily
,
-
passengers must never take
their seat without adjusting and
fastening their seat belt.
-
a passenger seated in row 3 must
ensure that he does not obstruct
the row 2 seat anchorage points,
-
a passenger seated in row 3 must
not have the seat in front of them in
row 2 in the folded position; this is
in case the seat could tip towards
the passenger unexpectedly and
injure them.
Do not place hard or heavy objects on
the seat backs forming a table, they
could become dangerous projectiles in
the event or sharp braking or impact.
EASE OF USE and COMFORT
4
Seats
Page 94 of 292
92
Partner2VP_en_Chap04_Ergonomie_ed02-2016Partner2VP_en_Chap04_Ergonomie_ed02-2016
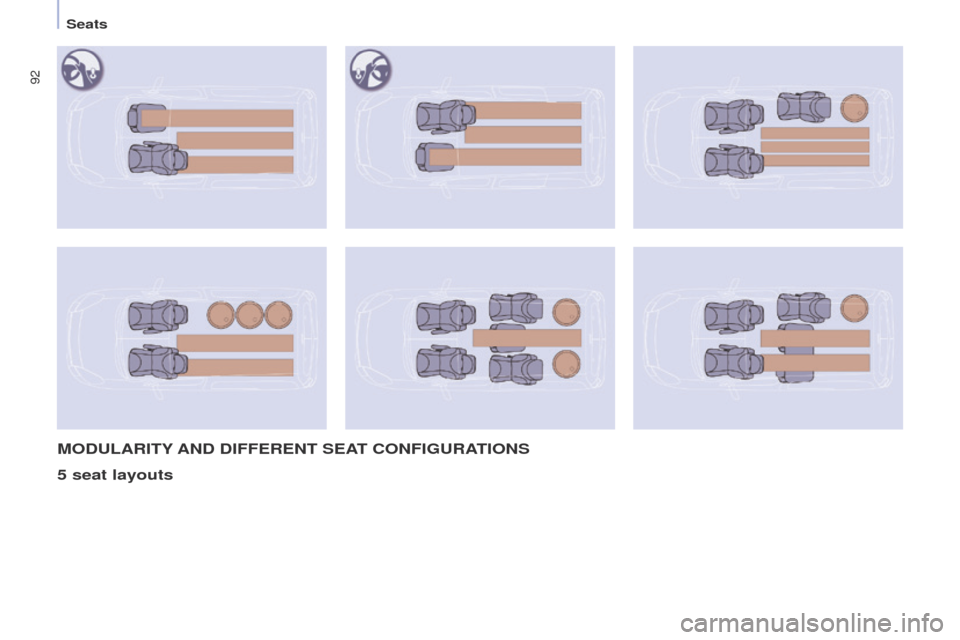
MODULARITY AND DIFFERENT SEAT CONFIGURATIONS
5 seat layouts
Seats
Page 95 of 292
93
Partner2VP_en_Chap04_Ergonomie_ed02-2016Partner2VP_en_Chap04_Ergonomie_ed02-2016
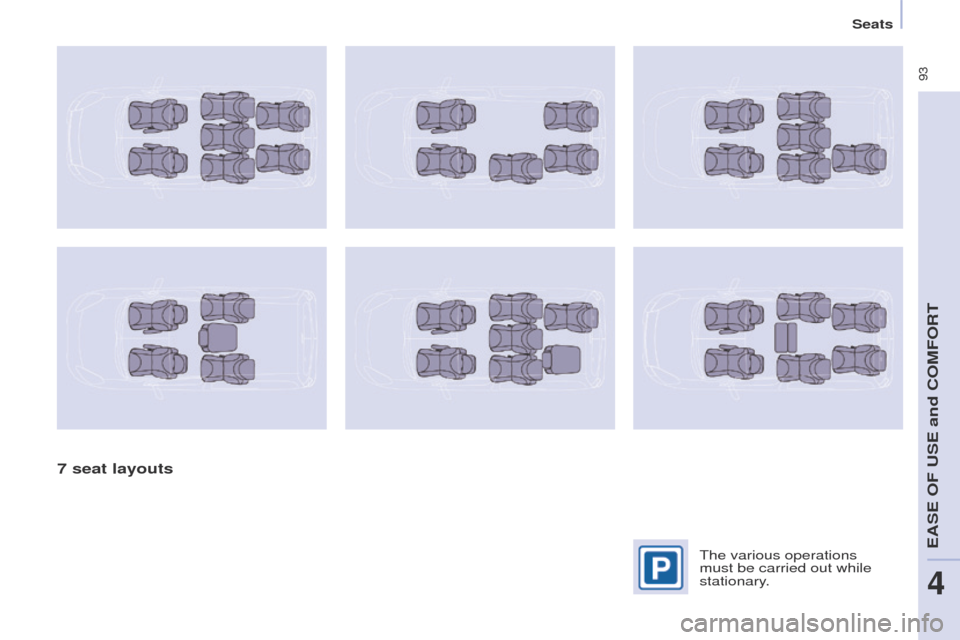
7 seat layouts
The various operations
must be carried out while
stationary.
EASE OF USE and COMFORT
4
Seats
Page 97 of 292
95
Partner2VP_en_Chap04_Ergonomie_ed02-2016Partner2VP_en_Chap04_Ergonomie_ed02-2016
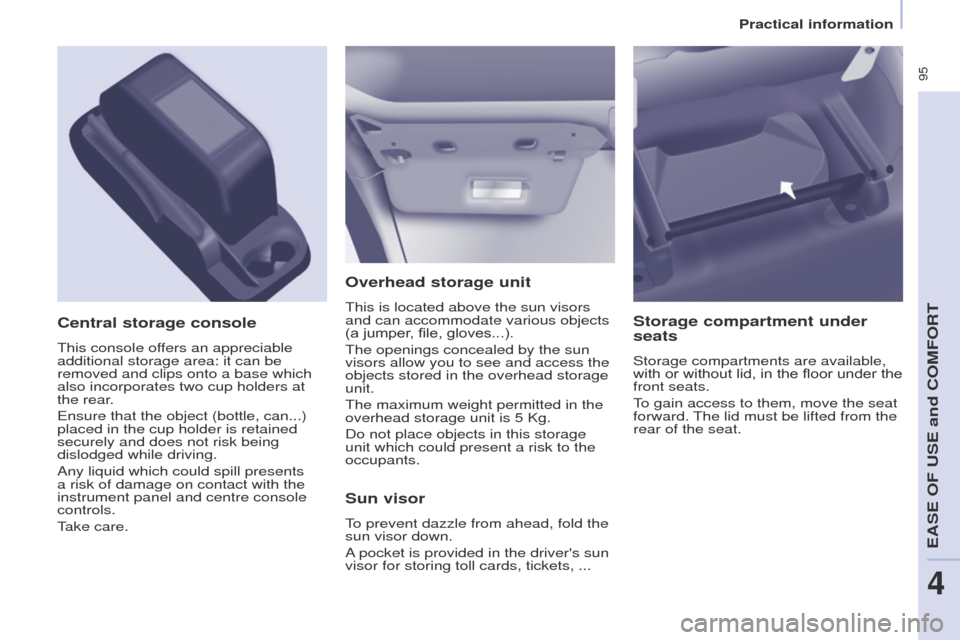
Overhead storage unit
This is located above the sun visors
and can accommodate various objects
(a jumper, file, gloves...).
The openings concealed by the sun
visors allow you to see and access the
objects stored in the overhead storage
unit.
The maximum weight permitted in the
overhead storage unit is 5 Kg.
Do not place objects in this storage
unit which could present a risk to the
occupants.
Central storage console
This console offers an appreciable
additional storage area: it can be
removed and clips onto a base which
also incorporates two cup holders at
the rear.
Ensure that the object (bottle, can...)
placed in the cup holder is retained
securely and does not risk being
dislodged while driving.
Any liquid which could spill presents
a risk of damage on contact with the
instrument panel and centre console
controls.
Take care.
Sun visor
To prevent dazzle from ahead, fold the
sun visor down.
A pocket is provided in the driver's sun
visor for storing toll cards, tickets, ...
Storage compartment under
seats
Storage compartments are available,
with or without lid, in the floor under the
front seats.
To gain access to them, move the seat
forward. The lid must be lifted from the
rear of the seat.
EASE OF USE and COMFORT
4
Practical information
Page 100 of 292
98
Partner2VP_en_Chap04_Ergonomie_ed02-2016Partner2VP_en_Chap04_Ergonomie_ed02-2016
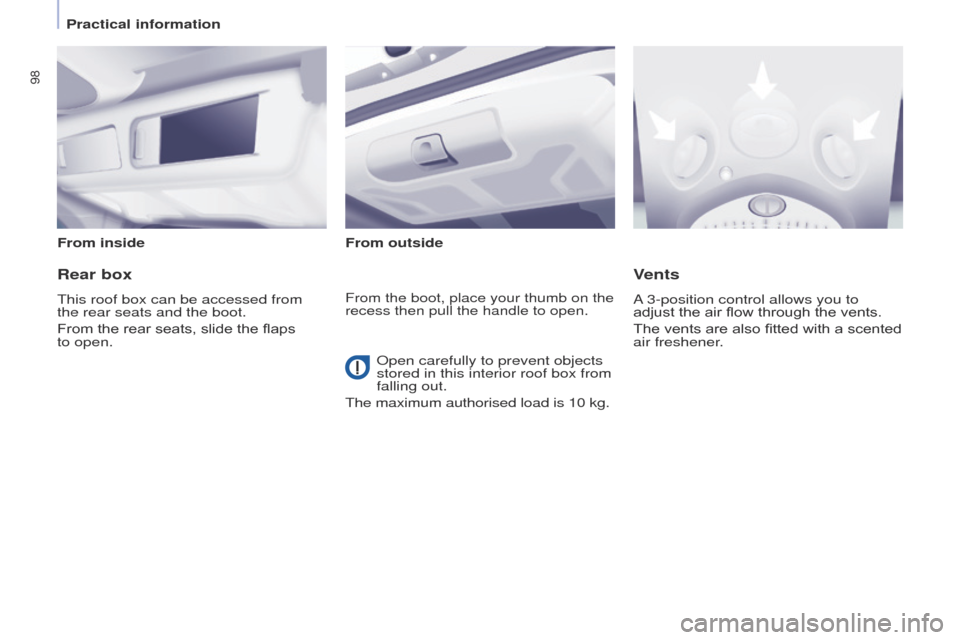
From insideFrom outside
Rear box
This roof box can be accessed from
the rear seats and the boot.
From the rear seats, slide the flaps
to
open.
Vents
A 3-position control allows you to
adjust the air flow through the vents.
The vents are also fitted with a scented
air freshener.From the boot, place your thumb on the
recess then pull the handle to open.
Open carefully to prevent objects
stored in this interior roof box from
falling out.
The maximum authorised load is 10 kg.
Practical information
Page 105 of 292
103
Partner2VP_en_Chap04_Ergonomie_ed02-2016Partner2VP_en_Chap04_Ergonomie_ed02-2016
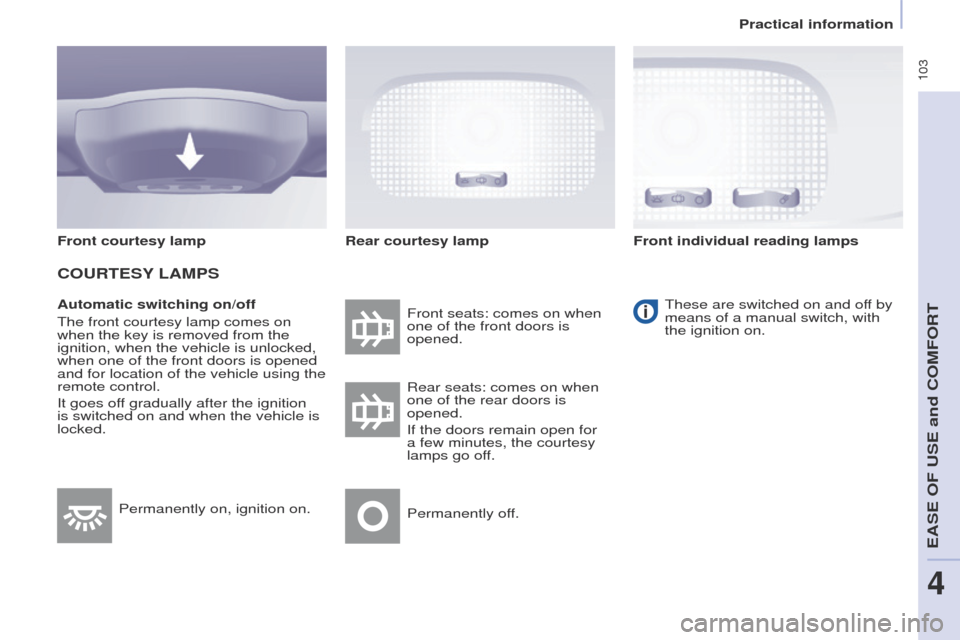
Automatic switching on/off
The front courtesy lamp comes on
when the key is removed from the
ignition, when the vehicle is unlocked,
when one of the front doors is opened
and for location of the vehicle using the
remote control.
It goes off gradually after the ignition
is switched on and when the vehicle is
locked.Front seats: comes on when
one of the front doors is
opened.
These are switched on and off by
means of a manual switch, with
the ignition on.
Rear seats: comes on when
one of the rear doors is
opened.
If the doors remain open for
a few minutes, the courtesy
lamps go off.
Permanently off.
Permanently on, ignition on.
Front courtesy lamp
COURTESY
LAMPS
Rear courtesy lamp Front individual reading lamps
EASE OF USE and COMFORT
4
Practical information
Page 106 of 292
104
Partner2VP_en_Chap04_Ergonomie_ed02-2016Partner2VP_en_Chap04_Ergonomie_ed02-2016
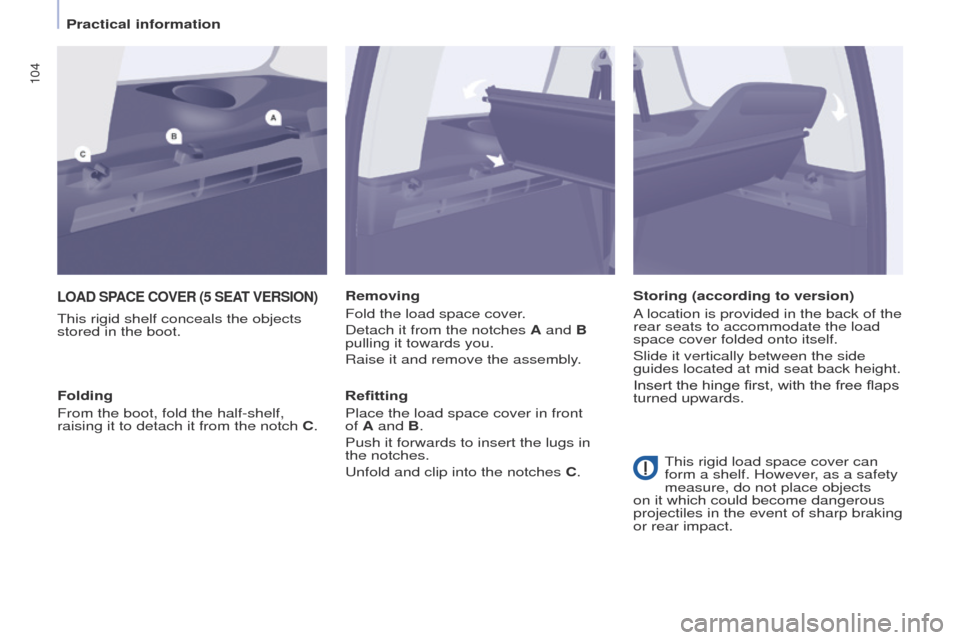
LOAD SPACE COVER (5 SEAT VERSION)
This rigid shelf conceals the objects
stored in the boot.Removing
Fold the load space cover.
Detach it from the notches A and B
pulling it towards you.
Raise it and remove the assembly.
Refitting
Place the load space cover in front
of
A and B.
Push it forwards to insert the lugs in
the notches.
Unfold and clip into the notches C.
Folding
From the boot, fold the half-shelf,
raising it to detach it from the notch C. Storing (according to version)
A location is provided in the back of the
rear seats to accommodate the load
space cover folded onto itself.
Slide it vertically between the side
guides located at mid seat back height.
Insert the hinge first, with the free flaps
turned upwards.
This rigid load space cover can
form a shelf. However, as a safety
measure, do not place objects
on it which could become dangerous
projectiles in the event of sharp braking
or rear impact.
Practical information
Page 110 of 292
108
Partner2VP_en_Chap04_Ergonomie_ed02-2016Partner2VP_en_Chap04_Ergonomie_ed02-2016
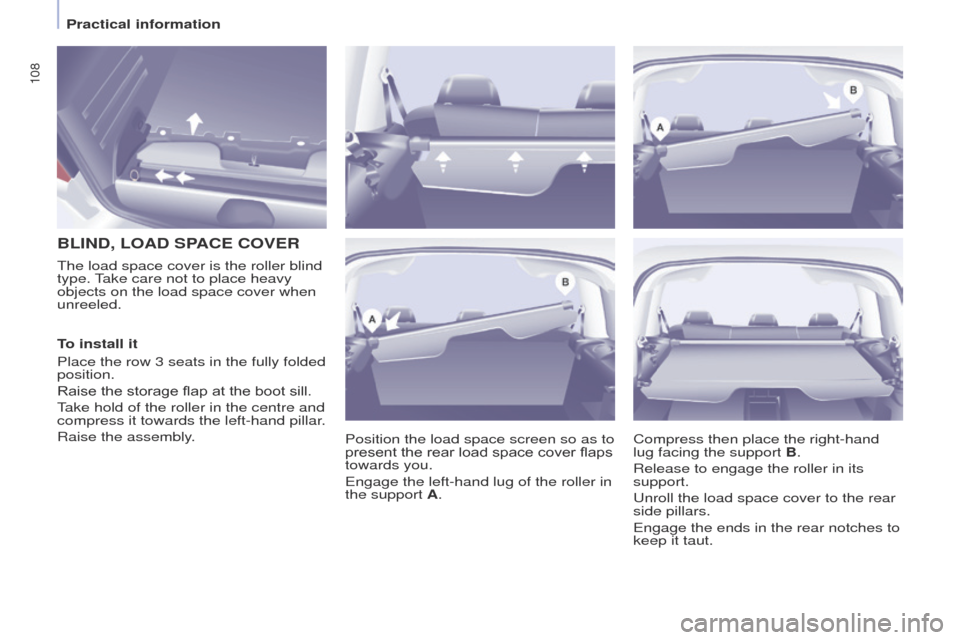
BLIND, LOAD SPACE COVER
Position the load space screen so as to
present the rear load space cover flaps
towards you.
Engage the left-hand lug of the roller in
the support A.
The load space cover is the roller blind
type. Take care not to place heavy
objects on the load space cover when
unreeled.
Compress then place the right-hand
lug facing the support B.
Release to engage the roller in its
support.
Unroll the load space cover to the rear
side pillars.
Engage the ends in the rear notches to
keep it taut.
To install it
Place the row 3 seats in the fully folded
position.
Raise the storage flap at the boot sill.
Take hold of the roller in the centre and
compress it towards the left-hand pillar.
Raise the assembly.
Practical information
Page 111 of 292
109
Partner2VP_en_Chap04_Ergonomie_ed02-2016Partner2VP_en_Chap04_Ergonomie_ed02-2016
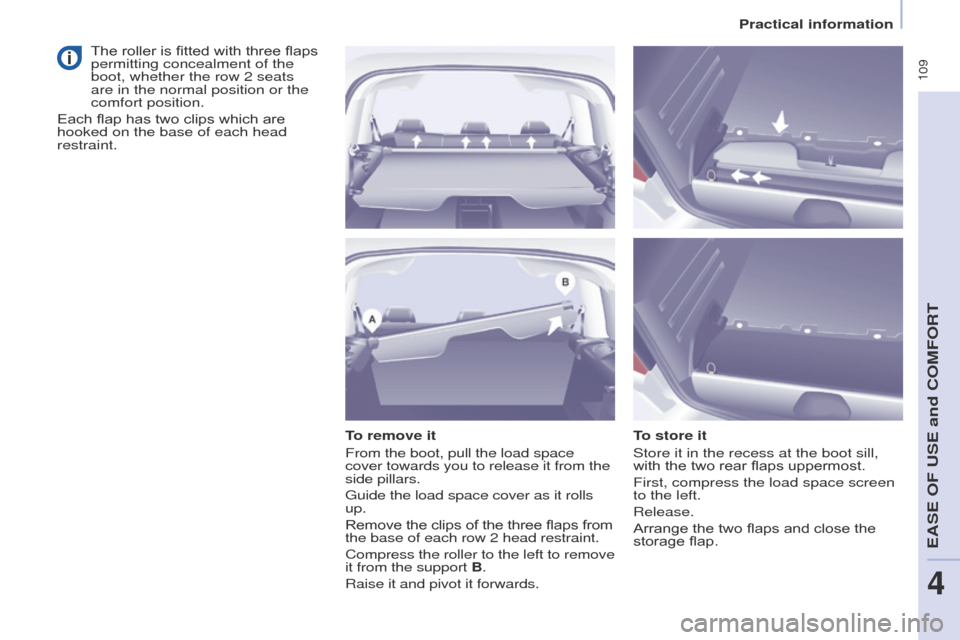
To remove it
From the boot, pull the load space
cover towards you to release it from the
side pillars.
Guide the load space cover as it rolls
up.
Remove the clips of the three flaps from
the base of each row 2 head restraint.
Compress the roller to the left to remove
it from the support B.
Raise it and pivot it forwards. To store it
Store it in the recess at the boot sill,
with the two rear flaps uppermost.
First, compress the load space screen
to the left.
Release.
Arrange the two flaps and close the
storage flap.
The roller is fitted with three flaps
permitting concealment of the
boot, whether the row 2 seats
are in the normal position or the
comfort position.
Each flap has two clips which are
hooked on the base of each head
restraint.
EASE OF USE and COMFORT
4
Practical information
Page 113 of 292
111
Partner2VP_en_Chap04_Ergonomie_ed02-2016Partner2VP_en_Chap04_Ergonomie_ed02-2016
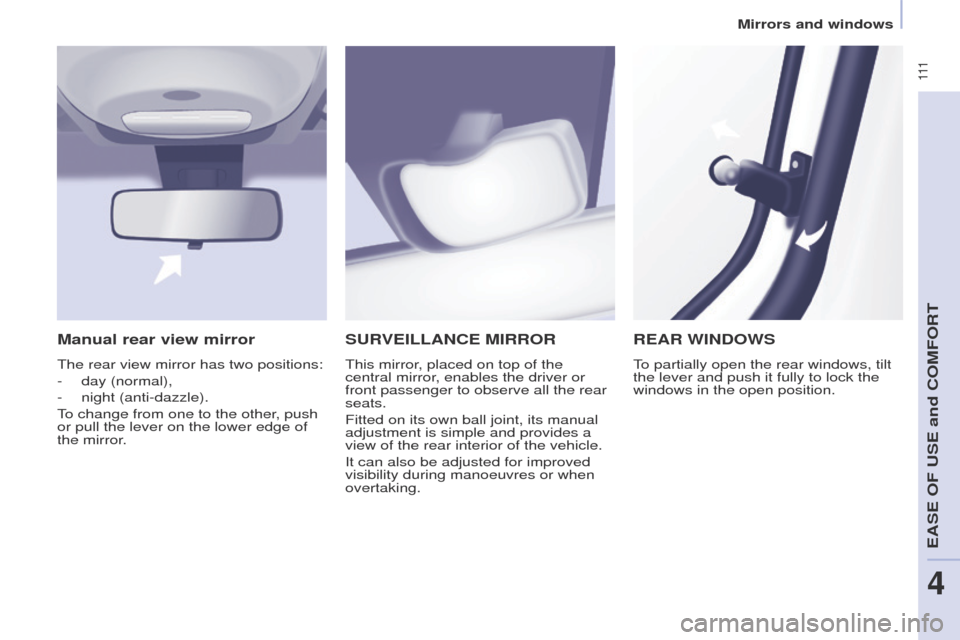
SURVEILLANCE MIRROR
This mirror, placed on top of the
central mirror, enables the driver or
front passenger to observe all the rear
seats.
Fitted on its own ball joint, its manual
adjustment is simple and provides a
view of the rear interior of the vehicle.
It can also be adjusted for improved
visibility during manoeuvres or when
overtaking.
REAR WINDOWS
To partially open the rear windows, tilt
the lever and push it fully to lock the
windows in the open position.
Manual rear view mirror
The rear view mirror has two positions:
-
day (normal),
-
night (anti-dazzle).
T
o change from one to the other, push
or pull the lever on the lower edge of
the mirror.
EASE OF USE and COMFORT
4
Mirrors and windows