buttons PONTIAC FIERO 1988 Service Repair Manual
[x] Cancel search | Manufacturer: PONTIAC, Model Year: 1988, Model line: FIERO, Model: PONTIAC FIERO 1988Pages: 1825, PDF Size: 99.44 MB
Page 1550 of 1825
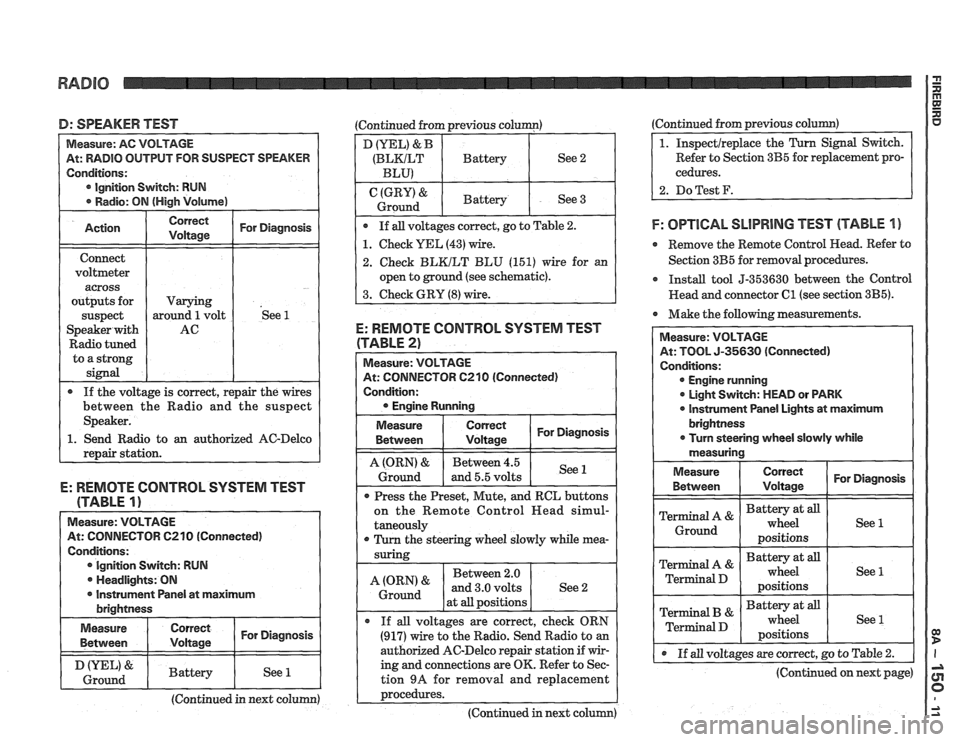
D: SPEAKER TEST (Continued from previous column)
At: RADIO OUTPUT FOR SUSPECT SPEAKER
Ignition Switch: RUN
o an authorized AC-Delco
E: REMOTE CONTROL SYSTEM TEST
(TABLE
1)
Measure: VOLTAGE
At: CONNECTOR C210 (Connected)
Conditions: Ignition Switch: RUN
. Headlights: ON
I r Instrument Panel at maximum I brightness
I Measure I I For Diagnosis ( Between
I & I Battery I See 1 1 Ground I I I I
(Continued in next column)
D (YEL) & B
(BLKILT Battery See 2
BLU)
(GRY) & Battery
Ground See 3
If all voltages correct, go to Table
2.
1. Check YEL (43) wire.
2. Check BLKILT BLU (151) wire for an
open to ground (see schematic).
3. Check GRY
(8) wire.
E: REMOTE CONTROL SYSTEM TEST
(TABLE 2)
At: CONNECTOR 6210 (Connected)
Condition:
Measure
Between
I tz I For Diagnosis
1 I - I
A (ORN) & Between 4.5
Ground and 5.5 volts See 1
Press
the Preset, Mute, and RCL buttons
on the Remote Control
Head simul-
taneously
r Turn the steering wheel slowly while mea-
Between 2.0
at
all positions
If
all voltages are correct, check ORN
(917) wire to the Radio. Send Radio to an
authorized AC-Delco repair station if wir-
ing and connections are OK. Refer to Sec-
tion
9A for removal and replacement
~rocedures. ---- - -
(Continued in next column) (Continued from
previous
column)
Refer to Section 3B5 for replacement pro-
cedures.
2. DoTest F.
F: OPTlCAL SLlPRlNG TEST (TABLE 1 )
e Remove the Remote Control Head. Refer to
Section 3B5 for removal procedures.
r Install tool 5-353630 between the Control
Head and connector
C1 (see section 3B5).
Make the following measurements.
At: TOOL 5-35630 (Connected)
Engine running
0 Light Switch: MEAD or PARK
0 lnstrument Panel Lights at maximum
@ If all voltages are correct, go to Table 2.
(Continued on next page)
Page 1551 of 1825
RADIO
(Continued from previous page)
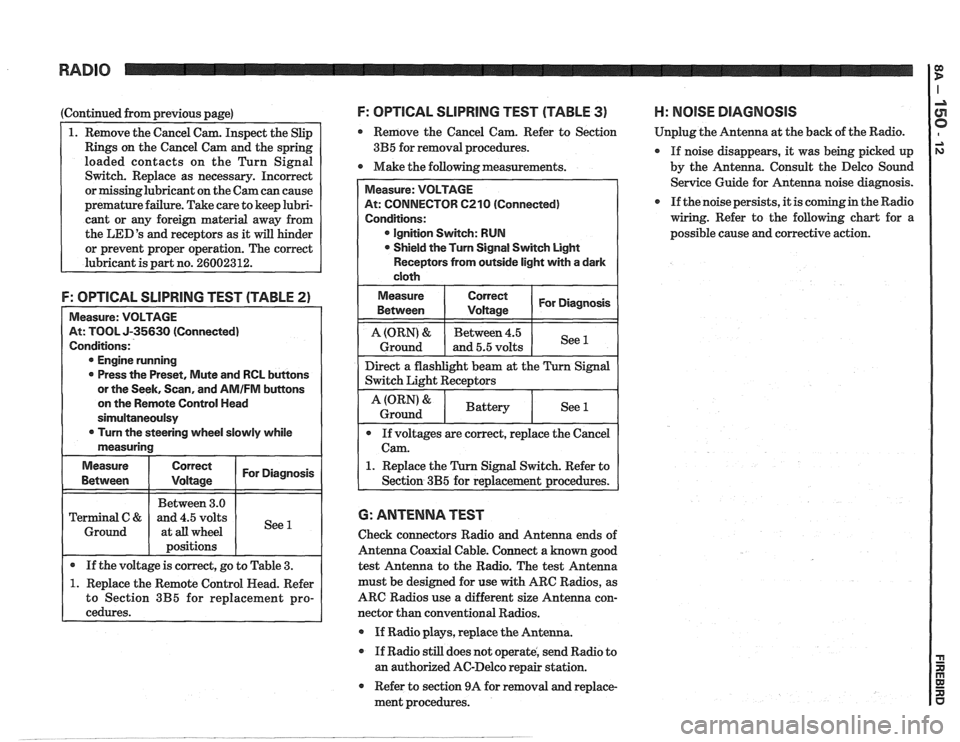
1. Remove the Cancel Cam. Inspect the Slip
Rings on the Cancel Cam and the spring
loaded contacts on the Turn Signal
Switch. Replace as necessary. Incorrect
or missinglubricant on the Cam can cause
premature failure. Take care to keep lubri-
cant or any foreign material away from
the
LED'S and receptors as it will hinder
or prevent proper operation. The correct
lubricant is part no.
26002312.
F: OPTICAL SLlPRlNG TEST (TABLE 2)
Measure: VOLTAGE
At: TOOL J-35630 (Connected)
Conditions:
@ Engine running
0 Press the Preset, Mute and RCL buttons
or the Seek, Scan, and
AMIFM buttons
on the Remote Control Head
sirnultaneoulsy
0 Turn the steering wheel slowly while
measuring
Measure
Correct I For Diagnosis I
I I Between 3.0 1 I Terminal C & and 4.5 volts
1 Ground 1 at all wheel
I 1 positions I I
I . If the voltage is correct, go to Table 3. (
1. Replace the Remote Control Head. Refer
to Section
3B5 for replacement pro-
cedures.
F: OPTICAL SLlPRllUG TEST (TABLE 3) H: NOlSE DIAGNOSIS
Remove the Cancel Cam. Refer to Section Unplug
the Antenna at the back of the Radio.
3B5 for removal procedures.
If noise disappears, it was being picked up
0 Make the following measurements.
by the Antenna. Consult the Delco Sound
Service Guide for Antenna noise diagnosis.
If the noise persists, it is coming in the Radio
wiring. Refer to the following chart for a
possible cause and corrective action.
At: CONNECTOR 6210 (Connected)
@ Ignition Switch: RUN
Shield the Turn Signal Switch Light
Receptors from outside light with a dark
1. Replace the Turn Signal Switch. Refer to
6: ANTENNA TEST
Check connectors Radio and Antenna ends of
Antenna Coaxial Cable. Connect a known good
test Antenna to the Radio. The test Antenna
must be designed for use
with ARC Radios, as
ARC Radios use a different size Antenna con-
nector than conventional Radios.
@ If Radio plays, replace the Antenna.
If Radio still does not operate, send Radio to
an authorized AC-Delco repair station.
Refer to section 9A for removal and replace-
ment procedures.
Page 1654 of 1825
RADIO SYSEEMS AWlD ANTENNAS 9A-5
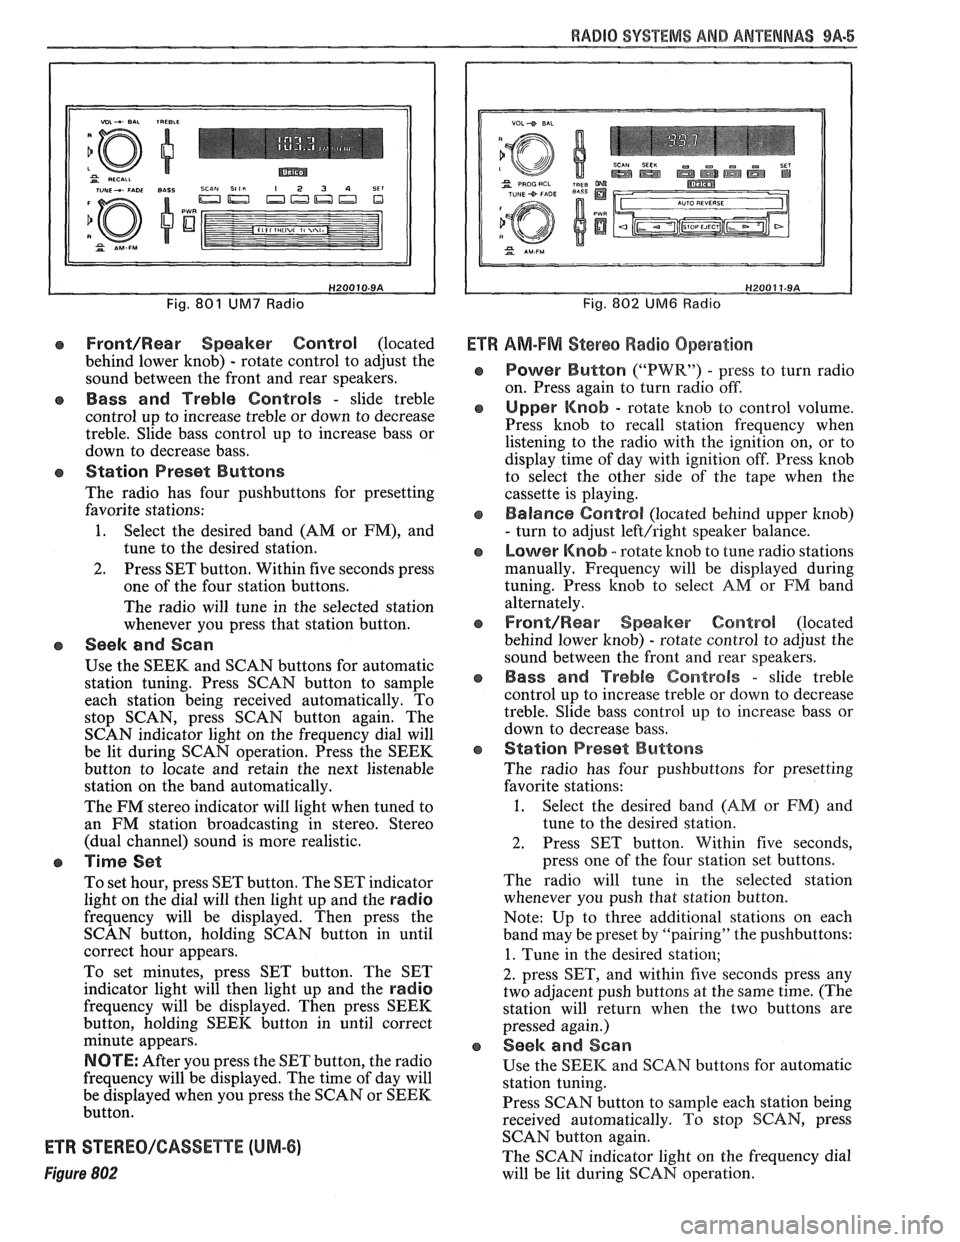
Fig. 801 UM7 Radio
Front/Rear Speaker Control (located
behind lower knob)
- rotate control to adjust the
sound between the front and rear speakers.
e Bass and Treble Controls - slide treble
control up to increase treble or down to decrease
treble. Slide bass control up to increase bass or
down to decrease bass.
e Station Preset Buttons
The radio has four pushbuttons for presetting
favorite stations:
1. Select the desired band (AM or FM), and
tune to the desired station.
2. Press SET button. Within five seconds press
one of the four station buttons.
The radio will tune in the selected station
whenever you press that station button.
e Seek and Scan
Use the SEEK and SCAN buttons for automatic
station tuning. Press SCAN button to sample
each station being received automatically. To
stop SCAN, press SCAN button again. The
SCAN indicator light on the frequency dial will
be lit during SCAN operation. Press the SEEK
button to locate and retain the next listenable
station on the band automatically.
The FM stereo indicator will light when tuned to
an FM station broadcasting in stereo. Stereo
(dual channel) sound is more realistic.
a Time Set
To set hour, press SET button. The SET indicator
light on the dial will then light up and the
radio
frequency will be displayed. Then press the
SCAN button, holding SCAN button in until
correct hour appears.
To set minutes, press SET button. The SET
indicator light will then light up and the
radio
frequency will be displayed. Then press SEEK
button, holding SEEK button in until correct
minute appears.
NOTE: After you press the SET button, the radio
frequency will be displayed. The time of day will
be displayed when you press the SCAN or SEEK
button.
ETR STEREO/GASSETTE (UM-6)
Figure 802
Fig. 802 UM6 Radio
Ef R AM-FM Stereo Radio Operation
Power Button ("PWR") - press to turn radio
on. Press again to turn radio off.
Upper Knob - rotate knob to control volume.
Press knob to recall station frequency when
listening to the radio with the ignition on, or to
display time of day with ignition off. Press knob
to select the other side of the tape when the
cassette is playing.
Balance Control (located behind upper knob)
- turn to adjust left/right speaker balance.
Lower Knob - rotate knob to tune radio stations
manually. Frequency will be displayed during
tuning. Press knob to select
AM or FM band
alternately.
Front/Rearr Speaker Control (located
behind lower knob)
- rotate control to adjust the
sound between the front and rear speakers.
Bass and Treble Controls - slide treble
control up to increase treble or down to decrease
treble. Slide bass control
up to increase bass or
down to decrease bass.
Station Preset Buttons
The radio has four pushbuttons for presetting
favorite stations:
1. Select the desired band (AM or FM) and
tune to the desired station.
2. Press SET button. Within five seconds,
press one of the four station set buttons.
The radio will tune in the selected station
whenever you push that station button.
Note: Up to three additional stations on each
band may be preset by "pairing" the pushbuttons:
1. Tune in the desired station;
2. press SET, and within five seconds press any
two adjacent push buttons at the same time. (The
station will return when the two buttons are
pressed again.)
Seek and Sean
Use the SEEK and SCAN buttons for automatic
station tuning.
Press SCAN button to
sample each station being
received automatically. To stop SCAN, press
SCAN button again.
The SCAN indicator light on the frequency dial
will be lit during SCAN operation.
Page 1656 of 1825
RADIO SVSEEMS AND ANTENNAS 9A-7
fully up. If this occurs, move it down until the
hiss disappears.
This radio has automatic Dynamic Noise
Reduction
(DNRB) to reduce high frequency
background hiss on AM, FM,
AM Stereo, FM
Stereo, and tape.
e Station Preset Buttons
The radio has four pushbuttons for presetting
favorite stations:
1. Select
the desired band (AM or
FM), and
tune to the desired station.
2. Press SET button. Within five secorads press
one of the four station buttons.
The radio will tune in the selected station
whenever you press that station button.
NOTE: Up to three additional stations on
each band may be preset by "pairing" the
pushbuttons:
1. Tune in the desired station;
2. press SET, and within five seconds press
any two
adjacant pushbuttons at the same
time. (The station will return when the two
buttons are pressed again.)
CB Seek and Scan
Use the SEEM and SCAN buttons for automatic
station tuning.
Press SCAN button to sample each station being
received automatically. To stop SCAN, press
SCAN button again.
The SCAN indicator light on the frequency dial
will be lit during SCAN operation.
Press the SEEK button to locate and retain the
next listenable station on the band automatically.
The
FM stereo indicator will light when tuned to
an
FM station broadcasting in stereo. Stereo
(dual channel) sound is more realistic.
o Time Set
To set hour, press SET button. The SET indicator
light on the dial will then light up. Then press
SCAN button, holding SCAN button in until
correct hour appears.
To set minutes, press SET button. The SET
indicator light will then light up. Then press
SEEK button, holding SEEK button in until
correct minute appears.
NOTE: After you press the SET button, the radio
frequency will be displayed. The time of day will
be displayed when you press the SCAN or SEEK
button.
e To Operate Tape Player:
Insert the cassette squarely through the door.
This automatically switches the unit from radio
to tape operation. If the sound is garbled (or there
is no sound), eject the tape and reinsert it
squarely.
To advance the tape, press the forward ("FWD")
button. To listen to the earlier portion of the tape,
press the reverse ("REV") button. To stop
forward or reverse movement, press the opposite
button lightly.
To listen to the next selection, slide the
"SEARCH" button to the right and press the forward
("FWD") button. The radio will seek the
next selection.
To listen to the previous selection again, slide the
"SEARCH" button to the right and press the
reverse ("REV") button. The radio will repeat
the previous selection.
The "ON" light, to the right of the search switch,
will be on while the search function is engaged.
When the left triangle indicator light is lit, the top
side of the tape is playing. When the right triangle
indicator light is lit, the bottom side of the tape
is playing.
To play the other side of the tape before the
present side has ended, press the upper left knob.
This will automatically play the opposite side of
the tape.
NOTE: When end-of-tape is reached in one
direction, the unit will automatically play the
other side of the tape. To remove the tape or listen
to the radio, push the EJECT button.
When the ignition is turned off, the tape is
automatically ejected.
The equalization setting which is desired will
vary according to the type of tape being used.
Chrome
(CrO,) and metal tapes usually have 70
usec equalization, while standard (iron) tapes
have
120 usec equalization. The tape bias is often
indicated on the cassette label or case.
Select the setting for proper tape equalization as
follows:
1. Select 70
usec (push button in).
2. Select 120 usec (button is out).
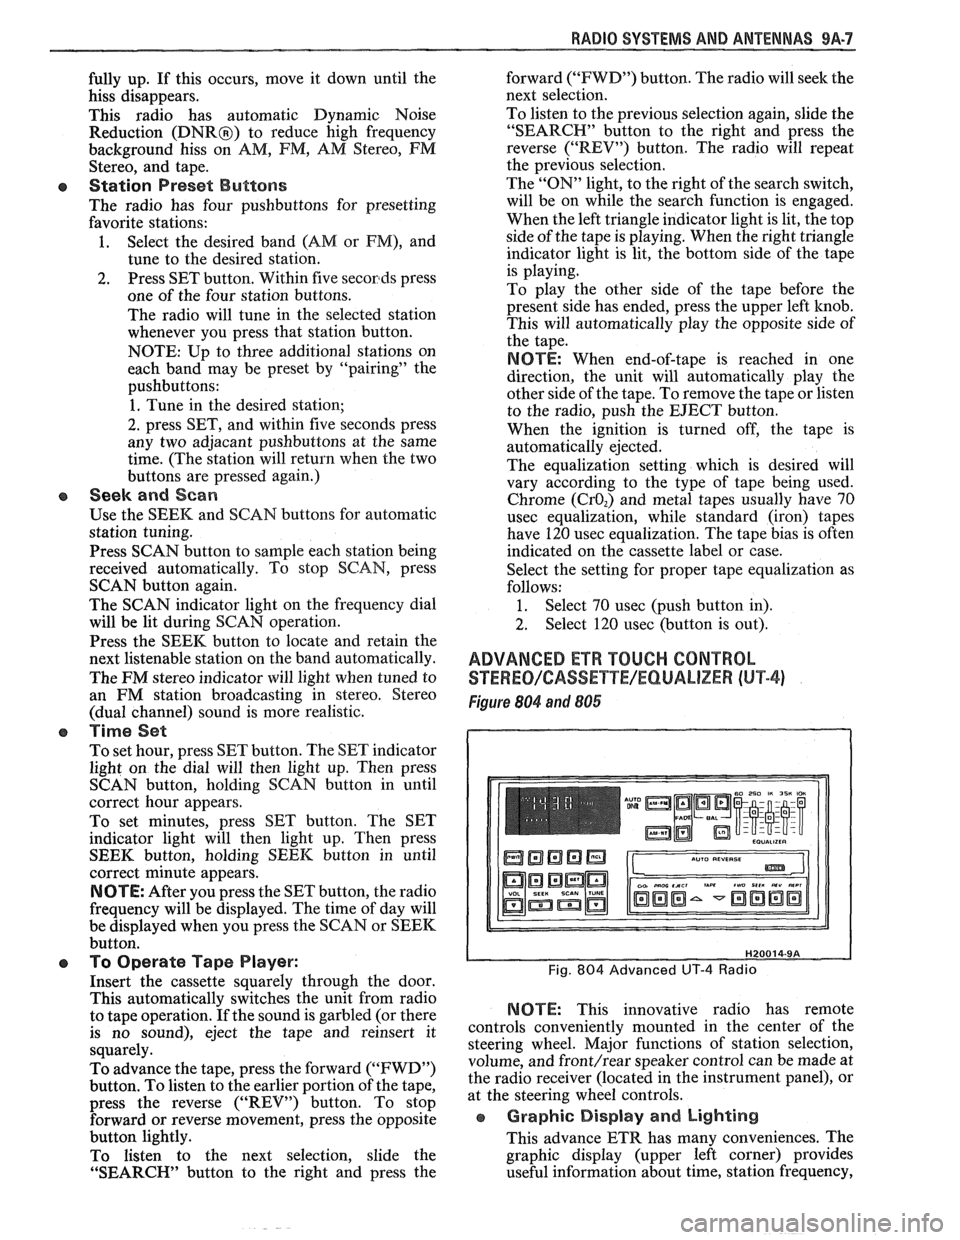
ADVANCED ETR TOUCH CONTROL
STEWEO/CASSETYE/EQUALIZER (hl"P-4)
Figure 804 and 806
NOTE: This innovative radio has remote
controls conveniently mounted in the center of the
steering wheel. Major functions of station selection,
volume, and
front/rear speaker control can be made at
the radio receiver (located in the instrument panel), or
at the steering wheel controls.
e Graphic Display and Lighting
This advance ETR has many conveniences. The
graphic display (upper left corner) provides
useful information about time, station frequency,
Page 1657 of 1825
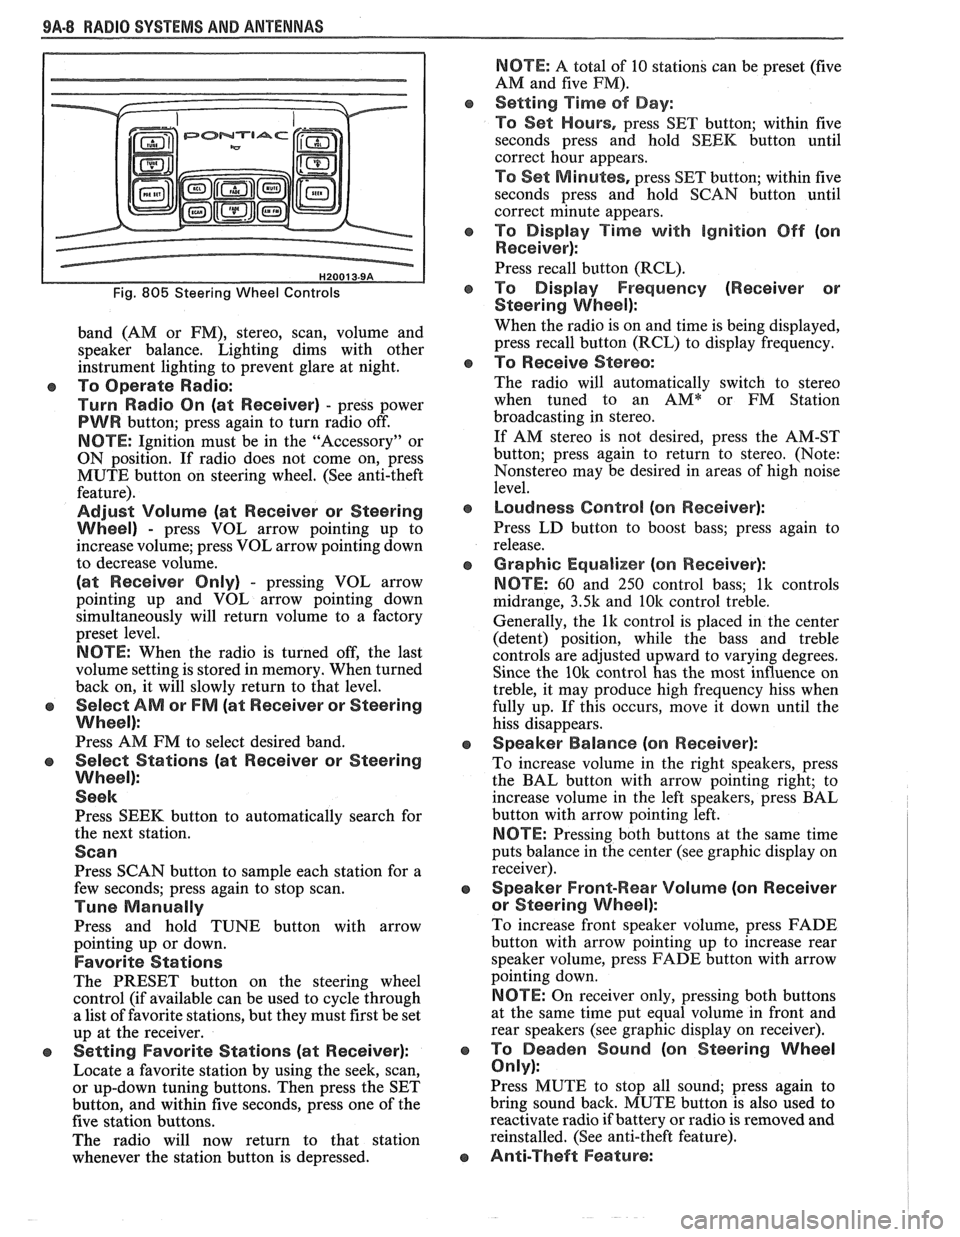
9A-8 RADIO SYSTEMS AND ANTENNAS
Fig. 805 Steering Wheel Controls
band (AM or FM), stereo, scan, volume and
speaker balance. Lighting dims with other
instrument lighting to prevent glare at night.
To Operate Radio:
Turn Radio On (at Receiver)
- press power
PWR button; press again to turn radio off.
NOTE: Ignition must be in the "Accessory" or
ON position. If radio does not come on, press
MUTE button on steering wheel. (See anti-theft
feature).
Adjust Volume (at Receiver or Steering
Wheel)
- press VOL arrow pointing up to
increase volume; press VOL arrow pointing down
to decrease volume.
(at Receiver Only) - pressing VOL arrow
pointing up and VOL arrow pointing down
simultaneously will return volume to a factory
preset level.
NOTE: When the radio is turned off, the last
volume setting is stored in memory. When turned
back on, it will slowly return to that level.
Select AM or FM (at Receiver or Steering
Wheel):
Press AM FM to select desired band.
Select Stations (at Receiver or Steering
Wheel):
Seek
Press SEEK button to automatically search for
the next station.
Scan
Press SCAN button to sample each station for a
few seconds; press again to stop scan.
Tune Manually
Press and hold TUNE button with arrow
pointing up or down.
Favorite Stations
The PRESET button on the steering wheel
control (if available can be used to cycle through
a list of favorite stations, but they must first be set
up at the receiver.
e Setting Favorite Stations (at Receiver):
Locate a favorite station by using the seek, scan,
or up-down tuning buttons. Then press the SET
button, and within five seconds, press one of the
five station buttons.
The radio will now return to that station
whenever the station button is depressed.
NBTE: A total of 10 stations can be preset (five
AM and five
PM).
Setting Time of Day:
To Set Hours,
press SET button; within five
seconds press and hold SEEK button until
correct hour appears.
TO Set M inlotes, press SET button; within five
seconds press and hold SCAN button until
correct minute appears.
To Display Time with ignition Off (on
Receiver):
Press recall button (RCL).
To Display Frequency (Receiver or
Steering
Wheel):
When the radio is on and time is being displayed,
press recall button (RCL) to display frequency.
To Receive Stereo:
The radio will automatically switch to stereo
when tuned to an
AMQr FM Station
broadcasting in stereo.
If AM stereo is not desired, press the AM-ST
button; press again to return to stereo. (Note:
Nonstereo may be desired in areas of high noise
level.
Loudness Control (on Receiver):
Press LD button to boost bass; press again to
release.
Graphic Equalizer (on Receiver):
NOTE:
60 and 250 control bass; lk controls
midrange,
3.5k and 10k control treble.
Generally, the
lk control is placed in the center
(detent) position, while the bass and treble
controls are adjusted upward to varying degrees.
Since the
10k control has the most influence on
treble, it may produce high frequency hiss when
fully up. If this occurs, move it down until the
hiss disappears.
Speaker Balance (on Receiver):
To increase volume in the right speakers, press
the BAL button with arrow pointing right; to
increase volume in the left speakers, press BAL
button with arrow pointing left.
NBTE: Pressing both buttons at the same time
puts balance in the center (see graphic display on
receiver).
Speaker Front-Wear Volume (on Receiver
or Steering Wheel):
To increase front speaker volume, press FADE
button with arrow pointing up to increase rear
speaker volume, press FADE button with arrow
pointing down.
NOTE: On receiver only, pressing both buttons
at the same time put equal volume in front and
rear speakers (see graphic display on receiver).
To Deaden Sound (on Steering Wheel
Only):
Press MUTE to stop all sound; press again to
bring sound back. MUTE button is also used to
reactivate radio if battery or radio is removed and
reinstalled. (See anti-theft feature).
Anti-Theft Feature: