belt PONTIAC FIREBIRD 1994 Owner's Manual
[x] Cancel search | Manufacturer: PONTIAC, Model Year: 1994, Model line: FIREBIRD, Model: PONTIAC FIREBIRD 1994Pages: 290, PDF Size: 14.84 MB
Page 35 of 290
Seats and Restraint Systems
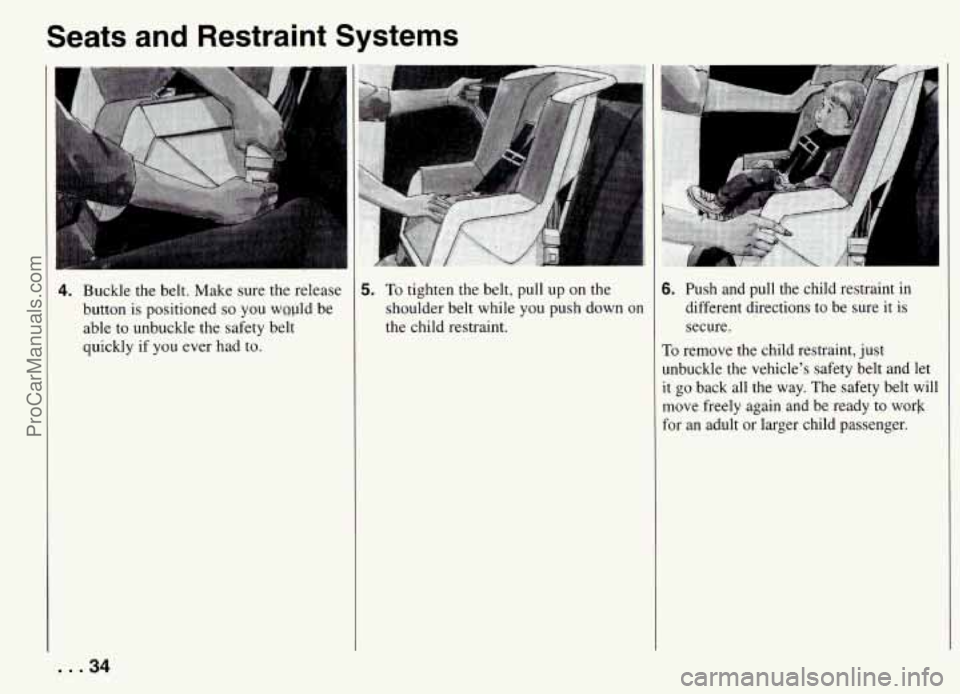
4. Buckle the belt. Make sure the release
button
is positioned so you wnpld be
able to unbuckle the safety belt
quickly if you ever had to. 5.
To tighten the
belt, pull up on the
shoulder belt while you push down on
the child restraint. 6. Push and pull the child restraint in different directions to be sure it is
secure.
To remove the child restraint, just
unbuckle the vehicle’s safety belt and let
it go back all the way. The safety belt will
move freely again and be ready to work
for an adult or larger child passenger.
... 34
ProCarManuals.com
Page 36 of 290
TI-
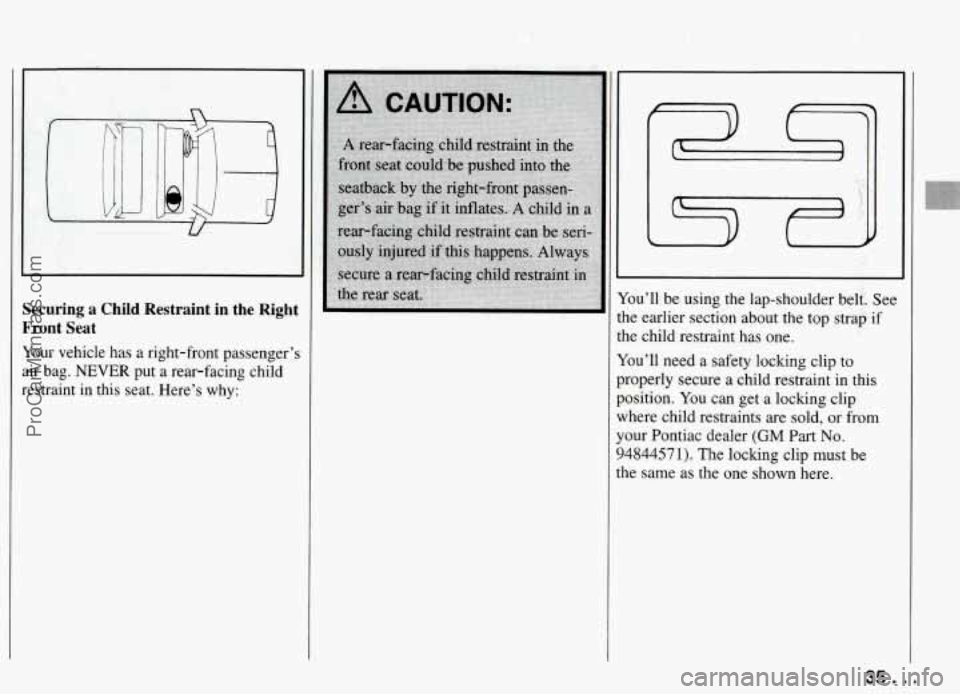
ecuring a Child Restraint in the Right
‘ront Seat
bur vehicle has a right-front passenger’s
ir bag.
NEVER put a rear-facing child
:straint in this seat. Here’s why: You’ll be using the
lap-shoulder belt. See
the earlier section about the top strap if
the child restraint has one.
You’ll need a safety locking clip to
properly secure a child restraint in this
position. You can get a locking clip
where child restraints are sold, or
from
your Pontiac dealer (GM Part No.
94844571). The locking clip must be
the same as the one shown here.
35 ... ProCarManuals.com
Page 37 of 290
Seats and Restraint Systems
Until you have this clip, secure a child
restraint only in the rear seat. See the
earlier section about securing a child
restraint in the rear seat. Once you have
the clip, follow these instructions:
1. Because your vehicle has a right-front
passenger’s air bag, always move the
seat as far back as it will go before
securing a front-facing child restraint.
2. Put the restraint on the seat. Follow
the instructions for the child restraint.
3. Secure the child in the child restraint
as the instructions say.
4. Pick up the latch plate, and run the lap
and shoulder portions of the vehicle’s
safety belt through or around the
restraint. The child restraint
instructions will show you how.
If the shoulder belt goes in front of the
child’s face or neck, put it behind the
child restraint.
5. Buckle the belt.
Make sure the release button is
positioned
so you would be able to
unbuckle the safety belt quickly
if you
ever had
to.
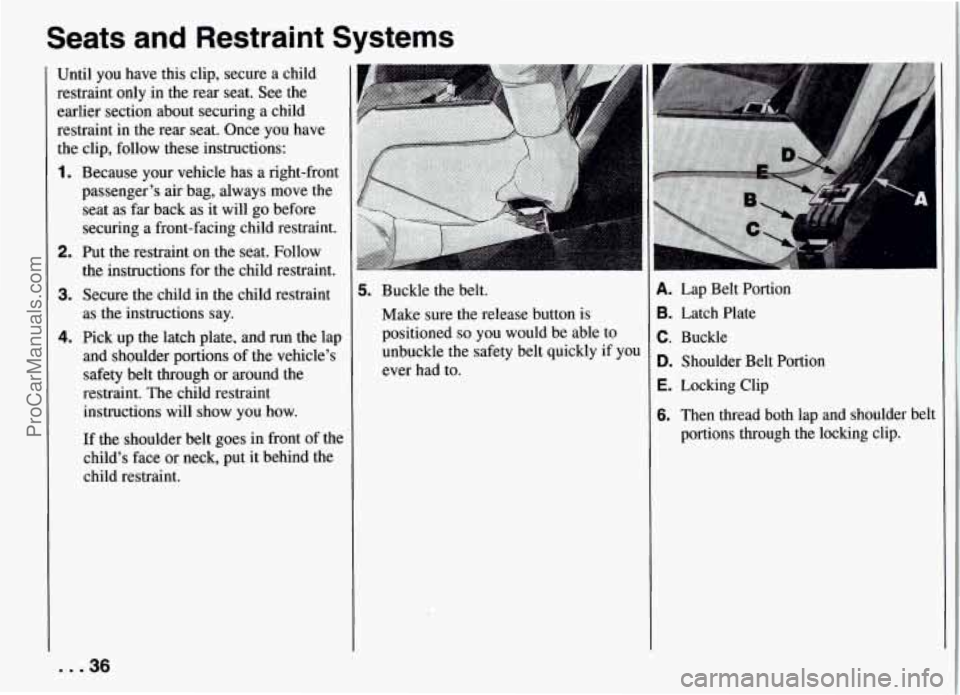
4. Lap Belt Portion
B. Latch Plate
C. Buckle
D. Shoulder Belt Portion
E. Locking Clip
6. Then thread both lap and shoulder belt
portions through
the locking clip.
... 36
ProCarManuals.com
Page 38 of 290
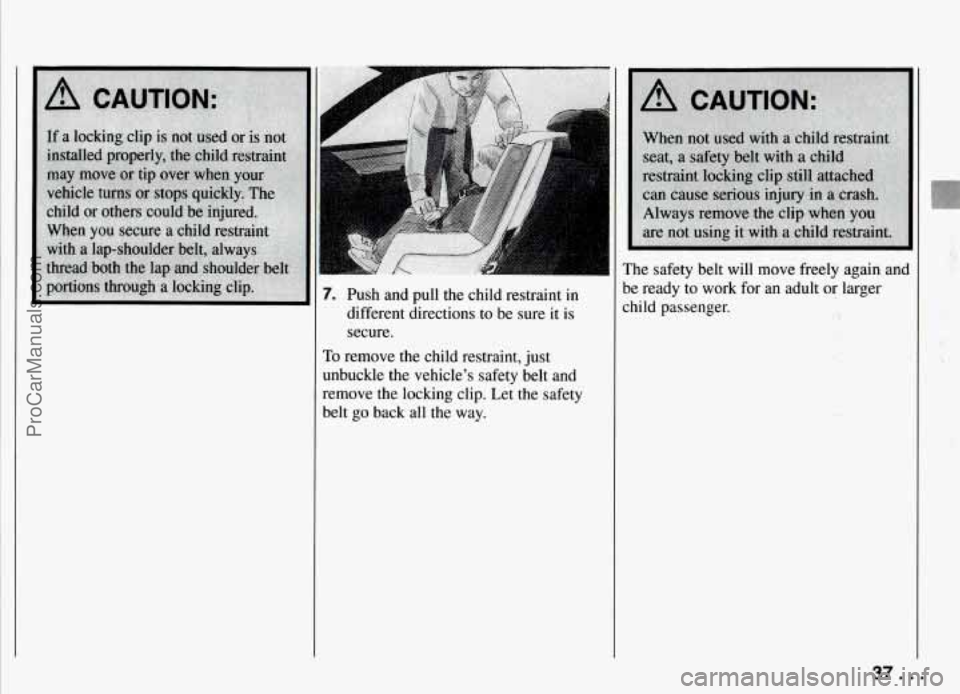
7. Push and pull the child restraint in
different directions
to be sure it is
secure.
To remove the child restraint, just
unbuckle the vehicle's safety belt and
remove the locking clip. Let the safety
belt
go back all the way. The safety belt
will move freely again and
be ready to work
for an adult or larger
child passenger.
37. .
ProCarManuals.com
Page 39 of 290
Seats and Restraint Systems
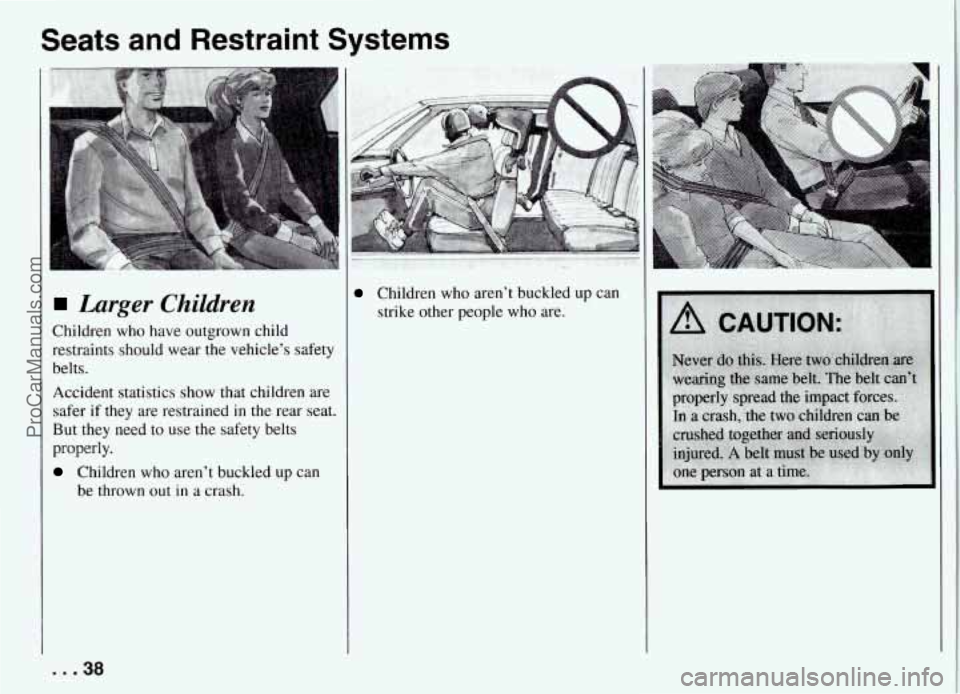
Larger Children
Children who have outgrown child
restraints should wear the vehicle’s safety
belts.
Accident statistics show that children are
safer if they are restrained in the rear seat.
But they need to use the safety belts
properly.
Children who aren’t buckled up can
be thrown out in a crash.
... 38
Children who aren’t buckled up can
strike other people who are.
ProCarManuals.com
Page 40 of 290
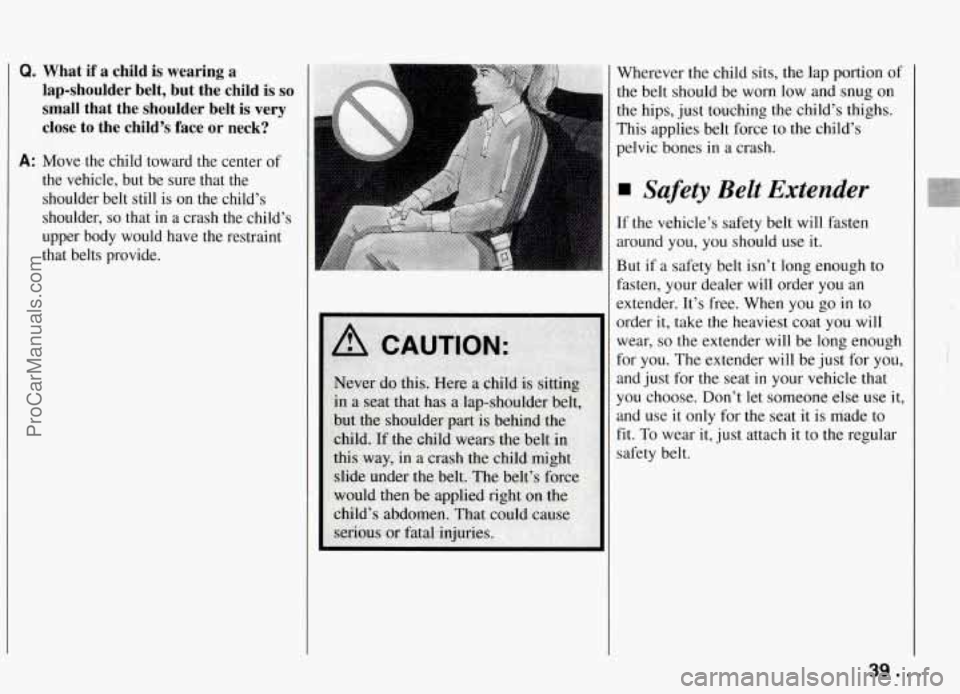
Q. What if a child is wearing a
lap-shoulder belt, but the child is so
small that the shoulder belt is very
close to the child’s face or neck?
A: Move the child toward the center of
the vehicle, but be sure that the
shoulder belt still is on the child’s
shoulder,
so that in a crash the child’s
upper body would have the restraint
that belts provide. Wherever
the child sits,
the lap portion of
the belt should be worn low and snug on
the hips, just touching the child’s thighs.
This applies belt force to the child’s
pelvic bones in a crash.
4 Safety Belt Extender
If the vehicle’s safety belt will fasten
around you, you should use it.
But if a safety belt isn’t long enough to
fasten, your dealer will order you an
extender. It’s free. When you go
in to
order it, take the heaviest coat you will
wear,
so the extender will be long enough
for you. The -extender will be just for you,
and just for the seat in your vehicle that
you choose. Don’t let someone else use it,
and use it only for the seat
it is made to
fit.
To wear it, just attach it to the regular
safety belt.
39 ...
ProCarManuals.com
Page 41 of 290
Seats and Restraint Systems
Checking Your
Restraint Systems
Now and then, make sure all your
belts, buckles, latch plates, retractors,
anchorages and reminder systems are
working properly,
Look for any loose
parts or damage. If you see anything that
might keep a restraint system from doing
its job, have it repaired.
Replacing Safety Belts
after
a Crash
[f you’ve had a crash, do you need new
belts?
After
a very minor collision, nothing
may be necessary. But if the belts were
stretched, as they would be
if worn during
a more severe crash, then you need new
belts.
Sf belts are cut or damaged, replace them.
Collision damage also may mean you
will need to have safety belt or seat parts
repaired or replaced. New parts and
repairs may be necessary even if the belt
wasn’t being used at the time of the
collision.
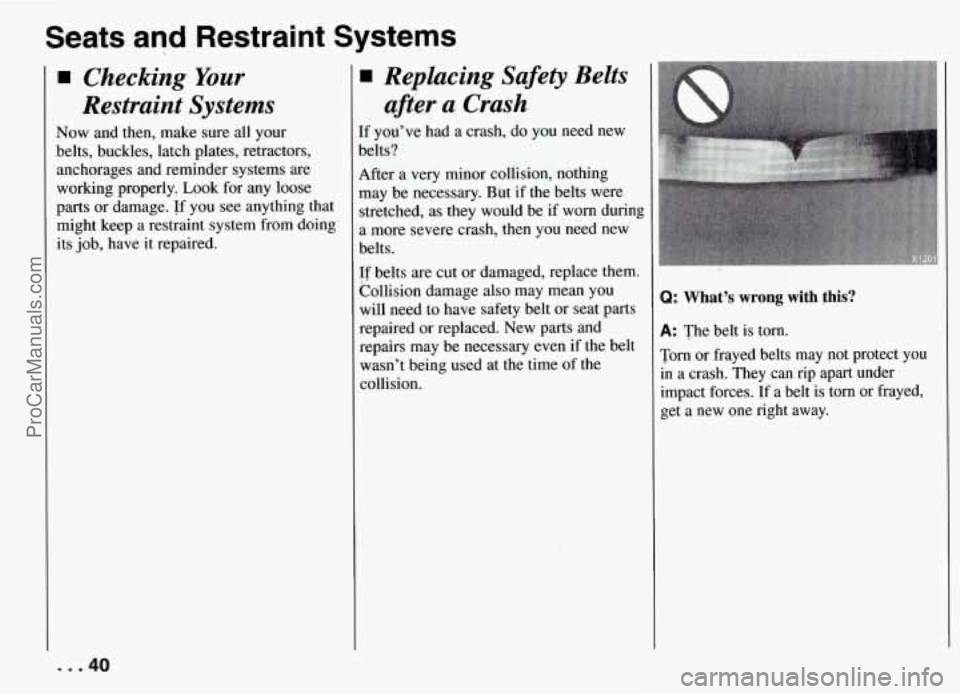
Q: What’s wrong with this?
A: The belt is torn.
Torn or frayed belts may not protect you
in a crash. They can rip apart under
impact forces.
If a belt is torn or frayed,
get a new one right away.
... 40
ProCarManuals.com
Page 100 of 290

1.
2. Open the
trunk and remove the
two
side covers from the storage bag.
Install the two side covers by
engaging the tab into the front seatbelt
cover. Lower the covers onto vehicle. 3. Install middle section of cover by
sliding tabs into slots on right side
cover. Lower cover and engage latch.
4. Close the trunk.
To Raise Your Convertible Tap
1. Park on a level surface. Set the
parking brake firmly. If you have an
automatic transmission, shift into
“P”
(Park). If you have a manual
transmission, shift into
“R7 (Reverse).
The ignition must be in the “ACC”
or “Run” position. Lower both sun
visors. Lower both windows at least
three inches. If the boot cover is
in
place, it must be removed first.
2. Open the trunk. Remove the middle
piece
of the cover by pushing in on
the latch and lifting up on the cover.
1
99 ...
ProCarManuals.com
Page 123 of 290

Comfort Controls and Audio Systems
Care of Your Cassette Tape
Player
A tape player that is not cleaned regularly
can cause reduced sound quality, ruined
cassettes, or a damaged mechanism.
Cassette tapes should be stored in their
cases away from contaminants, direct
sunlight, and extreme heat.
If they aren’t,
they may not operate properly or cause
failure of the tape player.
Cassettes are subject to wear and the
sound quality may degrade over time.
Always make sure that the cassette tape
is in good condition before you have
your tape player serviced. Your
tape player should be cleaned
after every
50 hours of use for best
performance. If you notice a reduction in
sound quality, regardless of when the tape
player was last cleaned, try a known
good cassette to see
if the tape or the tape
player
is at fault. If this other cassette has
no improvement in sound quality, clean
the tape player.
Clean your tape player with a
scrubbing-action, non-abrasive cleaning
cassette. This wet-type cleaning system
uses a cleaning cassette with pads which
scrub the tape head as the hubs of the
cleaner cassette turn.
If you use this type
of cleaner, the radio
may eject the cartridge. This is normal,
and is the result of a feature in the tape
player that ejects broken tapes. If this
happens, you will need to insert the
cleaning cassette three times to
thoroughly clean
the tape player.
You may prefer to use a non-scrubbing
action wet-type cleaner. This type of cleaning cassette, which uses a fabric belt
to clean the tape head, will not be ejected
but may not clean the tape player as
thoroughly as the scrubbing type cleaner. Whichever method you choose, follow
the
instructions provided with the
cleaning cassette. Cleaning cassettes are
available in most stores that sell audio
products. A scrubbing action cleaning
cassette is available from your dealer
(GM Part No. 12344600).
. . .I22
ProCarManuals.com
Page 127 of 290

Your Driving and the Road
I Defensive Driving
The best advice anyone can give about
driving
is: Drive defensively.
Please start with
a very important safety
device in your Pontiac: Buckle up.
(See “Safety Belts”
in the Index.)
Defensive driving really means “be ready
for anything.” On city streets, rural roads,
or freeways, it means “always expect the
unexpected.”
Assume that pedestrians or other drivers
are going to be careless and make
mistakes. Anticipate what they might
do. Be ready for their mistakes.
Rear-end collisions are about the most
preventable of accidents. Yet they are
common. Allow enough following
distance. It’s the best defensive driving
maneuver,
in both city and rural driving.
You never know when the vehicle in front
of you is going to brake or
turn suddenly.
Drunken Driving
Death and injury associated with drinking
and driving is a national tragedy. It’s the
number one contributor to the highway
death toll, claiming thousands of victims :very year.
Alcohol takes away three
:hings that anyone needs to drive a
vehicle:
Judgment
Muscular Coordination
Vision
Police records show that almost half of
all motor vehicle-related deaths involve
alcohol
- a driver, a passenger or
someone else, such as a pedestrian, had
been drinking. In most cases, these
deaths are the result of someone who
was drinking and driving. About
20,000
motor vehicle-related deaths occur each
year because of alcohol, and thousands
of people are injured.
Just how much alcohol
is too much if a
person plans to drive? Ideally, no one
should drink alcohol and
then drive. But
if one does, then what’s “too much”? It
can be a lot less than many might think.
Although it depends on each person and
situation, here is some general
information on the problem. The
Blood Alcohol Content (BAC) of
Gomeone who is drinking depends upon
Four things:
How much alcohol is in the drink.
The drinker’s body weight.
The amount of food that
is consumed
before and during drinking.
The length of time it has taken the
drinker to consume the alcohol.
. . .I26
ProCarManuals.com