clock PONTIAC FIREBIRD 1995 Owners Manual
[x] Cancel search | Manufacturer: PONTIAC, Model Year: 1995, Model line: FIREBIRD, Model: PONTIAC FIREBIRD 1995Pages: 386, PDF Size: 19.66 MB
Page 98 of 386

Headlamp Doors
The headlamp doors are designed to open when you turn
the headlamps on and close when you turn the
headlamps
off. The headlamp doors can be opened
without turning on the headlamps by turning the
headlamps on, then turning in the switch back to the
parlung lamps position.
The headlamp doors should be open when driving in icy
or snowy conditions to prevent the doors from freezing
closed and when washing the vehicle to help clean the
headlamps.
You can open the headlamp doors manually:
1. Open the hood.
2. Remove the plastic cover from the retractor motor
knob.
3. Turn the retractor motor knob counterclockwise until
the headlamp door is fully open. The
knob will get
harder to turn when the headlamp door is all the way
UP-
4. Replace the plastic cover on the retractor motor
knob.
To manually close the headlamp doors, turn the lamps
off and turn the
knob clockwise. If the headlamp doors
aren’t working properly, see your Pontiac dealer for
help.
2-51
ProCarManuals.com
Page 132 of 386

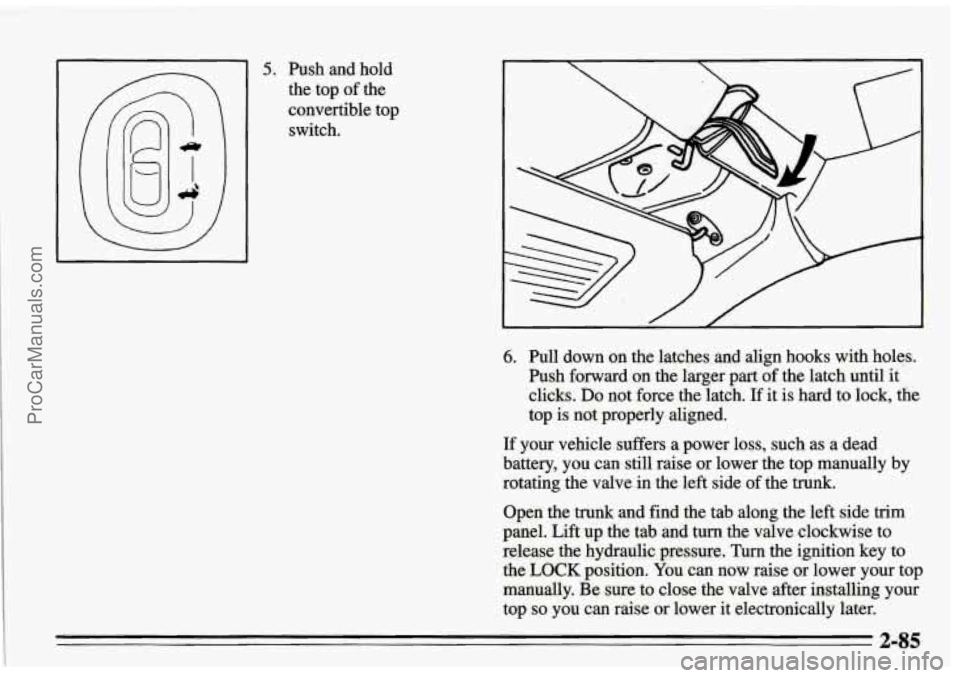
5. Push and hold
the top of the
convertible top switch. ~~~
6. Pull down on the latches and align hooks with
holes.
hsh forward on the larger part of the latch until it
clicks.
Do not force the latch. If it is hard to lock, the
top is not properly aligned.
If your vehicle suffers a power loss, such as a dead
battery, you
can still raise or lower the top manually by
rotating the valve in the left side of the
trunk.
Open the trunk and find the tab along the left side trim
panel. Lift up the tab and turn the valve clockwise to
release the hydraulic pressure.
Turn the ignition key to
the
LOCK position. You can now raise or lower your top
manually. Be
sure to close the valve after installing your
top
so you can raise or lower it electronically later.
2-85
ProCarManuals.com
Page 138 of 386

Audio Systems
Your Delco@ audio system has been designed to operate
easily and give years of listening pleasure. But you will
get the most enjoyment out of it if you acquaint yourself
with it first. Find out what
your Delco@systerh can do
and how to operate
all its controls, to be sure you’re
getting the most out of the advanced engineering that
went into it.
If you have power door locks, your vehicle has a feature
called Retained Accessory Power (RAP). With RAP you
can play your audio system even after the ignition is
off.
See the Index under “Retained Accessory Power.”
Setting the Clock
The clock may be set with the ignition on or off.
1. Press and hold HR until the correct hour appears.
2. Press and hold MIN until the correct minute appears.
NOTE: There will be a two second delay before the
clock goes into the time-set mode, and the colon in the
display will blink while in this mode’.
AmM Stereo Radios with Cassette Tape
Player or Compact
Disc Player
If your Pontiac has a radio with either a cassette tape
player, a compact disc player or a graphic equalizer, the
instructions below will explain how
to use the radio. For
other features,
see the instructions for the feature your
radi.0 has.
To Play the Radio
Push POWER to turn the system on or off.
VOLUME: Turn the VOLUME knob to adju.st the
sound.
RECALL: Press RECALL to recall the station being
played or the clock display. You can also press
RECALL
to display the time when the ignition is off.
Finding a Station
AM-FM: Press A” to get AM, FMI or FM~. The
lighted display shows yout selection.
TUNE: Press TUNE to release the knob. Tuk the knob
to choose radio stations. Push TUNE back in to store it
when not tuning.
ProCarManuals.com
Page 142 of 386

If E and a number appears in the radio display, an error
has occurred and the cassette
or compact disc will not
play temporarily.
If the error occurred while trying to play a cassette tape,
the following conditions may have caused the error:
1. The cassette tape is tight and the cassette player
cannot turn the hubs of the cassette tape.
2. E10 may be displayed.
Hold the cassette with the open end down and try
turning right hub counter clockwise with a pencil.
0 Flip the tape over and repeat same procedure.
If the hubs do not turn easily, your cassette tape may be
damaged and should not be used in the cassette player.
Try a new tape to make sure that your cassette player
is working properly.
If the cassette tape is broken, Ell may be displayed.
Check to see if your tape is broken.
Try a new cassette tape.
This feature may not work well with certain types of
adaptors for add-on CD players. If there is not tension
on the reels of the cassette player, it will sense that the
adaptor is a broken tape and eject it.
CLN (Clean): If this message appears on the display
when you insert your cassette tape, your cassette player
needs to be cleaned. It will still play cassette tapes, but it
should be cleaned to prevent damage to your cassette
tapes and the cassette tape player. See “Care,of Your
Cassette Tape Player” in the Index. After you: have
cleaned the cassette tape player, press and hold the
EJECT button for
5 seconds to reset the CLN indicator.
The radio will display
“---” to show that the clean
feature has been reset.
‘It
3-9
ProCarManuals.com
Page 163 of 386

Steering in Emergencies
There are times when steering can be more effective
than braking. For example, you come over a
hill and
find a truck stopped in your lane, or a car suddenly pulls
out from nowhere,
or a child darts out from between
parked cars and stops right in front of you.
You can
avoid these problems by braking
-- if you can stop in
time. But sometimes you can’t; there isn’t room. That’s
the time for evasive action
-- steering around the
problem.
Your Pontiac can perform very well in emergencies like
these.
First apply your brakes. It is better to remove as
much speed as you can from a possible collision. Then
steer around the problem, to the left or right depending
on the space available.
pin emergency like this requires close attention and a
quick decision. If you are holding the steering wheel at
the recommended
9 and 3 o’clock positions, you can
turn it a full 180 degrees very quickly without removing
either hand. But you have to act fast, steer quickly, and
just as quickly straighten the wheel once
you have
avoided the object.
The fact that such emergency situations are always
possible is a good reason to practice defensive driving at
all times and wear safety belts properly.
4-12
ProCarManuals.com
Page 221 of 386

On convertible models, you must also remove the trunk
accem panel. It's at the upper back
of the trunk. Turn the
two screw knobs under the trunk edge a quarter
turn
counterclockwise to remove the panel. . 11.: '*
Use a coin or a key to turn the screw heads until the
slots poht fkont and back. Gently lift the trim panel and
move it out
of the way.
If you have speakers in the trim panel, the speaker wire
should be long enough to remove the trim panel without
disconnecting the wire.
I
To remove the jack and wheel wrench, lomen and
remove the bolt and remove the plastic cover.
5-32
ProCarManuals.com
Page 224 of 386

Then pry off the center cap with the wheel wrench. If your vehicle has optional alloy wheels, each wheel
may have one locknut in place
of the standard wheel
nut.
A special wheel lock key (removal tool) and
instructions are located in the center console. Attach the
wheel lock key to the socket
of the wheel wrench.
Remove the locking wheel nut by turning
counterclockwise.
ProCarManuals.com
Page 227 of 386

Raise the vehicle by rotating the wheel wrench
clockwise. Raise the vehicle far enough
off the ground
so there is enough room for the spare tire to fit.
Remove all the wheel nuts and take off the flat tire.
Remove any rust or dirt from the wheel bolts, mounting
surfaces and spare wheel. Place the spare on the wheel
mounting surface.
ProCarManuals.com
Page 228 of 386

Replace the wheel nuts with the rounded end of the nuts
toward the wheel. Tighten each nut by hand until the
wheel
is held against the hub.
Lower the vehicle by rotating the wheel wrench
counterclockwise. Lower
the jack completely..
5-39
ProCarManuals.com
Page 240 of 386

To take off the cap, turn it slowly to the left
(counterclockwise).
Be careful not to spill gasoline. Clean gasoline from
painted surfaces as soon as possible. See “Cleaning the
Outside
of Your Pontiac” in the Index.
When you put the cap back on, turn it to the right until
you hear at least three clicks.
NOTICE:
If you need a new cap, be sure to get the right
type. Your dealer can get one for you. If you get
the wrong type, it may not fit and your fuel tank
and emissions system might be damaged.
,-
6-7
ProCarManuals.com