trunk PONTIAC FIREBIRD 1995 Owners Manual
[x] Cancel search | Manufacturer: PONTIAC, Model Year: 1995, Model line: FIREBIRD, Model: PONTIAC FIREBIRD 1995Pages: 386, PDF Size: 19.66 MB
Page 53 of 386

Operation
The driver’s door will unlock automatically when
UNLOCK is pressed. If UNLOCK is pressed again
within five seconds, the passenger door will
also unlock.
All doors will lock when DOOR is pressed. The hatch
will unlock when the opened
trunk symbol is pressed,
but only when the ignition switch is not in
RUN, and the
transmission is in
PARK (P) if you have an automatic
transmission.
If you have a manual transmission, the
parking brake must be set.
The system will turn on the interior lamps for about
40 seconds, or until the ignition switch is turned to
RUN,
or if you unlock the doors or hatch. The interior
lamps will come on for about two seconds when you
lock the doors.
Matching Transmitter(s) To Your Vehicle
Each key chain transmitter is coded to prevent another
transmitter from unlocking your vehicle.
If a transmitter
is lost or stolen, a replacement can be purchased through
your dealer. Remember to bring any remaining
transmitters with you when you
go to your dealer. When
the dealer matches the replacement transmitter to your
vehicle, the remaining transmitters must also be
matched. Once the new transmitter is coded, the lost
transmitter
will not unlock your vehicle.
You can match a transmitter to as many different
vehicles as you own, provided they are equipped with
exactly the same model system. (General Motors offers
several different models of these systems on their
vehicles.) Each vehicle can have only two transmitters
matched to
it.
2-6
ProCarManuals.com
Page 129 of 386

Installing the Boot Cover
After lowering the convertible top, you may want to
install the boot cover. The three-piece boot cover is
stored
in a bag in the trunk.
3. Be sure no one or nothing is on or around the top.
Push and hold the bottom
of the convertible top
switch. The switch
is on the left side of your console.
The top will automatically lower into the storage
area.
1. Open the trunk and remove the two side covers from
the storage bag.
2. Install the two side covers by engaging the tab into
the front seatbelt cover. Lower the covers onto the
car.
2-82
ProCarManuals.com
Page 130 of 386

To Raise Your Convqtible Top
1. Park on a level surface. Set the parking brake firmly.
If you have an automatic transmission, shift into
PARK (P). If you have a manual transmission, shift
into
REVERSE (R). The ignition must be in the
ACC or RUN position. Lower both sun visors.
Lower both windows at least three inches.
If the boot
cover is in place, it must be removed first.
3. Insta the middle section of the cover by sliding the
tabs ilifo the slots on right side cover. Lower the
cover and engage latch.
4. Close the trunk.
2. Open the trunk. Remove the middle piece of the
cover by pushing in on the latch and lifting up on the
cover.
2-83
ProCarManuals.com
Page 131 of 386

3. Remove the two side pieces of the boot cover by
lifting the rear cover and sliding them out of their
slots.
4. Store each piece of the cover in its separate
compartment in the storage bag. Store in the trunk
and close the trunk.
2-84
ProCarManuals.com
Page 132 of 386

5. Push and hold
the top of the
convertible top switch. ~~~
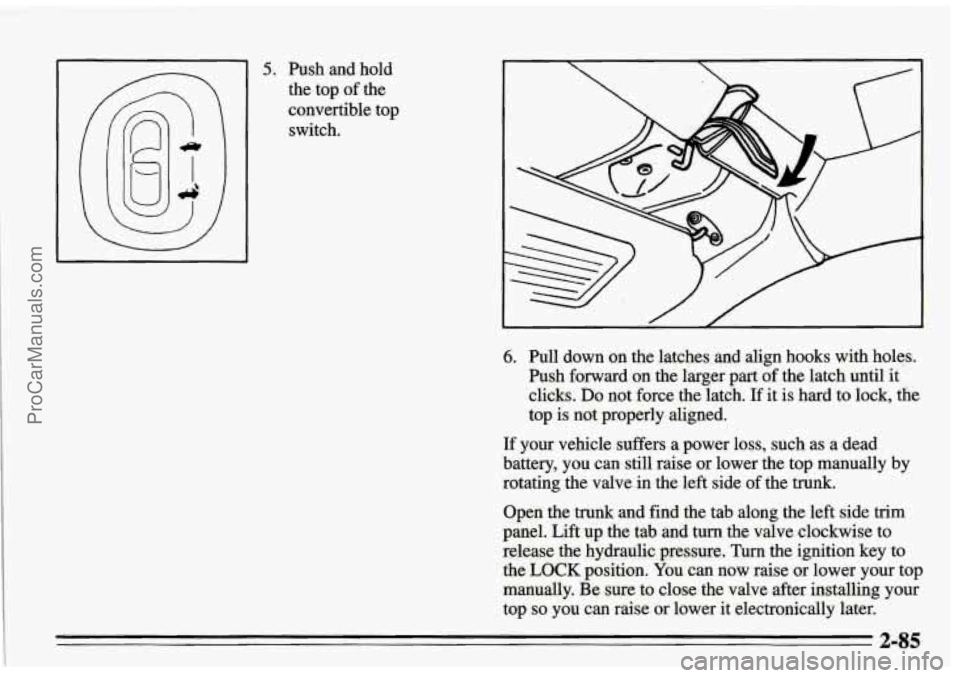
6. Pull down on the latches and align hooks with
holes.
hsh forward on the larger part of the latch until it
clicks.
Do not force the latch. If it is hard to lock, the
top is not properly aligned.
If your vehicle suffers a power loss, such as a dead
battery, you
can still raise or lower the top manually by
rotating the valve in the left side of the
trunk.
Open the trunk and find the tab along the left side trim
panel. Lift up the tab and turn the valve clockwise to
release the hydraulic pressure.
Turn the ignition key to
the
LOCK position. You can now raise or lower your top
manually. Be
sure to close the valve after installing your
top
so you can raise or lower it electronically later.
2-85
ProCarManuals.com
Page 221 of 386

On convertible models, you must also remove the trunk
accem panel. It's at the upper back
of the trunk. Turn the
two screw knobs under the trunk edge a quarter
turn
counterclockwise to remove the panel. . 11.: '*
Use a coin or a key to turn the screw heads until the
slots poht fkont and back. Gently lift the trim panel and
move it out
of the way.
If you have speakers in the trim panel, the speaker wire
should be long enough to remove the trim panel without
disconnecting the wire.
I
To remove the jack and wheel wrench, lomen and
remove the bolt and remove the plastic cover.
5-32
ProCarManuals.com
Page 230 of 386

Replace the jack, wheel wrench and flat tire using the storage instructions. When you replace the
trim panel,
be sure to tuck it under the weatherstrip.
1.
2.
3.
4.
5.
6.
7.
8.
9.
10.
11.
12.
Trim Panel
Bolt
Cover
Jack
Wing Nut
Adapter
Compact Spare Tire
Full-Size Tire
Carpet Flap
Tire Storage Bolt
Trunk Access Pane
Knob
:1 (Convertible Only)
6
5-41
ProCarManuals.com
Page 301 of 386

5. PCM IGN: Powertrain Control Module; Fuel Pump
Re1ay;Theft Deterrent Module; Engine Mass Air
Flow Sensor (V8 Engine)
6. STOP/HAZARD: Brake Light/Cruise Release
Switch; Hazard Flasher
7. PWR ACCY: Power Door Locks; Power Mirrors;
Hatch Release Switch; Auxiliary Accessory Wire
8. COURTESY: Audio Alarm Module; Courtesy
Lamps: Console Compartment, Glove Box, Dome,
Trunk, Rear Courtesy, Rearview Mirror; Radio;
Theft Deterrent Module; SECURITY Indicator;
Hatch Release Relay; Keyless Entry Receiver
9. GAGES: Audio Alarm Module; Daytime Running
Lamps Module (Canada); Diagnostic Energy
Reserve Module; Instrument Cluster; Keyless Entry
Receiver; Brake Switch Assembly; Auxiliary
Accessory Wire
10. TAIL LTS: Exterior Lighting
11.
CIGAR/HORN: Cigarette Lighter; Horn Relay;
12. DEFOGBEATS: Power Seats; Rear Defogger
13.
IP DIMMER: Brightness Control
14.
WIPEWASH: Windshield Wipermasher
15. WINDOWS: Power Windows, Convertible Top
Data Link Connector
Switch (Circuit Breaker); Cooling Level Latching
Module
16. CRANK: Diagnostic Energy Reserve Module
17.
RADIO: Radio Amplifier; Steering Wheel Controls
ProCarManuals.com