ECO mode PONTIAC G3 2009 Owners Manual
[x] Cancel search | Manufacturer: PONTIAC, Model Year: 2009, Model line: G3, Model: PONTIAC G3 2009Pages: 348, PDF Size: 2.16 MB
Page 53 of 348
Notice:Do not let the LATCH attachments rub
against the vehicle’s safety belts. This may damage
these parts. If necessary, move buckled safety
belts to avoid rubbing the LATCH attachments.
Do not fold the empty rear seat with a safety belt
buckled. This could damage the safety belt or
the seat. Unbuckle and return the safety belt to its
stowed position, before folding the seat.
1. Attach and tighten the lower attachments to the
lower anchors. If the child restraint does not have
lower attachments or the desired seating position
does not have lower anchors, secure the child
restraint with the top tether and the safety belts.
Refer to your child restraint manufacturer
instructions and the instructions in this manual.
1.1. Find the lower anchors for the desired
seating position.
1.2. Put the child restraint on the seat.
1.3. Attach and tighten the lower attachments on
the child restraint to the lower anchors.2. If the child restraint manufacturer recommends that
the top tether be attached, attach and tighten the
top tether to the top tether anchor, if equipped.
Refer to the child restraint instructions and the
following steps:
2.1. Find the top tether anchor.
2.2. Flip the cover to access the top tether
anchors.
2.3. For hatchback models, remove the cargo
shade before installing the top tether. The
cargo shade should remain off while the top
tether is in use.
2.4. Raise the headrest or head restraint if the
desired seating position has an adjustable
headrest or head restraint. SeeHead
Restraints on page 1-2.
1-49
Page 93 of 348
Content Theft-Deterrent
Your vehicle may have a content theft-deterrent system.
The theft-deterrent system will not arm when you lock
the doors using the key or the manual door lock. It arms
only when you use the remote keyless entry transmitter.
Arming the System
To arm the system, do the following:
1. Close the doors, the windows, the hood, and the
trunk or liftgate.
Make sure that the windows are closed, as the
system can be armed even if the windows are open.
2. Turn the key to LOCK/OFF and remove the
key from the ignition.
If the key is inserted in the ignition, the transmitter
will not arm the theft-deterrent system.
3. Lock the doors by pressing the lock button on the
remote keyless entry transmitter.
The LED light on the transmitter will �ash once.
All of the doors will lock.
The hazard warning lamps will �ash once and
the horn will sound.
The security light will �ash continuously to
indicate that the theft-deterrent system is armed.
The security light is located on the center of
the instrument panel near the clock.To avoid activating the alarm by accident, do one of the
following:
Unlock the driver’s or passenger’s front door using
the key.
Press the unlock button on the remote keyless
entry transmitter.
Unlocking a door any other way will activate the alarm
when a door or the trunk or liftgate is opened.
If you do not want to arm the theft-deterrent system,
lock the vehicle using the key or the manual door locks.
Disarming the System
To disarm the system, do one of the following:
Unlock the driver’s or passenger’s front door using
the key.
Press the unlock button on the remote keyless
entry transmitter.
� The LED light on the transmitter will
�ash once.
� All of the doors will unlock.
� The hazard warning lamps will �ash twice.
If the door is not opened or if the engine is not started
within 30 seconds after disarming the system using
the transmitter, all of the doors will automatically lock
and the theft-deterrent mode will rearm.
2-15
Page 100 of 348

D4 (Automatic Overdrive):This position is for normal
driving.
When operating the vehicle in severe cold conditions,
the transmission may be prevented from shifting into
D4 gear until the transmission �uid has warmed up to
it’s operational temperature.
Notice:If the vehicle seems to start up rather
slowly or not shift gears when you go faster, and
you continue to drive the vehicle that way, you could
damage the transmission. Have the vehicle serviced
right away. You can drive in 2 (Second) when you are
driving less than 35 mph (55 km/h) and D4 (Automatic
Overdrive) for higher speeds until then.
2 (Second):This position gives you more power but
lower fuel economy. You can use 2 (Second) on hills.
It can help control vehicle speed as you go down steep
mountain roads, while using the brakes off and on.
Notice:Do not drive in 2 (Second) at speeds
over 65 mph (105 km/h), or you can damage the
transmission. Use D4 (Automatic Overdrive) as
much as possible. Do not shift into 2 (Second) unless
you are going slower than 65 mph (105 km/h) or you
can damage the engine.1 (First):This position gives you even more power but
lower fuel economy than 2 (Second). You can use it
on very steep hills, or in deep snow or mud. If the shift
lever is put in 1 (First), the transmission will not shift
into �rst gear until the vehicle is going slowly enough.
Notice:Spinning the tires or holding the vehicle in
one place on a hill using only the accelerator pedal
may damage the transmission. The repair will not be
covered by the vehicle warranty. If you are stuck, do
not spin the tires. When stopping on a hill, use the
brakes to hold the vehicle in place.
If there is a malfunction with the automatic transmission,
the malfunction indicator lamp (MIL) or the HOLD
indicator light will turn on or �ash. SeeMalfunction
Indicator Lamp on page 3-32orHold Mode Light on
page 3-30.
Have the vehicle �xed as soon as possible.
2-22
Page 101 of 348
Hold Mode
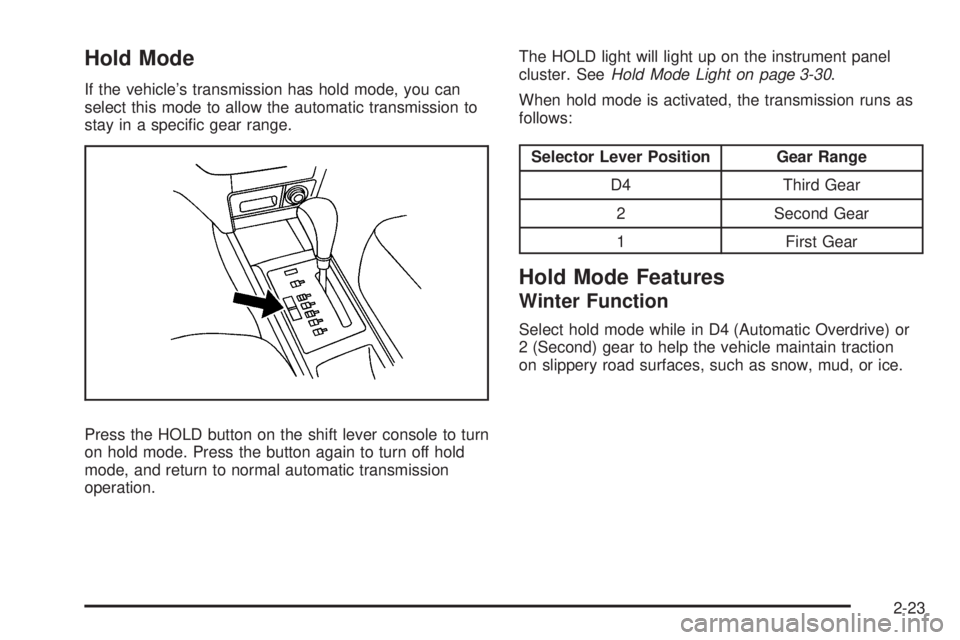
If the vehicle’s transmission has hold mode, you can
select this mode to allow the automatic transmission to
stay in a speci�c gear range.
Press the HOLD button on the shift lever console to turn
on hold mode. Press the button again to turn off hold
mode, and return to normal automatic transmission
operation.The HOLD light will light up on the instrument panel
cluster. SeeHold Mode Light on page 3-30.
When hold mode is activated, the transmission runs as
follows:
Selector Lever Position Gear Range
D4 Third Gear
2 Second Gear
1 First Gear
Hold Mode Features
Winter Function
Select hold mode while in D4 (Automatic Overdrive) or
2 (Second) gear to help the vehicle maintain traction
on slippery road surfaces, such as snow, mud, or ice.
2-23
Page 136 of 348
A/C (Air Conditioning):For vehicles with air
conditioning, follow these steps to use the system.
Turn
9to the desired speed. The air conditioning does
not operate when the fan control knob is in the off
position. Press A/C to turn the air conditioning on and
off. When A/C is pressed, an indicator light comes on to
show that the air conditioning is on.
For quick cool down on hot days, do the following:
1. Open the windows to let hot air escape.
2. Press
?.
3. Press A/C.
4. Select the coolest temperature.
5. Select the highest
9speed.
Using these settings together for long periods of time
may cause the air inside of the vehicle to become
too dry. To prevent this from happening, after the air in
the vehicle has cooled, turn the recirculation mode off.
The air conditioning system removes moisture from
the air, so a small amount of water might drip under the
vehicle while idling or after turning off the engine.
This is normal.
?(Recirculation):This mode recirculates and helps
to quickly cool the air inside the vehicle. It can be
used to prevent outside air and odors from entering the
vehicle.
For vehicles with a recirculation button, press the button
to turn the recirculation mode on. An indicator light
comes on to show that the recirculation is on. Press the
button again to return to outside air mode.
For vehicles with a lever, move the lever to choose the
recirculation mode.
Using the recirculation mode for extended periods may
cause the windows to fog. If this happens, select the
defrost mode.
:(Outside Air):This mode brings outside air into
the vehicle.
For vehicles with a recirculation button, press the button
until the recirculation mode is turned off. The vehicle
then returns to the outside air mode.
For vehicles with a lever, move the lever to choose the
outside air mode.
3-20
Page 165 of 348
Press CD/AUX while a CD is playing to pause the CD.
PAUSE �ashes on the display. Press CD/AUX again
to start playing the CD.
Press CD/AUX to play a CD when listening to the audio
contents from other device (AUX mode). CDP appears
on the display when the CD player has been selected.
The CD symbol will appear on the display when a CD
is loaded.
EJECT:Press to eject a CD. The CD can be ejected
when the ignition or the radio is turned off.
RPT (Repeat):Press the pushbutton under the RPT tab
on the display to repeat the current track, RPT appears
on the display. Press the pushbutton again to stop repeat.
RDM (Random):Press the pushbutton below the RDM
tab on the display to play tracks in random, rather
than sequential order, RDM appears on the display.
Press the pushbutton again to stop random play.
INT (Scan):Press the pushbutton below the INT tab
on the display to listen to the �rst few seconds of
each track on the CD, INTRO appears on the display.
Press the pushbutton again to stop scanning and
the current track begins to play.Playing an MP3/WMA CD-R Disc
The radio has the MP3/WMA CD-R disc capability.
For more information, seeUsing an MP3 on page 3-51
later in this section.
CD Messages
CHECK CD:If this message displays and/or the CD
comes out, it could be for one of the following reasons:
It is very hot. When the temperature returns to
normal, the CD should play.
The road is very rough. When the road becomes
smoother, the CD should play.
The CD is dirty, scratched, wet, or upside down.
The air is very humid. If so, wait about an hour and
try again.
The format of the CD might not be compatible.
SeeUsing an MP3 on page 3-51later in this section.
There could have been a problem while burning
the CD.
The label could be caught in the CD player.
3-49
Page 169 of 348
Playing an MP3/WMA
With the ignition in the ON/RUN position, insert a CD
partway into the slot, label side up. The player pulls the
disc in. LOADING, and then MP3 or WMA appears
on the display. The CD should begin playing. As each
new track starts to play, the track number, and the song
name will appear on the display. If the ignition or
radio is turned off with a CD in the player, it will stay
in the player. When a CD is in the player and the ignition
is turned on, the radio must be turned on before the
CD will start playback. When the ignition and radio are
turned on, the CD will start playing where it stopped,
if it was the last selected audio source.
The CD player can play the smaller 3 inch (8 cm)
single CDs with an adapter ring. Full-size CDs and the
smaller CDs are loaded in the same manner.
Sound quality may be reduced due to CD-R quality,
the method of recording, the quality of the music
that has been recorded, and the way the CD-R has
been handled.
DIR (Directory):Press to repeat the tracks in the
current directory. DIR displays.
Press DIR again to repeat the tracks in all of the
directories. ALL displays.
Press DIR again to turn off repeat play.
uSEEKt(Next/Previous Folder) (in MP3/WMA
Mode):Press to change the folder. If CD-R does not
have any folders, “ROOT” �ashes on the display for a
short time.
[TUNE (Next Track):Press the up TUNE arrow
to go to the next track. The track number displays.
The player continues moving forward through the CD
each time TUNE is pressed.
rTUNE (Previous Track):Press the down TUNE
arrow to go to the start of the current track. The track
number displays. The player continues moving backward
through the CD each time TUNE is pressed.
INFO/DISP (Information/Display):Press to display
additional text information related to the current
MP3/WMA song. A choice of additional information such
as: Song Title, Album Title, and Artist. Bit rate might
also display.
When information is not available, No Info displays.
Press this button for longer than two seconds to change
display mode.
SCROLL (MP3/WMA Mode Only):Press the SOUND
button for longer than two seconds. The song title or
other available information of a song scrolls on/off.
The offset is scroll on. The scroll mode can be changed
only when the SOUND button is pressed for longer
than two seconds.
3-53
Page 259 of 348
Intended Outboard Sidewall:The side of an
asymmetrical tire, that must always face outward
when mounted on a vehicle.
Kilopascal (kPa)
:The metric unit for air pressure.
Light Truck (LT-Metric) Tire
:A tire used on
light duty trucks and some multipurpose passenger
vehicles.
Load Index
:An assigned number ranging
from 1 to 279 that corresponds to the load
carrying capacity of a tire.
Maximum In�ation Pressure
:The maximum
air pressure to which a cold tire can be in�ated.
The maximum air pressure is molded onto the
sidewall.
Maximum Load Rating
:The load rating for a tire
at the maximum permissible in�ation pressure
for that tire.
Maximum Loaded Vehicle Weight
:The sum of
curb weight, accessory weight, vehicle capacity
weight, and production options weight.Normal Occupant Weight
:The number of
occupants a vehicle is designed to seat multiplied
by 150 lbs (68 kg). SeeLoading the Vehicle on
page 4-18.
Occupant Distribution
:Designated seating
positions.
Outward Facing Sidewall
:The side of an
asymmetrical tire that has a particular side that
faces outward when mounted on a vehicle.
The side of the tire that contains a whitewall,
bears white lettering, or bears manufacturer,
brand, and/or model name molding that is higher
or deeper than the same moldings on the other
sidewall of the tire.
Passenger (P-Metric) Tire
:A tire used on
passenger cars and some light duty trucks and
multipurpose vehicles.
Recommended In�ation Pressure
:Vehicle
manufacturer’s recommended tire in�ation pressure
as shown on the tire placard. SeeInflation - Tire
Pressure on page 5-57andLoading the Vehicle
on page 4-18.
5-55
Page 332 of 348

Current and Past Model Order Forms
Technical Service Bulletins and Manuals are available
for current and past model GM vehicles. To request
an order form, specify year and model name of
the vehicle.
ORDER TOLL FREE: 1-800-551-4123
Monday-Friday 8:00 AM - 6:00 PM
Eastern Time
For Credit Card Orders Only
(VISA-MasterCard-Discover), visit Helm, Inc.
on the World Wide Web at: helminc.com
Or you can write to:
Helm, Incorporated
P.O. Box 07130
Detroit, MI 48207
Prices are subject to change without notice and without
incurring obligation. Allow ample time for delivery.
Note to Canadian Customers: All listed prices are
quoted in U.S. funds. Canadian residents are to make
checks payable in U.S. funds.
Vehicle Data Recording and
Privacy
Your GM vehicle has a number of sophisticated
computers that record information about the vehicle’s
performance and how it is driven. For example, your
vehicle uses computer modules to monitor and control
engine and transmission performance, to monitor the
conditions for airbag deployment and deploy airbags in a
crash and, if so equipped, to provide antilock braking to
help the driver control the vehicle. These modules may
store data to help your dealer/retailer technician service
your vehicle. Some modules may also store data about
how you operate the vehicle, such as rate of fuel
consumption or average speed. These modules may also
retain the owner’s personal preferences, such as radio
pre-sets, seat positions, and temperature settings.
7-16