warning PONTIAC G3 2010 Owners Manual
[x] Cancel search | Manufacturer: PONTIAC, Model Year: 2010, Model line: G3, Model: PONTIAC G3 2010Pages: 368, PDF Size: 3.94 MB
Page 293 of 368

If a Tire Goes Flat
It is unusual for a tire to blowout while you are driving,
especially if you maintain your vehicle's tires properly.
If air goes out of a tire, it is much more likely to leak out
slowly. But if you should ever have a blowout, here are
a few tips about what to expect and what to do:
If a front tire fails, the flat tire creates a drag that pulls
the vehicle toward that side. Take your foot off the
accelerator pedal and grip the steering wheel firmly.
Steer to maintain lane position, and then gently brake to
a stop well out of the traffic lane.
A rear blowout, particularly on a curve, acts much like a
skid and may require the same correction you would
use in a skid. In any rear blowout remove your foot from
the accelerator pedal. Get the vehicle under control by
steering the way you want the vehicle to go. It may be
very bumpy and noisy, but you can still steer. Gently
brake to a stop, well off the road if possible.{WARNING:
Lifting a vehicle and getting under it to do
maintenance or repairs is dangerous without the
appropriate safety equipment and training. If a
jack is provided with the vehicle, it is designed
only for changing a flat tire. If it is used for
anything else, you or others could be badly
injured or killed if the vehicle slips off the jack. If a
jack is provided with the vehicle, only use it for
changing a flat tire.
If a tire goes flat, the next part shows how to use the
jacking equipment to change a flat tire safely.
6-69
Page 294 of 368
Changing a Flat Tire
If a tire goes flat, avoid further tire and wheel damage
by driving slowly to a level place. Turn on the hazard
warning flashers. SeeHazard Warning Flashers
on
page 4‑3.
{WARNING:
Changing a tire can be dangerous. The vehicle
can slip off the jack and roll over or fall on you or
other people. You and they could be badly injured
or even killed. Find a level place to change your
tire. To help prevent the vehicle from moving:
1. Set the parking brake firmly.
2. Put an automatic transmission shift lever in P (Park), or shift a manual transmission to
1 (First) or R (Reverse).
(Continued)
WARNING: (Continued)
3. Turn off the engine and do not restart whilethe vehicle is raised.
4. Do not allow passengers to remain in the vehicle.
To be even more certain the vehicle will not move,
you should put blocks at the front and rear of the
tire farthest away from the one being changed.
That would be the tire on the other side, at the
opposite end of the vehicle.
6-70
Page 299 of 368
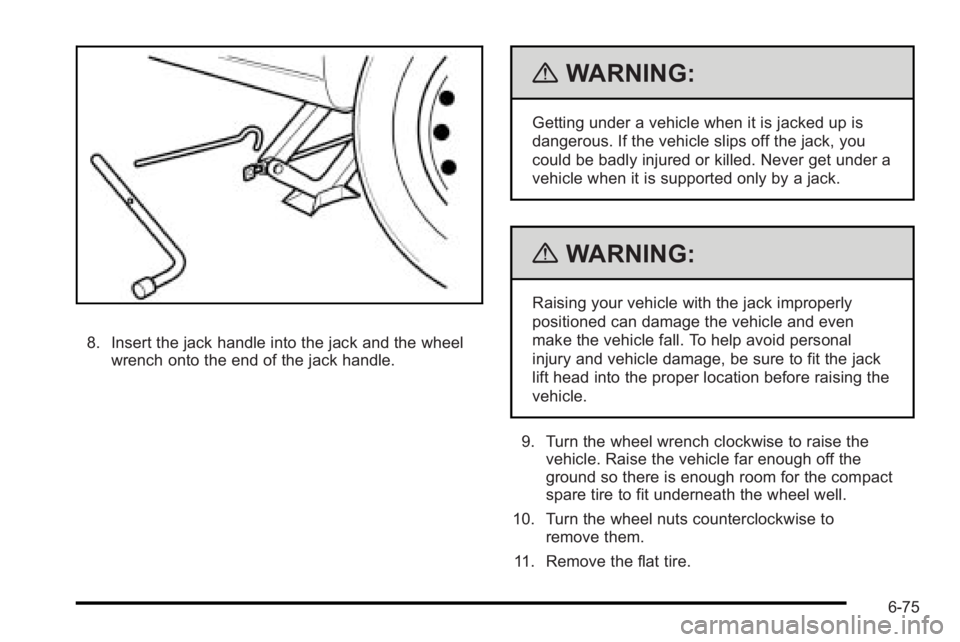
8. Insert the jack handle into the jack and the wheelwrench onto the end of the jack handle.
{WARNING:
Getting under a vehicle when it is jacked up is
dangerous. If the vehicle slips off the jack, you
could be badly injured or killed. Never get under a
vehicle when it is supported only by a jack.
{WARNING:
Raising your vehicle with the jack improperly
positioned can damage the vehicle and even
make the vehicle fall. To help avoid personal
injury and vehicle damage, be sure to fit the jack
lift head into the proper location before raising the
vehicle.
9. Turn the wheel wrench clockwise to raise the vehicle. Raise the vehicle far enough off the
ground so there is enough room for the compact
spare tire to fit underneath the wheel well.
10. Turn the wheel nuts counterclockwise to remove them.
11. Remove the flat tire.
6-75
Page 300 of 368
{WARNING:
Rust or dirt on a wheel, or on the parts to which it
is fastened, can make wheel nuts become loose
after time. The wheel could come off and cause
an accident. When changing a wheel, remove any
rust or dirt from places where the wheel attaches
to the vehicle. In an emergency, use a cloth or a
paper towel to do this; but be sure to use a
scraper or wire brush later, if needed, to get all the
rust or dirt off. SeeChanging a Flat Tire
on
page 6‑70
.
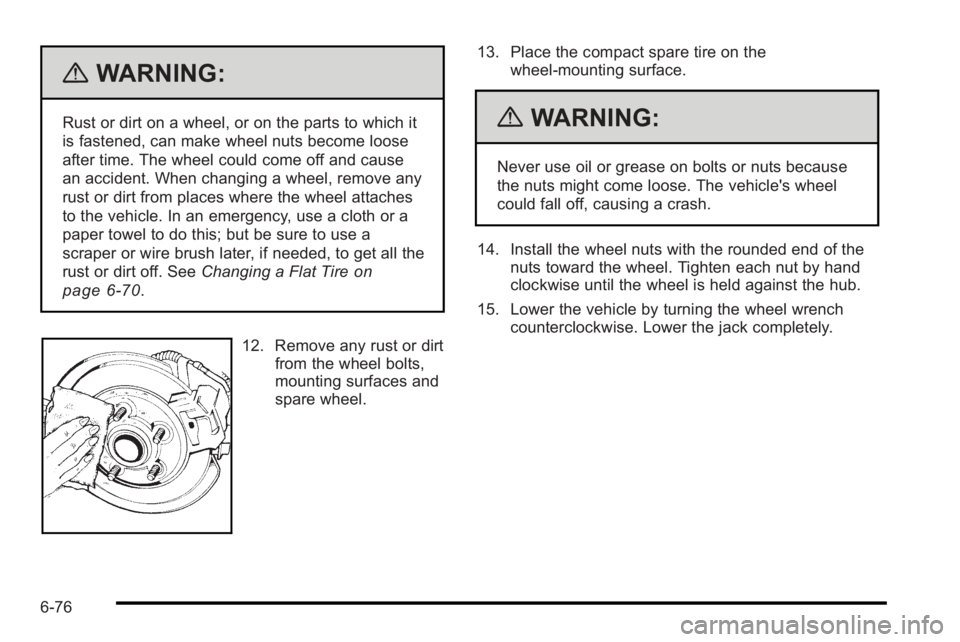
12. Remove any rust or dirt from the wheel bolts,
mounting surfaces and
spare wheel. 13. Place the compact spare tire on the
wheel-mounting surface.
{WARNING:
Never use oil or grease on bolts or nuts because
the nuts might come loose. The vehicle's wheel
could fall off, causing a crash.
14. Install the wheel nuts with the rounded end of the nuts toward the wheel. Tighten each nut by hand
clockwise until the wheel is held against the hub.
15. Lower the vehicle by turning the wheel wrench counterclockwise. Lower the jack completely.
6-76
Page 301 of 368
{WARNING:
Wheel nuts that are improperly or incorrectly
tightened can cause the wheels to become loose
or come off. The wheel nuts should be tightened
with a torque wrench to the proper torque
specification after replacing. Follow the torque
specification supplied by the aftermarket
manufacturer when using accessory locking wheel
nuts. SeeCapacities and Specifications
on
page 6‑93
for original equipment wheel nut
torque specifications.
Notice: Improperly tightened wheel nuts can lead to
brake pulsation and rotor damage. To avoid
expensive brake repairs, evenly tighten the wheel
nuts in the proper sequence and to the proper
torque specification. See Capacities and
Specifications
on page 6‑93for the wheel nut
torque specification.
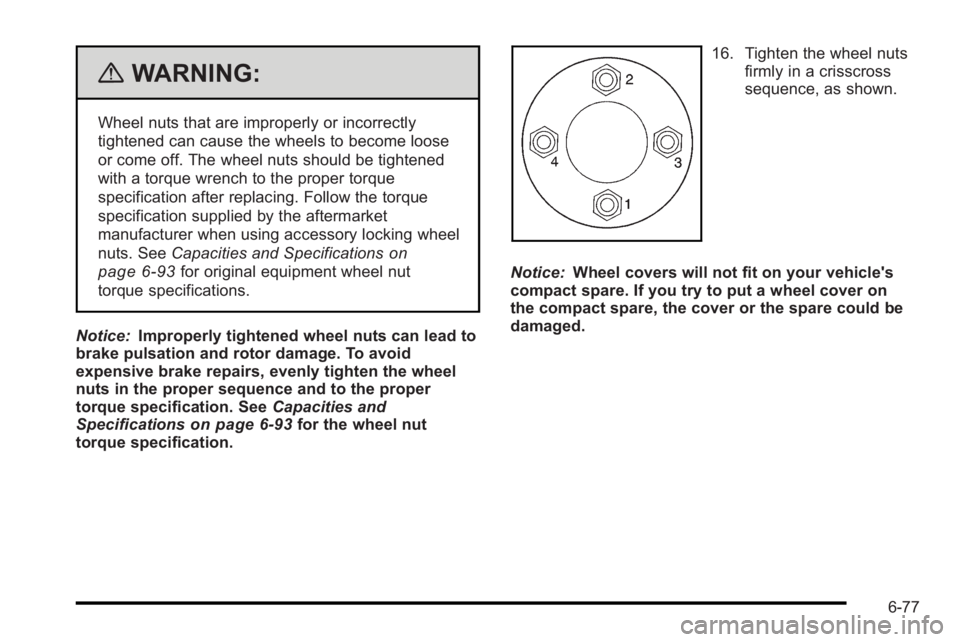
16. Tighten the wheel nuts
firmly in a crisscross
sequence, as shown.
Notice: Wheel covers will not fit on your vehicle's
compact spare. If you try to put a wheel cover on
the compact spare, the cover or the spare could be
damaged.
6-77
Page 302 of 368
Storing a Flat or Spare Tire and
Tools
{WARNING:
Storing a jack, a tire, or other equipment in the
passenger compartment of the vehicle could
cause injury. In a sudden stop or collision, loose
equipment could strike someone. Store all these
in the proper place.
To store a flat or compact spare tire and tools: 1. Store the flat tire or the compact spare in the compact spare tire compartment.
2. Secure the retainer.
3. Store the tools securely in the foam tray and place the tray back in the cargo area.
4. Replace the trim cover.
The compact spare tire is for temporary use only.
Replace the compact spare tire with a full-size tire as
soon as you can. See Compact Spare Tire
on
page 6‑78.
Compact Spare Tire
{WARNING:
Driving with more than one compact spare tire at
a time could result in loss of braking and handling.
This could lead to a crash and you or others could
be injured. Use only one compact spare tire at
a time.
The compact spare tire was fully inflated when the
vehicle was new, it can lose air after a time. Check the
inflation pressure regularly. It should be 60 psi
(414 kPa).
After installing the compact spare on your vehicle, you
should stop as soon as possible and make sure your
spare tire is correctly inflated. The compact spare is
intended to perform well at speeds up to 50 mph
(80 km/h), so you can finish your trip and have your
full-size tire repaired or replaced where you want.
Replace your spare with a full-size tire as soon as
you can.
6-78
Page 306 of 368
Care of Safety Belts
Keep belts clean and dry.
{WARNING:
Do not bleach or dye safety belts. It may severely
weaken them. In a crash, they might not be able
to provide adequate protection. Clean safety belts
only with mild soap and lukewarm water.
Weatherstrips
Silicone grease on weatherstrips will make them last
longer, seal better, and not stick or squeak. Apply
silicone grease with a clean cloth. During very cold,
damp weather frequent application may be required.
Washing Your Vehicle
The best way to preserve the vehicle's finish is to keep
it clean by washing it often.
Notice:Certain cleaners contain chemicals that can
damage the emblems or nameplates on the vehicle.
Check the cleaning product label. If it states that it
should not be used on plastic parts, do not use it on
the vehicle or damage may occur and it would not
be covered by the warranty. Do not wash the vehicle in direct sunlight. Use a car
washing soap. Do not use cleaning agents that are
petroleum based or that contain acid or abrasives, as
they can damage the paint, metal or plastic on the
vehicle. Approved cleaning products can be obtained
from your dealer/retailer. Follow all manufacturers'
directions regarding correct product usage, necessary
safety precautions and appropriate disposal of any
vehicle care product.
Rinse the vehicle well, before washing and after to
remove all cleaning agents completely. If they are
allowed to dry on the surface, they could stain.
Dry the finish with a soft, clean chamois or an all-cotton
towel to avoid surface scratches and water spotting.
High pressure car washes may cause water to enter the
vehicle. Avoid using high pressure washes closer than
12 inches (30 cm) to the surface of the vehicle. Use of
power washers exceeding 1,200 psi (8 274 kPa) can
result in damage or removal of paint and decals.Cleaning Exterior Lamps/Lenses
Use only lukewarm or cold water, a soft cloth and a car
washing soap to clean exterior lamps and lenses.
Follow instructions under
Washing Your Vehicle
on
page 6‑82.
6-82
Page 320 of 368
Maintenance Schedule
Introduction
Notice:Maintenance intervals, checks, inspections,
recommended fluids, and lubricants are necessary
to keep this vehicle in good working condition.
Damage caused by failure to follow scheduled
maintenance might not be covered by the vehicle
warranty.
Proper vehicle maintenance helps to keep the vehicle in
good working condition, improves fuel economy, and
reduces vehicle emissions for better air quality.
Because of all the different ways people use vehicles,
maintenance needs vary. The vehicle might need more
frequent checks and services. Please read the
information under Scheduled Maintenance. To keep the
vehicle in good condition, see your dealer/retailer. The maintenance schedule is for vehicles that:
.carry passengers and cargo within recommended
limits on the Tire and Loading Information label.
See
Loading the Vehicle on page 5‑14.
.are driven on reasonable road surfaces within legal
driving limits.
.use the recommended fuel. See Gasoline Octaneon page 6‑6.
{WARNING:
Performing maintenance work on a vehicle can be
dangerous. In trying to do some jobs, you can be
seriously injured. Do your own maintenance work
only if you have the required know-how and the
proper tools and equipment for the job. If you
have any doubt, see your dealer/retailer to have a
qualified technician do the work. See Doing Your
Own Service Work on page 6‑4.
At your General Motors dealer/retailer, you can be
certain that you will receive the highest level of service
available. Your dealer /retailer has specially trained
service technicians, uses genuine GM replacement
parts, as well as, up to date tools and equipment to
ensure fast and accurate diagnostics.
7-2
Page 327 of 368
Owner Checks and Services
Starter Switch Check
{WARNING:
When you are doing this inspection, the vehicle
could move suddenly. If the vehicle moves, you or
others could be injured.
1. Before starting this check, be sure there is enough room around the vehicle.
2. Firmly apply both the parking brake and the regular brake. See Parking Brake on page 3‑28.
Do not use the accelerator pedal, and be ready to
turn off the engine immediately if it starts. 3. For automatic transmission vehicles, try to start the
engine in each gear. The starter should work only
in P (Park) or N (Neutral). If the starter works in any
other position, your vehicle needs service.
For manual transmission vehicles, put the shift
lever in Neutral, push the clutch pedal down
halfway, and try to start the engine. The starter
should work only when the clutch pedal is pushed
down all the way to the floor. If the starter works
when the clutch pedal is not pushed all the way
down, your vehicle needs service.
7-9
Page 328 of 368

Automatic Transmission Shift Lock
Control System Check
{WARNING:
When you are doing this inspection, the vehicle
could move suddenly. If the vehicle moves, you or
others could be injured.
1. Before starting this check, be sure there is enough room around the vehicle. It should be parked on a
level surface.
2. Firmly apply the parking brake. See Parking Brake
on page 3‑28.
Be ready to apply the regular brake immediately if
the vehicle begins to move.
3. With the engine off, turn the ignition to ON/RUN, but do not start the engine. Without applying the
regular brake, try to move the shift lever out of
P (Park) with normal effort. If the shift lever moves
out of P (Park), contact your dealer/retailer for
service.
Ignition Transmission Lock Check
While parked, and with the parking brake set, try to turn
the ignition to LOCK/OFF in each shift lever position.
.For automatic transmission vehicles, the ignition
should turn to LOCK/OFF only when the shift lever
is in P (Park).
.For manual transmission vehicles, the ignition
should turn to LOCK/OFF only when you press the
key release button.
On all vehicles, the ignition key should come out only in
LOCK/OFF.
Turn the steering wheel to the left and to the right.
It should only lock when turned to the right.
Contact your dealer/retailer if service is required.
7-10