USB port PONTIAC G5 2010 Owners Manual
[x] Cancel search | Manufacturer: PONTIAC, Model Year: 2010, Model line: G5, Model: PONTIAC G5 2010Pages: 422, PDF Size: 2.22 MB
Page 7 of 422
Instrument Panel............................................. .1-2
Initial Drive Information ....................................1-4
Remote Keyless Entry (RKE) System ................1-4
Remote Vehicle Start ..................................... .1-4
Door Locks ................................................... .1-5
Trunk Release .............................................. .1-6
Windows ...................................................... .1-6
Seat Adjustment ............................................ .1-6
Head Restraint Adjustment ...............................1-9
Safety Belt ................................................... .1-9
Sensing System for Passenger Airbag ...............1-9
Mirror Adjustment ........................................ .1-10
Steering Wheel Adjustment ............................1-11
Interior Lighting ........................................... .1-11
Exterior Lighting .......................................... .1-12
Windshield Wiper/Washer ...............................1-13
Climate Controls .......................................... .1-14Vehicle Features
............................................ .1-14
Radio(s) ..................................................... .1-14
Satellite Radio ............................................. .1-16
Portable Audio Devices (Auxiliary Input or USB Port) ............................................... .1-16
Steering Wheel Controls ................................1-17
Bluetooth
®.................................................. .1-17
Cruise Control ............................................. .1-18
Power Outlets ............................................. .1-18
Performance and Maintenance .........................1-18
Traction Control System (TCS) .......................1-18
Electronic Stability Control (ESC) ....................1-19
Tire Pressure Monitor ................................... .1-19
Tire Sealant and Compressor Kit ....................1-20
Engine Oil Life System ................................. .1-20
Driving for Better Fuel Economy .....................1-21
Roadside Assistance Program ........................1-21
OnStar
®..................................................... .1-22
Section 1 In Brief
1-1
Page 20 of 422
Climate Controls
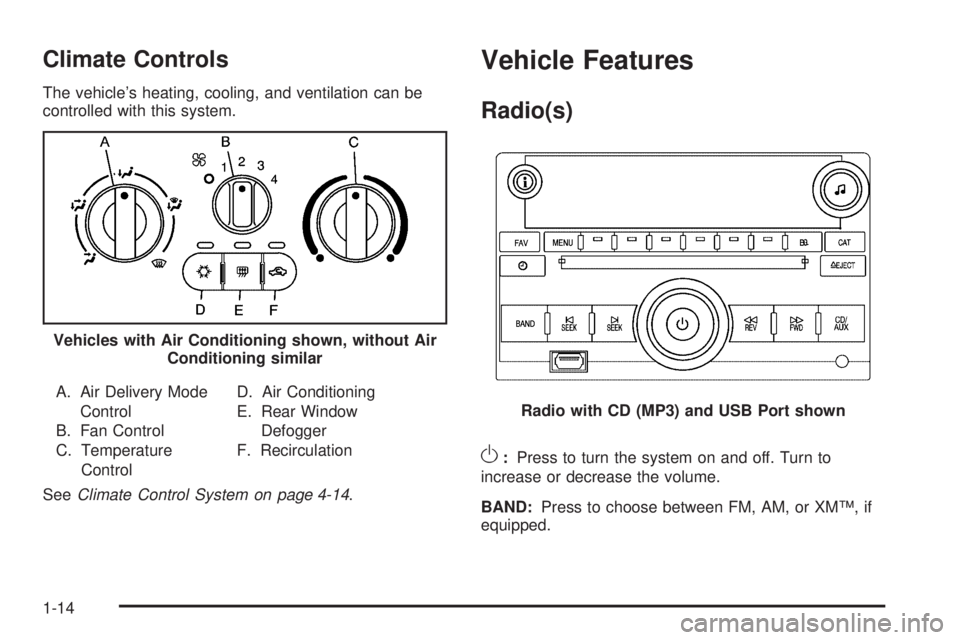
The vehicle’s heating, cooling, and ventilation can be
controlled with this system.A. Air Delivery Mode Control
B. Fan Control
C. Temperature Control D. Air Conditioning
E. Rear Window
Defogger
F. Recirculation
See Climate Control System on page 4-14 .
Vehicle Features
Radio(s)
O:Press to turn the system on and off. Turn to
increase or decrease the volume.
BAND: Press to choose between FM, AM, or XM™, if
equipped.
Vehicles with Air Conditioning shown, without Air
Conditioning similar
Radio with CD (MP3) and USB Port shown
1-14
Page 21 of 422
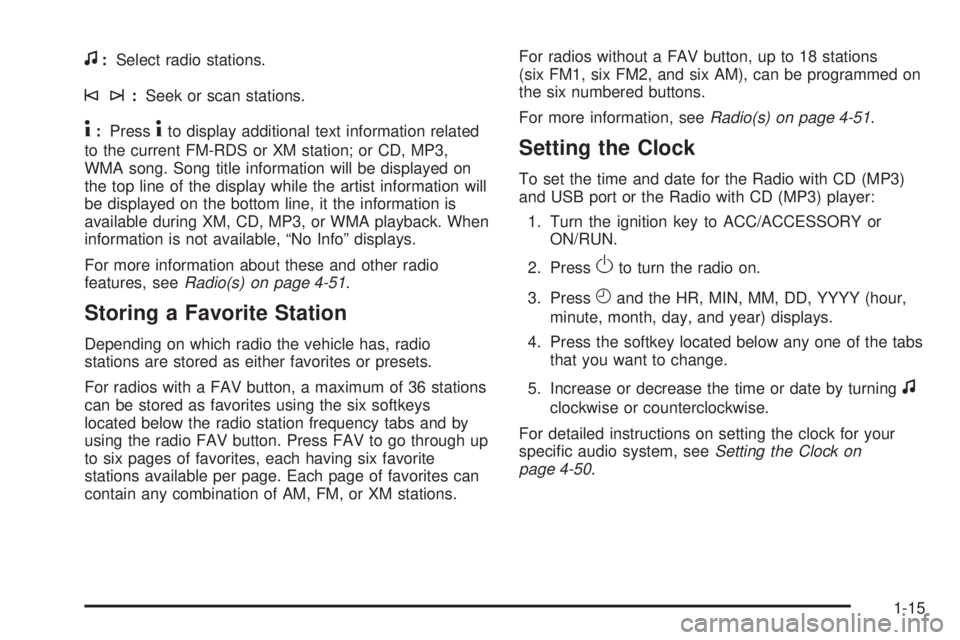
f:Select radio stations.
©¨:Seek or scan stations.
4:Press4to display additional text information related
to the current FM-RDS or XM station; or CD, MP3,
WMA song. Song title information will be displayed on
the top line of the display while the artist information will
be displayed on the bottom line, it the information is
available during XM, CD, MP3, or WMA playback. When
information is not available, “No Info” displays.
For more information about these and other radio
features, see Radio(s) on page 4-51 .
Storing a Favorite Station
Depending on which radio the vehicle has, radio
stations are stored as either favorites or presets.
For radios with a FAV button, a maximum of 36 stations
can be stored as favorites using the six softkeys
located below the radio station frequency tabs and by
using the radio FAV button. Press FAV to go through up
to six pages of favorites, each having six favorite
stations available per page. Each page of favorites can
contain any combination of AM, FM, or XM stations. For radios without a FAV button, up to 18 stations
(six FM1, six FM2, and six AM), can be programmed on
the six numbered buttons.
For more information, see
Radio(s) on page 4-51.
Setting the Clock
To set the time and date for the Radio with CD (MP3)
and USB port or the Radio with CD (MP3) player:
1. Turn the ignition key to ACC/ACCESSORY or ON/RUN.
2. Press
Oto turn the radio on.
3. Press
Hand the HR, MIN, MM, DD, YYYY (hour,
minute, month, day, and year) displays.
4. Press the softkey located below any one of the tabs that you want to change.
5. Increase or decrease the time or date by turning
f
clockwise or counterclockwise.
For detailed instructions on setting the clock for your
specific audio system, see Setting the Clock on
page 4-50.
1-15
Page 22 of 422

Satellite Radio
XM is a satellite radio service that is based in the 48
contiguous United States and 10 Canadian provinces.
XM satellite radio has a wide variety of programming
and commercial-free music, coast-to-coast, and in
digital-quality sound.
A fee is required to receive the XM service.
For more information, refer to:
•www.xmradio.com or call 1-800-929-2100 (U.S.)
•www.xmradio.ca or call 1-877-438-9677 (Canada)
See “XM Satellite Radio Service” under Radio(s)
on page 4-51.
Portable Audio Devices (Auxiliary
Input or USB Port)
This vehicle may have an auxiliary input jack and a
USB port, located on the audio faceplate. External
devices such as iPods
®, laptop computers, MP3 players,
CD changers, USB storage devices, etc. can be
connected to the auxiliary input jack using a 3.5 mm
(1/8 in) cable or the USB port depending on the audio
system.
Press the CD/AUX button to play audio from the
portable player.
See “Using the Auxiliary Input Jack” and “Using the
USB Port” under Radio(s) on page 4-51 .
1-16
Page 23 of 422
Steering Wheel Controls
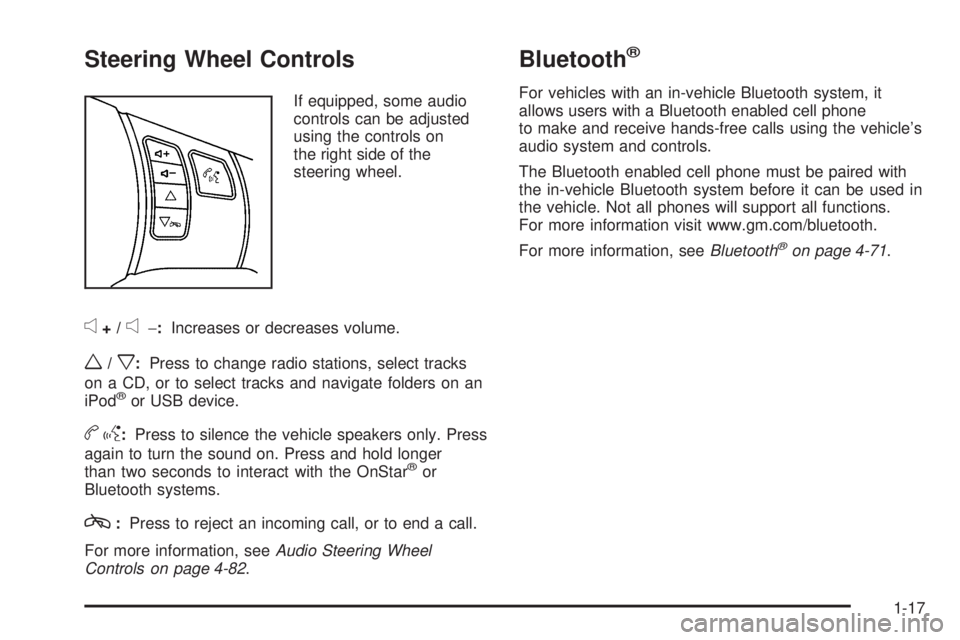
If equipped, some audio
controls can be adjusted
using the controls on
the right side of the
steering wheel.
e+/e−:Increases or decreases volume.
w/x:Press to change radio stations, select tracks
on a CD, or to select tracks and navigate folders on an
iPod
®or USB device.
b g: Press to silence the vehicle speakers only. Press
again to turn the sound on. Press and hold longer
than two seconds to interact with the OnStar
®or
Bluetooth systems.
c: Press to reject an incoming call, or to end a call.
For more information, see Audio Steering Wheel
Controls on page 4-82 .
Bluetooth®
For vehicles with an in-vehicle Bluetooth system, it
allows users with a Bluetooth enabled cell phone
to make and receive hands-free calls using the vehicle’s
audio system and controls.
The Bluetooth enabled cell phone must be paired with
the in-vehicle Bluetooth system before it can be used in
the vehicle. Not all phones will support all functions.
For more information visit www.gm.com/bluetooth.
For more information, see Bluetooth
®on page 4-71.
1-17
Page 190 of 422
Setting the Clock
Without Date Display
AM/FM Base Radio with a Single CD
Player
To set the time:1. Turn the ignition key to ACC/ACCESSORY or ON/RUN. Press
Oto turn the radio on.
2. Press
Huntil the hour begins flashing on the
display. Press
Ha second time and the minute
begins flashing on the display.
3. While either the hour or the minute numbers are flashing, turn
fto increase or decrease the time.
4. Press
Hagain until the clock display stops flashing
to set the currently displayed time; otherwise, the
flashing stops after five seconds and the current
time displayed is automatically set.
To change the time default setting from 12 hour to
24 hour, press the
Hbutton until 12H or 24H is displayed.
Once 12H or 24H is displayed, turn the
fknob to the
desired option to select the setting. Press the
Hbutton
again to apply the setting, or let the screen time out.
With Date Display
Radio with CD (MP3) and USB Port, and
Radio with Single CD (MP3) Player
To set the time and date:
1. Turn the ignition key to ACC/ACCESSORY or ON/RUN. Press
Oto turn the radio on.
2. Press
Hand the HR, MIN, MM, DD, YYYY (hour,
minute, month, day, and year) displays.
3. Press the softkey located below any one of the tabs that you want to change.
4. To increase the time or date do one of the following:
•Press the softkey located below the selected tab.
•Press¨SEEK, or\FWD.
•Turnfclockwise.
5. To decrease the time or date do one of the following:
•Press©SEEK orsREV.
•Turnfcounterclockwise.
4-50
Page 192 of 422
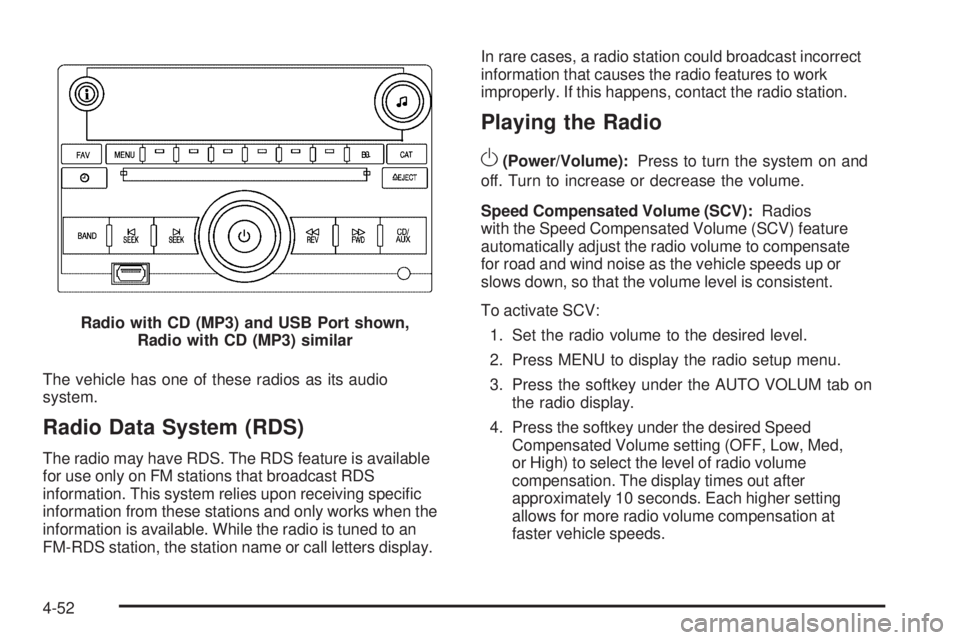
The vehicle has one of these radios as its audio
system.
Radio Data System (RDS)
The radio may have RDS. The RDS feature is available
for use only on FM stations that broadcast RDS
information. This system relies upon receiving specific
information from these stations and only works when the
information is available. While the radio is tuned to an
FM-RDS station, the station name or call letters display.In rare cases, a radio station could broadcast incorrect
information that causes the radio features to work
improperly. If this happens, contact the radio station.
Playing the Radio
O
(Power/Volume):
Press to turn the system on and
off. Turn to increase or decrease the volume.
Speed Compensated Volume (SCV): Radios
with the Speed Compensated Volume (SCV) feature
automatically adjust the radio volume to compensate
for road and wind noise as the vehicle speeds up or
slows down, so that the volume level is consistent.
To activate SCV:
1. Set the radio volume to the desired level.
2. Press MENU to display the radio setup menu.
3. Press the softkey under the AUTO VOLUM tab on the radio display.
4. Press the softkey under the desired Speed Compensated Volume setting (OFF, Low, Med,
or High) to select the level of radio volume
compensation. The display times out after
approximately 10 seconds. Each higher setting
allows for more radio volume compensation at
faster vehicle speeds.
Radio with CD (MP3) and USB Port shown,
Radio with CD (MP3) similar
4-52
Page 193 of 422
Finding a Station
BAND:Press to choose between FM1, FM2, AM, or
XM™ (if equipped) on the Radio with CD (Base). Press
to choose between FM, AM, XM (if equipped) on the
Radio with CD (MP3) and USB Port or the Radio
with CD (MP3).
f(Tune): Turn to select radio stations.
©SEEK:Press to seek or scan stations with a strong
signal in the selected band.
•To seek stations, press and release©SEEK to go
to the previous station and stay there.
•To scan stations, press and hold©SEEK for a few
seconds until the radio beeps once. The radio goes
to a station, plays for a few seconds, then goes to the
next station. Press
©SEEK again to stop scanning.
•To scan preset stations in the selected band, press
and hold
©SEEK for four seconds until a double
beep sounds. The radio goes to a stored preset,
plays for a few seconds, then goes to the next stored
preset. Press
©SEEK again to stop scanning preset
stations.
¨SEEK: Press to seek or scan stations with a strong
signal in the selected band.
•To seek stations, press and release¨SEEK to go
to the next station and stay there.
•To scan stations, press and hold¨SEEK for a few
seconds until the radio beeps once. The radio goes
to a station, plays for a few seconds, then goes to the
next station. Press
¨SEEK again to stop scanning.
•To scan preset stations in the selected band, press
and hold
¨SEEK for four seconds until a double
beep sounds. The radio goes to a stored preset,
plays for a few seconds, then goes to the next stored
preset. Press
¨SEEK again to stop scanning preset
stations.
4(Information): For vehicles with the Radio with CD
(Base), press to switch the display between the radio
station frequency and the time. While the ignition is off,
press
4to display the time.
For vehicles with XM, MP3, WMA, or RDS features, press
4to display additional text information related to the
current FM-RDS or XM station; or CD, MP3, WMA song.
Song title information will be displayed on the top line of
the display while the artist information will be displayed
on the bottom line, it the information is available during
XM, CD, MP3, or WMA playback. When information is
not available, “No Info” displays.
4-53
Page 196 of 422
Setting the Tone
(Bass/Midrange/Treble)
BASS/MID/TREB (Bass, Midrange, or Treble):The
radio may display some or all tones such as BASS, MID,
and TREB.
To adjust the tone settings on the Radio with CD (Base):
Press
funtil the tone control labels display, then
turn
fto change the setting.
To adjust the tone settings on the Radio with CD (MP3)
and USB Port or the Radio with CD (MP3):
1. Press
funtil the tone control tabs display.
2. Press the softkey below the desired tab to be adjusted.
3. To increase the level of the bass, midrange, or treble:
•Press¨SEEK, or\FWD.
•Turnfclockwise. 4. To decrease the level of the bass, midrange, or
treble:
•Press©SEEK, orsREV.
•Turnfcounterclockwise.
The radio may be capable of adjusting bass, midrange,
or treble to the middle position by pressing the softkey
below the BASS, MID, or TREB tab for more than
two seconds. The radio beeps once and the level
adjusts to the middle position.
The radio may also be capable of adjusting all tone and
speaker controls to the middle position by pressing
ffor
more than two seconds until the radio beeps once.
If a station’s frequency is weak, or has static, decrease
the treble.
EQ (Equalization): Press this button to select preset
equalization settings.
To return to the manual mode, press EQ until Manual
displays or start to manually adjust the bass, midrange,
or treble by pressing
f.
4-56
Page 202 of 422
To use a portable audio player, connect a 3.5 mm (1/8 in)
cable to the radio’s front auxiliary input jack. When a
device is connected, press the radio CD/AUX button to
begin playing audio from the device over the vehicle
speakers.
O(Power/Volume):Turn to adjust the volume.
Additional volume adjustments may have to be made
from the portable device if the volume is too quiet or
not loud.
BAND: Press to listen to the radio while a portable audio
device is connected to the auxiliary input. The portable
audio device continues playing until it is stopped or
turned off.
CD/AUX (CD/Auxiliary): Press to play a CD while a
portable audio device is connected to the auxiliary input.
Press again and the system begins playing audio
from the connected portable audio player. If a portable
audio player is not connected, No Aux Input Device
may display.
Using the USB Port
Radio’s with a USB port can control a USB storage
device or an iPod®using the radio buttons and knobs.
See Using an MP3 on page 4-63 for information about
how to connect and control a USB storage device or
an iPod.
USB Support
The USB connector is located on the front of the radio
and uses the USB 2.0 standard.
USB Supported Devices
•
USB Flash Drives
•Portable USB Hard Drives
•Fifth generation or later iPod
•iPod nano
•iPod touch
•iPod classic
Not all iPods and USB Drives are compatible with the
USB port.
Make sure the iPod has the latest firmware from
Apple
®for proper operation. iPod firmware can
be updated using the latest iTunes®application.
See www.apple.com/itunes.
For help with identifying your iPod, go to
www.apple.com/support.
4-62