brake PONTIAC G5 2010 User Guide
[x] Cancel search | Manufacturer: PONTIAC, Model Year: 2010, Model line: G5, Model: PONTIAC G5 2010Pages: 422, PDF Size: 2.22 MB
Page 131 of 422
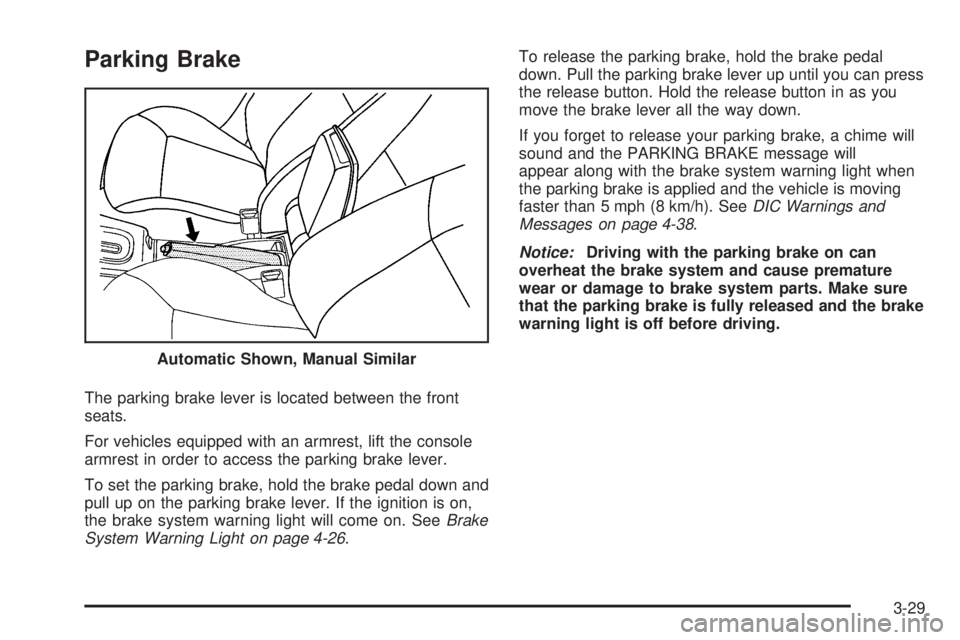
Parking Brake
The parking brake lever is located between the front
seats.
For vehicles equipped with an armrest, lift the console
armrest in order to access the parking brake lever.
To set the parking brake, hold the brake pedal down and
pull up on the parking brake lever. If the ignition is on,
the brake system warning light will come on. SeeBrake
System Warning Light on page 4-26 .To release the parking brake, hold the brake pedal
down. Pull the parking brake lever up until you can press
the release button. Hold the release button in as you
move the brake lever all the way down.
If you forget to release your parking brake, a chime will
sound and the PARKING BRAKE message will
appear along with the brake system warning light when
the parking brake is applied and the vehicle is moving
faster than 5 mph (8 km/h). See
DIC Warnings and
Messages on page 4-38 .
Notice: Driving with the parking brake on can
overheat the brake system and cause premature
wear or damage to brake system parts. Make sure
that the parking brake is fully released and the brake
warning light is off before driving.
Automatic Shown, Manual Similar
3-29
Page 132 of 422

Shifting Into Park
(Automatic Transmission)
{WARNING:
It can be dangerous to get out of the vehicle if the
shift lever is not fully in P (Park) with the parking
brake firmly set. The vehicle can roll. If you have
left the engine running, the vehicle can move
suddenly. You or others could be injured. To be
sure the vehicle will not move, even when you are
on fairly level ground, use the steps that follow. If
you are pulling a trailer, seeTowing a Trailer
(Automatic Transmission) on page 5-33 orTowing
a Trailer (Manual Transmission) on page 5-39 .
To shift into P (Park): 1. Hold the brake pedal down and set the parking brake. See Parking Brake on page 3-29 for more
information.
2. Move the shift lever into P (Park) by holding in the button on the shift lever and pushing the lever all
the way toward the front of the vehicle.
3. Turn the ignition key to LOCK/OFF.
Leaving the Vehicle With the Engine
Running (Automatic Transmission)
{WARNING:
It can be dangerous to leave the vehicle with the
engine running. The vehicle could move suddenly
if the shift lever is not fully in P (Park) with the
parking brake firmly set. And, if you leave the
vehicle with the engine running, it could overheat
and even catch fire. You or others could be
injured. Do not leave the vehicle with the engine
running.
If you have to leave an automatic transmission vehicle
with the engine running, be sure the vehicle is in
P (Park) and the parking brake is firmly set before you
leave it. After you have moved the shift lever into
P (Park), hold the brake pedal down. Then, see if you
can move the shift lever away from P (Park) without first
pushing the button. If you can, it means that the shift
lever was not fully locked into P (Park).
3-30
Page 133 of 422
Torque Lock (Automatic Transmission)
If you are parking on a hill and you do not shift into
P (Park) properly, the weight of the vehicle may put too
much force on the parking pawl in the transmission.
You may find it difficult to pull the shift lever out of
P (Park). This is called “torque lock.” To prevent torque
lock, set the parking brake and then shift into P (Park)
properly before you leave the driver seat. To find
out how, seeShifting Into Park (Automatic Transmission)
on page 3-30.
Move the shift lever out of P (Park) before you release
the parking brake.
If torque lock does occur, you may need to have
another vehicle push yours a little uphill to take some of
the pressure from the parking pawl in the transmission,
so you can pull the shift lever out of P (Park).
Shifting Out of Park
(Automatic Transmission)
This vehicle is equipped with an electronic shift lock
release system. The shift lock release is designed to:
•Prevent ignition key removal unless the shift
lever is in P (Park) with the shift lever button fully
released, and
•Prevent movement of the shift lever out of P (Park)
unless the ignition is in ON/RUN or ACC/
ACCESSORY and the regular brake pedal is applied.
The shift lock release is always functional except in the
case of a an uncharged or low voltage (less than 9 volt)
battery.
If the vehicle has an uncharged battery or a battery with
low voltage, try charging or jump starting the battery.
See Jump Starting on page 6-34 for more information.
To shift out of P (Park): 1. Apply the brake pedal.
2. Then press the shift lever button.
3. Move the shift lever to the desired position.
3-31
Page 134 of 422

If you still are unable to shift out of P (Park):1. Fully release the shift lever button.
2. While holding down the brake pedal, press the shift lever button again.
3. Move the shift lever to the desired position.
If you still cannot move the shift lever from P (Park),
consult your dealer/retailer or a professional towing
service.
Parking the Vehicle
(Manual Transmission)
Before leaving the vehicle, fully press the clutch pedal
down, move the shift lever into R (Reverse), and
firmly apply the parking brake. Once the shift lever has
been placed in R (Reverse) with the clutch pedal
pressed down, the ignition key can be turned to
LOCK/OFF, then remove the key and release the clutch
pedal. See Manual Transmission Operation on
page 3-27.
Parking Over Things That Burn
{WARNING:
Things that can burn could touch hot exhaust
parts under the vehicle and ignite. Do not park
over papers, leaves, dry grass, or other things that
can burn.
3-32
Page 136 of 422

Running the Vehicle While Parked
It is better not to park with the engine running. But if you
ever have to, here are some things to know.
{WARNING:
Idling a vehicle in an enclosed area with poor
ventilation is dangerous. Engine exhaust may
enter the vehicle. Engine exhaust contains Carbon
Monoxide (CO) which cannot be seen or smelled.
It can cause unconsciousness and even death.
Never run the engine in an enclosed area that has
no fresh air ventilation. For more information, see
Engine Exhaust on page 3-33.
{WARNING:
It can be dangerous to get out of the vehicle if the
automatic transmission shift lever is not fully in
P (Park) with the parking brake firmly set. The
vehicle can roll. Do not leave the vehicle when the
engine is running unless you have to. If you have
left the engine running, the vehicle can move
suddenly. You or others could be injured. To be
sure the vehicle will not move, even when you are
on fairly level ground, always set the parking
brake and move the shift lever to P (Park).
Follow the proper steps to be sure the vehicle will not
move. See Shifting Into Park (Automatic Transmission)
on page 3-30.
If parking on a hill and pulling a trailer, see Towing a
Trailer (Automatic Transmission) on page 5-33 or
Towing a Trailer (Manual Transmission) on page 5-39 .
3-34
Page 141 of 422
Instrument Panel Overview...............................4-3
Hazard Warning Flashers ................................4-3
Horn ............................................................ .4-3
Tilt Wheel .................................................... .4-3
Turn Signal/Multifunction Lever .........................4-4
Turn and Lane-Change Signals ........................4-4
Headlamp High/Low-Beam Changer ..................4-5
Flash-to-Pass ................................................ .4-5
Windshield Wipers ......................................... .4-5
Windshield Washer ........................................ .4-6
Cruise Control ............................................... .4-7
Headlamps ................................................... .4-9
Wiper Activated Headlamps ............................4-10
Headlamps on Reminder ................................4-10
Daytime Running Lamps (DRL) .......................4-10
Fog Lamps ................................................. .4-11
Instrument Panel Brightness ...........................4-11
Dome Lamp ................................................ .4-11
Entry/Exit Lighting ........................................ .4-12
Mirror Reading Lamps .................................. .4-12
Electric Power Management ...........................4-12Battery Run-Down Protection
..........................4-13
Accessory Power Outlet(s) .............................4-13
Ashtray(s) and Cigarette Lighter ......................4-14
Climate Controls ........................................... .4-14
Climate Control System .................................4-14
Outlet Adjustment ........................................ .4-17
Passenger Compartment Air Filter ...................4-18
Warning Lights, Gages, and Indicators ............4-19
Instrument Panel Cluster ................................4-20
Speedometer and Odometer ...........................4-21
Tachometer ................................................ .4-21
Safety Belt Reminders .................................. .4-22
Airbag Readiness Light ................................. .4-23
Passenger Airbag Status Indicator ...................4-24
Charging
System Light ................................. .4-25
Up-Shift Light .............................................. .4-25
Brake System Warning Light ..........................4-26
Antilock Brake System (ABS) Warning Light .....4-27
Enhanced Traction System (ETS) Indicator/ Warning Light .......................................... .4-27
Section 4 Instrument Panel
4-1
Page 147 of 422
Cruise Control
With cruise control, a speed of about 40 km/h (25 mph)
or more can be maintained without keeping your foot
on the accelerator. Cruise control does not work
at speeds below 40 km/h (25 mph).
The brake must be applied at least one time, after the
vehicle has been started, before cruise control will
function.
{WARNING:
Cruise control can be dangerous where you
cannot drive safely at a steady speed. So, do not
use the cruise control on winding roads or in
heavy traffic.
Cruise control can be dangerous on slippery roads.
On such roads, fast changes in tire traction can
cause excessive wheel slip, and you could lose
control. Do not use cruise control on slippery roads.
Setting Cruise Control
{WARNING:
If you leave your cruise control on when you are not
using cruise, you might hit a button and go into
cruise when you do not want to. You could be
startled and even lose control. Keep the cruise
control switch off until you want to use cruise
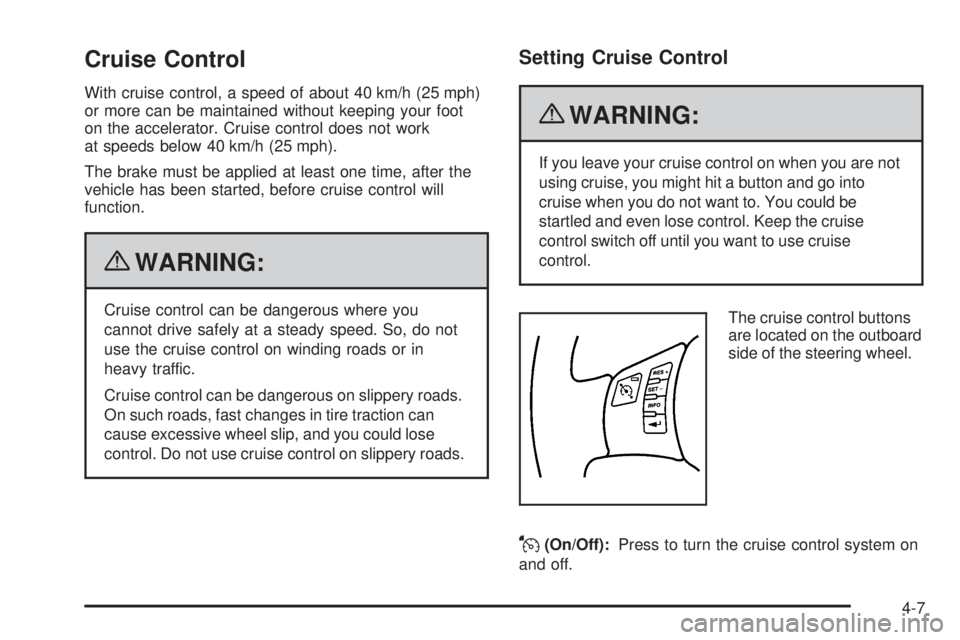
control.The cruise control buttons
are located on the outboard
side of the steering wheel.
J(On/Off):Press to turn the cruise control system on
and off.
4-7
Page 148 of 422
RES+ (Resume):Press to resume a set speed and to
accelerate the speed.
SET– (Set): Press to set a speed and to decrease the
speed.
To set a speed do the following:
1. Press
Jto turn the cruise control on. The indicator
light on the button will come on.
2. Get to the speed desired.
3. Press the SET– part of the control button and release it. The CRUISE ENGAGED message
will appear on the Driver Information Center (DIC)
to show the system is engaged.
4. Take your foot off the accelerator pedal.
Resuming a Set Speed
Suppose the cruise control is set at a desired speed
and then the brake is applied. This disengages the
cruise control. To return to the previously set speed,
you do not need to go through the set process again.
Once the vehicle is traveling at least 40 km/h (25 mph)
or more, press the RES+ part of the button briefly.
The vehicle returns to the previously selected speed and
stays there.
Increasing Speed While Using Cruise
Control
There are two ways to go to a higher speed. 1. Disengage the cruise control by applying the brake pedal, but do not turn it off. Accelerate to a higher
speed and reset the cruise control.
2. If the cruise control system is already engaged, press the RES+ part of the button. Hold it there until you
get up to the speed desired, and then release the
button. To increase the vehicle speed in very small
amounts, press the RES+ part of the button briefly
and then release it. Each time this is done, the
vehicle goes about 1.6 km/h (1 mph) faster.
Reducing Speed While Using Cruise
Control
If the cruise control system is already engaged,
•Push and hold the SET– part of the button until the
lower speed desired is reached, then release it.
•To slow down in very small amounts, push the
SET– part of the button briefly. Each time this
is done, the vehicle goes about 1.6 km/h (1 mph)
slower.
4-8
Page 149 of 422
Passing Another Vehicle While Using
Cruise Control
Use the accelerator pedal to increase the vehicle’s
speed. When you take your foot off the pedal, the
vehicle will slow down to the cruise control speed
you set earlier.
Using Cruise Control on Hills
How well the cruise control will work on hills depends
upon the vehicle speed, load, and the steepness of the
hills. When going up steep hills, you might have to step
on the accelerator pedal to maintain the vehicle’s speed.
When going downhill, you might have to brake or shift to
a lower gear to keep the vehicle’s speed down. Applying
the brake will turn off the cruise control.
Ending Cruise Control
There are two ways to end cruise control:
•Step lightly on the brake pedal or the clutch pedal if
the vehicle has a manual transmission. This will
only end the current cruise control session.
•PressJto turn the system completely off.
Erasing Speed Memory
The cruise control set speed memory is erased when
the cruise control or the ignition is turned off.
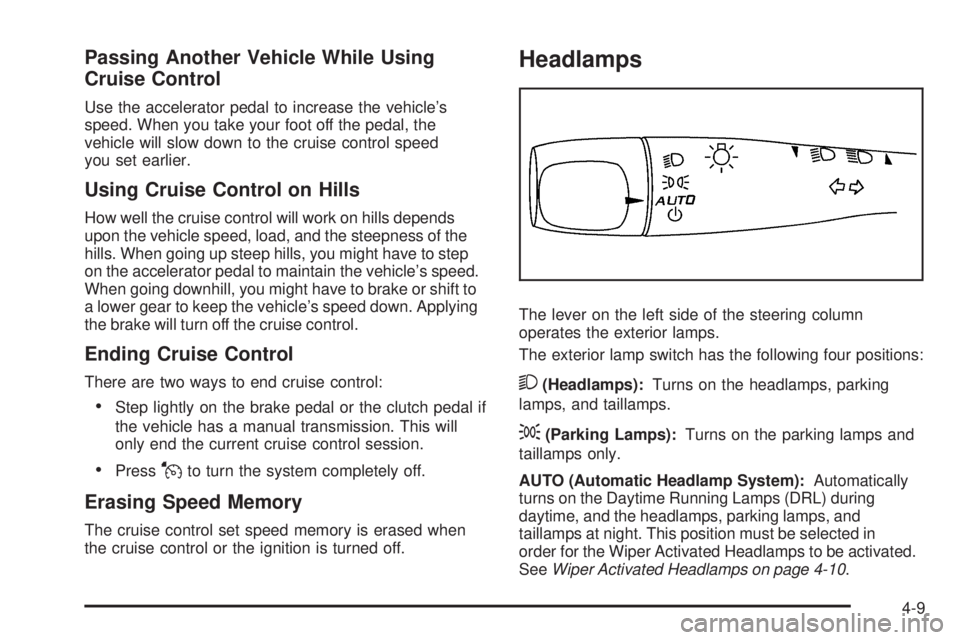
Headlamps
The lever on the left side of the steering column
operates the exterior lamps.
The exterior lamp switch has the following four positions:
2(Headlamps):Turns on the headlamps, parking
lamps, and taillamps.
;(Parking Lamps): Turns on the parking lamps and
taillamps only.
AUTO (Automatic Headlamp System): Automatically
turns on the Daytime Running Lamps (DRL) during
daytime, and the headlamps, parking lamps, and
taillamps at night. This position must be selected in
order for the Wiper Activated Headlamps to be activated.
See Wiper Activated Headlamps on page 4-10 .
4-9
Page 150 of 422

P(Off/On):When operating in AUTO, a momentary
turn of the switch to Off/On will turn the Automatic
Headlamp System off or back on. For vehicles first
sold in Canada, the automatic transmission must be
in P (Park) or the manual transmission must have the
park brake set, before the Automatic Headlamp System
can be turned off.
Wiper Activated Headlamps
The headlamps and parking lamps are activated
15 seconds after the windshield wipers are turned on.
For this feature to work, automatic lighting must be
enabled. See Headlamps on page 4-9 for additional
information.
When the ignition is turned off, the wiper-activated
headlamps will immediately turn off. They also turn
off 15 seconds after the windshield wiper control
is turned off.
Headlamps on Reminder
If the drivers door is opened with the ignition off and the
lamps on, a warning chime will sound. This indicates
that the headlamps are still on.
Daytime Running Lamps (DRL)
Daytime Running Lamps (DRL) can make it easier for
others to see the front of your vehicle during the day.
DRL can be helpful in many different driving conditions,
but they can be especially helpful in the short periods
after dawn and before sunset. Fully functional daytime
running lamps are required on all vehicles first sold in
Canada.
The vehicle has a light sensor on top of the instrument
panel. Make sure it is not covered or the headlamps
will come on when you do not need them.
The DRL system will make the headlamps come on at
reduced intensity when the following conditions are met:
•The ignition is on.
•The exterior lamp control is turned to AUTO.
•The light sensor detects daytime light.
•The shift lever is not in P (Park).
While the DRL system is on, the taillamps, sidemarker
lamps, and instrument panel lights will not be illuminated.
The DRL system will be off any time the vehicle is in
P (Park). The DRL system on U.S. vehicles can also be
turned off by using the off/on switch for one ignition cycle.
The regular headlamp system should be used when
needed.
4-10