engine coolant PONTIAC G5 2010 Owners Manual
[x] Cancel search | Manufacturer: PONTIAC, Model Year: 2010, Model line: G5, Model: PONTIAC G5 2010Pages: 422, PDF Size: 2.22 MB
Page 5 of 422
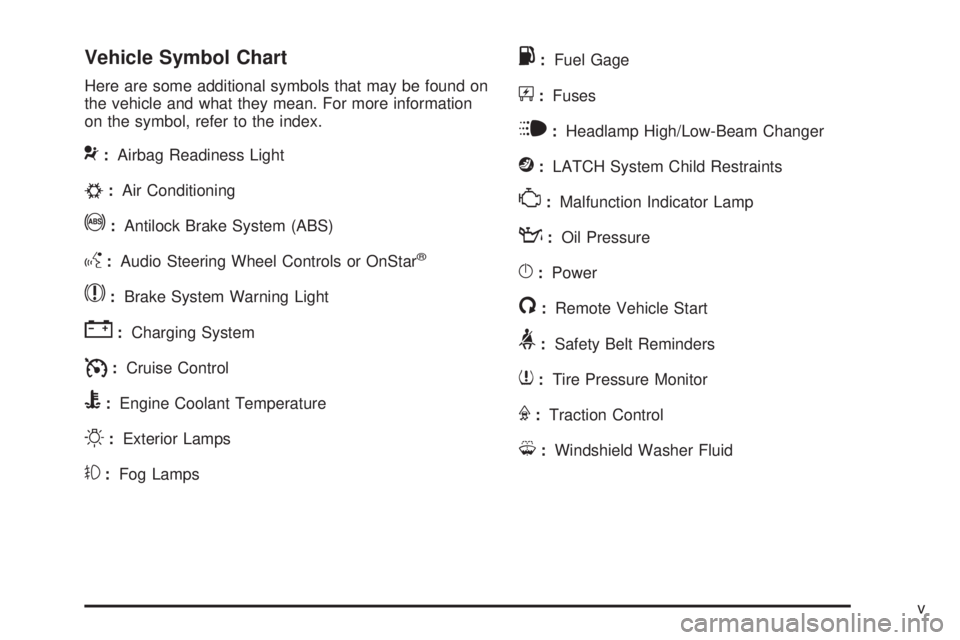
Vehicle Symbol Chart
Here are some additional symbols that may be found on
the vehicle and what they mean. For more information
on the symbol, refer to the index.
9:Airbag Readiness Light
#:Air Conditioning
!:Antilock Brake System (ABS)
g:Audio Steering Wheel Controls or OnStar®
$:Brake System Warning Light
":Charging System
I:Cruise Control
B:Engine Coolant Temperature
O:Exterior Lamps
#:Fog Lamps
.:Fuel Gage
+:Fuses
i:Headlamp High/Low-Beam Changer
j:LATCH System Child Restraints
*:Malfunction Indicator Lamp
::Oil Pressure
}:Power
/:Remote Vehicle Start
>:Safety Belt Reminders
7:Tire Pressure Monitor
F:Traction Control
M:Windshield Washer Fluid
v
Page 103 of 422
Keys.............................................................. .3-2
Remote Keyless Entry (RKE) System ................3-3
Remote Keyless Entry (RKE) System Operation .................................................. .3-3
Remote Vehicle Start ..................................... .3-6
Doors and Locks ............................................ .3-8
Door Locks ................................................... .3-8
Power Door Locks ......................................... .3-9
Delayed Locking ............................................ .3-9
Automatic Door Lock ...................................... .3-9
Programmable Automatic Door Unlock .............3-10
Rear Door Security Locks (Sedan) ..................3-10
Lockout Protection ....................................... .3-11
Trunk ......................................................... .3-11
Windows ....................................................... .3-13
Manual Windows ......................................... .3-13
Power Windows ........................................... .3-14
Sun Visors .................................................. .3-15
Theft-Deterrent Systems ..................................3-15
Content Theft-Deterrent .................................3-15
PASS-Key
®III+ Electronic Immobilizer .............3-17
PASS-Key®III+ Electronic Immobilizer
Operation ................................................ .3-17
Starting and Operating Your Vehicle ................3-19
New Vehicle Break-In ................................... .3-19
Ignition Positions ......................................... .3-19
Retained Accessory Power (RAP) ...................3-22Starting the Engine
...................................... .3-22
Engine Coolant Heater ................................. .3-23
Automatic Transmission Operation ...................3-24
Manual Transmission Operation ......................3-27
Parking Brake ............................................. .3-29
Shifting Into Park (Automatic Transmission) ............................3-30
Shifting Out of Park (Automatic Transmission) ............................3-31
Parking the Vehicle (Manual Transmission) ...............................3-32
Parking Over Things That Burn .......................3-32
Engine Exhaust ........................................... .3-33
Running the Vehicle While Parked ..................3-34
Mirrors .......................................................... .3-35
Manual Rearview Mirror .................................3-35
Outside Remote Control Mirror .......................3-35
Outside Power Mirrors .................................. .3-35
Outside Convex Mirror .................................. .3-36
Storage Areas ............................................... .3-36
Glove Box .................................................. .3-36
Cupholders ................................................. .3-36
Center Console Storage .................................3-36
Driver Storage Compartment ..........................3-36
Convenience Net ......................................... .3-36
Sunroof ........................................................ .3-37
Section 3 Features and Controls
3-1
Page 109 of 422
The engine will shut off automatically after 10 minutes,
unless a time extension has been done or the
vehicle’s key is inserted into the ignition switch and
turned to ON/RUN.
To manually shut off a remote start, do any of the
following. The parking lamps will turn off to indicate the
engine is off.
•Aim the RKE transmitter at the vehicle and press
and release the remote start button.
•Turn on the hazard warning flashers.
•Turn the ignition switch to ON/RUN and then
LOCK/OFF.
Your vehicle’s engine can be started two times, per
ignition cycle, using the transmitter’s remote start
feature.
If the remote start procedure is used again before the
first 10 minute time frame has ended, the first
10 minutes will immediately expire and the second
10 minute time frame will start. The remote vehicle start feature will not operate if any
of the follow occur:
•The remote start system is disabled through the DIC.
•The vehicle’s key is in the ignition.
•The vehicle’s hood is open.
•The hazard warning flashers are on.
•The check engine light is on. See
Malfunction
Indicator Lamp on page 4-30 .
•The engine coolant temperature is too high.
•The oil pressure is low.
•Two remote vehicle starts have already been
provided for that ignition cycle.
Vehicles that have the remote vehicle start feature are
shipped from the factory with the remote start system
enabled. The system may be enabled or disabled
through the DIC. See “REMOTE START” under DIC
Vehicle Personalization on page 4-43 for additional
information.
3-7
Page 125 of 422
Notice:Cranking the engine for long periods of
time, by returning the key to the START position
immediately after cranking has ended, can overheat
and damage the cranking motor, and drain the
battery. Wait at least 15 seconds between each try,
to let the cranking motor cool down.
2. If the engine does not start after 5-10 seconds, especially in very cold weather (below 0°F or
−18°C), it could be flooded with too much gasoline.
Push the accelerator pedal all the way to the
floor and holding it there as you hold the key in
START for a maximum of 15 seconds. Wait at least
15 seconds between each try, to allow the
cranking motor to cool. When the engine starts, let
go of the key and accelerator. If the vehicle
starts briefly but then stops again, repeat the
procedure. This clears the extra gasoline from the
engine. Do not race the engine immediately
after starting it. Operate the engine and
transmission gently until the oil warms up and
lubricates all moving parts. Notice:
The engine is designed to work with the
electronics in the vehicle. If you add electrical parts
or accessories, you could change the way the
engine operates. Before adding electrical equipment,
check with your dealer/retailer. If you do not, the
engine might not perform properly. Any resulting
damage would not be covered by the vehicle
warranty.
Engine Coolant Heater
The engine coolant heater can provide easier starting
and better fuel economy during engine warm-up in cold
weather condition at or below 0°F ( −18°C). Vehicles
with am engine coolant heater should be plugged in at
least four hours before starting. An internal thermostat
in the plug-end of the cord may exist which will prevent
engine coolant heater operation at temperatures
above 0°F (−18°C).
3-23
Page 126 of 422

To Use the Engine Coolant Heater
1. Turn off the engine.
2. Open the hood and unwrap the electrical cord. Theelectrical cord is located on the passenger side of
the vehicle between the strut and the air
cleaner/filter.
3. Plug it into a normal, grounded 110-volt AC outlet.
{WARNING:
Plugging the cord into an ungrounded outlet could
cause an electrical shock. Also, the wrong kind of
extension cord could overheat and cause a fire.
You could be seriously injured. Plug the cord into
a properly grounded three-prong 110-volt AC
outlet. If the cord will not reach, use a heavy-duty
three-prong extension cord rated for at least
15 amps.
4. Before starting the engine, be sure to unplug and store the cord as it was before to keep it away
from moving engine parts, and prevent damaged. The length of time the heater should remain plugged in
depends on several factors. Ask a dealer/retailer in
the area where you will be parking the vehicle for the
best advice on this.
Automatic Transmission Operation
If the vehicle has an automatic transmission, the
shift lever is located on the console between the seats.
There are several different
positions for the automatic
transmission.
P (Park): This position locks the front wheels. It is the
best position to use when starting the engine because
the vehicle cannot move easily.
3-24
Page 142 of 422
Electronic Stability Control (ESC)/TractionControl System (TCS) Indicator/Warning
Light ....................................................... .4-28
Engine Coolant Temperature Warning Light ......4-29
Tire Pressure Light ...................................... .4-29
Malfunction Indicator Lamp .............................4-30
Oil Pressure Light ........................................ .4-33
Security Light .............................................. .4-33
Fog Lamp Light ........................................... .4-34
Highbeam On Light ...................................... .4-34
Fuel Gage .................................................. .4-34
Driver Information Center (DIC) .......................4-35
DIC Operation and Displays ...........................4-36
DIC Warnings and Messages .........................4-38
DIC Vehicle Personalization ............................4-43Audio System(s)
............................................ .4-49
Setting the Clock ......................................... .4-50
Radio(s) ..................................................... .4-51
Using an MP3 ............................................. .4-63
XM Radio Messages .................................... .4-70
Bluetooth
®.................................................. .4-71
Theft-Deterrent Feature ................................. .4-81
Audio Steering Wheel Controls .......................4-82
Radio Reception .......................................... .4-83
Fixed Mast Antenna ..................................... .4-84
XM™ Satellite Radio Antenna System .............4-84
Section 4 Instrument Panel
4-2
Page 169 of 422
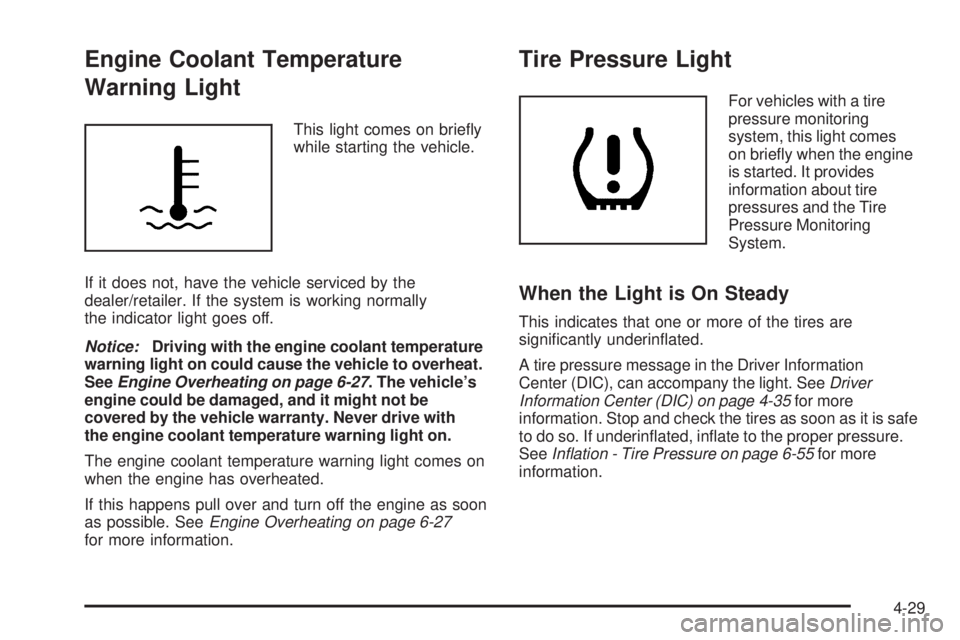
Engine Coolant Temperature
Warning Light
This light comes on briefly
while starting the vehicle.
If it does not, have the vehicle serviced by the
dealer/retailer. If the system is working normally
the indicator light goes off.
Notice: Driving with the engine coolant temperature
warning light on could cause the vehicle to overheat.
See Engine Overheating on page 6-27 . The vehicle’s
engine could be damaged, and it might not be
covered by the vehicle warranty. Never drive with
the engine coolant temperature warning light on.
The engine coolant temperature warning light comes on
when the engine has overheated.
If this happens pull over and turn off the engine as soon
as possible. See Engine Overheating on page 6-27
for more information.
Tire Pressure Light
For vehicles with a tire
pressure monitoring
system, this light comes
on briefly when the engine
is started. It provides
information about tire
pressures and the Tire
Pressure Monitoring
System.
When the Light is On Steady
This indicates that one or more of the tires are
significantly underinflated.
A tire pressure message in the Driver Information
Center (DIC), can accompany the light. See Driver
Information Center (DIC) on page 4-35 for more
information. Stop and check the tires as soon as it is safe
to do so. If underinflated, inflate to the proper pressure.
See In�ation - Tire Pressure on page 6-55 for more
information.
4-29
Page 177 of 422

MPG (L/100 KM) AVG (Average)
Press the information button until MPG (L/100 KM) AVG
displays. This mode shows how many miles per
gallon (mpg) or liters per 100 kilometers (L/100 km)
your vehicle is getting based on current and past
driving conditions.
To reset the average fuel economy, press and hold the
reset button while MPG (L/100 KM) AVG is displayed.
Average fuel economy is then calculated starting from
that point. If the average fuel economy is not reset, it is
continually updated each time you drive.
MPG (L/100 KM) INST (Instantaneous)
Press the information button until MPG (L/100 KM) INST
displays. This mode shows the current fuel economy at
a particular moment and changes frequently as driving
conditions change. This mode shows the instantaneous
fuel economy in miles per gallon (mpg) or liters per
100 kilometers (L/100 km). Unlike average fuel economy,
this screen cannot be reset.
AV (Average) SPEED
Press the information button until AV SPEED displays.
This mode shows the vehicle’s average speed in
miles per hour (mph) or kilometers per hour (km/h).
To reset the average vehicle speed, press and hold the
reset button while AV SPEED is displayed.
OIL LIFE
Press the information button until OIL LIFE displays.
The engine oil life system shows an estimate of the oil’s
remaining useful life. It shows 100% when the system
is reset after an oil change. It alerts you to change the
oil on a schedule consistent with your driving conditions.
In addition to the engine oil life system monitoring the
oil life, additional maintenance is recommended in the
Maintenance Schedule in this manual. SeeEngine Oil on
page 6-13 andScheduled Maintenance on page 7-3 .
Always reset the engine oil life system after an oil
change. See “How to Reset the Engine Oil Life System”
under Engine Oil Life System on page 6-16 .
COOLANT
Press the information button until COOLANT displays.
This mode shows the temperature of the engine coolant
in either degrees Fahrenheit (°F) or degrees Celsius (°C).
Tire Pressure
If your vehicle is equipped with a Tire Pressure
Monitoring System (TPMS), the pressure for each tire
can be viewed in the DIC. The tire pressure is shown in
either pounds per square inch (psi) or kilopascals (kPa).
Press the information button until LF ## PSI (kPa) ## RF
displays for the front tires. Press the information
button again until LR ## PSI (kPa) ## RR displays
for the rear tires.
4-37
Page 262 of 422

Turn Signals When Towing a Trailer
The arrows on the instrument panel flash whenever
signaling a turn or lane change. Properly hooked up, the
trailer lamps also flash, telling other drivers the vehicle
is turning, changing lanes or stopping.
When towing a trailer, the arrows on the instrument
panel flash for turns even if the bulbs on the trailer are
burned out. For this reason you may think other
drivers are seeing the signal when they are not. It is
important to check occasionally to be sure the
trailer bulbs are still working.
Driving on Grades
Notice:Do not tow on steep continuous grades
exceeding 6 miles (9.6 km). Extended, higher
than normal engine and transmission temperatures
may result and damage the vehicle. Frequent
stops are very important to allow the engine and
transmission to cool.
Reduce speed and shift to a lower gear beforestarting
down a long or steep downgrade. If the transmission is
not shifted down, the brakes might have to be used so
much that they would get hot and no longer work well.
On a long uphill grade, shift down and reduce the
vehicle’s speed to around 45 mph (70 km/h) to reduce
the possibility of the engine and the transmission
overheating. Vehicles can tow in D (Drive). Shift the transmission to
a lower gear if the transmission shifts too often under
heavy loads and/or hilly conditions.
Pay attention to the engine coolant gage. If the indicator
is in the red area, turn off the air conditioning to reduce
engine load. See
Engine Overheating on page 6-27 .
When towing under severe conditions such as hot
ambient temperatures or steep grades, the vehicle may
experience more transmission shifting. A COOLING
MODE ON message may also appear in the DIC. This
alerts the driver that the shifting mode is in progress
and is aiding engine cooling. See DIC Warnings
and Messages on page 4-38 DIC Warnings and
Messages for more information.Parking on Hills
{WARNING:
Parking the vehicle on a hill with the trailer
attached can be dangerous. If something goes
wrong, the rig could start to move. People can be
injured, and both the vehicle and the trailer can be
damaged. When possible, always park the rig on a
flat surface.
5-38
Page 265 of 422

Service........................................................... .6-3
Accessories and Modifications ..........................6-3
California Proposition 65 Warning .....................6-4
California Perchlorate Materials Requirements .....6-4
Doing Your Own Service Work .........................6-4
Adding Equipment to the Outside of the Vehicle ..................................................... .6-5
Fuel ............................................................... .6-5
Gasoline Octane ........................................... .6-6
Gasoline Specifications ................................... .6-6
California Fuel .............................................. .6-6
Additives ...................................................... .6-6
Fuels in Foreign Countries ...............................6-7
Filling the Tank ............................................. .6-8
Filling a Portable Fuel Container .....................6-10
Checking Things Under the Hood ....................6-10
Hood Release ............................................. .6-11
Engine Compartment Overview .......................6-12
Engine Oil .................................................. .6-13
Engine Oil Life System ................................. .6-16
Engine Air Cleaner/Filter ................................6-18
Automatic Transmission Fluid .........................6-19
Hydraulic Clutch .......................................... .6-19
Cooling System ........................................... .6-20
Engine Coolant ............................................ .6-24
Engine Overheating ...................................... .6-27Windshield Washer Fluid
................................6-28
Brakes ....................................................... .6-29
Battery ....................................................... .6-33
Jump Starting .............................................. .6-34
Headlamp Aiming .......................................... .6-38
Bulb Replacement ......................................... .6-41
Halogen Bulbs ............................................. .6-41
Headlamps, Front Turn Signal, Sidemarker, and Parking Lamps ................................... .6-42
Center High-Mounted Stoplamp (CHMSL) .........6-43
Taillamps
and Turn Signal Lamps (Coupe) .......6-44
Taillamps, Turn Signal, Stoplamps and Back-up Lamps (Sedan) .............................6-44
Back-Up Lamps (Coupe) ................................6-45
License Plate Lamp ..................................... .6-46
Replacement Bulbs ...................................... .6-47
Windshield Wiper Blade Replacement ..............6-47
Tires ............................................................. .6-48
Tire Sidewall Labeling .................................. .6-49
Tire Terminology and Definitions .....................6-52
Inflation - Tire Pressure .................................6-55
Tire Pressure Monitor System .........................6-56
Tire Pressure Monitor Operation .....................6-58
Tire Inspection and Rotation ...........................6-62
When It Is Time for New Tires .......................6-64
Section 6 Service and Appearance Care
6-1