jack PONTIAC G5 2010 Owners Manual
[x] Cancel search | Manufacturer: PONTIAC, Model Year: 2010, Model line: G5, Model: PONTIAC G5 2010Pages: 422, PDF Size: 2.22 MB
Page 22 of 422
Satellite Radio
XM is a satellite radio service that is based in the 48
contiguous United States and 10 Canadian provinces.
XM satellite radio has a wide variety of programming
and commercial-free music, coast-to-coast, and in
digital-quality sound.
A fee is required to receive the XM service.
For more information, refer to:
•www.xmradio.com or call 1-800-929-2100 (U.S.)
•www.xmradio.ca or call 1-877-438-9677 (Canada)
See “XM Satellite Radio Service” under Radio(s)
on page 4-51.
Portable Audio Devices (Auxiliary
Input or USB Port)
This vehicle may have an auxiliary input jack and a
USB port, located on the audio faceplate. External
devices such as iPods
®, laptop computers, MP3 players,
CD changers, USB storage devices, etc. can be
connected to the auxiliary input jack using a 3.5 mm
(1/8 in) cable or the USB port depending on the audio
system.
Press the CD/AUX button to play audio from the
portable player.
See “Using the Auxiliary Input Jack” and “Using the
USB Port” under Radio(s) on page 4-51 .
1-16
Page 26 of 422
You may notice during cooler conditions that the low tire
pressure warning light will appear when the vehicle is
first started and then turn off as you drive. This may be
an early indicator that your tire pressures are getting
low and the tires need to be inflated to the proper
pressure.
Note:The Tire Pressure Monitor can alert you about
low tire pressure, but it does not replace normal monthly
tire maintenance. It is the driver’s responsibility to
maintain correct tire pressures.
See Tire Pressure Monitor System on page 6-56 and
Tire Pressure Monitor Operation on page 6-58 .
Tire Sealant and Compressor Kit
This vehicle may come with a jack and spare tire or a
tire sealant and compressor kit. The kit can be used
to seal small punctures in the tread area of the tire.
SeeTire Sealant and Compressor Kit on page 6-72 for
complete operating information.
Engine Oil Life System
The engine oil life system calculates engine oil life
based on vehicle use and displays a DIC message when
it is necessary to change the engine oil and filter. The
oil life system should be reset to 100% only following an
oil change.
Resetting the Oil Life System
1. Turn the ignition to ON/RUN, with the engine off.
2. Press the DIC information and reset buttons at the same time to enter the personalization menu.
3. Press the information button until the DIC display shows OIL-LIFE RESET.
4. Press and hold the reset button until the DIC display shows ACKNOWLEDGED.
5. Turn the key to LOCK/OFF.
See Engine Oil Life System on page 6-16 .
1-20
Page 201 of 422
Care of CDs
Store CD(s) in their original cases or other protective
cases and away from direct sunlight and dust. The CD
player scans the bottom of the disc. If the bottom of a CD
is damaged it may not play properly or at all. Do not touch
the bottom of a CD while handling it. Pick up CDs by
grasping the outer edges or the edge of the hole and the
outer edge.
If the surface of a CD is dirty, take a soft, lint free cloth or
dampen a clean, soft cloth in a mild, neutral detergent
solution mixed with water, and clean it. Make sure the
wiping process starts from the center to the edge.
Care of the CD Player
Do not add labels to a CD, it could get caught in the CD
player. Use a marking pen to write on the top of the
CD if a description is needed.
Do not use CD lens cleaners, they could damage the
CD player.Notice:
If a label is added to a CD, or more than
one CD is inserted into the slot at a time, or an
attempt is made to play scratched or damaged CDs,
the CD player could be damaged. While using the
CD player, use only CDs in good condition without
any label, load one CD at a time, and keep the
CD player and the loading slot free of foreign
materials, liquids, and debris.
If an error displays, see “CD Messages” earlier in this
section.
Using the Auxiliary Input Jack
The radio system may have an auxiliary input jack
located on the lower right side of the faceplate. This is not
an audio output; do not plug the headphone set into the
front auxiliary input jack. An external audio device such
as an iPod
®, laptop computer, MP3 player, CD changer,
etc. can be connected to the auxiliary input jack for use
as another audio source.
Drivers are encouraged to set up any auxiliary device
while the vehicle is in P (Park). See Defensive Driving
on page 5-2 for more information on driver distraction.
4-61
Page 202 of 422
To use a portable audio player, connect a 3.5 mm (1/8 in)
cable to the radio’s front auxiliary input jack. When a
device is connected, press the radio CD/AUX button to
begin playing audio from the device over the vehicle
speakers.
O(Power/Volume):Turn to adjust the volume.
Additional volume adjustments may have to be made
from the portable device if the volume is too quiet or
not loud.
BAND: Press to listen to the radio while a portable audio
device is connected to the auxiliary input. The portable
audio device continues playing until it is stopped or
turned off.
CD/AUX (CD/Auxiliary): Press to play a CD while a
portable audio device is connected to the auxiliary input.
Press again and the system begins playing audio
from the connected portable audio player. If a portable
audio player is not connected, No Aux Input Device
may display.
Using the USB Port
Radio’s with a USB port can control a USB storage
device or an iPod®using the radio buttons and knobs.
See Using an MP3 on page 4-63 for information about
how to connect and control a USB storage device or
an iPod.
USB Support
The USB connector is located on the front of the radio
and uses the USB 2.0 standard.
USB Supported Devices
•
USB Flash Drives
•Portable USB Hard Drives
•Fifth generation or later iPod
•iPod nano
•iPod touch
•iPod classic
Not all iPods and USB Drives are compatible with the
USB port.
Make sure the iPod has the latest firmware from
Apple
®for proper operation. iPod firmware can
be updated using the latest iTunes®application.
See www.apple.com/itunes.
For help with identifying your iPod, go to
www.apple.com/support.
4-62
Page 206 of 422
To listen to files by another artist, press the softkey
located below either arrow tab. The disc goes to the next
or previous artist in alphabetical order. Continue pressing
either softkey below the arrow tab until the desired artist
displays.
To change from playback by artist to playback by
album:1. Press the softkey located below the Sort By tab.
2. Press one of the softkeys below the album tab from the sort screen.
3. Press the softkey below the back tab to return to the main music navigator screen.
The album name displays on the second line between
the arrows and songs from the current album begins
to play. Once all songs from that album have played, the
player moves to the next album in alphabetical order
on the CD and begins playing MP3 files from that album.
To exit music navigator mode, press the softkey
below the Back tab to return to normal MP3 playback.Connecting a USB Storage Device
or iPod®
The USB Port can be used to control an iPod or a USB
storage device.
To connect a USB storage device, connect the device
to the USB port located on the front of the radio.
To connect an iPod, connect one end of the USB cable
that came with the iPod to the iPod’s dock connector and
connect the other end to the USB port located on the front
of the radio. If the vehicle is on and the USB connection
works, “OK to disconnect” and a GM logo may appear
on the iPod and iPod appears on the radio’s display.
The iPod music appears on the radio’s display and
begins playing.
The iPod charges while it is connected to the vehicle if
the vehicle is in the ACC/ACCESSORY or ON/RUN
position. When the vehicle is turned off, the iPod
automatically powers off and will not charge or draw
power from the vehicle’s battery.
If you have an older iPod model that is not supported,
it can still be used by connecting it to the Auxiliary Input
Jack using a standard 3.5 mm (1/8 in) stereo cable.
See “Using the Auxiliary Input Jack” earlier for
more information.
4-66
Page 335 of 422
A rear blowout, particularly on a curve, acts much like a
skid and may require the same correction you would
use in a skid. In any rear blowout, remove your foot from
the accelerator pedal. Get the vehicle under control
by steering the way you want the vehicle to go. It may
be very bumpy and noisy, but you can still steer. Gently
brake to a stop, well off the road if possible.
If a tire goes flat, avoid further tire and wheel damage
by driving slowly to a level place and stopping.1. Turn on the hazard warning flashers. See Hazard
Warning Flashers on page 4-3 .
2. Park the vehicle. Set the parking brake firmly and put the shift lever in P (Park).
3. Turn off the engine.
4. Inspect the flat tire.
{WARNING:
Lifting a vehicle and getting under it to do
maintenance or repairs is dangerous without the
appropriate safety equipment and training. If a jack
is provided with the vehicle, it is designed only for
changing a flat tire. If it is used for anything else,
you or others could be badly injured or killed if the
vehicle slips off the jack. If a jack is provided with
the vehicle, only use it for changing a flat tire.
This vehicle may come with a jack and spare tire or a
tire sealant and compressor kit. To use the jack and
spare tire, see Changing a Flat Tire on page 6-80 .To
use the tire sealant and compressor kit, see Tire Sealant
and Compressor Kit on page 6-72 .
6-71
Page 344 of 422

3. Remove the retainer that holds the tire sealant andcompressor kit.
4. Remove the kit from the foam container.
To store the tire sealant and compressor kit, reverse the
steps.
Changing a Flat Tire
If a tire goes flat, avoid further tire and wheel damage
by driving slowly to a level place. Turn on the hazard
warning flashers. See Hazard Warning Flashers
on page 4-3.
{WARNING:
Changing a tire can be dangerous. The vehicle
can slip off the jack and roll over or fall on you or
other people. You and they could be badly injured
or even killed. Find a level place to change your
tire. To help prevent the vehicle from moving:
1. Set the parking brake firmly.
2. Put an automatic transmission shift lever in P (Park), or shift a manual transmission to
1 (First) or R (Reverse).
3. Turn off the engine and do not restart while the vehicle is raised.
4. Do not allow passengers to remain in the vehicle.
To be even more certain the vehicle will not move,
you should put blocks at the front and rear of the
tire farthest away from the one being changed.
That would be the tire on the other side, at the
opposite end of the vehicle.
6-80
Page 345 of 422
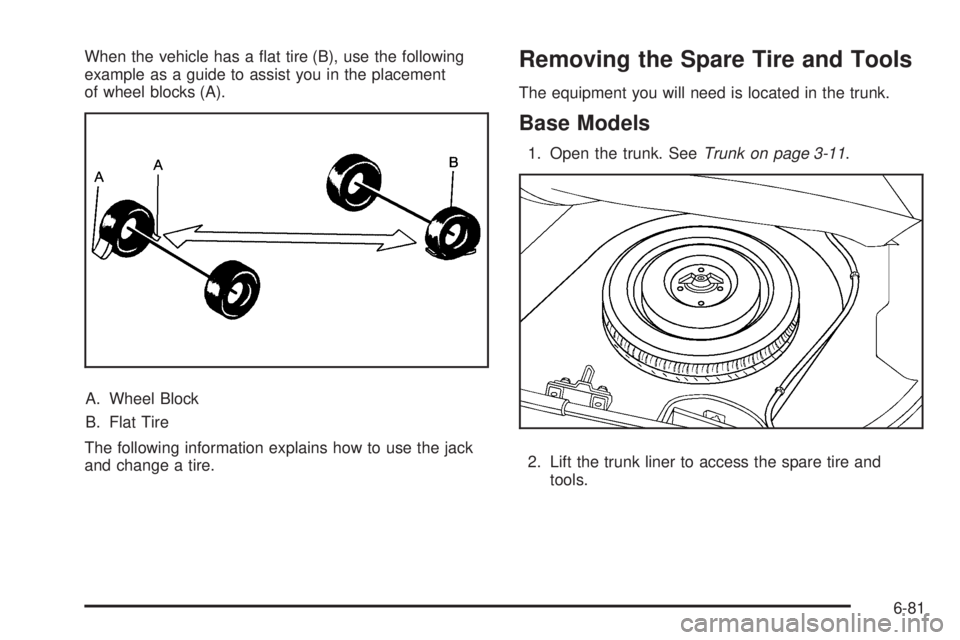
When the vehicle has a flat tire (B), use the following
example as a guide to assist you in the placement
of wheel blocks (A).A. Wheel Block
B. Flat Tire
The following information explains how to use the jack
and change a tire.Removing the Spare Tire and Tools
The equipment you will need is located in the trunk.
Base Models
1. Open the trunk. See Trunk on page 3-11.
2. Lift the trunk liner to access the spare tire and tools.
6-81
Page 346 of 422
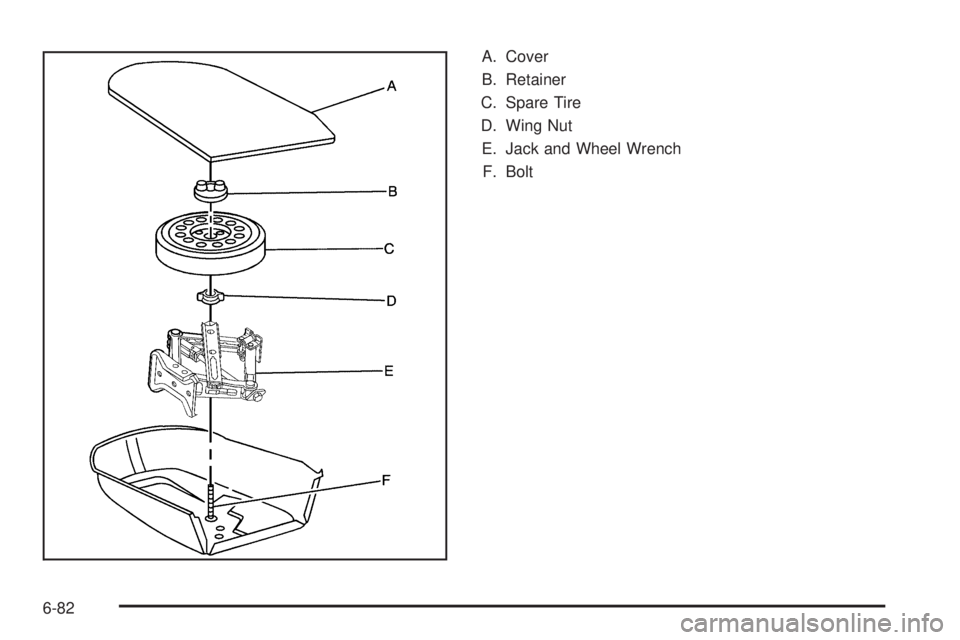
A. Cover
B. Retainer
C. Spare Tire
D. Wing Nut E. Jack and Wheel Wrench F. Bolt
6-82
Page 347 of 422
3. Remove the retainer (B) that holds down the sparetire. See Compact Spare Tire on page 6-93 for
more information.
4. Remove the spare tire (C) by gently pulling it up and out of the trunk.
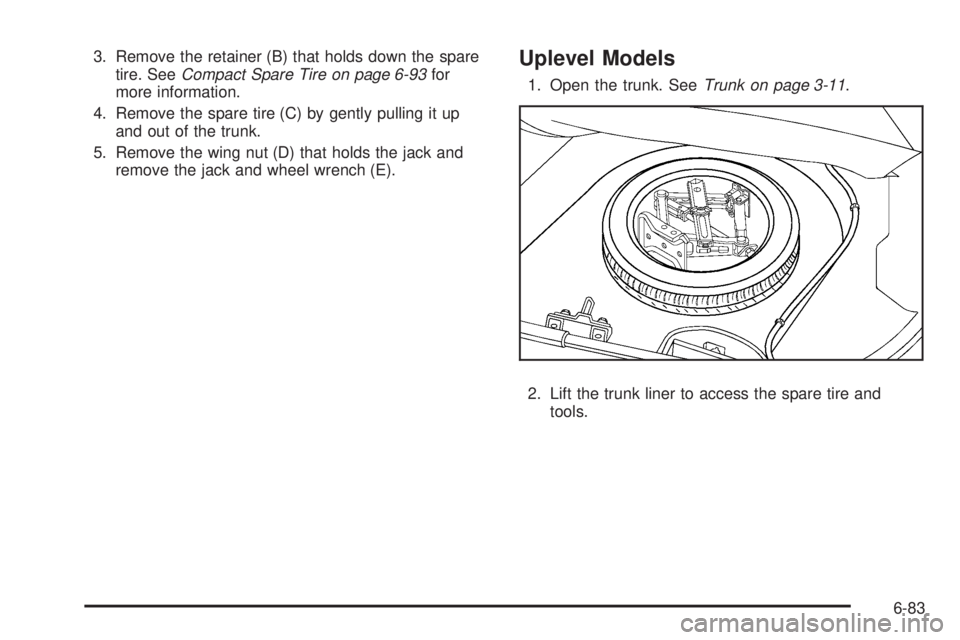
5. Remove the wing nut (D) that holds the jack and remove the jack and wheel wrench (E).Uplevel Models
1. Open the trunk. See Trunk on page 3-11.
2. Lift the trunk liner to access the spare tire and tools.
6-83