warning PONTIAC G6 2010 Owners Manual
[x] Cancel search | Manufacturer: PONTIAC, Model Year: 2010, Model line: G6, Model: PONTIAC G6 2010Pages: 448, PDF Size: 2.5 MB
Page 351 of 448

{WARNING:
Storing the tire sealant and compressor kit or
other equipment in the passenger compartment of
the vehicle could cause injury. In a sudden stop or
collision, loose equipment could strike someone.
Store the tire sealant and compressor kit in its
original location.
If this vehicle has a tire sealant and compressor kit,
there may not be a spare tire, tire changing equipment,
and on some vehicles there may not be a place to
store a tire.
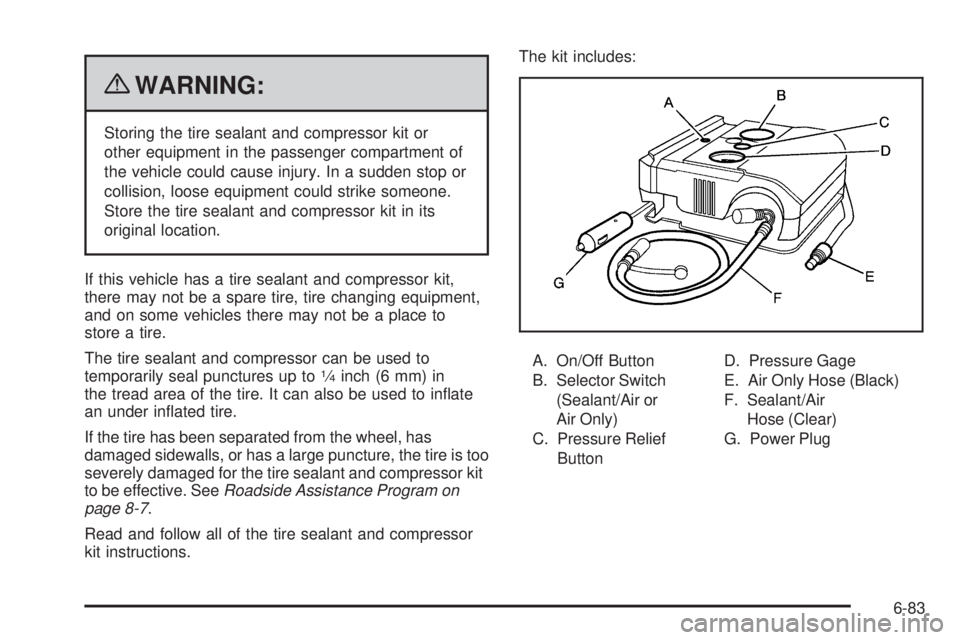
The tire sealant and compressor can be used to
temporarily seal punctures up to
1⁄4inch (6 mm) in
the tread area of the tire. It can also be used to inflate
an under inflated tire.
If the tire has been separated from the wheel, has
damaged sidewalls, or has a large puncture, the tire is too
severely damaged for the tire sealant and compressor kit
to be effective. SeeRoadside Assistance Program on
page 8-7.
Read and follow all of the tire sealant and compressor
kit instructions.The kit includes:
A. On/Off Button
B. Selector Switch
(Sealant/Air or
Air Only)
C. Pressure Relief
ButtonD. Pressure Gage
E. Air Only Hose (Black)
F. Sealant/Air
Hose (Clear)
G. Power Plug
6-83
Page 358 of 448

Changing a Flat Tire
If a tire goes flat, avoid further tire and wheel damage
by driving slowly to a level place. Turn on the hazard
warning flashers. SeeHazard Warning Flashers
on page 4-3.
{WARNING:
Changing a tire can be dangerous. The vehicle
can slip off the jack and roll over or fall on you or
other people. You and they could be badly injured
or even killed. Find a level place to change your
tire. To help prevent the vehicle from moving:
1. Set the parking brake firmly.
2. Put the shift lever in P (Park).
WARNING: (Continued)
WARNING: (Continued)
3. Turn off the engine and do not restart while
the vehicle is raised.
4. Do not allow passengers to remain in the
vehicle.
To be even more certain the vehicle will not move,
you should put blocks at the front and rear of the
tire farthest away from the one being changed.
That would be the tire, on the other side, at the
opposite end of the vehicle.
When the vehicle has a flat tire (B), use the following
example as a guide to assist you in the placement
of wheel blocks (A).
6-90
Page 363 of 448

{WARNING:
Getting under a vehicle when it is jacked up is
dangerous. If the vehicle slips off the jack, you
could be badly injured or killed. Never get under a
vehicle when it is supported only by a jack.
{WARNING:
Raising your vehicle with the jack improperly
positioned can damage the vehicle and even
make the vehicle fall. To help avoid personal injury
and vehicle damage, be sure to fit the jack lift
head into the proper location before raising the
vehicle.7. Raise the vehicle by turning the wheel wrench
clockwise. Raise the vehicle far enough off the
ground so there is enough room for the compact
spare tire to fit underneath the wheel well.
6-95
Page 364 of 448

8. Remove all of the
wheel nuts.
9. Remove the flat tire.10. Remove any rust or dirt
from the wheel bolts,
mounting surfaces,
and spare wheel.
{WARNING:
Rust or dirt on a wheel, or on the parts to which it is
fastened, can make wheel nuts become loose after
time. The wheel could come off and cause an
accident. When changing a wheel, remove any rust
or dirt from places where the wheel attaches to the
vehicle. In an emergency, use a cloth or a paper
towel to do this; but be sure to use a scraper or wire
brush later, if needed, to get all the rust or dirt off.
SeeChanging a Flat Tire on page 6-90.
6-96
Page 365 of 448

11. Install the compact spare tire.
12. Put the wheel nuts back on with the rounded end of
the nuts toward the wheel. Tighten each nut by
hand until the wheel is held against the hub.
{WARNING:
Never use oil or grease on bolts or nuts because
the nuts might come loose. The vehicle’s wheel
could fall off, causing a crash.
13. Lower the vehicle by turning the wheel wrench
counterclockwise. Lower the jack completely.
6-97
Page 366 of 448

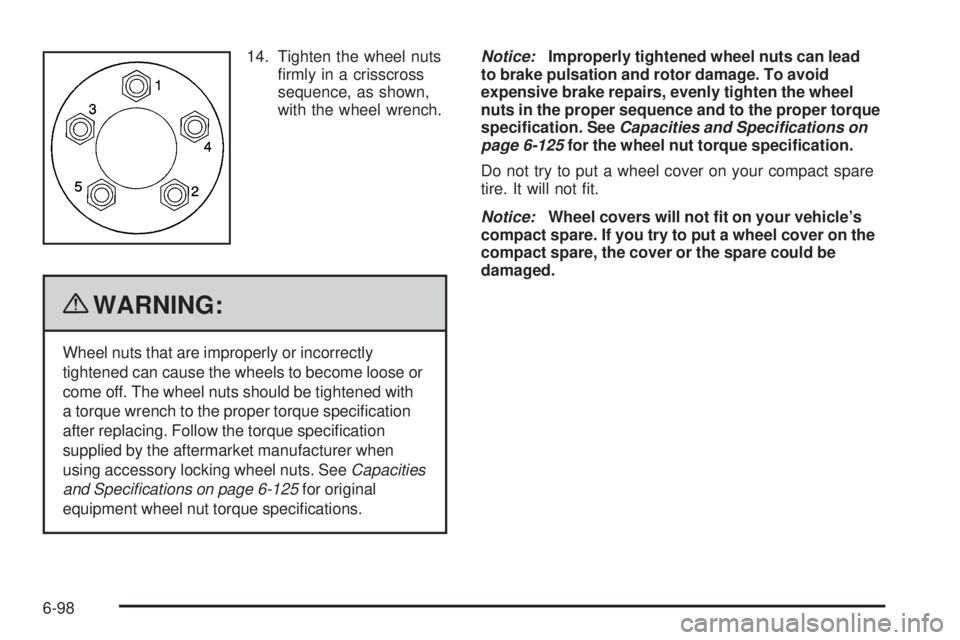
14. Tighten the wheel nuts
firmly in a crisscross
sequence, as shown,
with the wheel wrench.
{WARNING:
Wheel nuts that are improperly or incorrectly
tightened can cause the wheels to become loose or
come off. The wheel nuts should be tightened with
a torque wrench to the proper torque specification
after replacing. Follow the torque specification
supplied by the aftermarket manufacturer when
using accessory locking wheel nuts. SeeCapacities
and Speci�cations on page 6-125for original
equipment wheel nut torque specifications.Notice:Improperly tightened wheel nuts can lead
to brake pulsation and rotor damage. To avoid
expensive brake repairs, evenly tighten the wheel
nuts in the proper sequence and to the proper torque
speci�cation. SeeCapacities and Specifications on
page 6-125for the wheel nut torque speci�cation.
Do not try to put a wheel cover on your compact spare
tire. It will not fit.
Notice:Wheel covers will not �t on your vehicle’s
compact spare. If you try to put a wheel cover on the
compact spare, the cover or the spare could be
damaged.
6-98
Page 367 of 448

Storing a Flat or Spare Tire and
Tools
Storing a Flat Tire and Tools — All
Models Except GXP and Retractable
Hardtop
{WARNING:
Storing a jack, a tire, or other equipment in the
passenger compartment of the vehicle could
cause injury. In a sudden stop or collision, loose
equipment could strike someone. Store all these
in the proper place.
To store the flat tire and jack in the compact spare tire
compartment:
1. Open the trunk. SeeTrunk on page 3-11.
2. Remove the bolt extension (in the yellow sleeve)
from the jack and remove the center cap from the
wheel.3. Collapse the wrench using the same button used to
extend it.
4. Attach the wrench to the jack by placing the tab on
the wrench into the hole on the side of the jack.
Then place the wrench handle over the tab on the
side of the jack.
6-99
Page 372 of 448

Storing the Spare Tire and Tools — All
Models Except Retractable Hardtop
{WARNING:
Storing a jack, a tire, or other equipment in the
passenger compartment of the vehicle could
cause injury. In a sudden stop or collision, loose
equipment could strike someone. Store all these in
the proper place.
1. Open the trunk. SeeTrunk on page 3-11.
2. Collapse the wrench using the same button used to
extend it.
3. Attach the wrench to the jack by placing the tab on
the wrench into the hole on the side of the jack.
Then place the wrench handle over the tab on the
side of the jack.
6-104
Page 374 of 448

Compact Spare Tire
{WARNING:
Driving with more than one compact spare tire at a
time could result in loss of braking and handling.
This could lead to a crash and you or others could
be injured. Use only one compact spare tire at
a time.
If this vehicle has a compact spare tire it was fully
inflated when the vehicle was new, however, it can lose
air after a time. Check the inflation pressure regularly.
It should be 60 psi (420 kPa).
After installing the compact spare on the vehicle, stop as
soon as possible and make sure the spare tire is correctly
inflated. The compact spare is made to perform well at
speeds up to 65 mph (105 km/h) for distances up to3,000 miles (5 000 km), so you can finish your trip and
have the full-size tire repaired or replaced at your
convenience. Of course, it is best to replace the spare
with a full-size tire as soon as possible. The spare tire
will last longer and be in good shape in case it is needed
again.
Notice:When the compact spare is installed,
do not take the vehicle through an automatic car
wash with guide rails. The compact spare can
get caught on the rails which can damage the tire,
wheel and other parts of the vehicle.
Do not use the compact spare on other vehicles.
Do not mix the compact spare tire or wheel with other
wheels or tires. They will not fit. Keep the spare tire and
its wheel together.
Notice:Tire chains will not �t the compact spare.
Using them can damage the vehicle and can damage
the chains too. Do not use tire chains on the
compact spare.
6-106
Page 378 of 448

Care of Safety Belts
Keep belts clean and dry.
{WARNING:
Do not bleach or dye safety belts. It may severely
weaken them. In a crash, they might not be able
to provide adequate protection. Clean safety belts
only with mild soap and lukewarm water.
Weatherstrips
Silicone grease on weatherstrips will make them last
longer, seal better, and not stick or squeak. Apply
silicone grease with a clean cloth. During very cold,
damp weather frequent application may be required.
SeeRecommended Fluids and Lubricants on page 7-10.
Washing Your Vehicle
The best way to preserve the vehicle’s finish is to keep
it clean by washing it often.
Notice:Certain cleaners contain chemicals that can
damage the emblems or nameplates on the vehicle.
Check the cleaning product label. If it states that
it should not be used on plastic parts, do not use it
on the vehicle or damage may occur and it would
not be covered by the warranty.
Do not wash the vehicle in direct sunlight. Use a car
washing soap. Do not use cleaning agents that are
petroleum based or that contain acid or abrasives,
as they can damage the paint, metal or plastic on the
vehicle. Approved cleaning products can be obtained
from your dealer/retailer. Follow all manufacturers’
directions regarding correct product usage, necessary
safety precautions and appropriate disposal of any
vehicle care product.
Rinse the vehicle well, before washing and after to
remove all cleaning agents completely. If they are
allowed to dry on the surface, they could stain.
6-110