headlamp PONTIAC G6 2010 User Guide
[x] Cancel search | Manufacturer: PONTIAC, Model Year: 2010, Model line: G6, Model: PONTIAC G6 2010Pages: 448, PDF Size: 2.5 MB
Page 160 of 448

Headlamps
The band on the lever on the outboard side of the
steering column operates the exterior lamps.
The exterior lamp control has the following
four positions:
2(Headlamps):Turns on the headlamps, parking
lamps, and taillamps.
;(Parking Lamps):Turns on the parking lamps
and taillamps only.AUTO (Automatic Headlamp System):Automatically
turns on the Daytime Running Lamps during daytime,
and the headlamps, parking lamps, and taillamps
at night.
P(Off/On):Turn the band to this position to turn on
the Automatic Headlamp System. In Canada, this
position only works when a vehicle is in the P (Park)
position.
To turn on the Automatic Headlamp System, turn the
switch to off/on. To turn them off, turn the switch to off/on
again. This is a momentary control switch that springs
back when released. The Automatic Headlamp System
always turns on at the beginning of an ignition cycle.
Headlamps on Reminder
A reminder tone sounds when the headlamps or parking
lamps are manually turned on, if the driver’s door is
open and the ignition is in the LOCK/OFF or
ACC/ACCESSORY position. To turn the tone off, turn
the knob all the way counterclockwise. In the automatic
mode, the headlamps turn off once the ignition key is
in the LOCK/OFF position.
4-10
Page 161 of 448

Headlamps Off in Park
This feature works when the ignition is in the ON/RUN
position and it is dark outside. To turn the headlamps
off when it is dark outside but keep other exterior lights
on, turn the exterior lamp control to the parking lamp
position.
To turn on the headlamps along with the other lamps
when it is dark outside, turn the exterior lamp control to
the AUTO or headlamp position.
This function does not work for vehicles first sold in
Canada.
Delayed Headlamps
The delayed headlamps feature keeps the headlamps
on for 20 seconds after the key is turned to LOCK/OFF,
then the headlamps automatically turn off.
To override the 20 second delayed headlamp feature
while it is active turn the turn signal/multifunction
lever up one position and then back to AUTO.
Daytime Running Lamps (DRL)
Daytime Running Lamps (DRL) can make it easier for
others to see the front of your vehicle during the
day. Fully functional DRL are required on all vehicles
first sold in Canada. The vehicle has a light sensor
on top of the instrument panel that controls the DRL.
Do not cover this sensor or the head lamps will be
on when they are not needed.
The DRL system makes the low-beam headlamps come
on at a reduced brightness when the following
conditions are met:
•The ignition is on.
•The exterior lamps control is in AUTO.
•The exterior lamps control is in the parking lamps
only position (This applies only to vehicles that
are first sold in Canada).
•The light sensor detects daytime light.
•The parking brake is released or the vehicle is not
in P (Park).
When the DRL system is on, the taillamps, sidemarker
lamps, parking lamps, and instrument panel lights
are not on unless you turn the exterior lamps control to
the parking lamp position.
The regular headlamp system should be turned on
when they are needed.
4-11
Page 162 of 448

Automatic Headlamp System
When it is dark enough outside, the automatic headlamp
system turns on the headlamps at the normal brightness
along with other lamps such as the taillamps,
sidemarker, parking lamps, and the instrument panel
lights. The radio lights will also be dim.
The vehicle has a light sensor on top of the instrument
panel that controls the automatic headlamp system.
Do not cover the sensor or the automatic headlamp
system will turn on when it is not needed.
There is a delay in the transition between the daytime
and nighttime operation of the DRL and the automatic
headlamp systems so that driving under bridges or
bright overhead street lights does not affect the system.
The DRL and automatic headlamp systems will only
be affected when the light sensor sees a change
in lighting lasting longer than this delay.
If vehicle is started in a dark garage, the automatic
headlamp system comes on immediately. Once
the vehicle leaves the garage, it takes about one minute
for the automatic headlamp system to change to DRL
if it is light outside. During that delay, the instrument
panel cluster may not be as bright as usual. Make sure
the instrument panel brightness control is in the full
bright position. SeeInstrument Panel Brightness
on page 4-13.To idle the vehicle with the automatic headlamp system
off, turn the ignition on and set the exterior light
switch to the off/on position. For vehicles first sold in
Canada, the transmission must stay in P (Park) for this
function.
The regular headlamps should be used when needed.
Fog Lamps
For vehicles with fog lamps, the button for this feature is
located on the instrument panel, to the left of the
steering wheel.
The ignition must be on for the fog lamps to work.
#:Press to turn the fog lamps on or off. An indicator
light comes on when the fog lamps are on.
The parking lamps automatically turn on and off when
the fog lamps are turned on and off.
The fog lamps turn off while the high-beam headlamps
are turned on.
Some localities have laws that require the headlamps to
be on along with the fog lamps.
4-12
Page 164 of 448

Parade Dimming
Parade mode automatically prohibits the dimming of the
instrument panel displays during the daylight while
the headlamps are on so that the displays are still able
to be seen.
Reading Lamps
For vehicles with front and rear reading lamps, press
the lens to turn the lamp on and off, while the doors are
closed. These lamps come on automatically when
any door is opened.
Trunk Lamp
The trunk lamp comes on when the trunk is opened and
turns off when the trunk is closed.
Electric Power Management
The vehicle has Electric Power Management (EPM) that
estimates the battery’s temperature and state of
charge. It then adjusts the voltage for best performance
and extended life of the battery.When the battery’s state of charge is low, the voltage is
raised slightly to quickly bring the charge back up.
When the state of charge is high, the voltage is lowered
slightly to prevent overcharging. If the vehicle has a
voltmeter gage or a voltage display on the Driver
Information Center (DIC), you may see the voltage move
up or down. This is normal. If there is a problem, an
alert will be displayed.
The battery can be discharged at idle if the electrical
loads are very high. This is true for all vehicles. This is
because the generator (alternator) may not be
spinning fast enough at idle to produce all the power
that is needed for very high electrical loads.
A high electrical load occurs when several of the
following are on, such as: headlamps, high beams, fog
lamps, rear window defogger, climate control fan at
high speed, heated seats, engine cooling fans, trailer
loads, and loads plugged into accessory power outlets.
EPM works to prevent excessive discharge of the
battery. It does this by balancing the generator’s output
and the vehicle’s electrical needs. It can increase
engine idle speed to generate more power, whenever
needed. It can temporarily reduce the power demands of
some accessories.
4-14
Page 170 of 448

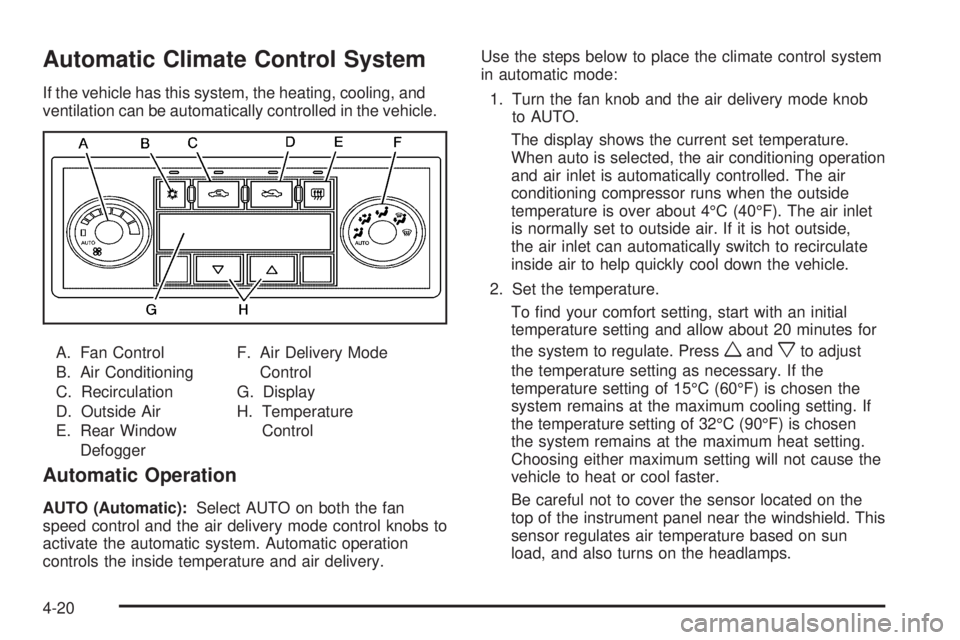
Automatic Climate Control System
If the vehicle has this system, the heating, cooling, and
ventilation can be automatically controlled in the vehicle.
A. Fan Control
B. Air Conditioning
C. Recirculation
D. Outside Air
E. Rear Window
DefoggerF. Air Delivery Mode
Control
G. Display
H. Temperature
Control
Automatic Operation
AUTO (Automatic):Select AUTO on both the fan
speed control and the air delivery mode control knobs to
activate the automatic system. Automatic operation
controls the inside temperature and air delivery.Use the steps below to place the climate control system
in automatic mode:
1. Turn the fan knob and the air delivery mode knob
to AUTO.
The display shows the current set temperature.
When auto is selected, the air conditioning operation
and air inlet is automatically controlled. The air
conditioning compressor runs when the outside
temperature is over about 4°C (40°F). The air inlet
is normally set to outside air. If it is hot outside,
the air inlet can automatically switch to recirculate
inside air to help quickly cool down the vehicle.
2. Set the temperature.
To find your comfort setting, start with an initial
temperature setting and allow about 20 minutes for
the system to regulate. Press
wandxto adjust
the temperature setting as necessary. If the
temperature setting of 15°C (60°F) is chosen the
system remains at the maximum cooling setting. If
the temperature setting of 32°C (90°F) is chosen
the system remains at the maximum heat setting.
Choosing either maximum setting will not cause the
vehicle to heat or cool faster.
Be careful not to cover the sensor located on the
top of the instrument panel near the windshield. This
sensor regulates air temperature based on sun
load, and also turns on the headlamps.
4-20
Page 188 of 448

Cruise Control Light
The cruise control light
comes on whenever the
cruise control is set.
The light goes out when the cruise control is turned off.
SeeCruise Control on page 4-7for more information.
Highbeam On Light
This light comes on when
the high-beam headlamps
are in use.
SeeHeadlamp High/Low-Beam Changer on page 4-5
for more information.
Fuel Gage
The fuel gage shows how much fuel the vehicle has left,
when the ignition is on. SeeLow Fuel Warning Light
on page 4-39for more information.
An arrow on the fuel gage indicates the side of the
vehicle the fuel door is on.
United StatesCanada
4-38
Page 192 of 448

DIC Warnings and Messages
These messages appear if there is a problem detected
in one of your vehicle’s systems.
A message clears when the vehicle’s condition is no
longer present. To acknowledge a message and clear it
from the display, press and hold any of the DIC
buttons. If the condition is still present, the warning
message comes back on the next time the vehicle is
turned off and back on. With most messages, a warning
chime sounds when the message displays. Your
vehicle may have other warning messages.
AUTO (Automatic) LIGHTS OFF
This message displays if the automatic headlamp
system is disabled with the headlamp switch.
AUTO (Automatic) LIGHTS ON
This message displays if the automatic headlamp
system is enabled with the headlamp switch.
BRAKE FLUID
This message displays, while the ignition is on, when
the brake fluid level is low. The brake system warning
light on the instrument panel cluster also comes on. See
Brake System Warning Light on page 4-30for more
information. Have the brake system serviced by
your dealer/retailer as soon as possible.
CHANGE OIL SOON
This message displays when the life of the engine oil
has expired and it should be changed.
When this message is acknowledged and cleared from
the display, the engine oil life system must still be
reset separately. SeeEngine Oil Life System on
page 6-24,Engine Oil on page 6-21, andScheduled
Maintenance on page 7-3for more information.
CHECK CARGO TOP
If your vehicle has a retractable hardtop, this message
displays if the cargo cover is not in place when
operating the retractable hardtop. Open the trunk and
make sure the cargo cover is secure and no objects are
in contact with the cargo cover. SeeTrunk on
page 3-11,Lowering the Retractable Hardtop on
page 3-38, andRaising the Retractable Hardtop on
page 3-41for more information.
CHECK GAS CAP
This message displays if the fuel cap has not been fully
tightened. Recheck the fuel cap to make sure that it
is on properly. A few driving trips with the cap properly
installed should turn the message off.
4-42
Page 198 of 448

To change feature settings, use the following procedure:
Entering Personalization Menu
1. Turn the ignition on while the vehicle is stopped.
To avoid excessive drain on the battery, it is
recommended that the headlamps are turned off.
2. Press and hold the information and reset buttons at
the same time for one second, then release to enter
the personalization menu.
If the vehicle speed is greater than 3 km/h (2 mph),
only the UNITS menu will be accessible.
3. Press the information button to scroll through the
available personalization menu modes.
Press the reset button to scroll through the available
settings for each mode.
If you do not make a selection within ten seconds,
the display will go back to the previous information
displayed.
Personalization Menu Modes
OIL LIFE RESET
When this feature is displayed, you can reset the engine
oil life system. To reset the system, seeEngine Oil
Life System on page 6-24. See “OIL LIFE” underDIC
Operation and Displays on page 4-40for more
information.
UNITS
This feature allows you to select the units of
measurement in which the DIC will display the vehicle
information. When UNITS appears on the display, press
and hold the reset button for at least one second to
scroll through the available settings:
ENGLISH (default in United States):All information
will be displayed in English units.
METRIC (default in Canada):All information will be
displayed in metric units.
To select a setting and move on to the next feature,
press the information button while the desired setting is
displayed on the DIC.
TIRE LEARN?
If your vehicle has the Tire Pressure Monitor System
(TPMS) and does not have Remote Keyless Entry
(RKE), this feature allows the TPMS to relearn the tire
positions. After rotating the tires or after replacing a
tire or sensor, the TPMS must re-learn the tire positions.
To re-learn the tire positions, seeTire Pressure
Monitor Operation on page 6-67,Tire Inspection and
Rotation on page 6-73, andDIC Warnings and
Messages on page 4-42for more information.
4-48
Page 245 of 448

While driving on a surface with reduced traction,
try your best to avoid sudden steering, acceleration,
or braking, including reducing vehicle speed by shifting to
a lower gear. Any sudden changes could cause the tires
to slide. You may not realize the surface is slippery until
the vehicle is skidding. Learn to recognize warning
clues — such as enough water, ice, or packed snow on
the road to make a mirrored surface — and slow down
when you have any doubt.
If the vehicle has the Antilock Brake System (ABS),
remember: It helps avoid only the braking skid. If the
vehicle does not have ABS, then in a braking skid,
where the wheels are no longer rolling, release enough
pressure on the brakes to get the wheels rolling again.
This restores steering control. Push the brake pedal down
steadily when you have to stop suddenly. As long as the
wheels are rolling, you will have steering control.Driving at Night
Night driving is more dangerous than day driving
because some drivers are likely to be impaired — by
alcohol or drugs, with night vision problems, or by
fatigue.
Night driving tips include:
•Drive defensively.
•Do not drink and drive.
•Reduce headlamp glare by adjusting the inside
rearview mirror.
•Slow down and keep more space between you and
other vehicles because headlamps can only light up
so much road ahead.
•Watch for animals.
•When tired, pull off the road.
•Do not wear sunglasses.
•Avoid staring directly into approaching headlamps.
•Keep the windshield and all glass on your vehicle
clean — inside and out.
•Keep your eyes moving, especially during turns or
curves.
5-11
Page 251 of 448

Run the engine for short periods only as needed to
keep warm, but be careful.
To save fuel, run the engine for only short periods as
needed to warm the vehicle and then shut the engine
off and close the window most of the way to save heat.
Repeat this until help arrives but only when you feel really
uncomfortable from the cold. Moving about to keep warm
also helps.
If it takes some time for help to arrive, now and then when
you run the engine, push the accelerator pedal slightly so
the engine runs faster than the idle speed. This keeps the
battery charged to restart the vehicle and to signal for
help with the headlamps. Do this as little as possible to
save fuel.If Your Vehicle is Stuck in Sand,
Mud, Ice, or Snow
Slowly and cautiously spin the wheels to free the
vehicle when stuck in sand, mud, ice, or snow.
SeeRocking Your Vehicle to Get It Out on page 5-18.
If the vehicle has a traction system, it can often help to
free a stuck vehicle. Refer to the vehicle’s traction system
in the Index. If stuck too severely for the traction system
to free the vehicle, turn the traction system off and use
the rocking method.
{WARNING:
If the vehicle’s tires spin at high speed, they can
explode, and you or others could be injured.
The vehicle can overheat, causing an engine
compartment fire or other damage. Spin the
wheels as little as possible and avoid going above
55 km/h (35 mph) as shown on the speedometer.
For information about using tire chains on the vehicle,
seeTire Chains on page 6-81.
5-17