PONTIAC G6 2010 Owners Manual
G6 2010
PONTIAC
PONTIAC
https://www.carmanualsonline.info/img/50/40821/w960_40821-0.png
PONTIAC G6 2010 Owners Manual
Trending: spark plugs replace, seat adjustment, spare tire location, automatic transmission, park assist, engine overheat, length
Page 361 of 448
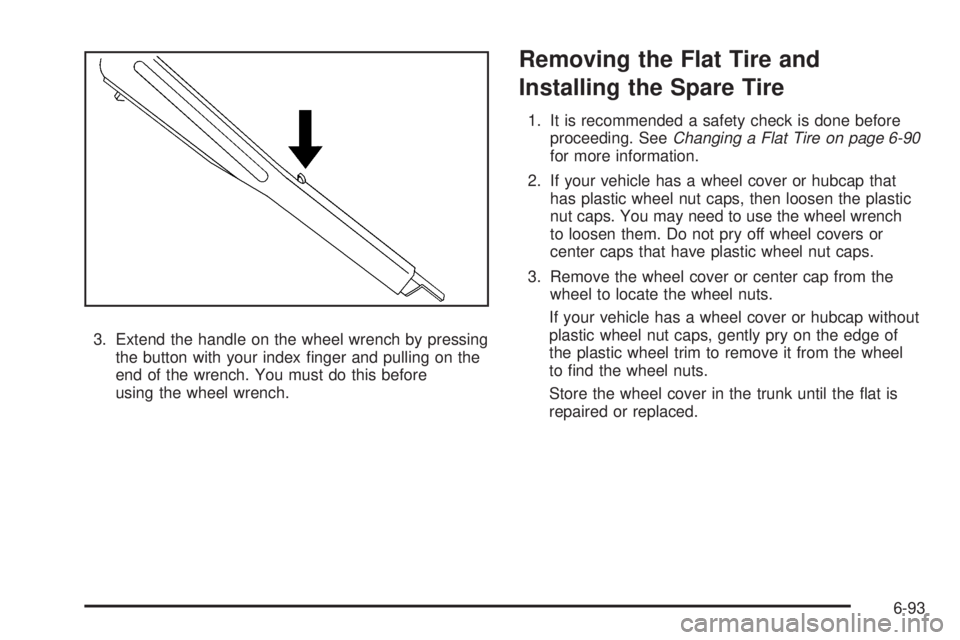
3. Extend the handle on the wheel wrench by pressing
the button with your index finger and pulling on the
end of the wrench. You must do this before
using the wheel wrench.
Removing the Flat Tire and
Installing the Spare Tire
1. It is recommended a safety check is done before
proceeding. SeeChanging a Flat Tire on page 6-90
for more information.
2. If your vehicle has a wheel cover or hubcap that
has plastic wheel nut caps, then loosen the plastic
nut caps. You may need to use the wheel wrench
to loosen them. Do not pry off wheel covers or
center caps that have plastic wheel nut caps.
3. Remove the wheel cover or center cap from the
wheel to locate the wheel nuts.
If your vehicle has a wheel cover or hubcap without
plastic wheel nut caps, gently pry on the edge of
the plastic wheel trim to remove it from the wheel
to find the wheel nuts.
Store the wheel cover in the trunk until the flat is
repaired or replaced.
6-93
Page 362 of 448
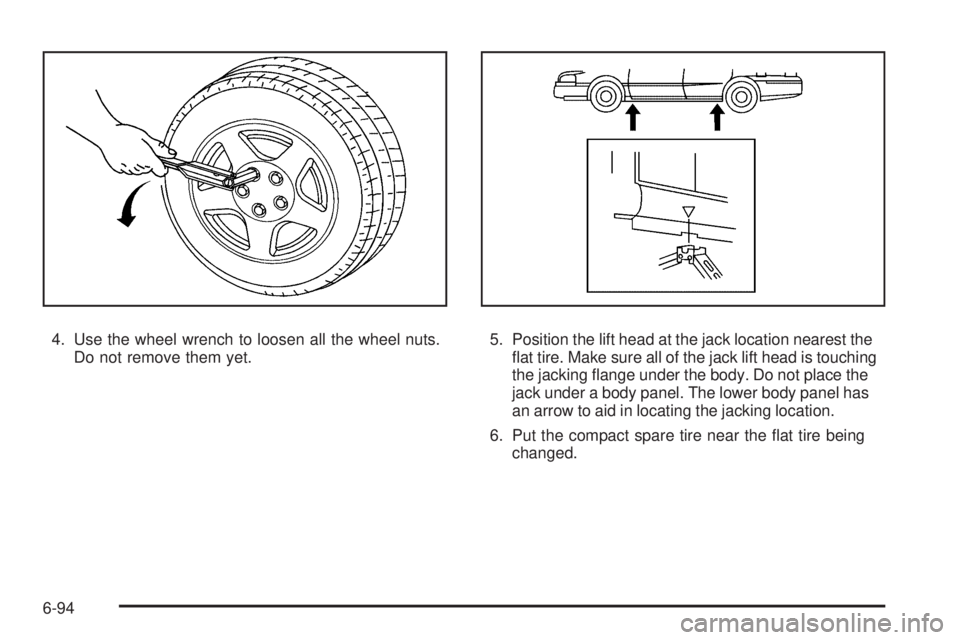
4. Use the wheel wrench to loosen all the wheel nuts.
Do not remove them yet.5. Position the lift head at the jack location nearest the
flat tire. Make sure all of the jack lift head is touching
the jacking flange under the body. Do not place the
jack under a body panel. The lower body panel has
an arrow to aid in locating the jacking location.
6. Put the compact spare tire near the flat tire being
changed.
6-94
Page 363 of 448
{WARNING:
Getting under a vehicle when it is jacked up is
dangerous. If the vehicle slips off the jack, you
could be badly injured or killed. Never get under a
vehicle when it is supported only by a jack.
{WARNING:
Raising your vehicle with the jack improperly
positioned can damage the vehicle and even
make the vehicle fall. To help avoid personal injury
and vehicle damage, be sure to fit the jack lift
head into the proper location before raising the
vehicle.7. Raise the vehicle by turning the wheel wrench
clockwise. Raise the vehicle far enough off the
ground so there is enough room for the compact
spare tire to fit underneath the wheel well.
6-95
Page 364 of 448
8. Remove all of the
wheel nuts.
9. Remove the flat tire.10. Remove any rust or dirt
from the wheel bolts,
mounting surfaces,
and spare wheel.
{WARNING:
Rust or dirt on a wheel, or on the parts to which it is
fastened, can make wheel nuts become loose after
time. The wheel could come off and cause an
accident. When changing a wheel, remove any rust
or dirt from places where the wheel attaches to the
vehicle. In an emergency, use a cloth or a paper
towel to do this; but be sure to use a scraper or wire
brush later, if needed, to get all the rust or dirt off.
SeeChanging a Flat Tire on page 6-90.
6-96
Page 365 of 448
11. Install the compact spare tire.
12. Put the wheel nuts back on with the rounded end of
the nuts toward the wheel. Tighten each nut by
hand until the wheel is held against the hub.
{WARNING:
Never use oil or grease on bolts or nuts because
the nuts might come loose. The vehicle’s wheel
could fall off, causing a crash.
13. Lower the vehicle by turning the wheel wrench
counterclockwise. Lower the jack completely.
6-97
Page 366 of 448

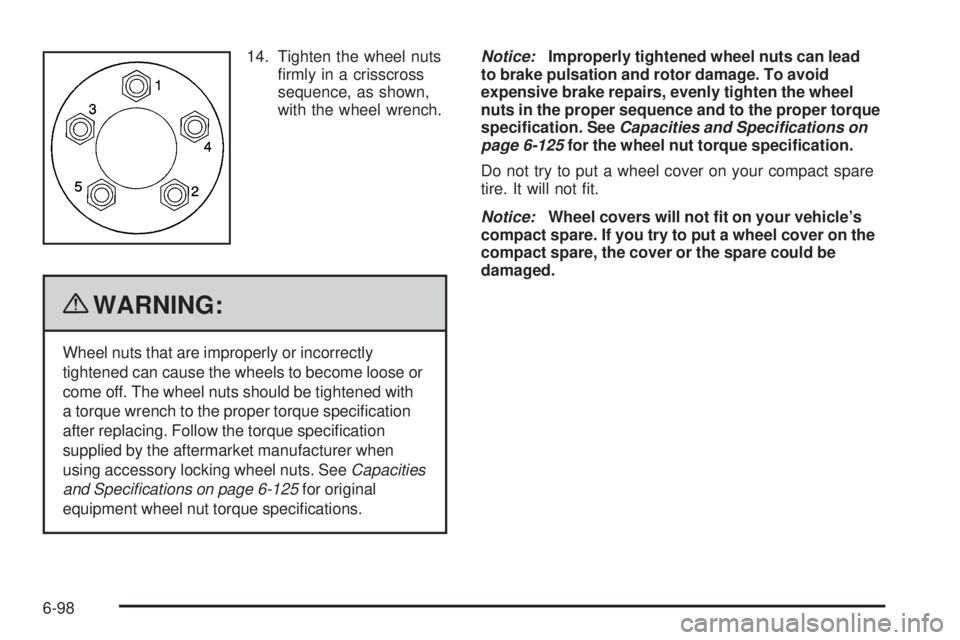
14. Tighten the wheel nuts
firmly in a crisscross
sequence, as shown,
with the wheel wrench.
{WARNING:
Wheel nuts that are improperly or incorrectly
tightened can cause the wheels to become loose or
come off. The wheel nuts should be tightened with
a torque wrench to the proper torque specification
after replacing. Follow the torque specification
supplied by the aftermarket manufacturer when
using accessory locking wheel nuts. SeeCapacities
and Speci�cations on page 6-125for original
equipment wheel nut torque specifications.Notice:Improperly tightened wheel nuts can lead
to brake pulsation and rotor damage. To avoid
expensive brake repairs, evenly tighten the wheel
nuts in the proper sequence and to the proper torque
speci�cation. SeeCapacities and Specifications on
page 6-125for the wheel nut torque speci�cation.
Do not try to put a wheel cover on your compact spare
tire. It will not fit.
Notice:Wheel covers will not �t on your vehicle’s
compact spare. If you try to put a wheel cover on the
compact spare, the cover or the spare could be
damaged.
6-98
Page 367 of 448
Storing a Flat or Spare Tire and
Tools
Storing a Flat Tire and Tools — All
Models Except GXP and Retractable
Hardtop
{WARNING:
Storing a jack, a tire, or other equipment in the
passenger compartment of the vehicle could
cause injury. In a sudden stop or collision, loose
equipment could strike someone. Store all these
in the proper place.
To store the flat tire and jack in the compact spare tire
compartment:
1. Open the trunk. SeeTrunk on page 3-11.
2. Remove the bolt extension (in the yellow sleeve)
from the jack and remove the center cap from the
wheel.3. Collapse the wrench using the same button used to
extend it.
4. Attach the wrench to the jack by placing the tab on
the wrench into the hole on the side of the jack.
Then place the wrench handle over the tab on the
side of the jack.
6-99
Page 368 of 448
5. Raise the jack to
the height shown and
lock the wrench
onto the jack.
6. Place the jack over the bolt (A) on the floor, making
sure it contacts the bolt. Thread the jack retainer
nut until it contacts the jack.7. With the valve stem up, place the tire on the
compartment floor with the rear of the tire under the
trim panel. The tire may not lay completely flat.
8. Line up the bolt with the wheel center.
9. With the yellow cap in place to prevent the wheel
from being scratched, screw the bolt extension
onto the bolt through the wheel center hole.
10. Remove the yellow cap from the bolt extension.
11. Secure the tire and wheel with the larger wing nut.
6-100
Page 369 of 448
A. Cover
B. Wing Nut
C. Extension
D. Flat Tire (valve stem up)
E. Nut
F. Jack
G. Bolt
The compact spare is for temporary use only. Replace
the compact spare tire with a full-size tire as soon
as you can. SeeCompact Spare Tire on page 6-106.
Storing a Flat Tire and
Tools — GXP and Retractable
Hardtop Models
To store the flat tire and jack in the compact spare tire
compartment:
1. Make sure the retractable hardtop is in the up
position.
2. Open the trunk. SeeTrunk on page 3-11.
3. If you have a retractable hardtop model, unlatch the
trunk cargo cover so that it is in the open position.
4. Remove the bolt extension (in the yellow sleeve)
from the jack and remove the center cap from the
wheel.
6-101
Page 370 of 448
5. Collapse the wrench using the same button used to
extend it.
6. Attach the wrench to the jack by placing the tab on
the wrench into the hole on the side of the jack.
Then place the wrench handle over the tab on the
side of the jack.7. Raise the jack to
the height shown
and lock the wrench
onto the jack.
8. Place the jack over the bolt (B) on the floor, making
sure it contacts the bolt.
6-102
Trending: trunk release, lights, transmission fluid, manual radio set, Fuses, check engine, wheel bolts


