window PONTIAC G8 2009 Owner's Manual
[x] Cancel search | Manufacturer: PONTIAC, Model Year: 2009, Model line: G8, Model: PONTIAC G8 2009Pages: 356, PDF Size: 1.83 MB
Page 71 of 356
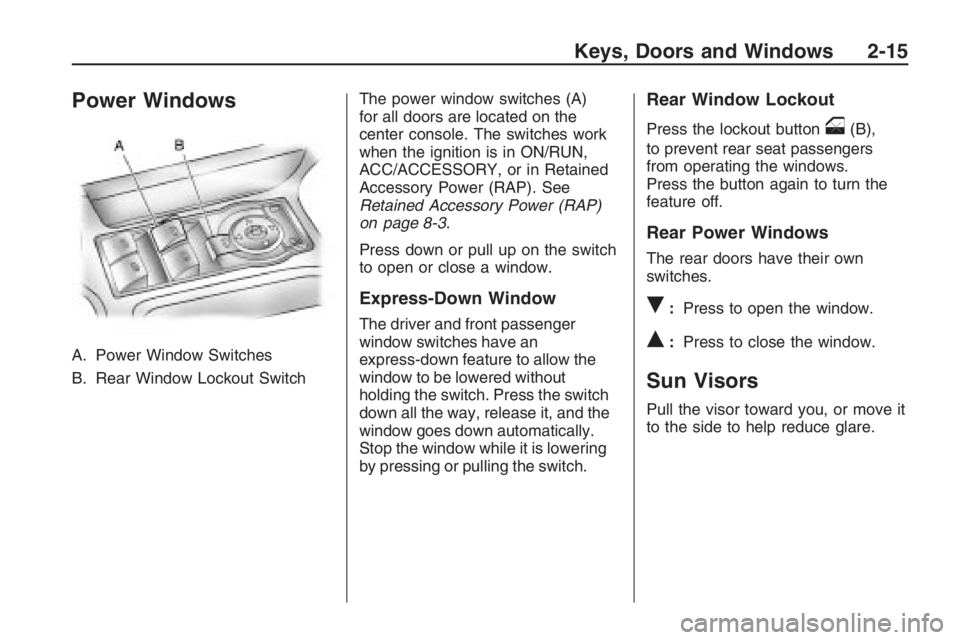
Power Windows
A. Power Window Switches
B. Rear Window Lockout SwitchThe power window switches (A)
for all doors are located on the
center console. The switches work
when the ignition is in ON/RUN,
ACC/ACCESSORY, or in Retained
Accessory Power (RAP). See
Retained Accessory Power (RAP)
on page 8-3.
Press down or pull up on the switch
to open or close a window.
Express-Down Window
The driver and front passenger
window switches have an
express-down feature to allow the
window to be lowered without
holding the switch. Press the switch
down all the way, release it, and the
window goes down automatically.
Stop the window while it is lowering
by pressing or pulling the switch.
Rear Window Lockout
Press the lockout buttono(B),
to prevent rear seat passengers
from operating the windows.
Press the button again to turn the
feature off.
Rear Power Windows
The rear doors have their own
switches.
R:Press to open the window.
Q:Press to close the window.
Sun Visors
Pull the visor toward you, or move it
to the side to help reduce glare.
Keys, Doors and Windows 2-15
Page 72 of 356
Mirrors
Manual Rearview Mirror
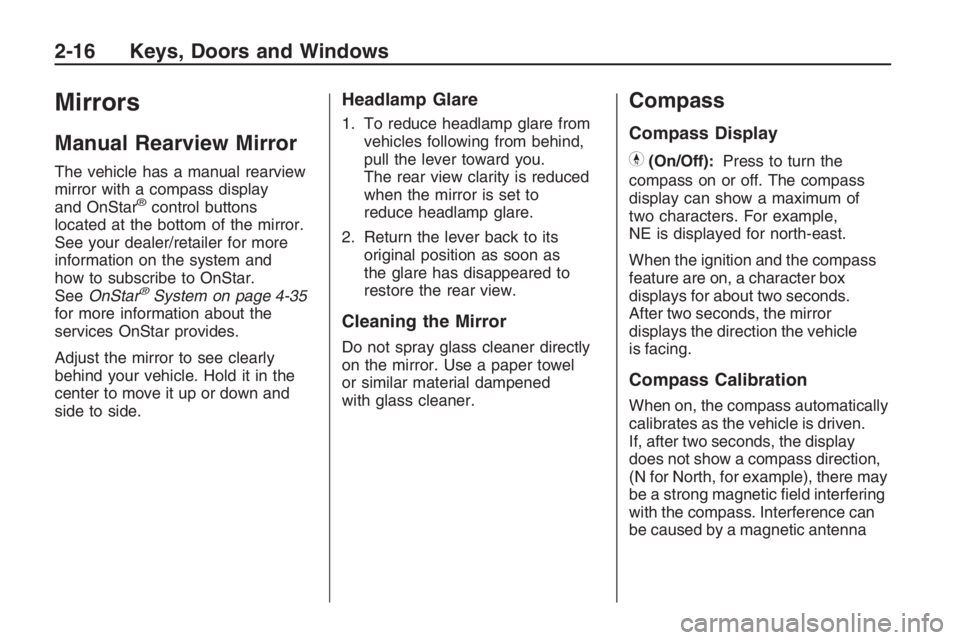
The vehicle has a manual rearview
mirror with a compass display
and OnStar
®control buttons
located at the bottom of the mirror.
See your dealer/retailer for more
information on the system and
how to subscribe to OnStar.
SeeOnStar
®System on page 4-35
for more information about the
services OnStar provides.
Adjust the mirror to see clearly
behind your vehicle. Hold it in the
center to move it up or down and
side to side.
Headlamp Glare
1. To reduce headlamp glare from
vehicles following from behind,
pull the lever toward you.
The rear view clarity is reduced
when the mirror is set to
reduce headlamp glare.
2. Return the lever back to its
original position as soon as
the glare has disappeared to
restore the rear view.
Cleaning the Mirror
Do not spray glass cleaner directly
on the mirror. Use a paper towel
or similar material dampened
with glass cleaner.
Compass
Compass Display
Y(On/Off):Press to turn the
compass on or off. The compass
display can show a maximum of
two characters. For example,
NE is displayed for north-east.
When the ignition and the compass
feature are on, a character box
displays for about two seconds.
After two seconds, the mirror
displays the direction the vehicle
is facing.
Compass Calibration
When on, the compass automatically
calibrates as the vehicle is driven.
If, after two seconds, the display
does not show a compass direction,
(N for North, for example), there may
be a strong magnetic �eld interfering
with the compass. Interference can
be caused by a magnetic antenna
2-16 Keys, Doors and Windows
Page 73 of 356
mount, magnetic note pad holder,
or a similar magnetic item. If CAL
should ever display in the compass
window, the compass might need
calibration.
Press and hold
Yfor several
seconds to activate the compass
calibration mode. CAL displays in
the compass window on the mirror.
The mirror can be calibrated by
driving the vehicle in circles
at 5 mph (8 km/h) or less until the
display shows a direction.
Compass Variance
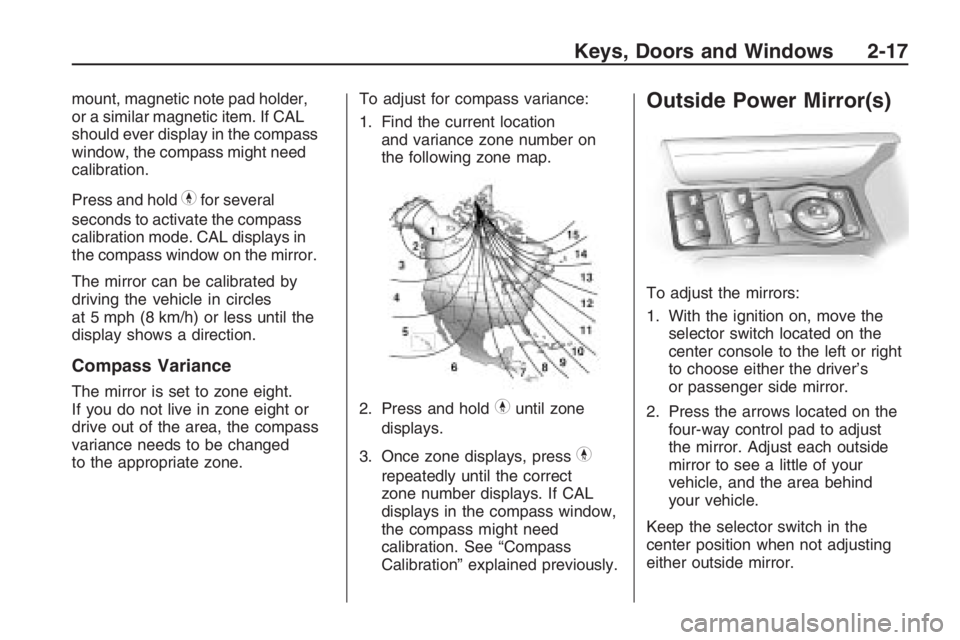
The mirror is set to zone eight.
If you do not live in zone eight or
drive out of the area, the compass
variance needs to be changed
to the appropriate zone.To adjust for compass variance:
1. Find the current location
and variance zone number on
the following zone map.
2. Press and holdYuntil zone
displays.
3. Once zone displays, press
Y
repeatedly until the correct
zone number displays. If CAL
displays in the compass window,
the compass might need
calibration. See “Compass
Calibration” explained previously.
Outside Power Mirror(s)
To adjust the mirrors:
1. With the ignition on, move the
selector switch located on the
center console to the left or right
to choose either the driver’s
or passenger side mirror.
2. Press the arrows located on the
four-way control pad to adjust
the mirror. Adjust each outside
mirror to see a little of your
vehicle, and the area behind
your vehicle.
Keep the selector switch in the
center position when not adjusting
either outside mirror.
Keys, Doors and Windows 2-17
Page 74 of 356
Manually fold the mirrors inward to
prevent damage when going
through an automatic car wash.
To fold, push the mirror toward the
vehicle. Push the mirror outward,
to return to its original position.
Outside Convex Mirror
{CAUTION
A convex mirror can make things
(like other vehicles) look farther
away than they really are. If you
cut too sharply into the right lane,
you could hit a vehicle on the
right. Check the inside mirror or
glance over your shoulder before
changing lanes.
The passenger side mirror is convex
shaped. A convex mirror’s surface
is curved so more can be seen from
the driver’s seat.
Sunroof
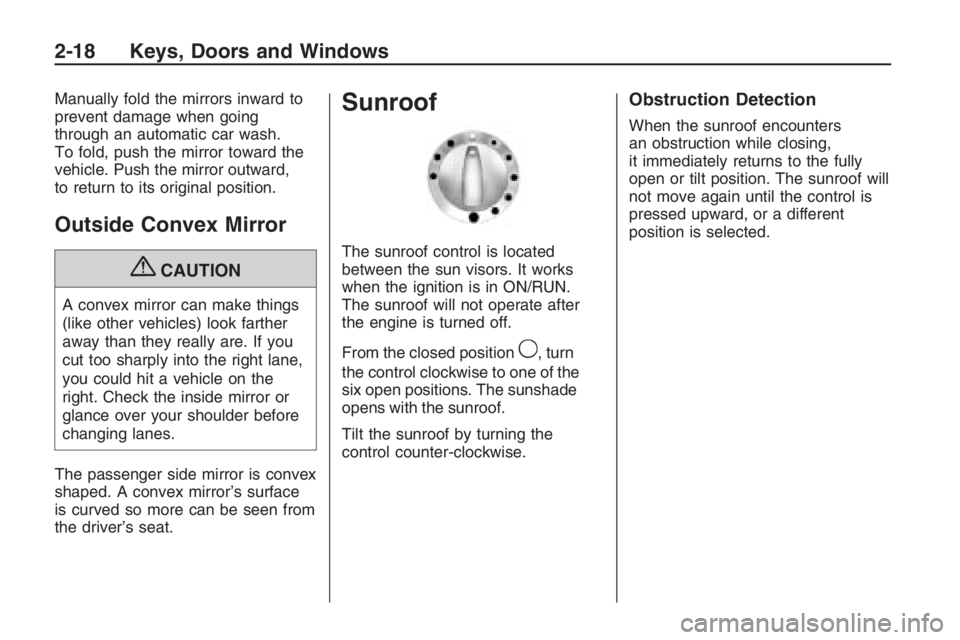
The sunroof control is located
between the sun visors. It works
when the ignition is in ON/RUN.
The sunroof will not operate after
the engine is turned off.
From the closed position
9, turn
the control clockwise to one of the
six open positions. The sunshade
opens with the sunroof.
Tilt the sunroof by turning the
control counter-clockwise.
Obstruction Detection
When the sunroof encounters
an obstruction while closing,
it immediately returns to the fully
open or tilt position. The sunroof will
not move again until the control is
pressed upward, or a different
position is selected.
2-18 Keys, Doors and Windows
Page 79 of 356
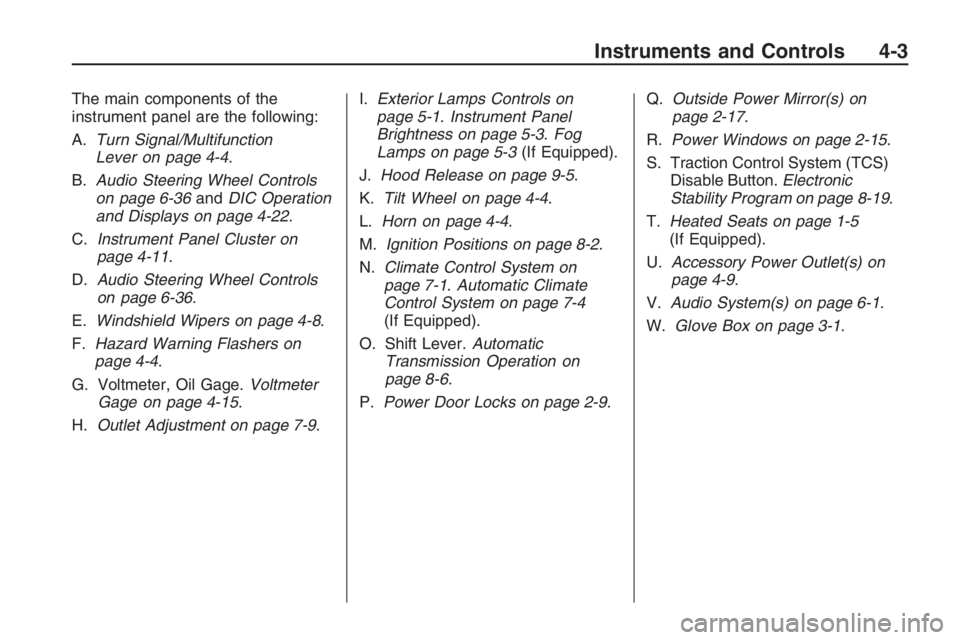
The main components of the
instrument panel are the following:
A.Turn Signal/Multifunction
Lever on page 4-4.
B.Audio Steering Wheel Controls
on page 6-36andDIC Operation
and Displays on page 4-22.
C.Instrument Panel Cluster on
page 4-11.
D.Audio Steering Wheel Controls
on page 6-36.
E.Windshield Wipers on page 4-8.
F.Hazard Warning Flashers on
page 4-4.
G. Voltmeter, Oil Gage.Voltmeter
Gage on page 4-15.
H.Outlet Adjustment on page 7-9.I.Exterior Lamps Controls on
page 5-1.Instrument Panel
Brightness on page 5-3.Fog
Lamps on page 5-3(If Equipped).
J.Hood Release on page 9-5.
K.Tilt Wheel on page 4-4.
L.Horn on page 4-4.
M.Ignition Positions on page 8-2.
N.Climate Control System on
page 7-1.Automatic Climate
Control System on page 7-4
(If Equipped).
O. Shift Lever.Automatic
Transmission Operation on
page 8-6.
P.Power Door Locks on page 2-9.Q.Outside Power Mirror(s) on
page 2-17.
R.Power Windows on page 2-15.
S. Traction Control System (TCS)
Disable Button.Electronic
Stability Program on page 8-19.
T.Heated Seats on page 1-5
(If Equipped).
U.Accessory Power Outlet(s) on
page 4-9.
V.Audio System(s) on page 6-1.
W.Glove Box on page 3-1.
Instruments and Controls 4-3
Page 157 of 356
Climate Controls
Climate Controls
Climate Control System......7-1
Automatic Climate
Control System................ .7-4
Outlet Adjustment...............7-9
Climate Controls
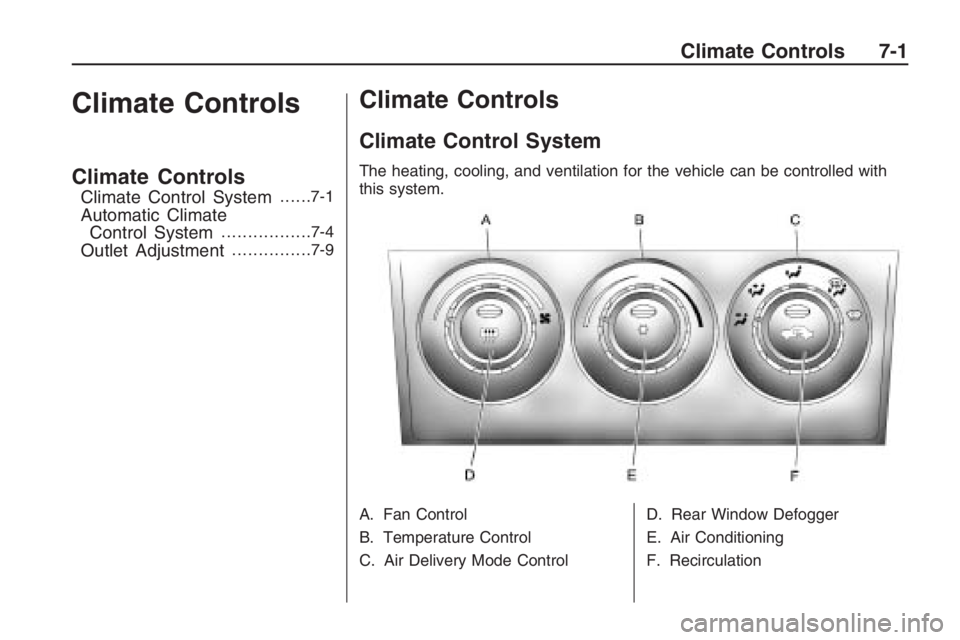
Climate Control System
The heating, cooling, and ventilation for the vehicle can be controlled with
this system.
A. Fan Control
B. Temperature Control
C. Air Delivery Mode Control D. Rear Window Defogger
E. Air Conditioning
F. Recirculation
Climate Controls 7-1
Page 158 of 356
9(Fan Control):Turn clockwise
or counterclockwise to increase or
decrease the fan speed. Turn the
knob all the way counterclockwise
to turn the system off.
Temperature Control:Turn
clockwise or counterclockwise to
increase or decrease the
temperature inside the vehicle.
Air Delivery Mode Control:Turn
the knob to change the current
air�ow mode.
Select from the following:
0(Vent):Air is directed to the
instrument panel outlets.
1(Bi-Level):Air is divided
between the instrument panel
outlets and the �oor outlets.
d(Floor):Air is directed to the
�oor outlets with some air directed to
the windshield and side window
outlets.
4(Defog):Air is directed to the
windshield, �oor outlets, and
side window vents. Use this mode
to clear the windows of fog or
moisture and warm the passengers.
5(Defrost):Air is directed to
the windshield, with some air
directed to the side window vents.
Use this mode to quickly remove fog
or frost from the windshield.
When defrost is selected, the air
conditioning turns on automatically to
improve defrosting performance. In
this mode the air conditioning cannot
be turned off and the recirculation
mode cannot be turned on.
Air Conditioning
#(Air Conditioning):Press to
turn on or off. An indicator comes on
when the air conditioning is on.
The fan must be on to use the air
conditioning.The air conditioning cannot be
turned off in defrost mode. If
#is
pressed, the indicator light
�ashes three times and the air
conditioning stays on.
For quick cool down on hot days,
select the following settings
together:
1. Press
#to turn on the air
conditioning.
2. Press
/to turn on the
recirculation.
3. Select the coolest temperature
and highest fan speed.
4. Open the windows brie�y to
let hot air escape and then
close them.
5. Once the vehicle’s interior cools
down, turn off the recirculation,
and select
0. This maintains the
best comfort level during
extended driving.
7-2 Climate Controls
Page 159 of 356
The air conditioning system removes
moisture from the air, so a small
amount of water might drip under the
vehicle while idling or after turning off
the engine. This is normal.
The air conditioning should be
turned on for at least �ve to
ten minutes once every two weeks
to lubricate the air conditioning
seals, even in the winter.
Recirculation
/(Recirculation):Press to
change the air intake between
recirculated air and outside air.
An indicator light comes on when
the recirculation is on.
The recirculation mode recycles
interior air and is not recommended
for extended use. If it is used for
a long period of time, the system
automatically lets some fresh air into
the vehicle for ventilation.The recirculation mode cannot be
turned on in defrost mode. If
/is
pressed, the indicator light �ashes
three times and recirculation
stays off.
Rear Window Defogger
The rear window defogger uses a
warming grid to remove fog from the
rear window. It only works when
the ignition is in ON/RUN.
+(Rear Window Defogger):
Press to turn on or off. An indicator
comes on when the rear window
defogger is on. The rear window
defogger turns off automatically if it
is left on.
Notice:Do not use anything
sharp on the inside of the rear
window. If you do, you could cut
or damage the warming grid, and
the repairs would not be covered
by the vehicle warranty. Do not
attach a temporary vehicle
license, tape, a decal or anything
similar to the defogger grid.
Passenger Compartment
Air Filter
The vehicle has a passenger
compartment air �lter that �lters the
outside air entering the vehicle.
The �lter removes contaminants,
such as pollen and dust. See
your dealer/retailer for more
information.
Climate Controls 7-3
Page 160 of 356

Automatic Climate Control System
The heating, cooling, and ventilation for the vehicle can be controlled with
this system. For vehicles with the remote start feature, the climate control
system will turn on with a remote start. SeeRemote Vehicle Start on page 2-6.
A. Rear Window Defogger
B. Defrost
C. Fan Control
D. Air Delivery Mode Control
E. Air Conditioning F. EXT TEMP
G. ZONE
H. Recirculation
I. AUTO
J. Power
O(OFF):
Press to turn the climate
control system off. Press any button
to turn the system on again. While
the climate control system is off the
recirculation and rear window
defogger can still be turned on.
Automatic Operation
AUTO (Automatic): When this
button is pressed, the system
automatically controls the inside
temperature, the air delivery mode,
the air conditioning compressor, and
the fan speed. When AUTO appears
in the display, the system is in full
automatic operation. If any of the
controls are manually adjusted, the
AUTO indicator turns off in the
display.
1. Press the AUTO button, if the AUTO indicator does
not appear on the display.
7-4 Climate Controls
Page 162 of 356
Dual-Zone (DZ) Mode:Allows
different temperatures to be set for
the driver and passenger sides
or to link them. When linked,
the passenger side temperature
uses the same temperature setting
as the driver side.
Turn the AUTO control to set a
different temperature for the
passenger.
Press and hold the AUTO button
for at least three seconds to link
the passenger and driver side
temperatures. Linking automatically
occurs if the passenger and driver
sides are set to the same
temperature when the ignition is
turned on.e*(Air Delivery Mode Control):
Press to change the current air�ow
mode. The current mode selection
appears in the display screen.
Changing the mode cancels the
automatic operation and the system
goes into semi-automatic operation.
Press AUTO to return to automatic
operation.
Select from the following:
0(Vent):Air is directed to the
instrument panel outlets.
1(Bi-Level):Air is divided
between the instrument panel
outlets and the �oor outlets. Cooler
air is directed to the upper outlets
and warmer air to the �oor outlets.
d(Floor):Air is directed to the
�oor outlets with some air directed
to the outer instrument panel,
windshield and side window outlets.
4(Defog):Air is directed to the
windshield, �oor and side window
outlets. Use this mode to clear
the windows of fog or moisture and
warm the passengers.
5(Defrost):Press to turn the
defrost on or off. The
5indicator
appears in the display. A portion
of the air is directed to the
windshield, with some air directed to
the side window vents.
When defrost is selected, the air
conditioning turns on automatically to
improve defrosting performance. In
this mode the air conditioning cannot
be turned off and the recirculation
mode cannot be turned on.
7-6 Climate Controls