mirror PONTIAC G8 2009 Owners Manual
[x] Cancel search | Manufacturer: PONTIAC, Model Year: 2009, Model line: G8, Model: PONTIAC G8 2009Pages: 356, PDF Size: 1.83 MB
Page 1 of 356
Seats and Restraints......... 1-1
Front Seats
.................... 1-2
Rear Seats
.................... 1-5
Safety Belts
................... 1-5
Airbag System
..............1-20
Child Restraints
.............1-34
Keys, Doors and
Windows............................ 2-1
Keys
............................. 2-2
Doors and Locks
............ 2-8
Theft-Deterrent
Systems
...................2-11
Windows
......................2-14
Mirrors
.........................2-16
Sunroof
........................2-18
Storage.............................. 3-1
Storage
......................... 3-1
Instruments and
Controls............................. 4-1
Instrument Panel
Overview
.................... 4-2
Warning Lights, Gages, and
Indicators
..................4-10Driver Information
Center (DIC)
.............4-22
OnStar
®System
............4-35
Lighting............................. 5-1
Lighting
......................... 5-1
Infotainment...................... 6-1
Audio System(s)
............. 6-1
Climate Controls............... 7-1
Climate Controls
............. 7-1
Driving and Operating....... 8-1
Starting and Operating
Your Vehicle
............... 8-2
Driving Your Vehicle
......8-16
Fuel
............................8-34
Vehicle Service
and Care............................ 9-1
Service
.......................... 9-2
Owner Checks
................ 9-5
Headlamp Aiming
..........9-28
Bulb Replacement
.........9-31
Electrical System
...........9-36
Tires
...........................9-42Tire Changing
...............9-66
Jump Starting
...............9-84
Towing
........................9-88
Appearance Care
..........9-95
Technical Data.................10-1
Vehicle Identi�cation
......10-1
Capacities and
Speci�cations
............10-2
Service and
Maintenance.....................11-1
Service and
Maintenance
..............11-1
Customer Information......12-1
Customer Information
.....12-1
Reporting Safety
Defects
...................12-14
Vehicle Data Recording
and Privacy
.............12-16
Index....................................i-1
2009 Pontiac G8 Owner ManualM
Page 31 of 356
Passenger Sensing
System
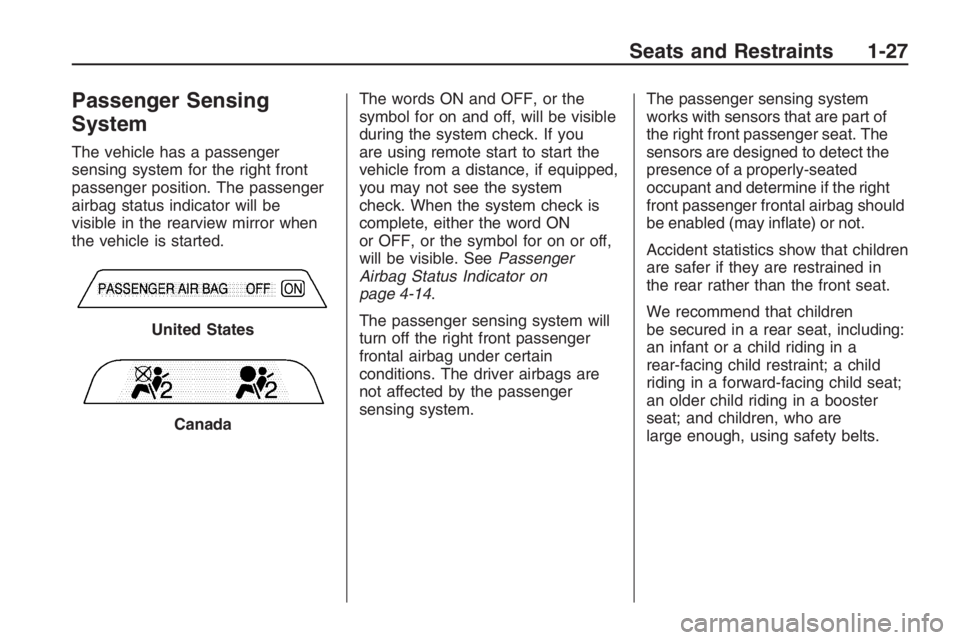
The vehicle has a passenger
sensing system for the right front
passenger position. The passenger
airbag status indicator will be
visible in the rearview mirror when
the vehicle is started.The words ON and OFF, or the
symbol for on and off, will be visible
during the system check. If you
are using remote start to start the
vehicle from a distance, if equipped,
you may not see the system
check. When the system check is
complete, either the word ON
or OFF, or the symbol for on or off,
will be visible. SeePassenger
Airbag Status Indicator on
page 4-14.
The passenger sensing system will
turn off the right front passenger
frontal airbag under certain
conditions. The driver airbags are
not affected by the passenger
sensing system.The passenger sensing system
works with sensors that are part of
the right front passenger seat. The
sensors are designed to detect the
presence of a properly-seated
occupant and determine if the right
front passenger frontal airbag should
be enabled (may in�ate) or not.
Accident statistics show that children
are safer if they are restrained in
the rear rather than the front seat.
We recommend that children
be secured in a rear seat, including:
an infant or a child riding in a
rear-facing child restraint; a child
riding in a forward-facing child seat;
an older child riding in a booster
seat; and children, who are
large enough, using safety belts. United States
Canada
Seats and Restraints 1-27
Page 36 of 356
Adding Equipment to
Your Airbag-Equipped
Vehicle
Q:Is there anything I might add to
or change about the vehicle
that could keep the airbags
from working properly?
A:Yes. If you add things that
change the vehicle’s frame,
bumper system, height, front end
or side sheet metal, they may
keep the airbag system from
working properly. Changing or
moving any parts of the front
seats, safety belts, the airbag
sensing and diagnostic module,
steering wheel, instrument panel,
roof-rail airbag modules, the
inside rearview mirror, ceiling
headliner or pillar garnish trim,
front sensors, or airbag wiring
can affect the operation of the
airbag system.In addition, the vehicle has a
passenger sensing system for the
right front passenger position,
which includes sensors that are
part of the passenger’s seat.
The passenger sensing system
may not operate properly if the
original seat trim is replaced
with non-GM covers, upholstery
or trim, or with GM covers,
upholstery or trim designed for
a different vehicle. Any object,
such as an aftermarket seat
heater or a comfort enhancing
pad or device, installed under or
on top of the seat fabric, could
also interfere with the operation of
the passenger sensing system.
This could either prevent proper
deployment of the passenger
airbag(s) or prevent the
passenger sensing system from
properly turning off the passenger
airbag(s). SeePassenger
Sensing System on page 1-27.If you have any questions about
this, you should contact Customer
Assistance before you modify
your vehicle. The phone numbers
and addresses for Customer
Assistance are in Step Two of the
Customer Satisfaction Procedure
in this manual. SeeCustomer
Satisfaction Procedure on
page 12-1.
Q:Because I have a disability,
I have to get my vehicle
modi�ed. How can I �nd out
whether this will affect my
airbag system?
A:If you have questions, call
Customer Assistance.
The phone numbers and
addresses for Customer
Assistance are in Step Two
of the Customer Satisfaction
Procedure in this manual.
SeeCustomer Satisfaction
Procedure on page 12-1.
1-32 Seats and Restraints
Page 57 of 356
Keys, Doors and
Windows
Keys
Keys...................................2-2
Remote Keyless Entry
(RKE) System...................2-3
Remote Keyless Entry
(RKE) System
Operation
..........................2-4
Remote Vehicle Start..........2-6
Doors and Locks
Door Locks.........................2-8
Power Door Locks..............2-9
Rear Door Security
Locks................................2-9
Trunk................................2-10
Theft-Deterrent Systems
Theft-Deterrent Systems. . . .2-11
Immobilizer.......................2-11
Immobilizer Operation.......2-12
Content Theft-Deterrent.....2-13
Windows
Windows...........................2-14
Power Windows................2-15
Sun Visors........................2-15
Mirrors
Manual Rearview Mirror. . . .2-16
Compass..........................2-16
Outside Power Mirror(s). . . .2-17
Outside Convex Mirror......2-18
Sunroof
Sunroof.............................2-18
Keys, Doors and Windows 2-1
Page 72 of 356
Mirrors
Manual Rearview Mirror
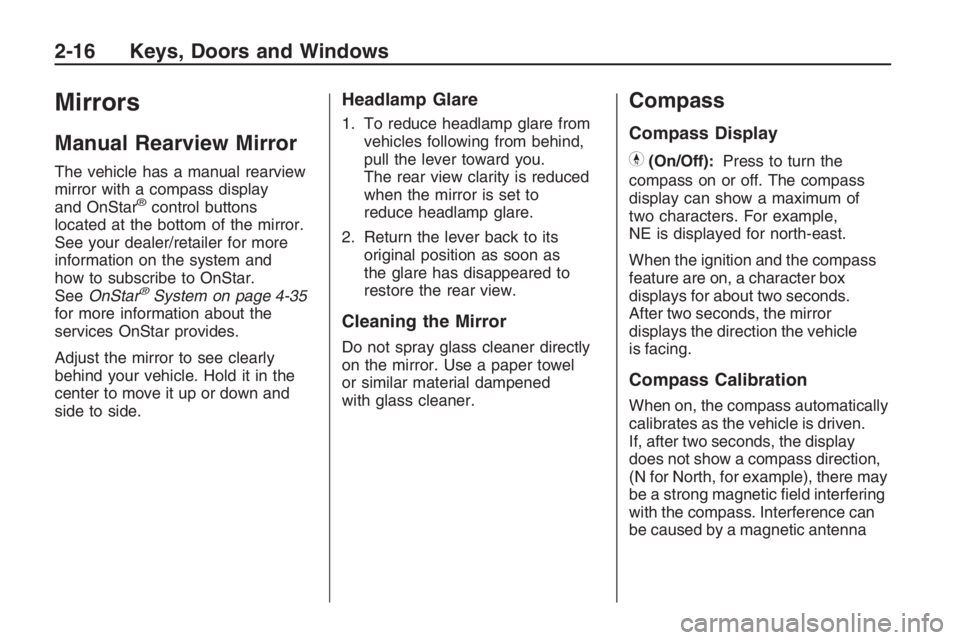
The vehicle has a manual rearview
mirror with a compass display
and OnStar
®control buttons
located at the bottom of the mirror.
See your dealer/retailer for more
information on the system and
how to subscribe to OnStar.
SeeOnStar
®System on page 4-35
for more information about the
services OnStar provides.
Adjust the mirror to see clearly
behind your vehicle. Hold it in the
center to move it up or down and
side to side.
Headlamp Glare
1. To reduce headlamp glare from
vehicles following from behind,
pull the lever toward you.
The rear view clarity is reduced
when the mirror is set to
reduce headlamp glare.
2. Return the lever back to its
original position as soon as
the glare has disappeared to
restore the rear view.
Cleaning the Mirror
Do not spray glass cleaner directly
on the mirror. Use a paper towel
or similar material dampened
with glass cleaner.
Compass
Compass Display
Y(On/Off):Press to turn the
compass on or off. The compass
display can show a maximum of
two characters. For example,
NE is displayed for north-east.
When the ignition and the compass
feature are on, a character box
displays for about two seconds.
After two seconds, the mirror
displays the direction the vehicle
is facing.
Compass Calibration
When on, the compass automatically
calibrates as the vehicle is driven.
If, after two seconds, the display
does not show a compass direction,
(N for North, for example), there may
be a strong magnetic �eld interfering
with the compass. Interference can
be caused by a magnetic antenna
2-16 Keys, Doors and Windows
Page 73 of 356
mount, magnetic note pad holder,
or a similar magnetic item. If CAL
should ever display in the compass
window, the compass might need
calibration.
Press and hold
Yfor several
seconds to activate the compass
calibration mode. CAL displays in
the compass window on the mirror.
The mirror can be calibrated by
driving the vehicle in circles
at 5 mph (8 km/h) or less until the
display shows a direction.
Compass Variance
The mirror is set to zone eight.
If you do not live in zone eight or
drive out of the area, the compass
variance needs to be changed
to the appropriate zone.To adjust for compass variance:
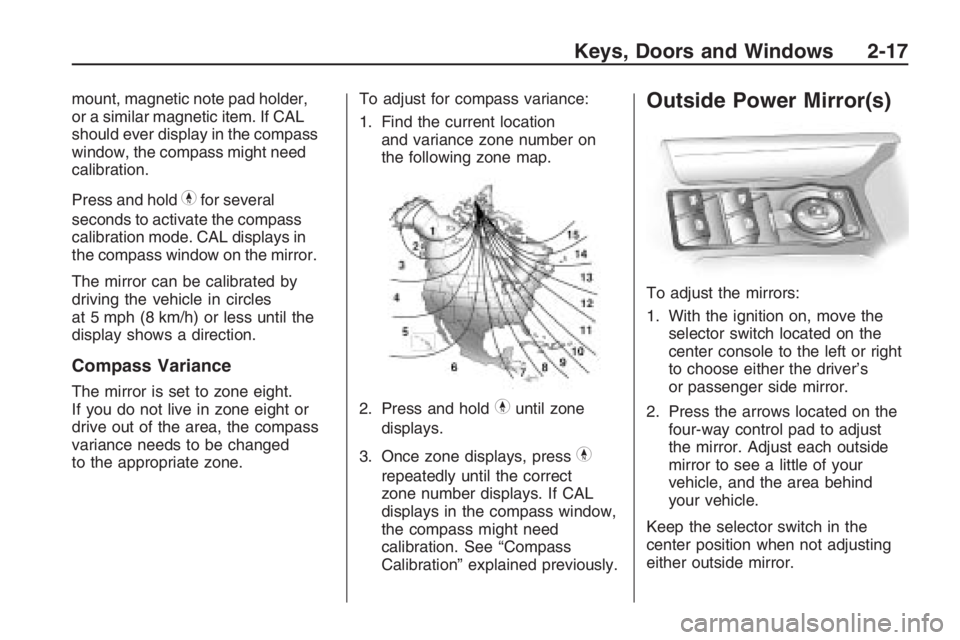
1. Find the current location
and variance zone number on
the following zone map.
2. Press and holdYuntil zone
displays.
3. Once zone displays, press
Y
repeatedly until the correct
zone number displays. If CAL
displays in the compass window,
the compass might need
calibration. See “Compass
Calibration” explained previously.
Outside Power Mirror(s)
To adjust the mirrors:
1. With the ignition on, move the
selector switch located on the
center console to the left or right
to choose either the driver’s
or passenger side mirror.
2. Press the arrows located on the
four-way control pad to adjust
the mirror. Adjust each outside
mirror to see a little of your
vehicle, and the area behind
your vehicle.
Keep the selector switch in the
center position when not adjusting
either outside mirror.
Keys, Doors and Windows 2-17
Page 74 of 356
Manually fold the mirrors inward to
prevent damage when going
through an automatic car wash.
To fold, push the mirror toward the
vehicle. Push the mirror outward,
to return to its original position.
Outside Convex Mirror
{CAUTION
A convex mirror can make things
(like other vehicles) look farther
away than they really are. If you
cut too sharply into the right lane,
you could hit a vehicle on the
right. Check the inside mirror or
glance over your shoulder before
changing lanes.
The passenger side mirror is convex
shaped. A convex mirror’s surface
is curved so more can be seen from
the driver’s seat.
Sunroof
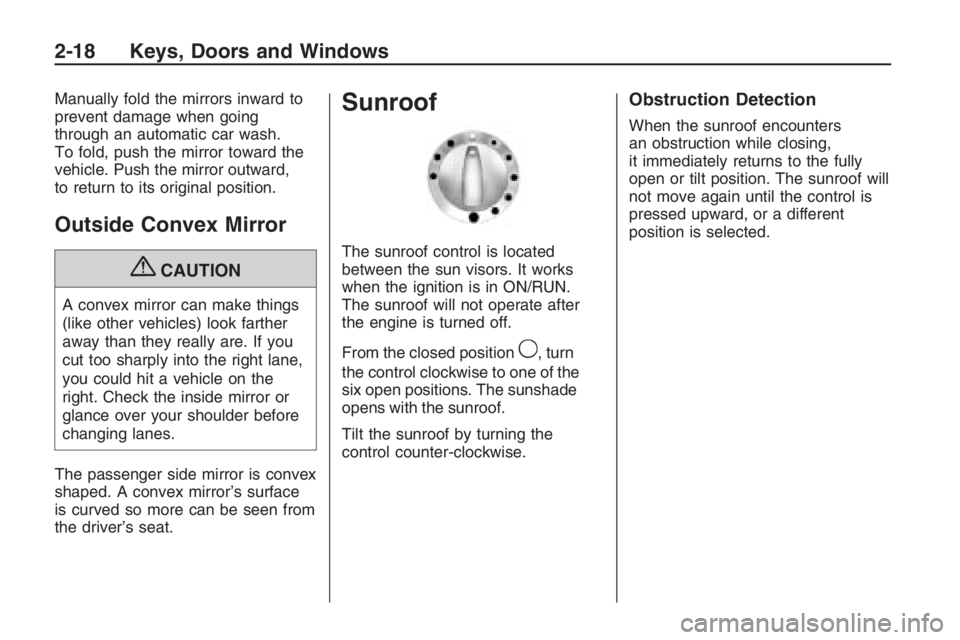
The sunroof control is located
between the sun visors. It works
when the ignition is in ON/RUN.
The sunroof will not operate after
the engine is turned off.
From the closed position
9, turn
the control clockwise to one of the
six open positions. The sunshade
opens with the sunroof.
Tilt the sunroof by turning the
control counter-clockwise.
Obstruction Detection
When the sunroof encounters
an obstruction while closing,
it immediately returns to the fully
open or tilt position. The sunroof will
not move again until the control is
pressed upward, or a different
position is selected.
2-18 Keys, Doors and Windows
Page 79 of 356
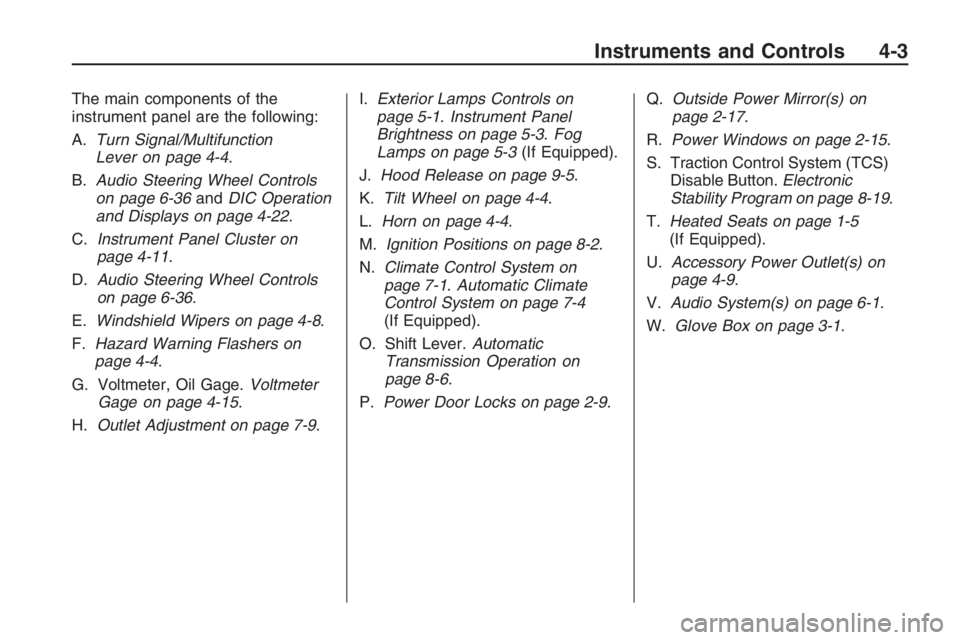
The main components of the
instrument panel are the following:
A.Turn Signal/Multifunction
Lever on page 4-4.
B.Audio Steering Wheel Controls
on page 6-36andDIC Operation
and Displays on page 4-22.
C.Instrument Panel Cluster on
page 4-11.
D.Audio Steering Wheel Controls
on page 6-36.
E.Windshield Wipers on page 4-8.
F.Hazard Warning Flashers on
page 4-4.
G. Voltmeter, Oil Gage.Voltmeter
Gage on page 4-15.
H.Outlet Adjustment on page 7-9.I.Exterior Lamps Controls on
page 5-1.Instrument Panel
Brightness on page 5-3.Fog
Lamps on page 5-3(If Equipped).
J.Hood Release on page 9-5.
K.Tilt Wheel on page 4-4.
L.Horn on page 4-4.
M.Ignition Positions on page 8-2.
N.Climate Control System on
page 7-1.Automatic Climate
Control System on page 7-4
(If Equipped).
O. Shift Lever.Automatic
Transmission Operation on
page 8-6.
P.Power Door Locks on page 2-9.Q.Outside Power Mirror(s) on
page 2-17.
R.Power Windows on page 2-15.
S. Traction Control System (TCS)
Disable Button.Electronic
Stability Program on page 8-19.
T.Heated Seats on page 1-5
(If Equipped).
U.Accessory Power Outlet(s) on
page 4-9.
V.Audio System(s) on page 6-1.
W.Glove Box on page 3-1.
Instruments and Controls 4-3
Page 90 of 356
Passenger Airbag Status
Indicator
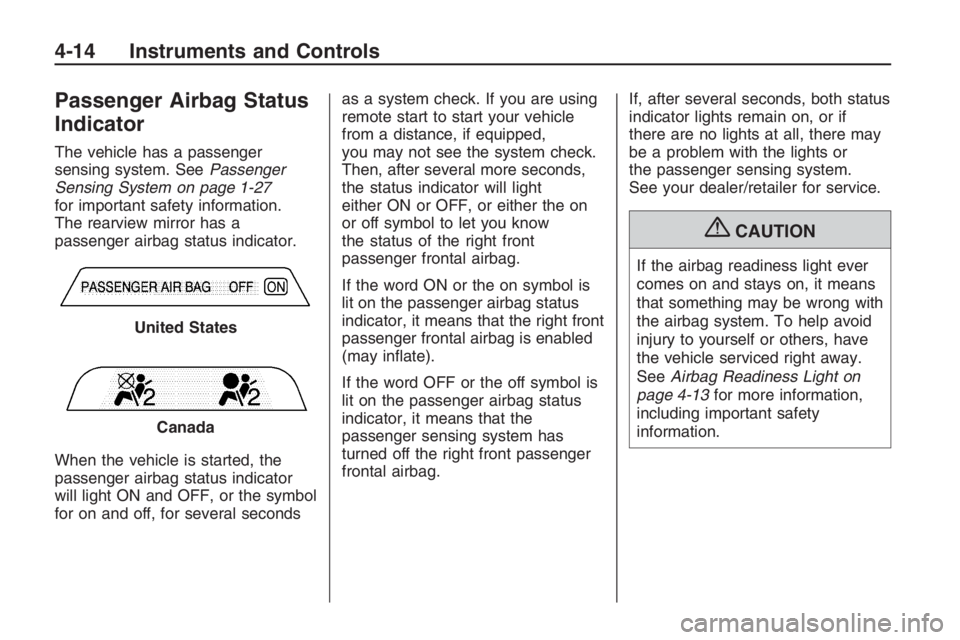
The vehicle has a passenger
sensing system. SeePassenger
Sensing System on page 1-27
for important safety information.
The rearview mirror has a
passenger airbag status indicator.
When the vehicle is started, the
passenger airbag status indicator
will light ON and OFF, or the symbol
for on and off, for several secondsas a system check. If you are using
remote start to start your vehicle
from a distance, if equipped,
you may not see the system check.
Then, after several more seconds,
the status indicator will light
either ON or OFF, or either the on
or off symbol to let you know
the status of the right front
passenger frontal airbag.
If the word ON or the on symbol is
lit on the passenger airbag status
indicator, it means that the right front
passenger frontal airbag is enabled
(may in�ate).
If the word OFF or the off symbol is
lit on the passenger airbag status
indicator, it means that the
passenger sensing system has
turned off the right front passenger
frontal airbag.If, after several seconds, both status
indicator lights remain on, or if
there are no lights at all, there may
be a problem with the lights or
the passenger sensing system.
See your dealer/retailer for service.
{CAUTION
If the airbag readiness light ever
comes on and stays on, it means
that something may be wrong with
the airbag system. To help avoid
injury to yourself or others, have
the vehicle serviced right away.
SeeAirbag Readiness Light on
page 4-13for more information,
including important safety
information. United States
Canada
4-14 Instruments and Controls
Page 99 of 356
Trip/Fuel Menu Items
Press3to scroll through the
following menu items:
Speedometer
UNITS
Tire Pressure
Customize Options
Odometer/Trip Odometer
Distance/Time To Go
Range
Avg (Average)Speed/Avg
(Average) Fuel
OverSpeed
Speedometer
Press
3until the speedometer
is displayed.
The speedometer shows how fast
the vehicle is moving in either miles
per hour (MPH) or kilometers per
hour (km/h). To switch between
English and metric measurements,
see “UNITS” later in this section.The digital speedometer display can
be enabled or disabled. See “Digital
Speedometer” underDIC Vehicle
Customization on page 4-31for more
information.
UNITS
Move the thumbwheel up
Qor
down
Rto highlight English or Metric
when the UNITS display is active.
Press
8to con�rm the setting.
This will change the displays on the
cluster, DIC, and the temperature
display in the mirror to either English
or metric measurements.
Tire Pressure
Press
3until Tire Pressure is
displayed.
The display will show a vehicle and
the approximate pressures of all four
tires. Tire pressure is displayed in
either pounds per square inch (PSI)
or in kilopascal (kPa).
This display can be customized.
SeeDIC Vehicle Customization on
page 4-31for more information.Customize Options
SeeDIC Vehicle Customization on
page 4-31for more information.
Odometer/Trip Odometer
Press
3until the Odometer/Trip
Odometer is displayed.
The odometer display shows the
distance the vehicle has been
driven in either miles (MI) or
kilometers (km). To switch between
English and metric measurements,
see “UNITS” earlier in this section.
The Trip Odometer display shows
the current distance traveled since
the last reset for the trip odometer.
The trip odometer can be reset to
zero by pressing and holding
8
while the trip odometer value is
highlighted. If
8is only pressed
brie�y, the Avg Speed/Avg Fuel
will be reset as well.
Instruments and Controls 4-23