spare wheel PONTIAC GRAND AM 2003 Owners Manual
[x] Cancel search | Manufacturer: PONTIAC, Model Year: 2003, Model line: GRAND AM, Model: PONTIAC GRAND AM 2003Pages: 354, PDF Size: 16.3 MB
Page 224 of 354
Section 5 Service and Appearance Care
Service ............................................................ 5.3
Doing Your Own Service Work
......................... 5.3
Adding Equipment to the Outside of Your
Vehicle
...................................................... 5.4
Fuel ................................................................ 5.5
Gasoline Octane
............................................ 5.5
Gasoline Specifications
.................................... 5.5
California Fuel
............................................... 5-6
Additives
....................................................... 5-6
Fuels in Foreign Countries
............................... 5-7
Filling
a Portable Fuel Container ..................... -5-9
Filling Your Tank
............................................ 5-7
Checking Things Under the Hood
.................................................... 5-10
Hood Release
.............................................. 5-10
Engine Compartment Overview
....................... 5-12
Engine Oil
................................................... 5.15
Engine Air CleanedFilter
................................ 5-21
Manual Transaxle Fluid
.................................. 5-22
Hydraulic Clutch
........................................... 5-23
Engine Coolant
............................................. 5-23
Engine Overheating
....................................... 5-26
Cooling System
............................................ 5-29
Power Steering Fiuia
~1-36
I~~ULWIII~LIW I 1ulIaUAlG I lulu J-LL An ntnmntie Trnnr.r-.vln Cln #;PI r on ..............................
- -- ....................................
Windshield Washer Fluid ................................ 5-37
Brakes
........................................................ 5.39
Battery
........................................................ 5.42
Jump Starting
............................................... 5-43
Bulb Replacement .......................................... 5.49
Halogen Bulbs
.............................................. 5.49
Headlamps
.................................................. 5.49
Front Turn Signal and Parking Lamps
.............. 5-50
Center High-Mounted Stoplamp (CHMSL)
......... 5.50
Taillamps, Turn Signal, and Stoplamps
............ 5.51
Replacement Bulbs
....................................... 5.51
Windshield Wiper Blade Replacement
.............. 5.52
Tires
.............................................................. 5.53
Inflation
.. Tire Pressure ................................ 5-54
Tire Inspection and Rotation
........................... 5-55
When It
Is Time for New Tires ....................... 5-56
Buying New Tires
......................................... 5-56
Uniform Tire Quality Grading
......................... 5-57
Wheel Alignment and Tire Balance
.................. 5-59
Wheel Replacement
...................................... 5-59
Tire Chains
.................................................. 5-60
If a Tire Goes Flat ........................................ 5-61
Changing
a Flat Tire ..................................... 5-62
Compact Spare Tire
...................................... 5-71
5-
1
Page 278 of 354
Tire Inspection and Rotation
Tires should be rotated every 7,500 miles (12 500 km).
Any time you notice unusual wear, rotate your tires
as soon as possible and check wheel alignment.
Also
check for damaged tires or wheels. See When It Is Time
for New Tires on page 5-56
and Wheel Replacement
on page 5-59
for more information.
The purpose of regular rotation is to achieve more
uniform wear for all tires on the vehicle. The first rotation
is the most important. See “Part A: Scheduled
Maintenance Services” in Section
6, for scheduled
rotation intervals.
n 4 J
1
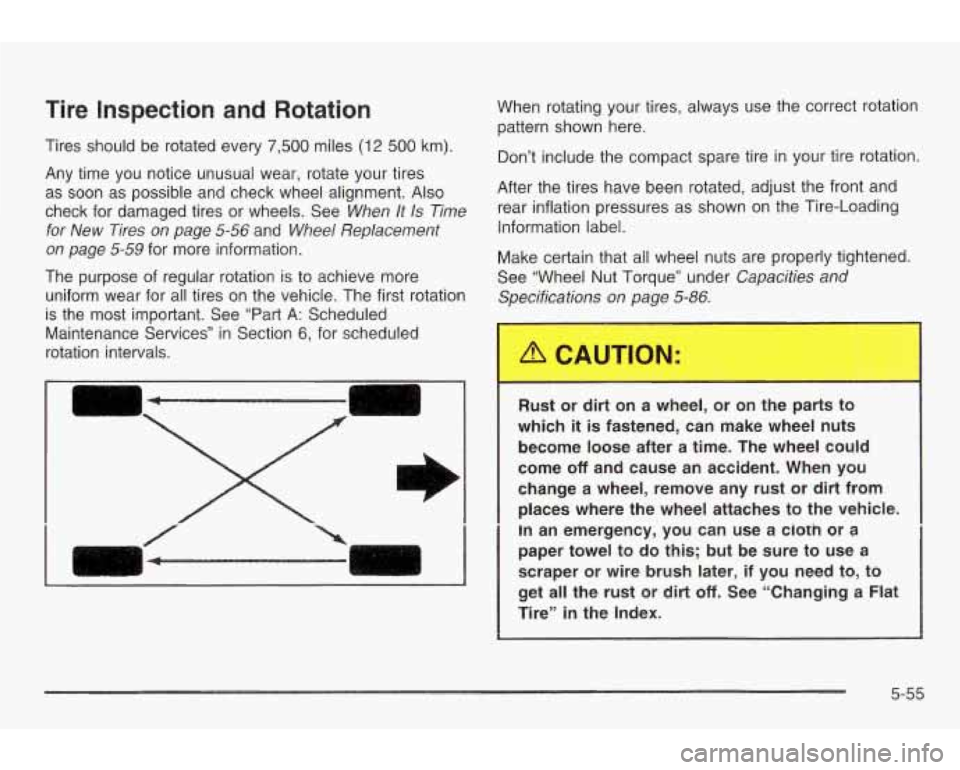
When rotating your tires, always use the correct rotation
pattern shown here.
Don’t include the compact spare tire in your tire rotation.
After the tires have been rotated, adjust the front and
rear inflation pressures as shown on the Tire-Loading
Information label.
Make certain that all wheel nuts are properly tightened.
See “Wheel Nut Torque” under
Capacities and
Specifications on page 5-86.
.
Rust or dirt on a wheel, or on the parts to
which
it is fastened, can make wheel nuts
become loose after a time. The wheel could
come
off and cause an accident. When you
change
a wheel, remove any rust or dirt from
places where the wheel attaches to the vehicle.
In an emergency, you can use a ciorh or a
paper towel to
do this; but be sure to use a
scraper or wire brush later,
if you need to, to
get all the rust or dirt
off. See “Changing a Flat
Tire”
in the Index.
5-55
Page 280 of 354
Mixing tires could cause you to lose control
while driving.
If you mix tires of different sizes
or
types (radial and bias-belted tires), the
vehicle may not handle properly, and you
could have a crash. Using tires of different
sizes may also cause damage
to your vehicle.
Be sure to use the same size and type tires on
all wheels. It’s all right to drive with your
compact spare, though.
It was developed for
use on your vehicle.
I
If you use bias-ply tires on your vehicle, the
wheel rim flanges could develop cracks after
I
many miles of driving. A tire and/or wheel
could fail suddenly, causing a crash. Use only radial-ply tires with the wheels on your vehicle.
I
Uniform Tire Quality Grading
Quality grades can be found where applicable on the
tire sidewall between tread shoulder and maximum
section width. For example:
Treadwear 200 Traction AA Temperature A
The following information relates to the system
developed by the United States National Highway
Traffic Safety Administration, which grades tires by
treadwear, traction and temperature performance. (This
applies only
to vehicles sold in the United States.)
The grades are molded on the sidewalls of most
passenger car tires. The Uniform Tire Quality Grading
system does
not apply to deep tread, winter-type
snow tires, space-saver or temporary use spare tires,
tires with nominal rim diameters of
10 to 12 inches
(25 to 30 cm), or to some limited-production tires.
While the tires available on General Motors passenger
cars and light trucks may vary with respect
to these
grades, they must also conform
to federal safety
requirements and additional General Motors Tire
Performance Criteria (TPC) standards.
5-57
Page 286 of 354
Removing the Spare Tire and Tools
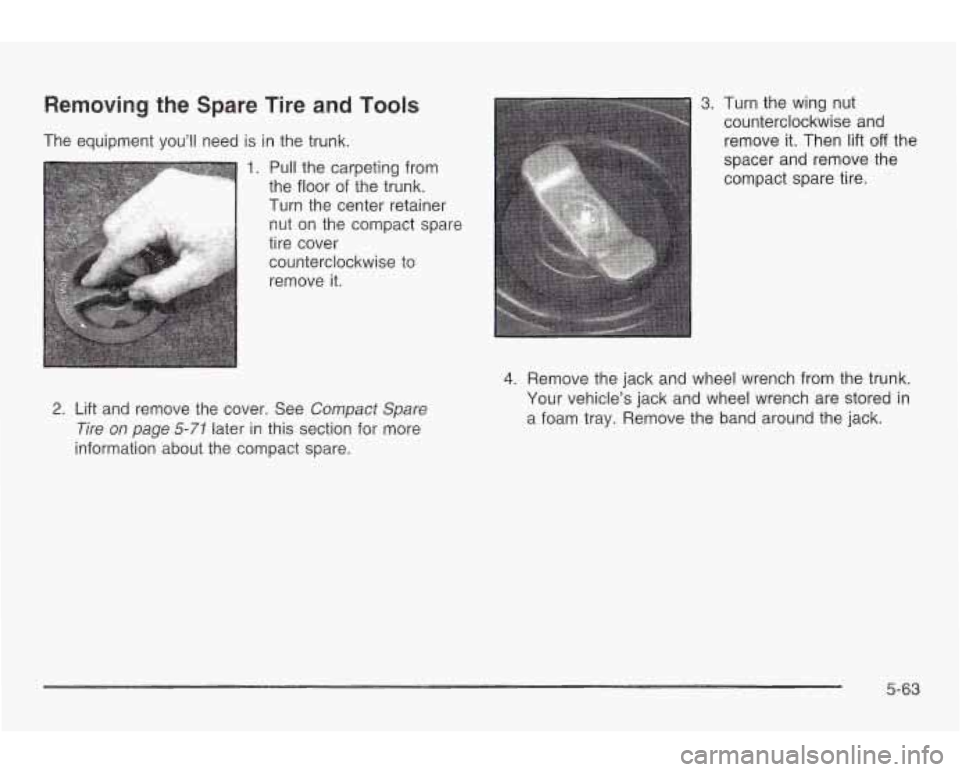
The equipment you’ll need is in the trunk.
1. Pull the carpeting from
the floor of the trunk.
I Turn the center retainer
nut on the compact spare
tire cover
counterclockwise to
remove it.
2. Lift and remove the cover. See Compact Spare
Tire on page
5-71 later in this section for more
information about the compact spare.
3. Turn the wing nut
counterclockwise and
remove
it. Then lift off the
spacer and remove the
compact spare tire.
4. Remove the jack and wheel wrench from the trunk.
Your vehicle’s jack and wheel wrench are stored in
a foam tray. Remove the band around the jack.
5-63
Page 287 of 354
A
Removing the Flat Tire and Installing
the Spare Tire
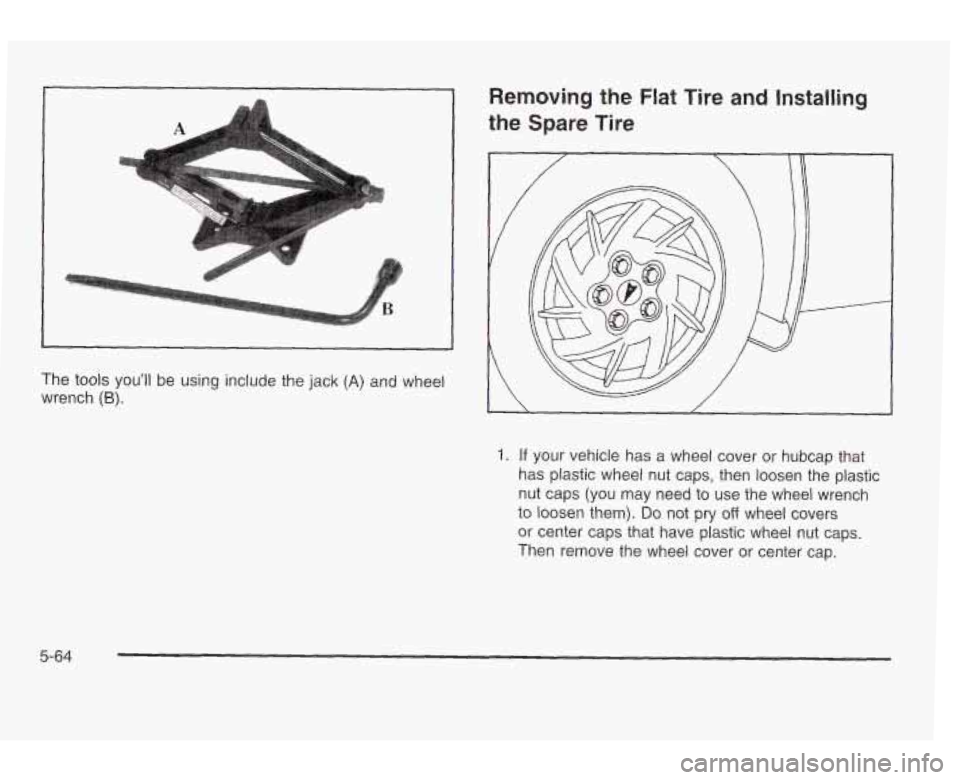
The tools you'll be using include the jack (A) and wheel
wrench
(6).
1. If your vehicle has a wheel cover or hubcap that
has plastic wheel nut caps, then loosen the plastic
nut caps (you may need to use the wheel wrench
to loosen them). Do not pry off wheel covers
or center caps that have plastic wheel nut caps.
Then remove the wheel cover or center cap.
5-64
Page 288 of 354
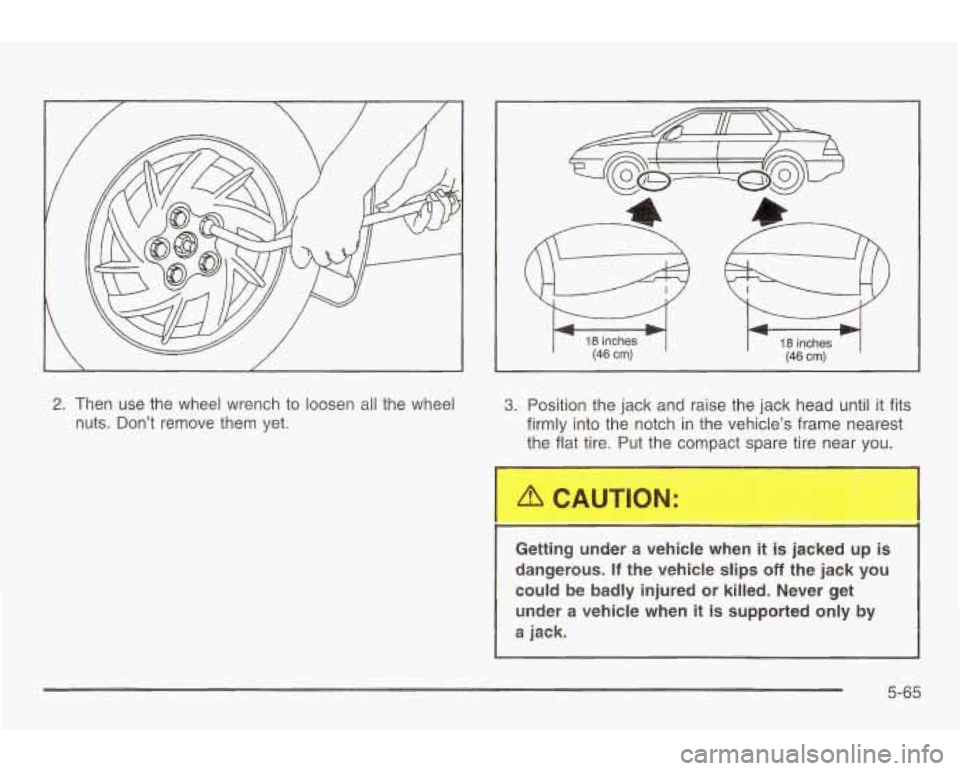
2. Then use the wheel wrench to loosen all the wheel
nuts. Don’t remove them yet.
/ \-
18 inches (46 cm)
3. Position the jack and raise the jack head until it fits
firmly into the notch in the vehicle’s frame nearest
the flat tire. Put the compact spare tire near you.
Getting under a vehicle when
it is jacked up is
dangerous.
If the vehicle slips off the jack you
could be badly injured or killed. Never get
under
a vehicle when it is supported only by
a jack.
5-65
Page 289 of 354
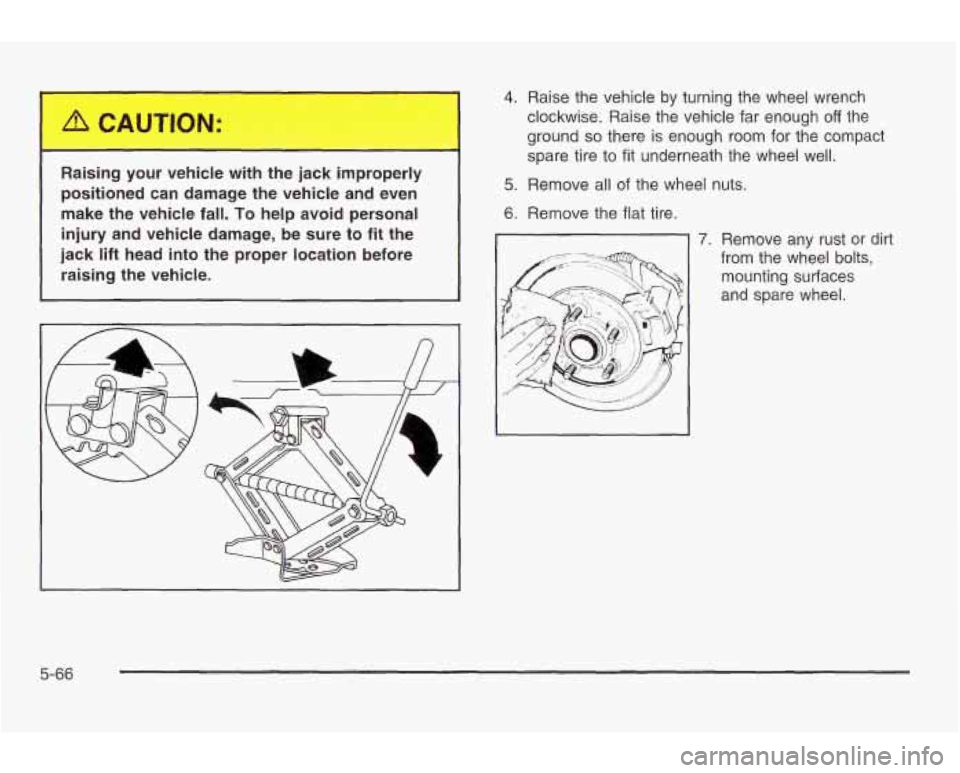
Raising your vehicle with the jack improperly
positioned can damage the vehicle and even
make the vehicle fall.
To help avoid personal
injury and vehicle damage, be sure to fit the
jack
lift head into the proper location before
raising the vehicle.
4. Raise the vehicle by turning the wheel wrench
clockwise. Raise the vehicle far enough
off the
ground
so there is enough room for the compact
spare tire
to fit underneath the wheel well.
5. Remove all of the wheel nuts.
6. Remove the flat tire.
7. Remove any rust or dirt
from the wheel
bolts,
mounting surfaces
and spare wheel.
5-66
Page 290 of 354
Rust or dirt on the wheel, or on the parts to
which
it is fastened, can make the wheel nuts
become
lccse after a time. The wheel could
come
off and cause an accident. When you
change a wheel, remove any rust or dirt from
the places where the wheel attaches to the
vehicle.
In an emergency, you can use a cloth
or
a paper towel to do this; but be sure to use
a scraper or wire brush later, if you need to,
to
get all the rust or dirt off.
1
Never use oil or grease on studs or nuts. If
could fall
off, causing a serious accident.
..-.. -I, +L- -..+- -:-k& ---- I ---- \I ____. ... L--I I YWU UW, lilt llUL3 Illlyllb GWIIIC; IWUDC;. IUUi VVIlGel
I I
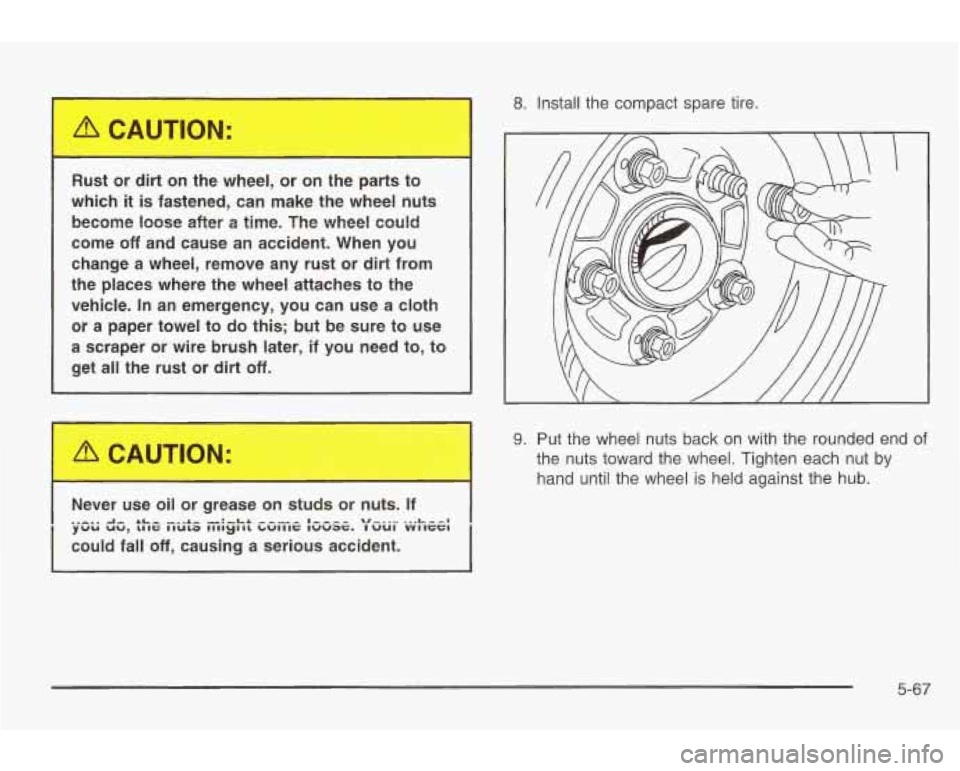
8. Install the compact spare tire.
9. Put the wheel nuts back on with the rounded end of
the nuts toward the wheel. Tighten each nut by
hand until the wheel is held against the hub.
5-67
Page 291 of 354
c
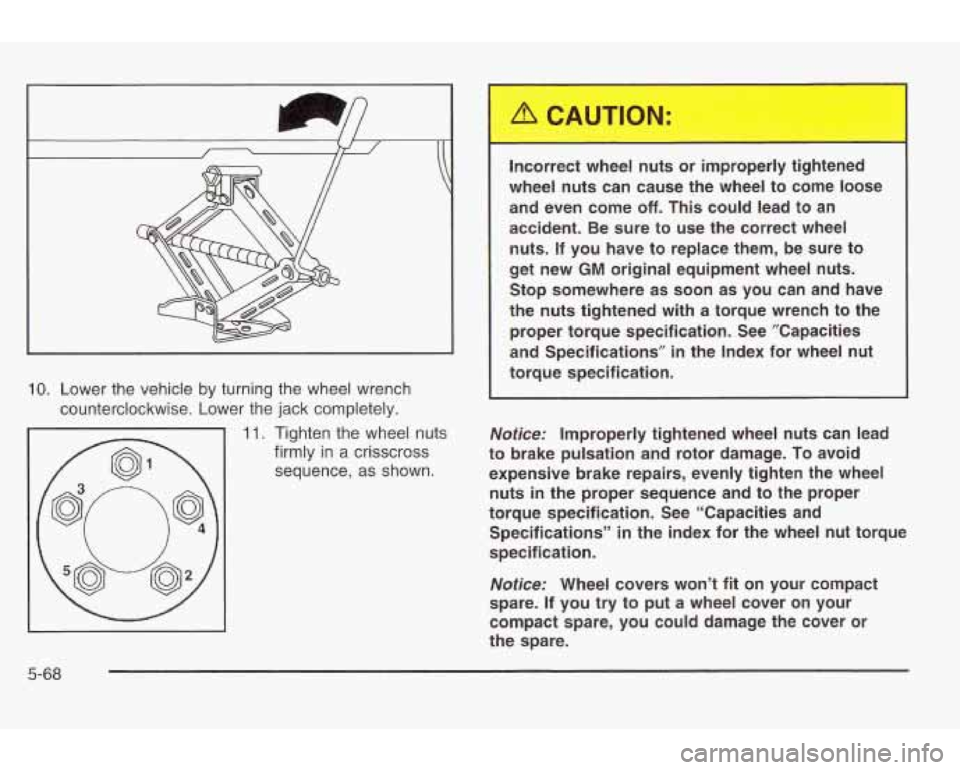
10. Lower the vehicle by turning the wheel wrench
counterclockwise. Lower the jack completely.
11. Tighten the wheel nuts
firmly in a crisscross
sequence, as shown.
E
Incorrect wheel nuts or improperly tightened
wheel nuts can cause the wheel to come loose
and even come
off. This could lead to an
accident. Be sure to use
the correct wheel
nuts. If you have to replace them, be sure to
get new
GM original equipment wheel nuts.
Stop somewhere as soon as you can and have
the nuts tightened with a torque wrench to the proper torque specification. See ”Capacities
and Specifications” in the Index for wheel nut
torque specification.
Notice: Improperly tightened wheel nuts can lead
to brake pulsation and rotor damage.
To avoid
expensive brake repairs, evenly tighten the wheel
nuts in the proper sequence and to the proper
torque specification. See “Capacities and
Specifications”
in the index for the wheel nut torque
specification.
Notice: Wheel covers won’t fit on your compact
spare. If you try to put a wheel cover on your
compact spare, you could damage the cover or
the spare.
5-68
Page 294 of 354
Compact Spare Tire
Although the compact spare tire was fully inflated when
your vehicle was new, it can lose air after
a time.
Check the inflation pressure regularly. It should be
60 psi (420 kPa).
After installing the compact spare on your vehicie, you
should stop as soon as possible and make sure
your spare tire is correctly inflated. The compact spare
is made to perform well at speeds up
to 65 mph
(105 km/h) for distances up to 3,000 miles (5 000 km),
so you can finish your trip and have your full-size
tire repaired or replaced where you want. Of course, it’s
best
to replace your spare with a full-size tire as
soon as you can. Your spare will last longer and be in
good shape in case you need it again.
Notice: When the compact spare is installed, don’t
take your vehicle through an automatic car wash
with guide rails. The compact spare can get caught
on the rails. That can damage the tire and wheel,
and maybe other parts
of your vehicle.
Don’t use your compact spare on other vehicles.
And don’t mix your compact spare tire or wheel with
other wheels or tires. They won’t fit. Keep your spare tire
and its wheel together.
Notice: Tire chains won’t fit your compact spare.
Using them can damage your vehicle and can
damage the chains too. Don’t use tire chains on
your compact spare.
5-71