engine coolant PONTIAC GRAND PRIX 2003 Owners Manual
[x] Cancel search | Manufacturer: PONTIAC, Model Year: 2003, Model line: GRAND PRIX, Model: PONTIAC GRAND PRIX 2003Pages: 378, PDF Size: 17.64 MB
Page 6 of 378

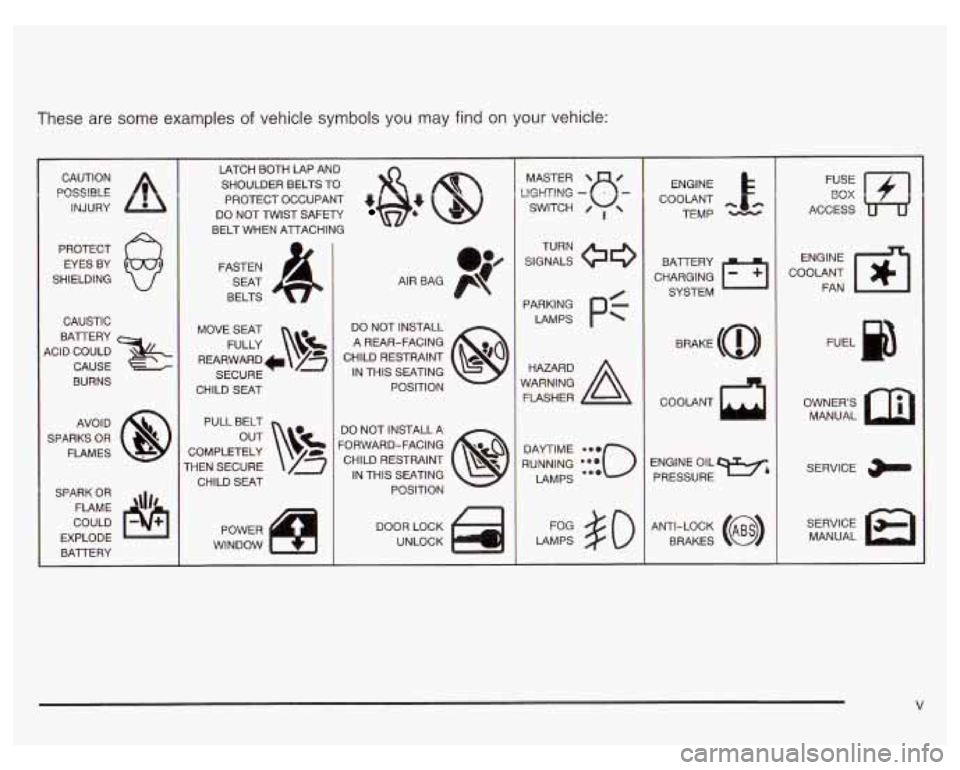
These are some examples of vehicle symbols you may find on your vehicle:
POSSlBLE A
CAUTION
INJURY
PROTECT EYES BY
SHIELDING
CAUSTIC
BAlTERY
4CID COULD CAUSE
BURNS
AVO1
D
SPARKS OR
FLAMES
SPARK OR FLAME
\\I/'
COULD
EXPLODE BAlTERY LATCH BOTH LAP AND
SHOULDER BELTS
TO
PROTECT OCCUPANT 4
DO NOT TWIST SAFETY
BELT WHEN AlTACHING
FASTEN SEAT
BELTS
MOVE SEAT FULLY
\!$%
REARWARD* /z
SECURE
CHILD SEAT
PULL BELT
COMPLETELY
THEN SECURE CHILD SEAT
TI POWER
WINDOW DO NOT INSTALL
A REAR-FACING
CHILD RESTRAINT IN THIS SEATING POSITION
DO NOT INSTALL A
'ORWARD-FACING CHILD RESTRAINT IN THIS SEATING
POSITION
DOOR LOCK
UNLOCK
L
LlGHTlNG - MASTER SWITCH e- / ,
SIGNALS TURN
PARKING
pf
LAMPS
RUNNING LAMPS
LAMPS
so
ENGINE
COOLANT TEMP
CHARGING BAlTERY
SYSTEM
COOLANT
d
ENGINE OIL PRESSURE
Wb
ANTI-LOCK (@)
BRAKES ENGINE
COOLANT FAN
OWNERS MANUAL
SERVICE
MANUAL
Page 68 of 378

Section 2 Features and Controls
Keys ............................................................... 2.3
Remote Keyless Entry System
......................... 2.4
Remote Keyless Entry System Operation ........... 2.5
Doors and Locks ............................................. 2-8
Door Locks
.................................................... 2-8
Power Door Locks
.......................................... 2-9
Last Door Closed Locking
................................ 2-9
Programmable Automatic Door Locks
.............. 2-10
Lockout Protection
........................................ 2-10
Leaving Your Vehicle
.................................... 2-1 1
Trunk
.......................................................... 2-1 1
Windows ........................................................ 2.13
Power Windows
............................................ 2-14
Sun Visors
................................................... 2.14
Theft-Deterrent Systems .................................. 2.15
Content Theft-Deterrent
................................. 2.15
PASS-Key@
Ill .......................................... 2.16
PASS-Key@
Ill Operation ........................... 2-17
Starting and Operating Your Vehicle ............... -2-1 9
New Vehicle Break-In
.................................... 2-19
Ignition Positions
.......................................... 2.19
Starting Your Engine
..................................... 2-20
Engine Coolant Heater
.................................. 2-23
Automatic Transaxle Operation
....................... 2.24 Shifting Into
Park
(P) ..................................... 2-28
Parking Over Things That Burn
....................... 2-30
Shifting
Out
of Park (PI ................................. 2-30
Engine Exhaust ............................................ 2-31
Running Your Engine While You Are Parked
.... 2-32
Mirrors ........................................................... 2-33
Manual Rearview Mirror
................................ -2-33
Automatic Dimming Rearview Mirror with
Onstar@, Compass and Temperature
Automatic Dimming Rearview Mirror with
Compass and Temperature Display
.............. 2-34
Outside Power Mirrors
................................... 2-37
Outside Convex Mirror
................................... 2-37
OnStar@ System ............................................. 2-38
Storage Areas .... -2-40
Glove Box
................................................... 2-40
Overhead Console
........................................ 2-40
Center Console Storage Area
......................... 2-40
Assist Handles
............................................. 2-41
Purse or Litter Bag Holder
............................. 2-41
Rear Storage Area
........................................ 2-41
Convenience Net
.......................................... 2-41
Trunk Access Panel
...................................... 2-41
Display
.................................................... 2-33
....................................
Parking Brake .............................................. 2-27 Sunroof .................. ........... ............. 2.42
2-1
Page 90 of 378

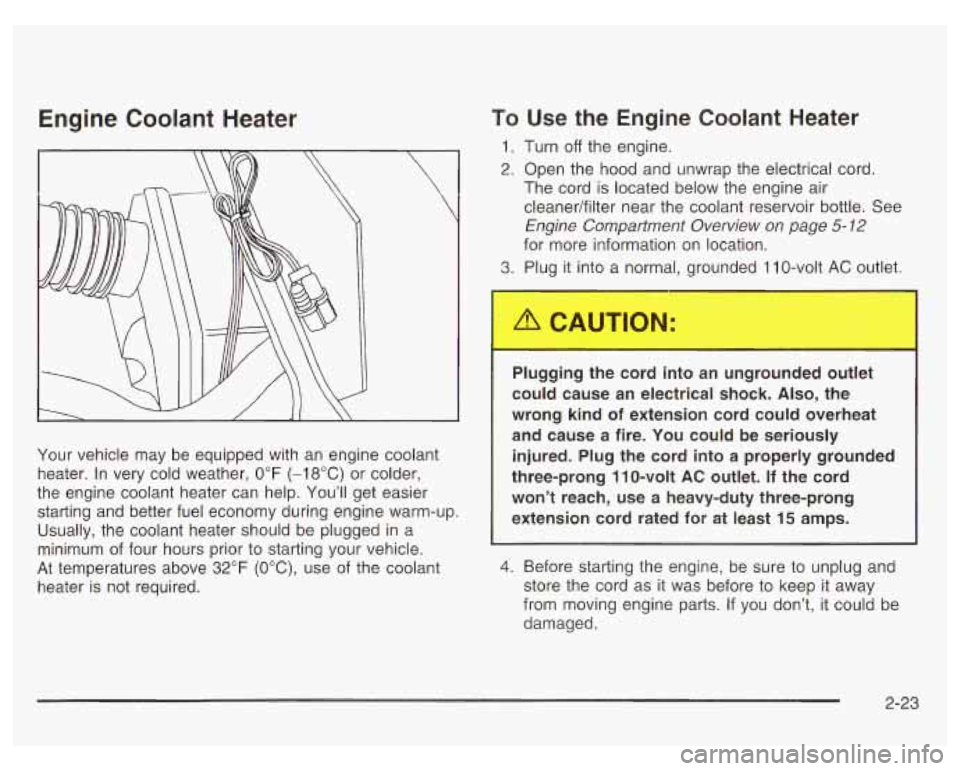
Engine Coolant Heater
Your vehicle may be equipped with an engine coolant
heater. In very cold weather,
0°F (-18°C) or colder,
the engine coolant heater can help. You’ll get easier
starting and better fuel economy during engine warm-up.
Usually, the coolant heater should be plugged in a
minimum of four hours prior
to starting your vehicle.
At temperatures above 32°F
(OOC), use of the coolant
heater
is not required.
To Use the Engine Coolant Heater
1. Turn off the engine.
2. Open the hood and unwrap the electrical cord.
The cord is located below the engine air
cleaner/filter near the coolant reservoir bottle. See
Engine Comparfment Overview on page
5-12
for more information on location.
3. Plug
it into a normal, grounded 1 IO-volt AC outlet.
Plugging the cord into an ungrounded outlet
could cause an electrical shock.
Also, the
wrong kind of extension cord could overheat
and cause a fire. You could be seriously injured. Plug the cord into a properly grounded
three-prong 110-volt
AC outlet. If the cord
won’t reach, use a heavy-duty three-prong
extension cord rated for at least 15 amps.
4. Before starting the engine, be sure to unplug and
store the cord as it was before
to keep it away
from moving engine parts. If you don’t, it could be
damaged.
2-23
Page 91 of 378

How long should you keep the coolant heater plugged
in? The answer depends on the outside temperature, the
kind of oil you have, and some other things. Instead
of trying to list everything here, we ask that you contact
your dealer in the area where you’ll be parking your
vehicle. The dealer can give you the best advice for that
particular area.
Automatic Transaxle Operation
Maximum engine speed is limited when your vehicle is
in PARK
(P) or NEUTRAL (N) to protect driveline
components from improper operation.
There are several different positions for the shift lever.
PARK (P): This position locks the front wheels. It’s
the best position to
use when you start the engine
because the vehicle can’t move easily.
The automatic transaxle has a shift lever on the console
between the seats. There is also a display of the gear
positions on the instrument panel cluster near the
speedometer and tachometer.
It is dangerous to get out of your vehicle if the
shift lever is not fully in PARK (P) with the
parking brake firmly set. Your vehicle can roll.
Don’t leave your vehicle when the engine is
running unless you have to. If you have left the
engine running,
the vehicle can move suddenly.
You
or others could be injured. To be sure your
vehicle won’t move, even when you’re on fairly
level ground, always set your parking brake and
move the
shift lever to PARK (P). See “Shifting
Into Park (P)”
in the Index. If you’re pulling a
trailer, see “Towing a Trailer”
in the Index.
2-24
Page 122 of 378

Section 3 Instrument Panel
Instrument Panel Overview .......................... -3-2
Hazard Warning Flashers
-3-3
Other Warning Devices ................................... 3.4
Horn
............................................................. 3.4
Tilt Wheel
..................................................... 3.4
Turn Signal/Multifunction Lever
......................... 3.5
Exterior Lamps
............................................. 3.10
Interior Lamps
.............................................. 3.12
Head-Up Display (HUD)
................................. 3-15
Accessory Power Outlets
............................... 3.18
Auxiliary Power Connection (Power Drop)
......... 3.19
Ashtrays and Cigarette Lighter
........................ 3-19
Climate Controls ............................................ 3.20
Dual Climate Control System
.......................... 3.20
Outlet Adjustment
......................................... 3.22
Warning Lights, Gages and Indicators ............. 3.23
Instrument Panel Cluster
................................ 3.24
Speedometer and Odometer
........................... 3.25
Tachometer
................................................. 3.25
Safety Belt Reminder Light
............................. 3.26
Air Bag Readiness Light
................................ 3-26
Charging System Light
.................................. 3.27
Brake System Warning Light
......................... -3-28
Anti-Lock Brake System Warning Light
............. 3.29
Traction Control System (TCS) Warning Light
...... 3.29
Enhanced Traction System Warning Light
........ -3-30
.. ...............................
Low Traction Light ....................................... -3-30
Engine Coolant Temperature Gage
.................. 3-31
Malfunction Indicator Lamp
............................ -3-32
Oil Pressure Light
........................................ -3-35
Security Light
............................................... 3-36
Fuel Gage
................................................... 3-37
Low Fuel Warning Light
................................. 3-37
Driver Information Center (DE) ....................... 3-38
Trip Computer ................................... ..... 3-40
Control Buttons
............................................ 3-42
Functions
.................................................... 3-42
Audio System(s) ............................................. 3-44
Setting the Time
........................................... 3-44
Radio with Cassette
...................................... 3-45
Radio with CD (Base Level)
........................... 3-48
Radio with CD
(Up Level) .............................. 3-51
Theft-Deterrent Feature
.................................. 3-54
Engine
Coolant Temperature 'Warning Light
...... 3.31
Low Oil Level Light ....................................... 3-36
Audio Steering Wheel Controls
....................... 3-56
Understanding Radio Reception
...................... 3-57
Care of Your Cassette Tape Player
................. 3-58
Care
of Your CDs ......................................... 3-59
Care of Your CD Player
................................ 3-59
Backglass Antenna
....................................... 3-59
3-
1
Page 137 of 378

The HUD also shows the following lights when they are
lit on the instrument panel cluster:
Turn Signal Indicators
High-Beam Indicator Symbol
Low Fuel Symbol
The HUD will display CHECK GAGES when the
following items are lit on the instrument panel cluster:
Oil Warning Symbol
Coolant Temperature Symbol
Charging System Symbol
When the ignition key is turned to RUN, the entire HUD
image will come on. Then the Head-Up Display will
operate normally.
Notice: Although the HUD image appears to be
near the front
of the vehicle, do not use it as
a parking aid. The
HUD was not designed for that
purpose.
If you try to use it as such, you may
misjudge the distance and damage your vehicle.
When the HUD is on, the speedometer reading will be
displayed continually. The current radio station
or
CD track number will only be displayed for three
seconds after the radio or CD track status changes.
This will happen whenever one of the radio controls is
pressed, either on the radio itself or on the optional
steering wheel controls. To
adjust the HUD
so you can see it properly do the
following:
1. Adjust your seat, if necessary, to a comfortable
position.
2. Start the engine and adjust the HUD controls
located on the instrument panel, to the right
of
the steering wheel. Move the DIM thumbwheel up
or down to adjust brightness.
3-1 6
Page 152 of 378

Engine Coolant Temperature
Warning Light
TEMP
This light tells goti ihai
the engine coolant has
overheated or the
radiator cooling fan is
not working.
If you have been operating the vehicle under normal
driving conditions, you should pull
of the road, stop the
vehicle and turn
off the engine as soon as possible.
See Engine Overheating on page
5-33.
Engine Coolant Temperature Gage
United States
19
Canada
Your vehicle has a gage that shows the engine coolant
temperature.
If the gage pointer moves into the
shaded area, the engine is too hot.
That reading means the same thing as the warning
light. It means that the engine coolant has overheated.
If you have been operating the vehicle under normal
conditions, you should pull
off the road, stop the vehicle,
and turn
off the engine as soon as possible.
See Engine Overheating
on page 5-33.
3-31
Page 160 of 378

The Driver Information Center (DIC) gives you important
safety and maintenance facts. When you turn the
ignition on, all of the DIC lights illuminate for a few
seconds. After this, the DIC will begin working.
Functions
__ (Door Ajar): If one of the doors is ajar, this light
will appear next to that door on the vehicle outline.
CHANGE OIL SOON: This light will appear when the
system indicates that it’s time for an oil change. The
system predicts remaining oil life using data from length
of drives, coolant temperature, engine rpm and
vehicle speed. It alerts you to change the oil on a
schedule consistent with the vehicle’s driving conditions.
After changing the oil, the system must be reset. See
How to Reset the GM
Oil Life SystemTM under
Engine
Oil on page 5- 18.
e LOW: This light will come on when the ignition is
on and the fluid in the washer fluid container is low.
AJAR: This light alerts you that the trunk is not
fully closed.
LOW TRAC (Low Traction): If your vehicle is equipped
with anti-lock brakes, this light will come on when the
enhanced traction system is limiting wheel spin. See Enhanced Traction System (ETS) on page 4-
I I or
Low Traction Light on page 3-30.
TRAC OFF (Traction Off): If your vehicle is equipped
with anti-lock brakes, this light lets you know that
the enhanced traction system has been disabled and
will not limit wheel spin. See Enhanced Traction System
Warning Light
on page 3-30 or Low Traction Light on
page 3-30.
TRAC (Traction): If the vehicle has anti-lock brakes
and the enhanced traction system, you will have a
disable button on the far right side of the DIC.
The enhanced traction system is automatically activated
when you turn the ignition on. This button will
activate/deactivate the system. If you need to disable
the system, such
as when you are stuck and are rocking
the vehicle back and forth, push this button. See If
You Are Stuck: in Sand, Mud, Ice or Snow on
page 4-32.
3-39
Page 163 of 378

Control Buttons
The trip computer has three buttons that control its
functions.
ENG/MET (English/Metric): Press this button to
change the display from English
to metric units or metric
to English.
RESET: Press this button for two seconds to reset the
mode displayed.
MODE: Press this button to change the function mode,
(Fuel Used, AVG ECON, OIL LIFE, RANGE) being
displayed.
OIL LIFE: This shows a percentage of the engine’s oil
remaining useful life. The system predicts remaining
oil life using data from length of drives, coolant
temperature, engine rpm and vehicle speed. Each time
you get an oil change, be sure to reset this function
so that it will give you an accurate percentage. See
“How to Reset the GM Oil Life System” under Engine
Oil on page
5-18.
RANGE: This mode shows how much farther you can
travel with the fuel you have remaining in the gas
tank before refueling. When the range displays
L, for
40 to
50 miles (64.36 to 80.45 km), the display will flash
LOW continuously. The range is calculated from the
AVG ECON value multiplied by the fuel remaining in
the tank.
Functions
LOW: This light will come on the vehicle outline when
FUEL USED: This mode shows the total amount of fuel the ignition is on and the fluid in the washer fluid
used since you last reset it. The amount can be container is low.
displayed in gallons or liters.
AVG ECON (Average Economy): This mode shows
the average fuel economy since you last reset
it.
3-42
Page 226 of 378

Section 5 Service and Appearance Care
Service ............................................................ 5.3
Doing Your
Owr? Service Work ......................... 5-4
Adding Equipment to the Outside of
Your Vehicle
.............................................. 5-4
Fuel ................................................................ 5-5
Gasoline Octane
............................................ 5-5
Gasoline Specifications
.................................... 5-5
California Fuel
............................................... 5-6
Additives
....................................................... 5-6
Fuels in Foreign Countries
............................... 5-7
Filling Your Tank
............................................ 5-7
Filling a Portable Fuel Container
....................... 5-9
Checking Things Under the Hood .................... 5-10
Hood Release
.............................................. 5-10
Engine Compartment Overview
....................... 5-12
Engine Oil
................................................... 5-18
Supercharger Oil
.......................................... 5-24
Engine Air CleanedFilter
................................ 5-25
Automatic Transaxle Fluid
.............................. 5-27
Engine Coolant
............................................. 5-30
Radiator Pressure Cap
.................................. 5-33
Cooling System
........................................... -5-36
Power Steering Fluid
..................................... 5-46
Windshield Washer Fluid
................................ 5-48
Engine Overheating
....................................... 5-33 Brakes
........................................................ 5.49
Battery
........................................................ 5.52
Jump Starting
............................................... 5-53
Bulb Replacement .......................................... 5-60
Halogen Bulbs
.............................................. 5-60
Headlamps
.................................................. 5-60
Front Turn Signal and Sidemarker Lamps
........ 5-62
Center High-Mounted Stoplamp (CHMSL)
......... 5-63
Taillamps, Sidemarker and Back-up Lamps
...... 5-64
Replacement Bulbs
....................................... 5-66
Windshield Wiper Blade Replacement .............. 5-67
Tires ............................................................. -5-68
Inflation
-- Tire Pressure ................................ 5-68
Tire Inspection and Rotation
........................... 5-69
When It
Is Time for New Tires ....................... 5-70
Buying New Tires
......................................... 5-71
Uniform Tire Quality Grading
.......................... 5-72
Wheel Replacement
...................................... 5-73
Headlamp Aiming ........................................... 5-59
Wheel Alignment and Tire Balance
.................. 5-73
Tire Chains
.................................................. 5-75
If a Tire Goes Flat ........................................ 5-76
Changing a Flat Tire
..................................... 5-76
Compact Spare Tire
...................................... 5-87
5- 1