trailer PONTIAC GRAND PRIX 2003 Owners Manual
[x] Cancel search | Manufacturer: PONTIAC, Model Year: 2003, Model line: GRAND PRIX, Model: PONTIAC GRAND PRIX 2003Pages: 378, PDF Size: 17.64 MB
Page 86 of 378
Starting and Operating Your
Vehicle
New Vehicle Break-In Ignition Positions
With
the key in the ignition switch, you can turn it to
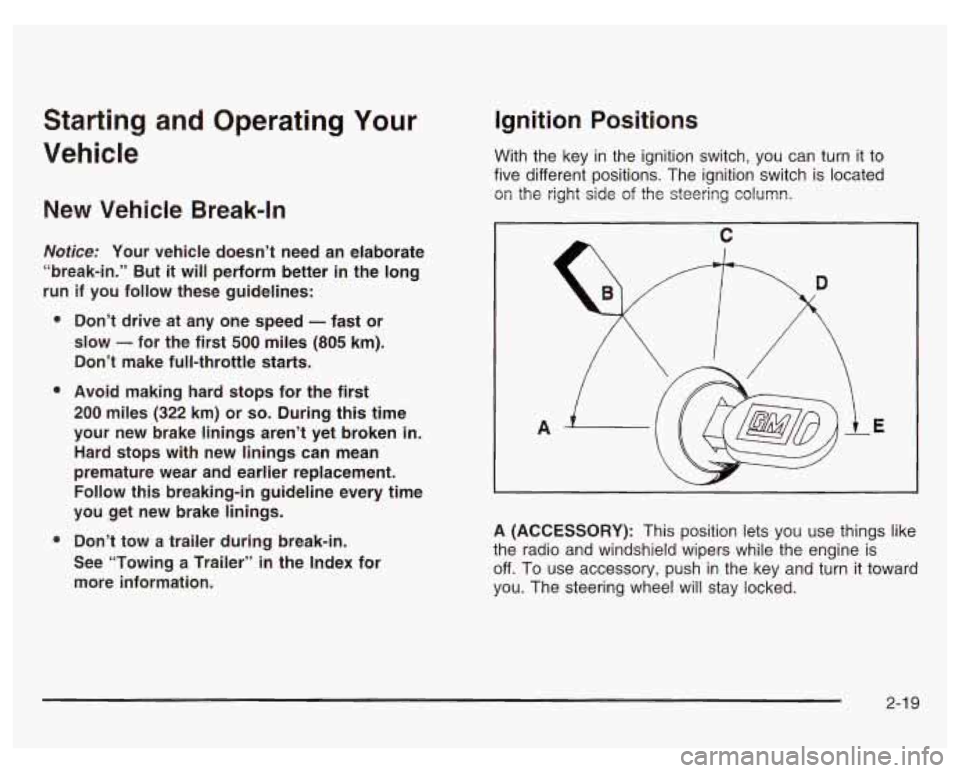
five different positions. The ignition switch is located
on the right side of the steering column.
Notice: Your vehicle doesn’t need an elaborate
“break-in.” But
it will perform better in the long
run if you follow these guidelines:
e
e
e Don’t drive at any one speed - fast or
slow
- for the first 500 miles (805 km).
Don’t make full-throttle starts.
Avoid making hard stops for the first
200 miles (322 km) or so. During this time
your new brake linings aren’t yet broken
in.
Hard stops with new linings can mean
premature wear and earlier replacement.
Follow this breaking-in guideline every time
you get new brake linings.
Don’t tow a trailer during break-in.
See “Towing a Trailer”
in the Index for
more information. A
(ACCESSORY): This position lets
you use things like
the radio and windshield wipers while the engine is
off. To use accessory, push in the key and turn it toward
you. The steering wheel will stay locked.
3-1 9
Page 91 of 378

How long should you keep the coolant heater plugged
in? The answer depends on the outside temperature, the
kind of oil you have, and some other things. Instead
of trying to list everything here, we ask that you contact
your dealer in the area where you’ll be parking your
vehicle. The dealer can give you the best advice for that
particular area.
Automatic Transaxle Operation
Maximum engine speed is limited when your vehicle is
in PARK
(P) or NEUTRAL (N) to protect driveline
components from improper operation.
There are several different positions for the shift lever.
PARK (P): This position locks the front wheels. It’s
the best position to
use when you start the engine
because the vehicle can’t move easily.
The automatic transaxle has a shift lever on the console
between the seats. There is also a display of the gear
positions on the instrument panel cluster near the
speedometer and tachometer.
It is dangerous to get out of your vehicle if the
shift lever is not fully in PARK (P) with the
parking brake firmly set. Your vehicle can roll.
Don’t leave your vehicle when the engine is
running unless you have to. If you have left the
engine running,
the vehicle can move suddenly.
You
or others could be injured. To be sure your
vehicle won’t move, even when you’re on fairly
level ground, always set your parking brake and
move the
shift lever to PARK (P). See “Shifting
Into Park (P)”
in the Index. If you’re pulling a
trailer, see “Towing a Trailer”
in the Index.
2-24
Page 93 of 378
You’ll shift down to the next gear and have more power.
Notice: If your vehicle seems to start up rather
slowly, or if
it seems not to shift gears as you go
faster, something may be wrong with a transaxle system sensor.
If you drive very far that way, your
vehicle can be damaged. So, if
this happens,
have your vehicle serviced right away. Until then,
you can use SECOND
(2) when you are driving
less than
35 mph (55 km/h) and AUTOMATIC
OVERDRIVE (D) for higher speeds.
THIRD
(3): This position is also used for normal driving,
but
it offers more power and lower fuel economy than
AUTOMATIC OVERDRIVE
(@ ).
Here are some times you might choose THIRD (3)
instead of AUTOMATIC OVERDRIVE (a):
When driving on hilly, winding roads.
When towing a trailer, so there is less shifting
between gears.
When going down a steep hill.
When driving in non-highway scenarios
(i.e. city streets, etc.). SECOND
(2): This
position gives you more power but
lower fuel economy than THIRD
(3). You can use
SECOND (2) on hills. It can help control your speed as
you go down steep mountain roads, but then you
would also want to use your brakes
off and on.
Notice: Don’t drive in SECOND (2) for more than
25 miles (40 km), or at speeds over 55 mph
(90 km/h), or you can damage your transaxle.
Use THIRD
(3) or AUTOMATIC OVERDRIVE (D) as
much as possible. Don’t shift into SECOND
(2)
unless you are going slower than 65 mph (105 km/h)
or you can damage your engine.
FIRST
(1): This position gives you even more power
but lower fuel economy than SECOND (2). You can use
it on very steep hills, or in deep snow or mud. If the
shift lever is in
FIRST (I), the transaxle won’t shift into
first gear until the vehicle is going slowly enough.
Notice: If your front wheels won’t turn, don’t try to
drive. This might happen if you were stuck in
very deep sand or mud or were up against a solid
object. You could damage your transaxle. Also,
if you stop when going uphill, don’t hold your
vehicle there with only the accelerator pedal. This
could overheat and damage the transaxle. Use your
brakes to hold your vehicle in position on
a hill.
2-26
Page 94 of 378
Parking Brake
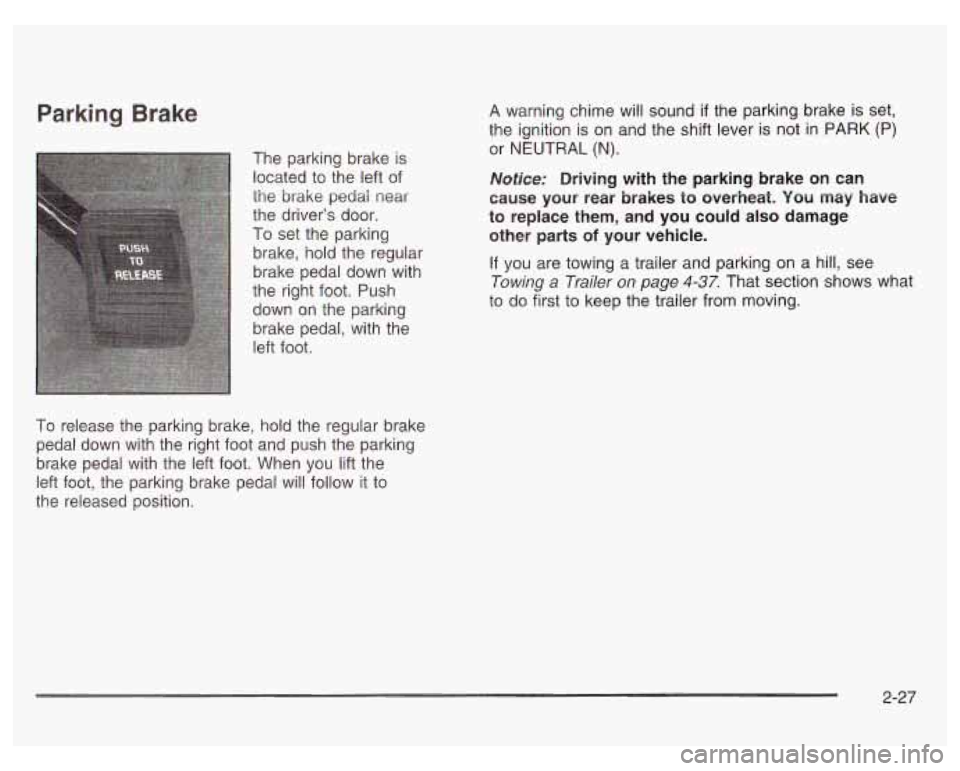
The parking brake is
located to the left of
the
brake pedai near
the driver’s door.
To set the parking
brake, hold the regular
brake pedal down with
the right foot. Push
down on the parking
brake pedal, with the
left foot.
To release the parking brake, hold the regular brake
pedal down with the right foot and push the parking
brake pedal with the left foot. When
you lift the
left foot, the parking brake pedal will follow it to
the released position. A
warning chime will sound
if the parking brake is set,
the ignition is on and the shift lever is not
in PARK (P)
or NEUTRAL (N).
Notice: Driving with the parking brake on can
cause your rear brakes
to overheat. You may have
to replace them, and you could also damage
other parts
of your vehicle.
If you are towing a trailer and parking on a hill, see
Towing a Trailer
on page 4-37. That section shows what
to do first to keep the trailer from moving.
2-27
Page 95 of 378
Shifting Into Park (P)
It can be dangerous to get out of your vehicle
if the shift lever
is not fully in PARK (P) with
the parking brake firmly set. Your vehicle can
roll. If you have left the engine running, the
vehicle can move suddenly. You or others
could be injured. To be sure your vehicle won’t move, even when you’re on fairly level ground,
use the steps that follow.
If you’re pulling a
trailer, see “Towing
a Trailer” in the Index.
1. Hold the brake pedal down with your right foot and
set the parking brake.
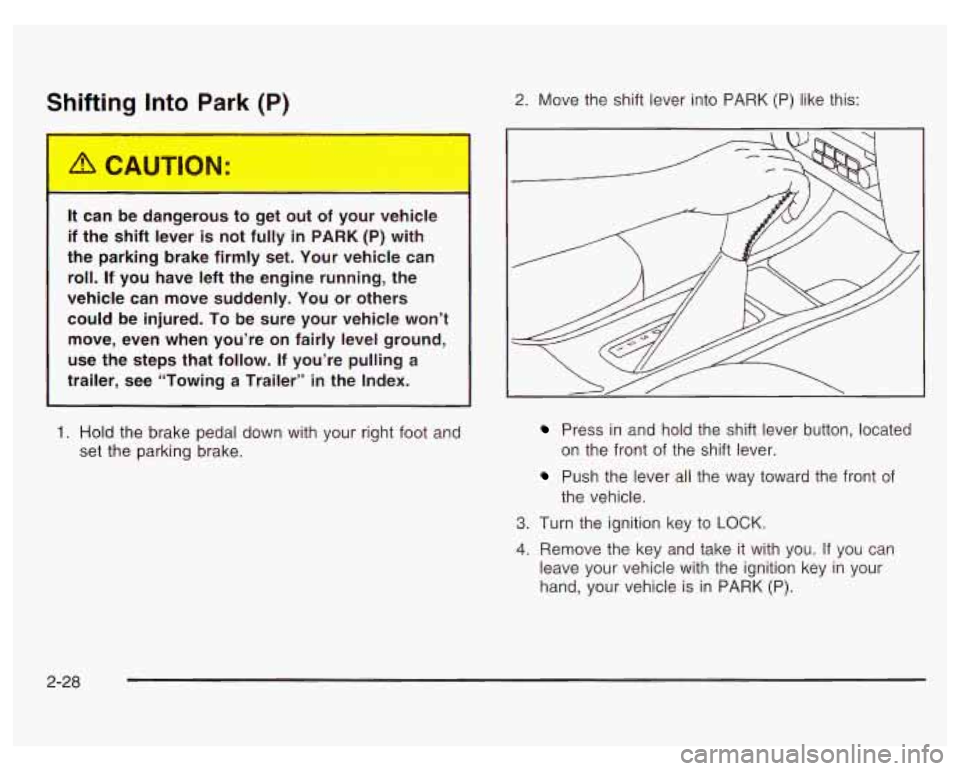
2. Move the shift lever into PARK (P) like this:
Press in and hold the shift lever button, located
on the front of the shift lever.
Push the lever all the way toward the front of
the vehicle.
3. Turn the ignition key to LOCK.
4. Remove the key and take it with you. If you can
leave your vehicle with the ignition key in your
hand, your vehicle is in PARK (P).
2-28
Page 99 of 378
Running Your Engine While You
Are Parked
It’s better not to park with the engine running. But if you
ever ha.-- to, here are som- ‘hings to know.
Idling the engine with the climate control
system
off could allow dangerous exhaust into
your vehicle. See the earlier Caution under
“Engine Exhaust.”
Also, idling
in a closed-in place can let deadly
carbon monoxide (CO) into your vehicle even
if the fan
is at the highest setting. One place
this can happen is a garage. Exhaust - with
CO - can come in easily. NEVER park in a
garage with the engine running.
Another closed-in place can be a blizzard. See “Winter Driving” in the Index.
It can be dangerous to get out of your vehicle
if the
shift lever is not fully in PARK (P) with
the parking brake firmly set. Your vehicle can
roll. Don’t leave your vehicle when the engine
is running unless you have to.
If you’ve left the
engine running, the vehicle can move
suddenly. You or others could be injured.
To
be sure your vehicle won’t move, even when
you’re on fairly level ground, always set your parking brake and move the shift lever to
PARK
(P).
Follow the proper steps to be sure your vehicle won’t
move. See Shifting
Into Park (P) on page 2-28.
If you are parking on a hill and if you’re pulling a trailer,
also see Towing a Trailer
on page 4-37.
2-32
Page 154 of 378
This light should come on, as a check to show you it is
working, when the ignition is on and the engine is
not running. If the light doesn’t come on, have it
repaired. This light will also come on during a
malfunction in one of two ways:
Light Flashing - A misfire condition has been
detected. A misfire increases vehicle emissions
and may damage the emission control system on
your vehicle. Dealer or qualified service center
diagnosis and service may be required.
0 Light On Steady - An emission control system
malfunction has been detected on your vehicle.
Dealer or qualified service center diagnosis
and service may be required.
If the Light Is Flashing
The following may prevent more serious damage to
your vehicle:
0 Reducing vehicle speed.
0 Avoiding hard accelerations.
Avoiding steep uphill grades.
0 If you are towing a trailer, reduce the amount of
cargo being hauled as soon as it is possible. If
the light stops flashing and remains on steady,
see “If the Light
Is On Steady” following.
If the light continues to flash, when
it is safe to do so,
stop the vehicle. Find a safe place to park your vehicle.
Turn the key
off, wait at least 10 seconds and restart the
engine. If the light remains on steady, see
“If the Light Is
On Steady” following. If the light is still flashing, follow the
previous steps, and drive the vehicle
to your dealer or
qualified service center for service.
If the Light Is On Steady
You may be able to correct the emission system
malfunction by considering the following:
Did you recently put fuel into your vehicle?
If so, reinstall the fuel cap, making sure to fully install
the cap. See Filling
Your Tank on page 5-7. The
diagnostic system can determine
if the fuel cap has
been left
off or improperly installed. A loose or missing
fuel cap will allow fuel
to evaporate into the atmosphere.
A few driving trips with the cap properly installed
should turn the light
off.
Did you just drive through a deep puddle of water?
If
so, your electrical system may be wet. The condition
will usually be corrected when the electrical system
dries out. A few driving trips should turn the light
off.
3-33
Page 182 of 378
Section 4 Driving Your Vehicle
Your Driving. the Road. and Your Vehicle .......... 4-2
Defensive Driving
........................................... 4.2
Drunken Driving
............................................. 4-3
Braking
......................................................... 4.6
Steering
...................................................... 4.13
Off-Road Recovery
....................................... 4-15
Passing
....................................................... 4.15
Loss
of Control ............................................. 4.16
Driving at Night
............................................ 4.18
Driving in Rain and on Wet
Roads .................. 4-19
Control
of a
Vehicle ........................................ 4-6
Traction Control System (TCS)
....................... 4.10
Enhanced Traction System
(ETS) .................... 4-1 1 City
Driving
.................................. ..... 4-22
Freeway Driving ............................... ..... 4.23
Highway Hypnosis
........................................ 4.25
Winter Driving
.............................................. 4.27
Ice or Snow
.............................................. 4-32
Towing Your Vehicle
................. ......... 4.33
Loading Your Vehicle
.................................... 4.35
Before Leaving
on a Long Trip
....................... 4-24
Hill and Mountain Roads
................................ 4-25
If You Are Stuck: In Sand, Mud,
Towing ....................... ............................ 4.33
Recreational Vehicle Towing
....... ..... 4.33
Towing
a Trailer ........................................... 4.37
4- 1
Page 214 of 378
Towing
Towing Your Vehicle
Consult your dealer or a professional towing service if
you need to have your disabled vehicle towed. See
Roadside Assistance Program
on page 7-5.
If you want to tow your vehicle behind another vehicle
for recreational purposes (such as behind a motorhome),
see “Recreational Vehicle Towing” following. With
the proper preparation and equipment, many
vehicles can be towed in these ways. See “Dinghy
Towing” and “Dolly Towing,” following.
Here are some important things to consider before you
do recreational vehicle towing:
Recreational Vehicle Towing
Recreational vehicle towing means towing your vehicle
behind another vehicle
- such as behind a motorhome.
The two most common types of recreational vehicle
towing are known as “dinghy towing” (towing your
vehicle with all four wheels on the ground) and
“dolly towing” (towing your vehicle with two wheels on
the ground and two wheels up on a device known
as a “dolly”). What’s
the towing capacity of the towing vehicle?
Be sure you read the tow vehicle manufacturer’s
recommendations.
How far will you tow? Some vehicles have
restrictions on how far and how long they can tow.
Do you have the proper towing equipment?
See your dealer or trailering professional for
additional advice and equipment recommendations. Is your vehicle ready to be towed? Just as you
would prepare your vehicle for a long trip, you’ll
want to make sure your vehicle
is prepared to be
towed. See Before Leaving on
a Long Trip on
page
4-24.
4-33
Page 218 of 378
Towing a Trailer
If you don’t use the correct eq+ment and
drive properly, you can lose control when you pull
a trailer. For example, if the trailer is too
heavy, the brakes may not work well
-- or even
at all. You and your passengers could be
seriously injured. You may also damage your
vehicle; the resulting repairs would not be
covered by your warranty. Pull a trailer only if
you have followed all the steps
in this section.
Ask your dealer for advice and information
about towing a trailer with your vehicle. Your
vehicle can tow a trailer
if it is equipped with the
proper trailer towing equipment.
To identify what
the vehicle trailering capacity is for your vehicle, you
should read the information in “Weight of the Trailer” that
appears later in this section. But trailering
is different
than just driving your vehicle by itself. Trailering means
changes in handling, durability and fuel economy.
Successful, safe trailering takes correct equipment, and
it has
to be used properly.
That’s the reason for this part. In
it are many time-tested,
important trailering tips and safety rules. Many of
these are important for your safety and that of your
passengers.
So please read this section carefully before
you pull a trailer.
Load-pulling components such as the engine, transaxle,
wheel assemblies and tires are forced to work harder
against the drag of the added weight. The engine
is required to operate at relatively higher speeds and
under greater loads, generating extra heat. What’s more,
the trailer adds considerably to wind resistance,
increasing the pulling requirements.
4-37