PONTIAC GTO 2005 Owners Manual
Manufacturer: PONTIAC, Model Year: 2005, Model line: GTO, Model: PONTIAC GTO 2005Pages: 318, PDF Size: 2.06 MB
Page 111 of 318

The system is turned on if a door is opened, the vehicle
is unlocked, or the trunk is opened. Once the system
is turned on, the one hour battery protection time resets
to zero and the interior lamps will continue to operate
for another hour, or until the vehicle is locked.
The interior lamp system will shut down 10 seconds
after your vehicle is locked using either the key or the
remote key locking system. However, if an interior lamp,
such as the dome lamp, has been turned on manually
and is on at the time the vehicle is locked, the system will
not shut down after the normal 10 seconds. The one hour
battery protection will be activated instead.
The vehicle’s hazard lights will continue to operate at
all times.
Accessory Control
If you want the accessories to operate once the key has
been removed from the ignition, you must turn the
system on by either manually starting an accessory,
such as turning the radio on again. This will activate a
one hour timer that will operate accessories such as
the radio, accessory power outlet, and windshield wipers
before turning off. These actions will reset the timer to
zero. Likewise, if an accessory such as the radio is
turned on at any time during the one hour period, the
timer is reset to zero and all accessories will continue to
operate for another hour. To enable accessory control
after the system has been reset, you must turn the
ignition on and then off again.
Accessory Power Outlets
The vehicle has an
accessory power outlet
which can be used to plug
in electrical equipment.
The accessory power outlet is located inside the center
console. The power outlet is operational when the
ignition is turned to ON, LOCK, or when Retained
Accessories Power is in operation. SeeRetained
Accessory Power (RAP) on page 2-17.
Remove the tethered cap to use the outlet. When
not using the outlet, be sure to cover it with the
protective cap.
Notice:Leaving electrical equipment on for
extended periods will drain the battery. Always turn
off electrical equipment when not in use and do
not plug in equipment that exceeds the maximum
amperage rating.
3-17
Page 112 of 318

Certain electrical accessories may not be compatible
with the accessory power outlet and could result
in blown vehicle or adapter fuses. If you experience a
problem, see your dealer for additional information
on accessory power outlets.
Notice:Adding any electrical equipment to your
vehicle may damage it or keep other components
from working as they should. The repairs would not
be covered by your warranty. Check with your
dealer before adding electrical equipment.
When adding electrical equipment, be sure to follow the
proper installation instructions included with the
electrical equipment you install.
Notice:Improper use of the power outlet can cause
damage not covered by your warranty. Do not
hang any type of accessory or accessory bracket
from the plug because the power outlets are
designed for accessory power plugs only.
Ashtrays and Cigarette Lighter
Notice:If you put papers, pins, or other �ammable
items in the ashtray, hot cigarettes or other
smoking materials could ignite them and possibly
damage your vehicle. Never put �ammable items in
the ashtray.
Ashtray
If your vehicle has this accessory, the front ashtray is
located in the center of the instrument panel under
the audio controls. The rear ashtray is located at the rear
of the center console. To use the ashtray, push the
cover inwards and the ashtray will slide open.
To empty the ashtray, open it and grip it at the
depressions located on each side. Then pull the
ashtray out.
Cigarette Lighter
Notice:Holding a cigarette lighter in while it is
heating will not allow the lighter to back away from
the heating element when it is hot. Damage from
overheating may occur to the lighter or heating
element, or a fuse could be blown. Do not hold a
cigarette lighter in while it is heating.
If your vehicle has this accessory, the cigarette lighter is
located inside the ashtray and can be operated
whenever the ignition is turned on.
Press the lighter all the way in and release it. It will pop
back out once the element is ready for use.
The cigarette lighter should not be used as an accessory
power outlet. Use the accessory power outlet provided
in the center console.
3-18
Page 113 of 318

Climate Controls
Climate Control System
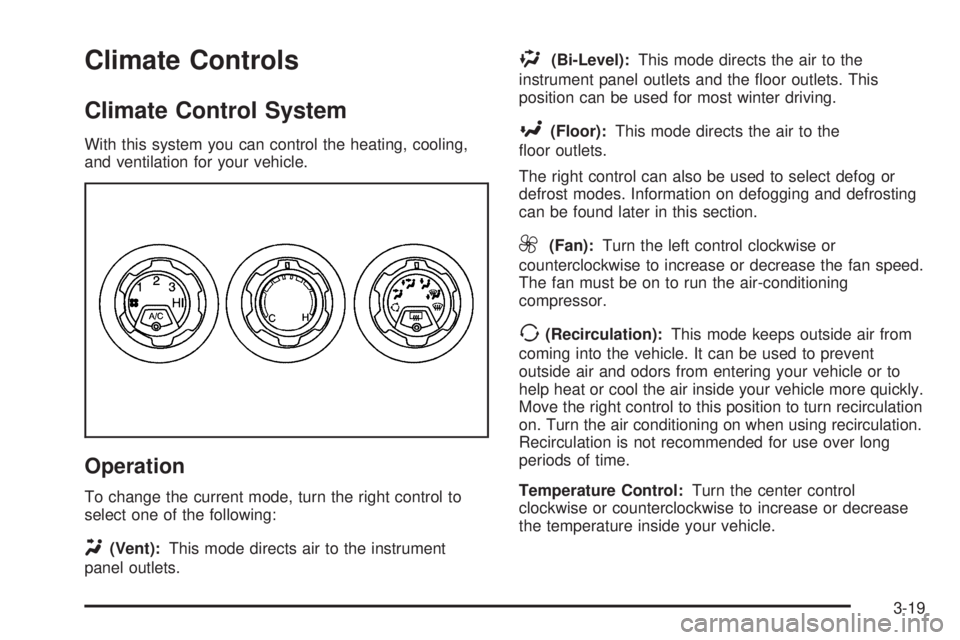
With this system you can control the heating, cooling,
and ventilation for your vehicle.
Operation
To change the current mode, turn the right control to
select one of the following:
Y(Vent):This mode directs air to the instrument
panel outlets.
%(Bi-Level):This mode directs the air to the
instrument panel outlets and the floor outlets. This
position can be used for most winter driving.
[(Floor):This mode directs the air to the
floor outlets.
The right control can also be used to select defog or
defrost modes. Information on defogging and defrosting
can be found later in this section.
9(Fan):Turn the left control clockwise or
counterclockwise to increase or decrease the fan speed.
The fan must be on to run the air-conditioning
compressor.
>(Recirculation):This mode keeps outside air from
coming into the vehicle. It can be used to prevent
outside air and odors from entering your vehicle or to
help heat or cool the air inside your vehicle more quickly.
Move the right control to this position to turn recirculation
on. Turn the air conditioning on when using recirculation.
Recirculation is not recommended for use over long
periods of time.
Temperature Control:Turn the center control
clockwise or counterclockwise to increase or decrease
the temperature inside your vehicle.
3-19
Page 114 of 318

A/C (Air Conditioning):Press this button on the left
dial to turn the air-conditioning system on or off.
When A/C is pressed, an indicator light in the button will
come on to let you know that air conditioning is
activated.
On hot days, open the windows to let hot inside air
escape; then close them. This helps to reduce the time
it takes for your vehicle to cool down. It also helps
the system to operate more efficiently.
For quick cool down on hot days, do the following:
1. Select the vent mode.
2. Select the highest fan speed.
3. Select A/C.
4. Select the coolest temperature.
The air-conditioning system removes moisture from the
air, so you may sometimes notice a small amount of
water dripping underneath your vehicle while idling
or after turning off the engine. This is normal.Defogging and Defrosting
Fog on the inside of windows is a result of high humidity
(moisture) condensing on the cool window glass. This
can be minimized if the climate control system is
used properly. There are two modes to choose from to
clear fog or frost from your windshield. Use the
defog mode to clear the windows of fog or moisture and
warm the passengers. Use the defrost mode to
remove fog or frost from the windshield more quickly.
Turn the right control to select the defog or
defrost modes.
-(Defog):This mode directs the air to the windshield
and to the floor outlets. When you select this mode,
the system turns off recirculation automatically.
The recirculation mode cannot be selected while in the
defog mode. Do not drive the vehicle until all the
windows are clear.
To help clear the side windows quickly while using air
conditioning, do the following:
1. Select the bi-level mode.
2. Select the highest fan speed.
3. Select A/C.
4. Select the temperature.
3-20
Page 115 of 318

1(Defrost):This mode directs the air to the
windshield. When you select this mode, the system
turns off recirculation automatically. The recirculation
mode cannot be selected while in the defrost mode. Do
not drive the vehicle until the windscreen is clear
To help clear the windscreen quickly, do the following:
1. Select the defrost mode.
2. Select the highest temperature.
3. Select the highest fan speed.
4. Select A/C.
Rear Window Defogger
The rear window defogger uses a warming grid to
remove fog or frost from the rear window.
<(Rear Defogger):Press this button on the right
dial to turn the rear window defogger on or off. An
indicator light in the button will come on to let your know
that the rear window defogger is activated. Be sure to
clear as much snow from the rear window as possible.
The rear window defogger will turn off about 15 minutes
after the button is pressed. The defogger can also
be turned off by pressing the button again or by turning
off the engine.Notice:Do not use anything sharp on the inside of
the rear window. If you do, you could cut or
damage the warming grid, and the repairs would not
be covered by your warranty. Do not attach a
temporary vehicle license, tape, a decal or anything
similar to the defogger grid.
Outlet Adjustment
Move the thumbwheel on the vents to change the
direction of the airflow. The center thumbwheel adjusts
the volume of the airflow.
There are also similar vents for the rear of the vehicle.
They are located at the rear of the center console.
Operation Tips
•Clear away any ice, snow or leaves from the air
inlets at the base of the windshield that may
block the flow of air into your vehicle.
•Use of non-GM approved hood deflectors may
adversely affect performance of the system.
•When an objectionable odor outside the vehicle is
encountered, use the recirculation mode, with the
temperature knob at a comfortable setting to prevent
the odor from entering the vehicle through the
ventilation system. This can be helpful when driving
through a long tunnel with poor ventilation.
However, extended usage of this mode in cold or
cool weather can cause window fogging.
3-21
Page 116 of 318

Warning Lights, Gages, and
Indicators
This part describes the warning lights and gages
that may be on your vehicle. The pictures will help you
locate them.
Warning lights and gages can signal that something is
wrong before it becomes serious enough to cause
an expensive repair or replacement. Paying attention to
your warning lights and gages could also save you
or others from injury.
Warning lights come on when there may be or is a
problem with one of your vehicle’s functions. As you will
see in the details on the next few pages, some
warning lights come on briefly when you start the
engine just to let you know they’re working. If you are
familiar with this section, you should not be alarmed
when this happens.
Gages can indicate when there may be or is a problem
with one of your vehicle’s functions. Often gages
and warning lights work together to let you know when
there’s a problem with your vehicle.When one of the warning lights comes on and stays on
when you are driving, or when one of the gages
shows there may be a problem, check the section that
tells you what to do about it. Please follow this
manual’s advice. Waiting to do repairs can be
costly – and even dangerous. So please get to know
your warning lights and gages. They’re a big help.
Your vehicle also has a trip computer that works along
with the warning lights and gages. The trip computer
display provides visual information. SeeTrip Computer
on page 3-33. The warning message are displayed
through the trip computer or as an illuminated symbol or
sometimes both ways.
If a Service Error Contact Dealer message appears on
the trip computer display while driving, a fault in the
instrument panel is indicated. Contact your dealer
as soon as possible. This message will remain until the
MODE button on the trip computer is pressed.
3-22
Page 117 of 318

Instrument Panel Cluster
The instrument panel cluster is designed to let you know at a glance how your vehicle is running. You’ll know how
fast you’re going, how much fuel you’re using, and many other things you’ll need to drive safely and economically.
3-23
Page 118 of 318

Speedometer
The speedometer shows vehicle speed in both miles
per hour (mph) and kilometers per hour (km/h).
Tachometer
The tachometer shows
engine speed in
revolutions per
minute (rpm).
For automatic transmission vehicle’s, under wide open
throttle acceleration, when the accelerator pedal is
pushed flat to the floor, it is possible that the tachometer
needle may briefly enter the lower end of the
tachometer’s red zone just prior to automatically
upshifting into a higher gear. This is normal during wide
open throttle acceleration and will not harm the engine.Notice:If you operate the engine with the
tachometer in the shaded warning area, your vehicle
could be damaged, and the damages would not
be covered by your warranty. Do not operate
the engine with the tachometer in the shaded
warning area.Safety Belt Reminder Light
When the key is turned to
ON, the safety belt light will
come on and stay on for
several seconds and a
chime will be sounded for
eight seconds, then it will
flash continuously until the
driver’s belt is buckled.
If the driver’s belt is already buckled, the light will not
come on.
3-24
Page 119 of 318

Airbag Readiness Light
There is an airbag
readiness light on the
instrument panel which
shows the airbag symbol.
This light will come on when you start your vehicle, and
it will flash for a few seconds. Then the light should
go out. This means the system is ready.
The system checks the airbag’s electrical system for
malfunctions. The light tells you if there is an electrical
problem. The system check includes the airbag
sensors, the airbag modules, the wiring and the
diagnostic module. SeeAirbag System on page 1-44for
more information.If the airbag readiness light stays on after you start the
vehicle or comes on when you are driving, your
airbag system may not work properly. Have your vehicle
serviced right away. The light comes on after an
accident where the airbags were activated.
{CAUTION:
If the airbag readiness light stays on after you
start your vehicle, it means the airbag system
may not be working properly. The airbags in
your vehicle may not in�ate in a crash, or they
could even in�ate without a crash. To help avoid
injury to yourself or others, have your vehicle
serviced right away if the airbag readiness light
stays on after you start your vehicle.
3-25
Page 120 of 318

Charging System Light
The charging system light
will come on when you
turn on the ignition,
until the engine is started,
as a check to show
you it is working.
When the engine is running, the light should go out.
If the light illuminates and the Check Alternator message
on the trip computer stays on, or comes on while you
are driving you may have a problem with the electrical
charging system. It could indicate that you have a loose
generator drive belt or another electrical problem.
Have it checked right away. Driving while this light is on
could drain your battery.
If you must drive a short distance with the light on, be
certain to turn off all your accessories, such as the radio
and air conditioner.
The Check Alternator message will remain until the
MODE button on the trip computer is pressed, but the
symbol will remain until the problem is fixed.
One-to-Four Shift Light (Manual
Transmission)
When this light comes on,
you can only shift from
FIRST (1) to FOURTH (4)
instead of FIRST (1) to
SECOND (2).
You must complete the shift into FOURTH (4) to turn off
this feature. This helps you get the best possible fuel
economy.
After shifting to FOURTH (4), you may downshift to a
lower gear if you prefer.
3-26