PONTIAC PONTIAC 1996 Owners Manual
PONTIAC 1996
PONTIAC
PONTIAC
https://www.carmanualsonline.info/img/50/58390/w960_58390-0.png
PONTIAC PONTIAC 1996 Owners Manual
Trending: spark plugs replace, ECU, park assist, child lock, mirror, adding oil, battery capacity
Page 261 of 370
12.
13.
14.
15.
16.
Plug the electrical connector into the headlamp
socket. Make
sure the locking tabs snap onto
the socket.
Put the headlamp assembly in position. Make sure
the two guide tabs drop into their holes in the
headlamp support panel.
Tighten the two bottom screws. Make sure
the guide tabs are still in place before tightening
the screws.
Insert the top screw
and tighten it.
Close
the headlamp panel.
/
Headlamps (4-Door Models)
1. Open the headlamp panel.
ProCarManuals.com
Page 262 of 370
Turn the socket
counterclockwise until it
pops loose
from the housing.
3. Pull out the bulb socket.
Headlamp Aiming
4. Lift the plastic locking tab on the electrical
connector and pull the connector from the
bulb socket.
5. Snap the electrical connector into a new bulb socket.
6. Replace the bulb socket into the housing and have a four-door Pontiac, see your dealer when your
This section only applies to two-door Pontiacs. If you
turn clockwise. headlamp aim needs to be checked
or adjusted.
7. Close the headlamp panel.
Your vehicle has the 55 x 135 mini-quad headlamp
system. These headlamps have horizontal and vertical
aim indicators. The aim has been pre-set at the factory
and should need
no further adjustment.
ProCarManuals.com
Page 263 of 370
If your vehicle is damaged in an accident and the
headlarnp aim seems to be affected, see your
Pontiac dealer. Headlamps on damaged vehicles
may require recalibration of the horizontal aim by
your Pontiac dealer.
To check the aim, the vehicle should be properly
prepared as follows:
The vehicle must have all four tires an a perfectly
level surface.
0 The vehicle should not have any snow, ice or mud
There should not be my cmgu ur loading of the
attached to it.
vehicle, except it should have
a full tank of gas and
one person or
160 lbs. (75 kg) on the driver’s seat.
0 Tires should be properly inflated.
t
indicator should
read
“0.”
1 0 The horizontal
-
NOTICE:
To make sure your headlamps are aimed
properly, read all the instructions
before
beginning. Failure to follow these instructions
could cause damage to headlamp parts.
State inspection stations will allow a vertical reading of
plus 0.76 degrees or minus 0.76 degrees from the center
of the bubble.
ProCarManuals.com
Page 264 of 370
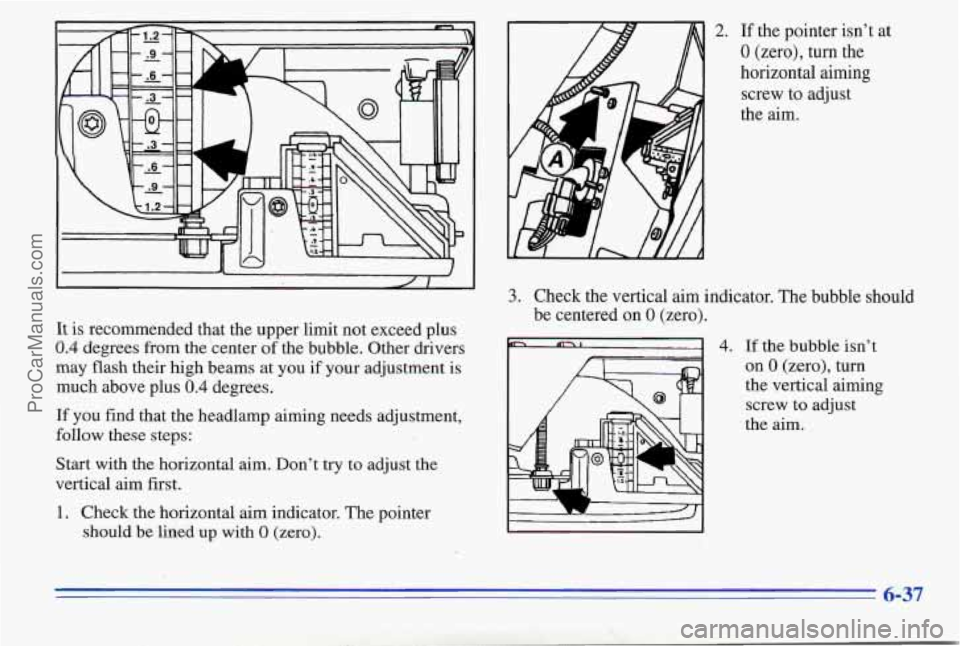
It is recommended that the upper limit not exceed plus
0.4 degrees from the center of the bubble. Other drivers
may flash their high beams at you if your adjustment is
much above plus
0.4 degrees.
If you find that the headlamp aiming needs adjustment,
follow these steps:
Start with the horizontal aim. Don’t try to adjust the
vertical aim first.
1. Check the horizontal aim indicator. The pointer
should be
lined up with 0 (zero).
2. If the pointer isn’t at
0 (zero), turn the
horizontal
aiming
screw to adjust
the aim.
3. Check the vertical aim indicator. The bubble should
be centered on
0 (zero).
~1 4.
L-!
If the bubble isn’t
on
0 (zero), turn
the vertical aiming
screw
to adjust
the aim.
6-37
ProCarManuals.com
Page 265 of 370
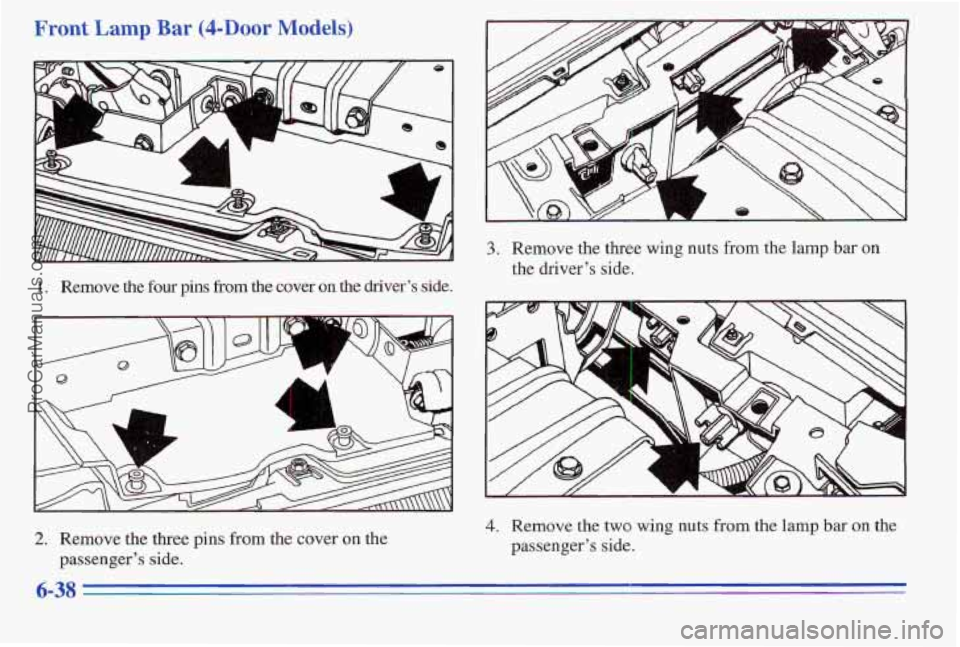
Front Lamp Bar (4-Door Models)
i ’ 1‘ 4 -.
1
L
w ” ’-‘‘W’’’’- - - - Y
1. Remove the four pins fkom the cover on the driver’s side.
4. Remove the two wing nuts from the lamp bar on the 2. Remove the three pins from the cover on the
passenger’s side.
passenger’s side.
6-38
ProCarManuals.com
Page 266 of 370
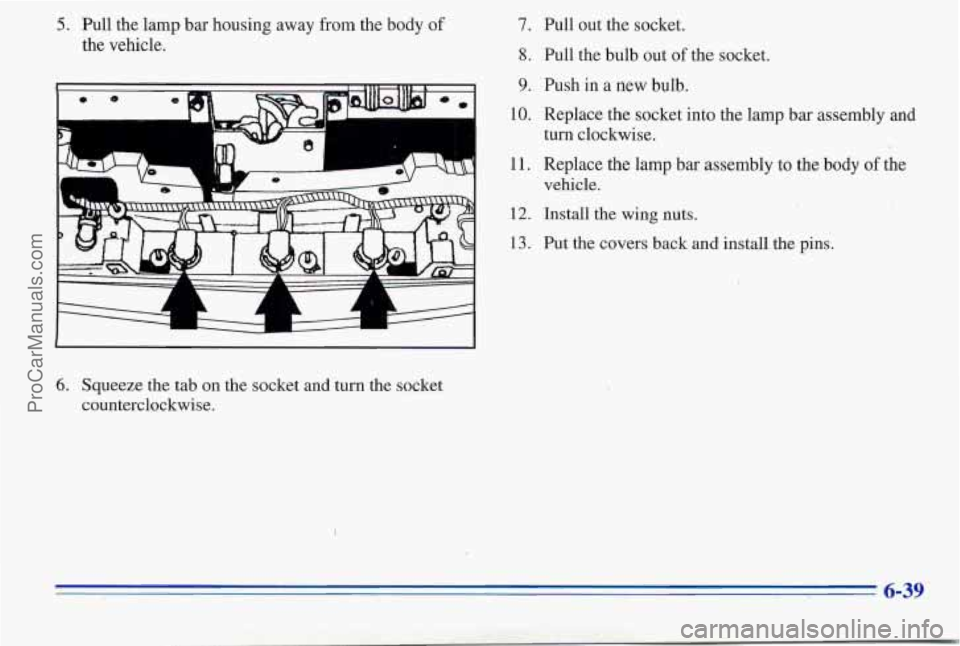
5. Pull the lamp bar housing away from the body of
the vehicle.
6. Squeeze the tab on the socket and turn the socket
counterclockwise.
7. Pull out the socket.
8. Pull the bulb out of the socket.
9.
10.
11.
12.
13.
Push in a new bulb.
Replace the socket into the lamp bar assembly
and
turn clockwise.
Replace the lamp bar assembly to the body
of the
vehicle.
Install the wing nuts.
Put the covers back and install the pins.
ProCarManuals.com
Page 267 of 370
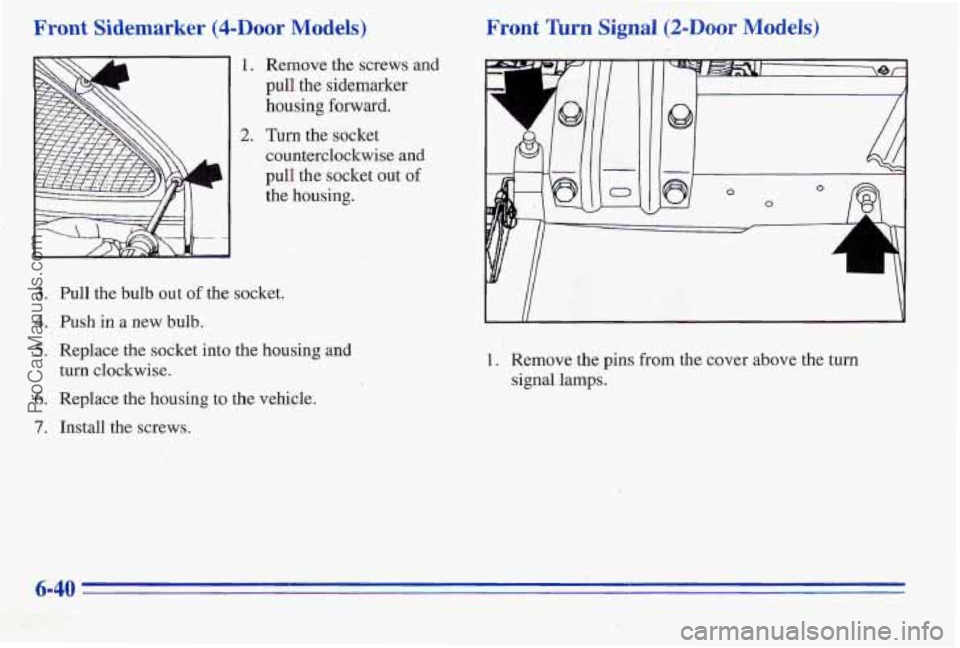
Front Sidemarker (4-Door Models)
1.
2.
Remove the screws and
pull the sidemarker
housing
forward.
Turn the socket
counterclockwise and
pull
the socket out of
the housing.
3.
4.
5.
6.
7.
Pull the bulb out of the socket.
Push in a new bulb.
Replace the socket into
the housing and
turn clockwise.
Replace the housing to
the vehicle.
Install the screws.
Front lbrn Signal (2-Door Models)
\er
1. Remove the pins from the cover above the turn
signal lamps.
6-40
ProCarManuals.com
Page 268 of 370
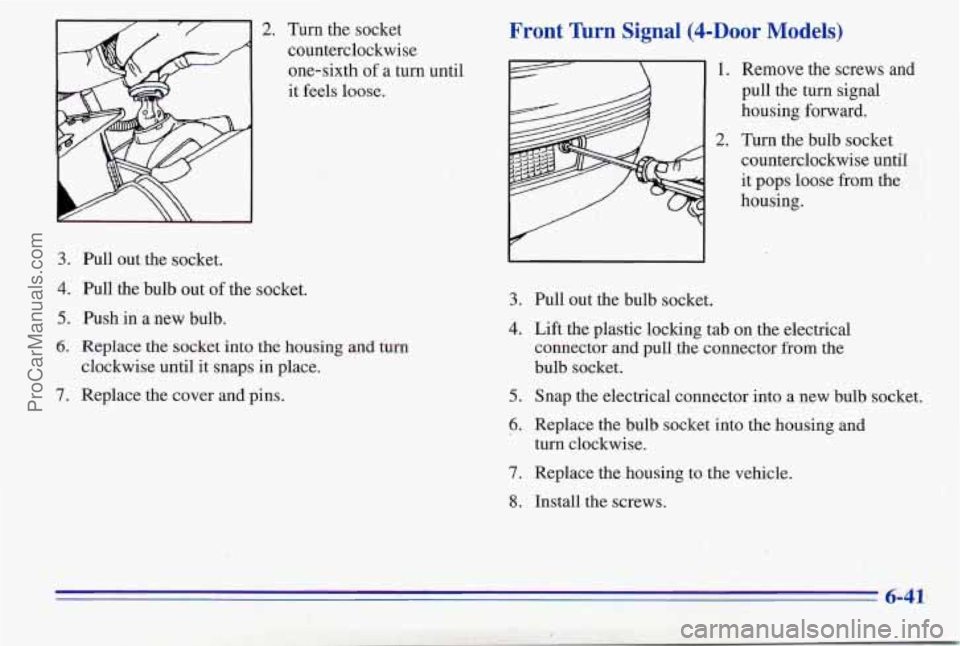
2. Turn the socket
counterclockwise one-sixth of a turn until
it feels loose.
3. Pull out the socket.
4. Pull the bulb out of the socket.
5. Push in a new bulb.
6. Replace the socket into the housing and turn
7. Replace the cover and pins. clockwise until it snaps in place.
Front Turn Signal (4-DOor Models)
3.
4.
5.
6.
7.
8.
1.
2.
Remove the screws and
pull the turn signal
housing forward.
Turn the bulb socket
counterclockwise untiI
it pops loose from
the
housing.
Pull out the bulb socket.
Lift the plastic locking tab on the electrical
connector and pull .the connector from the
bulb socket.
Snap the electrical connector into a new bulb socket,
Replace the bulb socket into the housing and
turn clockwise.
Replace the housing to the vehicle.
Install the screws.
ProCarManuals.com
Page 269 of 370
Fog Lamps (2-Door Models)
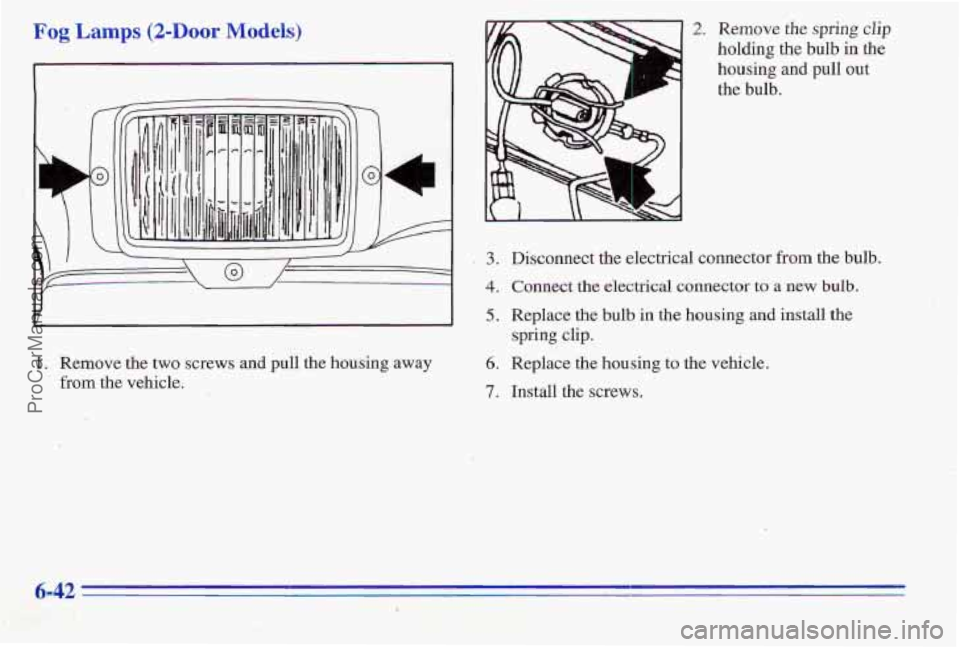
1. Remove the two screws and pull the housing away
from the vehicle.
.3
4
5
6.
7.
2. Remove the spring clip
holding the bulb in the
housing and pull
out
the bulb.
Disconnect
the electrical connector from the bulb.
Connect the eiectrical connector to a new bulb.
Replace the bulb in the housing and install the
spring clip.
Replace the housing to the vehicle.
Install the screws.
ProCarManuals.com
Page 270 of 370
Fog Lamps @-Door Models)
-- I. I
I/ w /
I h \\ I
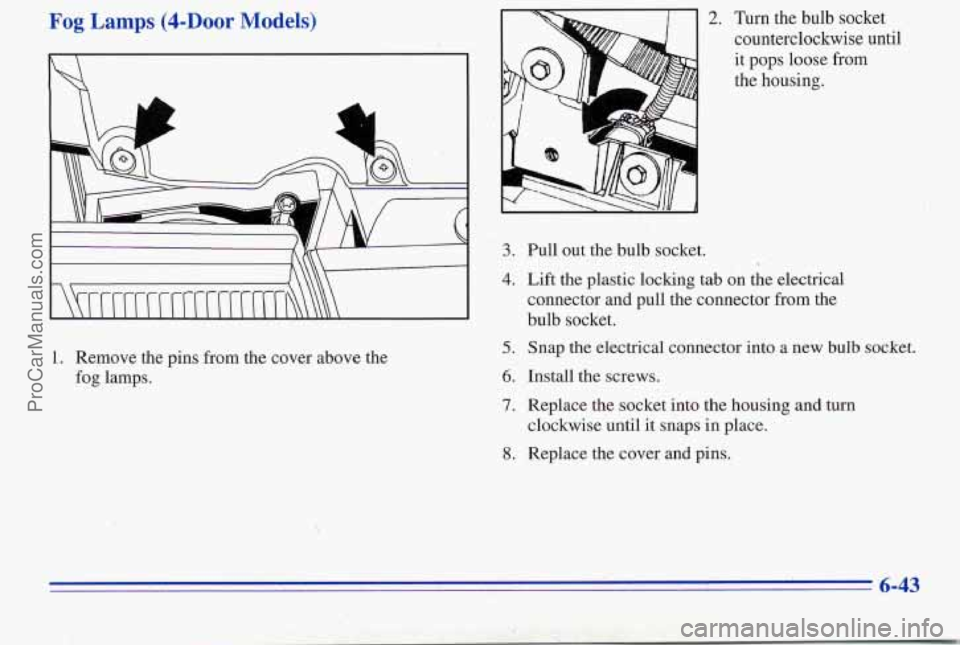
1. Remove the pins from the cover above the
fog lamps.
2. Turn the bulb socket
counterclockwise until
it pops loose from
the housing.
3.
4.
5.
6.
1
8.
Pull out the bulb socket.
Lift the plastic locking tab on the electrical
connector and pull the connector from the
bulb socket.
Snap the electrical connector into a new
bulb socket.
Install the screws.
Replace the socket into the housing and turn
clockwise until it snaps in place.
Replace the cover and pins.
6-43
ProCarManuals.com
Trending: oil additives, brake light, service schedule, fuse box, low oil pressure, radio controls, manual radio set


