Section 2 PONTIAC VIBE 2004 Owner's Manual
[x] Cancel search | Manufacturer: PONTIAC, Model Year: 2004, Model line: VIBE, Model: PONTIAC VIBE 2004Pages: 370, PDF Size: 2.68 MB
Page 235 of 370

How to Add Fluid
Refer to the Maintenance Schedule to determine
what kind of transaxle ¯uid to use. See
Part D: Recommended Fluids and Lubricants
on page 6-26.
If the ¯uid level is low, add only enough of the proper
¯uid to bring the level into the area between dimples on
the dipstick.
1. Pull out the dipstick.
2. Using a long-neck funnel, add enough ¯uid at the
dipstick hole to bring it to the proper level.
It doesn't take much ¯uid, generally less than
one pint (0.5 L).
Don't over®ll.
Notice:
We recommend you use only ¯uid labeled
T-IV Automatic Transmission Fluid because ¯uid
with that label is made especially for your automatic
transaxle. Damage caused by ¯uid other than T-IV
Automatic Transmission ¯uid is not covered by your
new vehicle warranty. See ªRecommended Fluids
and Lubricantsº in the Index.
3. After adding ¯uid, recheck the ¯uid level as
described under ªHow to Checkº previously in
this section.
4. When the correct ¯uid level is obtained, push the
dipstick back in all the way; then press the tab
down to lock the dipstick in place.
Manual Transaxle Fluid
When to Check
A good time to have it checked is when the engine oil is
changed. However, the ¯uid in your manual transaxle
doesn't require changing.
How to Check
Because this operation can be difficult, you may choose
to have this done at your Pontiac dealership service
department.
If you do it yourself, be sure to follow all the instructions
here, or you could get a false reading.
Notice:Too much or too little ¯uid can damage
your transaxle. Too much can mean that some of the
¯uid could come out and fall on hot engine or
exhaust system parts, starting a ®re. Too little ¯uid
could cause the transaxle to overheat. Be sure
to get an accurate reading if you check your
transaxle ¯uid.
Check the ¯uid level only when your engine is off, the
vehicle is parked on a level place and the transaxle
is cool enough for you to rest your ®ngers on the
transaxle case.
5-25
Page 261 of 370
All-Wheel Drive
If you have an all-wheel-drive vehicle, be sure to
perform the lubricant checks described in this section.
However, it has two additional systems that need
lubrication.
Transfer Case (Power Transfer Unit)
When to Check Lubricant
Refer to the Maintenance Schedule to determine how
often to check the lubricant. SeePart C: Periodic
MaintenanceInspections on page 6-24.
How to Check Lubricant
To get an accurate reading, the vehicle should be on a
level surface.
If the level is below the bottom of the ®ller plug hole,
you'll need to add some lubricant. Add enough lubricant
to raise the level to the bottom of the ®ller plug hole.
What to Use
Refer to the Maintenance Schedule to determine what
kind of lubricant to use. SeePart D: Recommended
Fluids and Lubricants on page 6-26.
Carrier Assembly-Differential
(Rear Drive Module)
When to Check and Change Lubricant
Refer to the Maintenance Schedule to determine how
often to check the lubricant and when to change it. See
Part A: Scheduled Maintenance Services on page 6-4.
How to Check Lubricant
To get an accurate reading, the vehicle should be on a
level surface.
If the level is below the bottom of the ®ller plug hole,
you'll need to add some lubricant. Add enough lubricant
to raise the level to the bottom of the ®ller plug hole.
A ¯uid loss could indicate a problem; check and have it
repaired, if needed.
What to Use
Refer to the Maintenance Schedule to determine what
kind of lubricant to use. SeePart D: Recommended
Fluids and Lubricants on page 6-26.
5-51
Page 262 of 370
Bulb Replacement
For any bulb changing procedure not listed in this
section, contact your dealer. For the type of bulb to use,
see
Replacement Bulbs on page 5-59.
Halogen Bulbs
{CAUTION:
Halogen bulbs have pressurized gas inside
and can burst if you drop or scratch the bulb.
You or others could be injured. Be sure to read
and follow the instructions on the bulb
package.
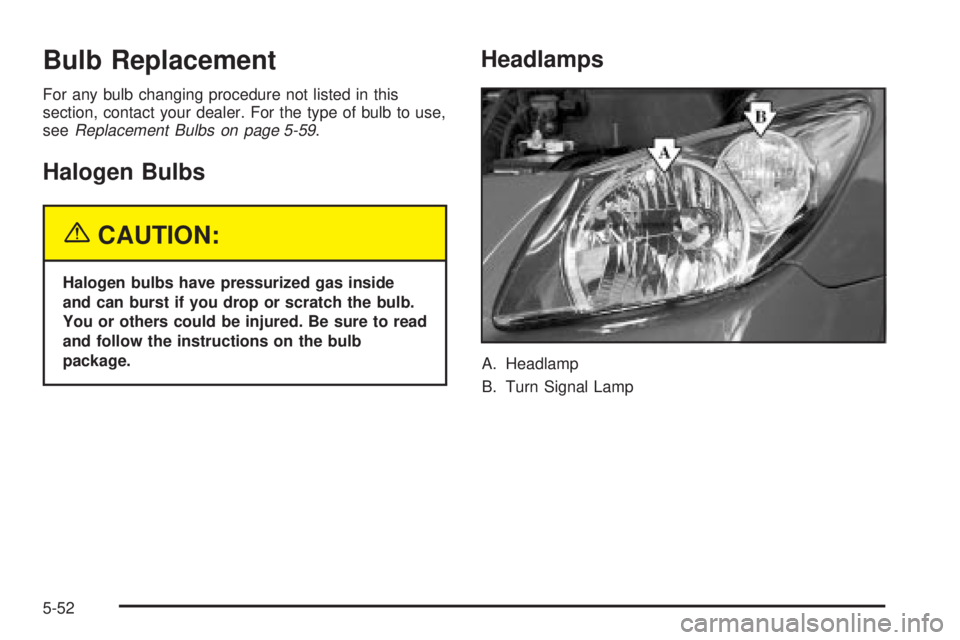
Headlamps
A. Headlamp
B. Turn Signal Lamp
5-52
Page 273 of 370
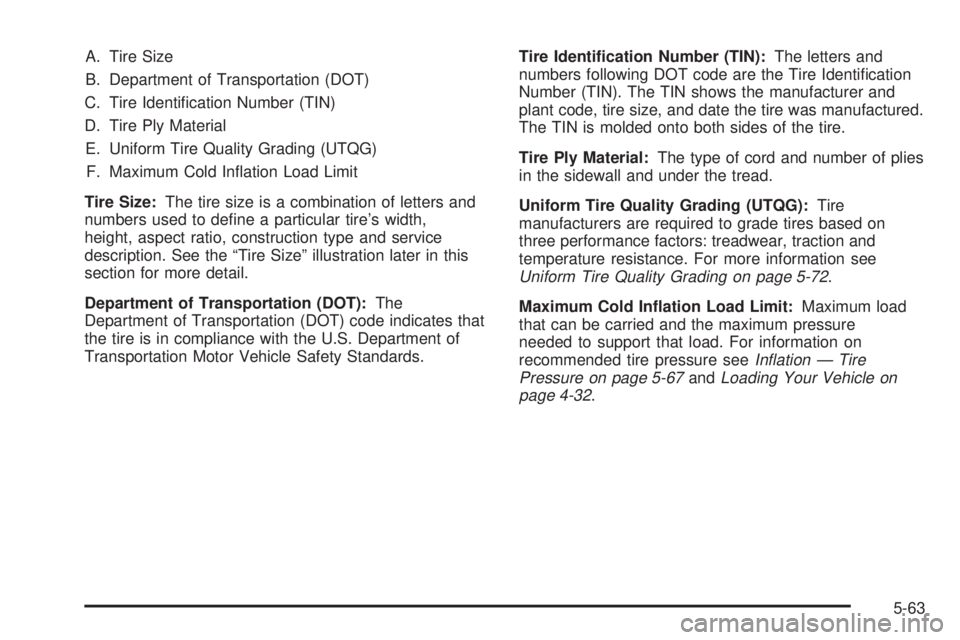
A. Tire Size
B. Department of Transportation (DOT)
C. Tire Identi®cation Number (TIN)
D. Tire Ply Material
E. Uniform Tire Quality Grading (UTQG)
F. Maximum Cold In¯ation Load Limit
Tire Size:The tire size is a combination of letters and
numbers used to de®ne a particular tire's width,
height, aspect ratio, construction type and service
description. See the ªTire Sizeº illustration later in this
section for more detail.
Department of Transportation (DOT):The
Department of Transportation (DOT) code indicates that
the tire is in compliance with the U.S. Department of
Transportation Motor Vehicle Safety Standards.Tire Identi®cation Number (TIN):The letters and
numbers following DOT code are the Tire Identi®cation
Number (TIN). The TIN shows the manufacturer and
plant code, tire size, and date the tire was manufactured.
The TIN is molded onto both sides of the tire.
Tire Ply Material:The type of cord and number of plies
in the sidewall and under the tread.
Uniform Tire Quality Grading (UTQG):Tire
manufacturers are required to grade tires based on
three performance factors: treadwear, traction and
temperature resistance. For more information see
Uniform Tire Quality Grading on page 5-72.
Maximum Cold In¯ation Load Limit:Maximum load
that can be carried and the maximum pressure
needed to support that load. For information on
recommended tire pressure see
In¯ation Ð Tire
Pressure on page 5-67andLoading Your Vehicle on
page 4-32.
5-63
Page 274 of 370
Tire Size
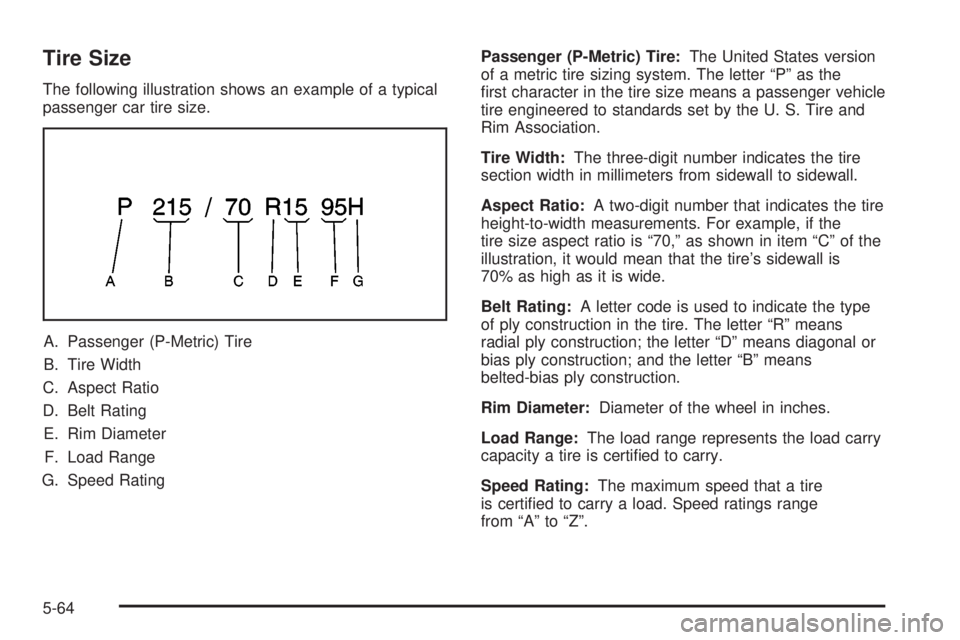
The following illustration shows an example of a typical
passenger car tire size.
A. Passenger (P-Metric) Tire
B. Tire Width
C. Aspect Ratio
D. Belt Rating
E. Rim Diameter
F. Load Range
G. Speed RatingPassenger (P-Metric) Tire:The United States version
of a metric tire sizing system. The letter ªPº as the
®rst character in the tire size means a passenger vehicle
tire engineered to standards set by the U. S. Tire and
Rim Association.
Tire Width:The three-digit number indicates the tire
section width in millimeters from sidewall to sidewall.
Aspect Ratio:A two-digit number that indicates the tire
height-to-width measurements. For example, if the
tire size aspect ratio is ª70,º as shown in item ªCº of the
illustration, it would mean that the tire's sidewall is
70% as high as it is wide.
Belt Rating:A letter code is used to indicate the type
of ply construction in the tire. The letter ªRº means
radial ply construction; the letter ªDº means diagonal or
bias ply construction; and the letter ªBº means
belted-bias ply construction.
Rim Diameter:Diameter of the wheel in inches.
Load Range:The load range represents the load carry
capacity a tire is certi®ed to carry.
Speed Rating:The maximum speed that a tire
is certi®ed to carry a load. Speed ratings range
from ªAº to ªZº.
5-64
Page 300 of 370
Here are some cleaning tips:
·Always read the instructions on the cleaner label.
·Clean up stains as soon as you can Ð before
they set.
·Carefully scrape off any excess stain.
·Use a clean cloth or sponge, and change to a clean
area often. A soft brush may be used if stains are
stubborn.
·If a ring forms on fabric after spot cleaning, clean
the entire area immediately or it will set.
Using Cleaner on Fabric
1. Vacuum and brush the area to remove any
loose dirt.
2. Always clean a whole trim panel or section. Mask
surrounding trim along stitch or welt lines.
3. Follow the directions on the container label.
4. Apply cleaner with a clean sponge. Do not saturate
the material and do not rub it roughly.
5. As soon as you have cleaned the section, use a
sponge to remove any excess cleaner.
6. Wipe cleaned area with a clean, water-dampened
towel or cloth.
7. Wipe with a clean cloth and let dry.
Special Fabric Cleaning Problems
Stains caused by such things as catsup, coffee (black),
egg, fruit, fruit juice, milk, soft drinks, vomit, urine
and blood can be removed as follows:
1. Carefully scrape off excess stain, then sponge the
soiled area with cool water.
2. If a stain remains, follow the cleaning instructions
described earlier.
3. If an odor lingers after cleaning vomit or urine, treat
the area with a water and baking soda solution:
1 teaspoon (5 ml) of baking soda to 1 cup (250 ml)
of lukewarm water.
4. Let dry.
Stains caused by candy, ice cream, mayonnaise, chili
sauce and unknown stains can be removed as follows:
1. Carefully scrape off excess stain.
2. Clean with cool water and allow to dry completely.
3. If a stain remains, follow the cleaner instructions
described earlier.
5-90
Page 315 of 370

Maintenance Schedule......................................6-2
Introduction...................................................6-2
Maintenance Requirements..............................6-2
Your Vehicle and the Environment....................6-2
How This Section is Organized.........................6-3
Part A: Scheduled Maintenance Services...........6-4
Using Your Maintenance Schedule....................6-4
Selecting the Right Schedule...........................6-5
Short Trip/City Scheduled Maintenance..............6-7
Long Trip/Highway Scheduled Maintenance......6-14
Part B: Owner Checks and Services................6-19
At Each Fuel Fill..........................................6-19
At Least Once a Month.................................6-19At Least Twice a Year...................................6-20
At Least Once a Year...................................6-21
Part C: Periodic MaintenanceInspections.........6-24
Steering, Suspension and Front Drive Axle
Boot and Seal Inspection............................6-24
Exhaust System Inspection............................6-24
Fuel System Inspection..................................6-24
Engine Cooling System Inspection...................6-25
Throttle System Inspection.............................6-25
Brake System Inspection................................6-25
Part D: Recommended Fluids and Lubricants. . . .6-26
Part E: Maintenance Record...........................6-28
Section 6 Maintenance Schedule
6-1
Page 317 of 370
How This Section is Organized
This maintenance schedule is divided into ®ve parts:
ªPart A: Scheduled Maintenance Servicesºexplains
what to have done and how often. Some of these
services can be complex, so unless you are technically
quali®ed and have the necessary equipment, you should
let your GM dealer's service department do these jobs.
Your GM dealer has GM-trained and supported service
people that will perform the work using genuine GM parts.
{CAUTION:
Performing maintenance work on a vehicle can
be dangerous. In trying to do some jobs, you
can be seriously injured. Do your own
maintenance work only if you have the
required know-how and the proper tools and
equipment for the job. If you have any doubt,
have a quali®ed technician do the work.
If you want to get the service information, see
Service
Publications Ordering Information on page 7-11.ªPart B: Owner Checks and Servicesºtells you what
should be checked and when. It also explains what
you can easily do to help keep your vehicle in good
condition.
ªPart C: Periodic MaintenanceInspectionsºexplains
important inspections that your dealer's service
department can perform for you.
ªPart D: Recommended Fluids and Lubricantsºlists
some recommended products necessary to help
keep your vehicle properly maintained. These products,
or their equivalents, should be used whether you do
the work yourself or have it done.
ªPart E: Maintenance Recordºis a place for you to
record and keep track of the maintenance performed on
your vehicle. Keep your maintenance receipts. They
may be needed to qualify your vehicle for warranty
repairs.
6-3
Page 345 of 370
Customer Assistance Information......................7-2
Customer Satisfaction Procedure......................7-2
Online Owner Center......................................7-4
Customer Assistance for Text
Telephone (TTY) Users................................7-4
Customer Assistance Offices............................7-4
GM Mobility Program for Persons
with Disabilities...........................................7-6
Roadside Assistance Program..........................7-6
Courtesy Transportation...................................7-8Reporting Safety Defects................................7-10
Reporting Safety Defects to the
United States Government..........................7-10
Reporting Safety Defects to the
Canadian Government................................7-10
Reporting Safety Defects to
General Motors.........................................7-11
Service Publications Ordering Information.........7-11
Section 7 Customer Assistance Information
7-1
Page 364 of 370

Light (cont.)
Safety Belt Reminder...................................3-28
Loading Your Vehicle.......................................4-32
Locks............................................................. 2-7
Door........................................................... 2-7
Leaving Your Vehicle..................................... 2-9
Power Door.................................................. 2-8
Rear Door Security Locks............................... 2-8
Long Trip/Highway De®nition.............................. 6-6
Long Trip/Highway Intervals............................... 6-6
Long Trip/Highway Scheduled Maintenance........6-14
Loss of Control...............................................4-14
Low Washer Fluid Warning Light.......................3-39
Luggage Carrier..............................................2-38
M
Maintenance, Normal Replacement Parts..........5-103
Maintenance Schedule.....................................6-19
At Each Fuel Fill.........................................6-19
At Least Once a Month................................6-19
At Least Once a Year..................................6-21
At Least Twice a Year..................................6-20
Brake System Inspection..............................6-25
Engine Cooling System Inspection.................6-25
Exhaust System Inspection...........................6-24
Fuel System Inspection................................6-24
How This Section is Organized....................... 6-3
Introduction.................................................. 6-2
Long Trip/Highway Scheduled Maintenance.....6-14Maintenance Schedule (cont.)
Maintenance Requirements............................. 6-2
Part A - Scheduled Maintenance Services......... 6-4
Part B - Owner Checks and Services.............6-19
Part C - Periodic MaintenanceInspections......6-24
Part D - Recommended Fluids and
Lubricants...............................................6-26
Part E - Maintenance Record........................6-28
Selecting the Right Schedule.......................... 6-5
Short Trip/City Scheduled Maintenance............. 6-7
Steering, Suspension and Front Drive Axle
Boot and Seal Inspection..........................6-24
Throttle System Inspection............................6-25
Using Your................................................... 6-4
Your Vehicle and the Environment................... 6-2
Maintenance When Trailer Towing.....................4-40
Making Turns.................................................4-38
Malfunction Indicator Light................................3-34
Manual Seats................................................... 1-2
Manual Transaxle............................................2-18
Fluid..........................................................5-25
Operation...................................................2-23
Manual Windows............................................2-11
Matching Transmitter(s) to Your Vehicle............... 2-6
Mexico, Central America and Caribbean
Islands/Countries (Except Puerto Rico and
U.S. Virgin Islands) ± Customer Assistance....... 7-5
Mirrors..........................................................2-35
Manual Rearview Mirror................................2-35
Outside Convex Mirror.................................2-36
8