engine PONTIAC VIBE 2005 User Guide
[x] Cancel search | Manufacturer: PONTIAC, Model Year: 2005, Model line: VIBE, Model: PONTIAC VIBE 2005Pages: 374, PDF Size: 2.49 MB
Page 96 of 374
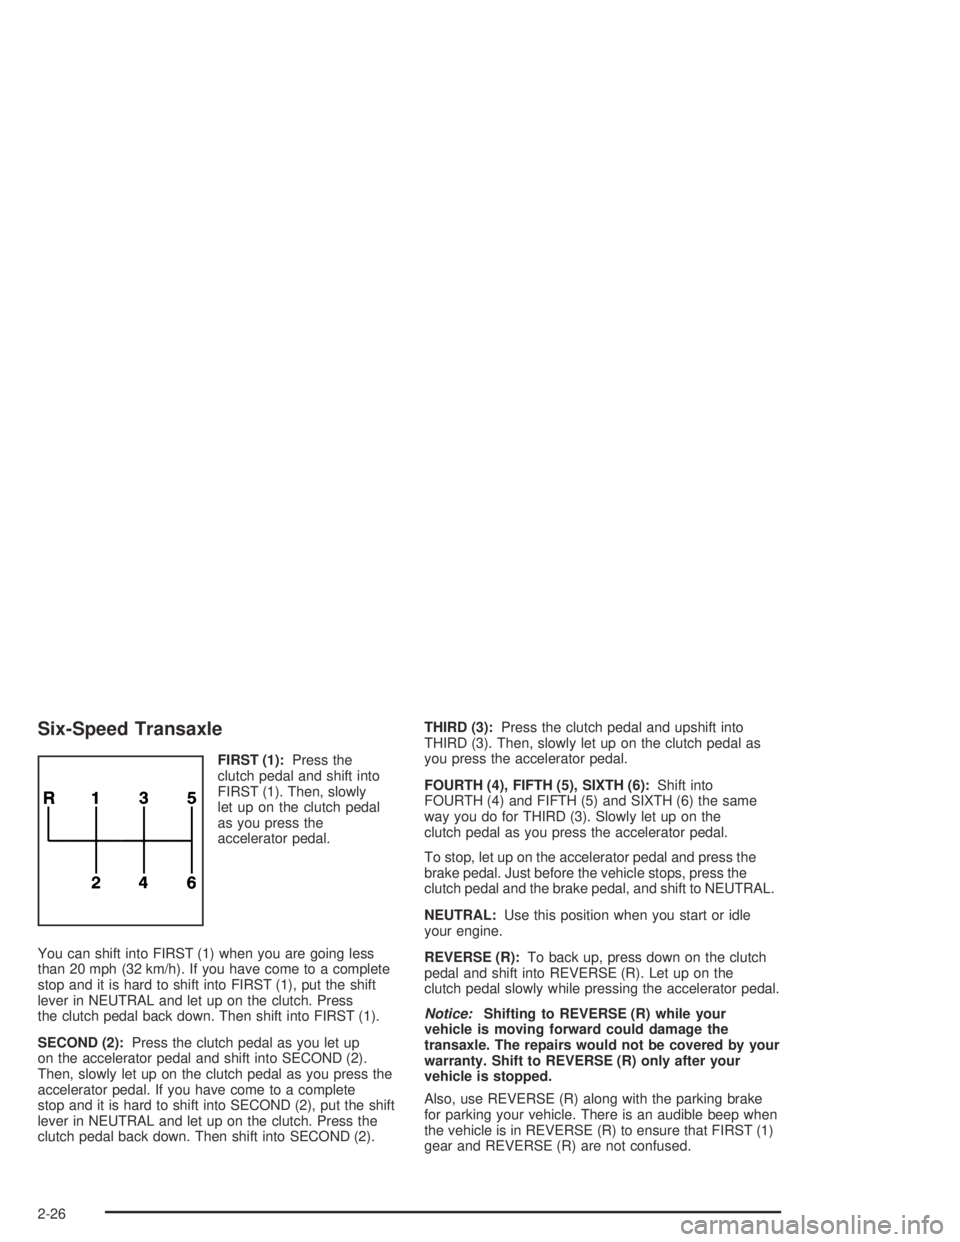
Six-Speed Transaxle
FIRST (1):Press the
clutch pedal and shift into
FIRST (1). Then, slowly
let up on the clutch pedal
as you press the
accelerator pedal.
You can shift into FIRST (1) when you are going less
than 20 mph (32 km/h). If you have come to a complete
stop and it is hard to shift into FIRST (1), put the shift
lever in NEUTRAL and let up on the clutch. Press
the clutch pedal back down. Then shift into FIRST (1).
SECOND (2):Press the clutch pedal as you let up
on the accelerator pedal and shift into SECOND (2).
Then, slowly let up on the clutch pedal as you press the
accelerator pedal. If you have come to a complete
stop and it is hard to shift into SECOND (2), put the shift
lever in NEUTRAL and let up on the clutch. Press the
clutch pedal back down. Then shift into SECOND (2).THIRD (3):Press the clutch pedal and upshift into
THIRD (3). Then, slowly let up on the clutch pedal as
you press the accelerator pedal.
FOURTH (4), FIFTH (5), SIXTH (6):Shift into
FOURTH (4) and FIFTH (5) and SIXTH (6) the same
way you do for THIRD (3). Slowly let up on the
clutch pedal as you press the accelerator pedal.
To stop, let up on the accelerator pedal and press the
brake pedal. Just before the vehicle stops, press the
clutch pedal and the brake pedal, and shift to NEUTRAL.
NEUTRAL:Use this position when you start or idle
your engine.
REVERSE (R):To back up, press down on the clutch
pedal and shift into REVERSE (R). Let up on the
clutch pedal slowly while pressing the accelerator pedal.
Notice:Shifting to REVERSE (R) while your
vehicle is moving forward could damage the
transaxle. The repairs would not be covered by your
warranty. Shift to REVERSE (R) only after your
vehicle is stopped.
Also, use REVERSE (R) along with the parking brake
for parking your vehicle. There is an audible beep when
the vehicle is in REVERSE (R) to ensure that FIRST (1)
gear and REVERSE (R) are not confused.
2-26
Page 97 of 374
Shift Speeds
{CAUTION:
If you skip a gear when you downshift, you
could lose control of your vehicle. You could
injure yourself or others. Don’t shift down more
than one gear at a time when you downshift.
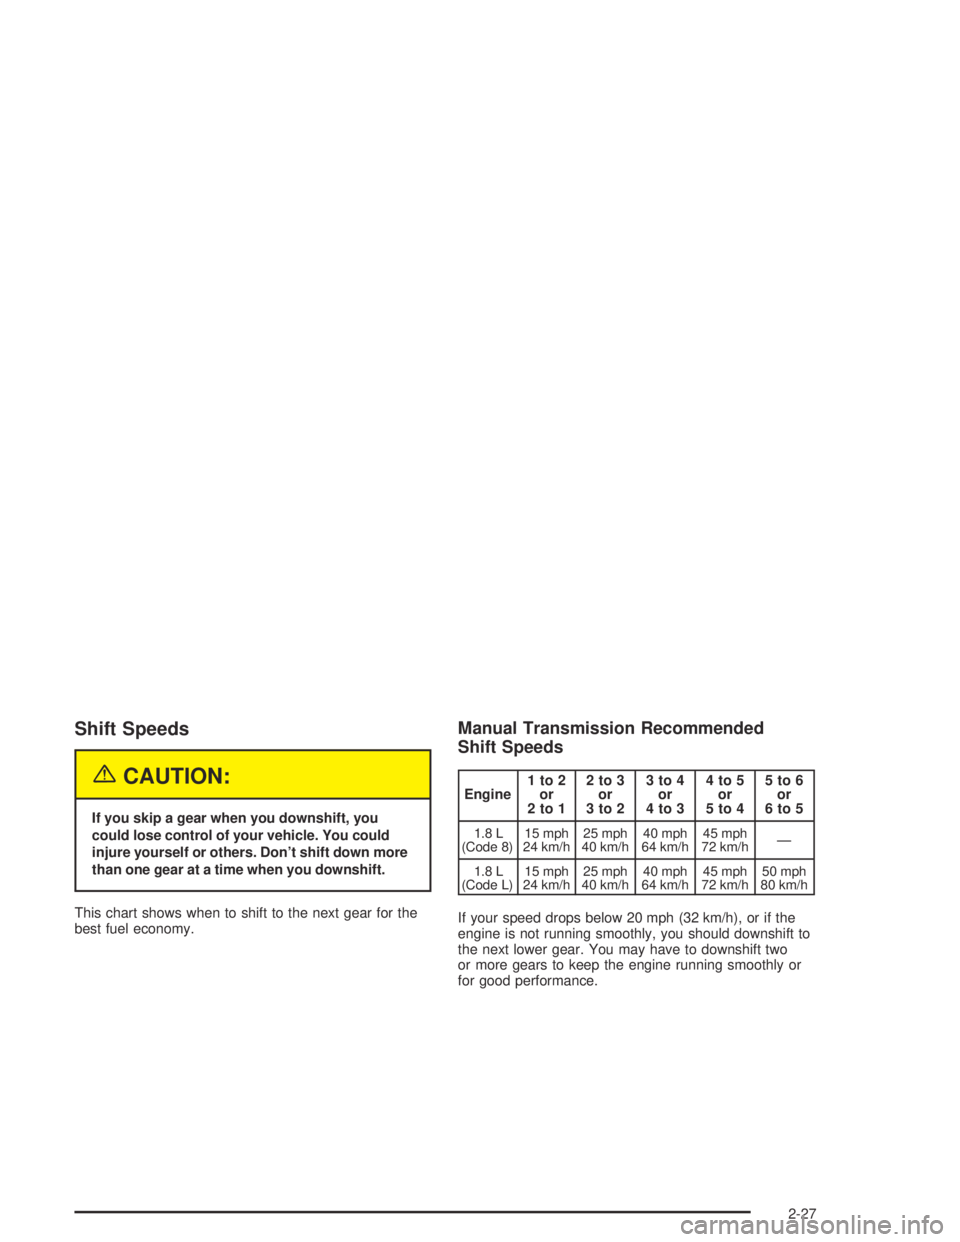
This chart shows when to shift to the next gear for the
best fuel economy.
Manual Transmission Recommended
Shift Speeds
Engine1to2
or
2to12to3
or
3to23to4
or
4to34to5
or
5to45to6
or
6to5
1.8 L
(Code 8)15 mph
24 km/h25 mph
40 km/h40 mph
64 km/h45 mph
72 km/h—
1.8 L
(Code L)15 mph
24 km/h25 mph
40 km/h40 mph
64 km/h45 mph
72 km/h50 mph
80 km/h
If your speed drops below 20 mph (32 km/h), or if the
engine is not running smoothly, you should downshift to
the next lower gear. You may have to downshift two
or more gears to keep the engine running smoothly or
for good performance.
2-27
Page 98 of 374
Parking Brake
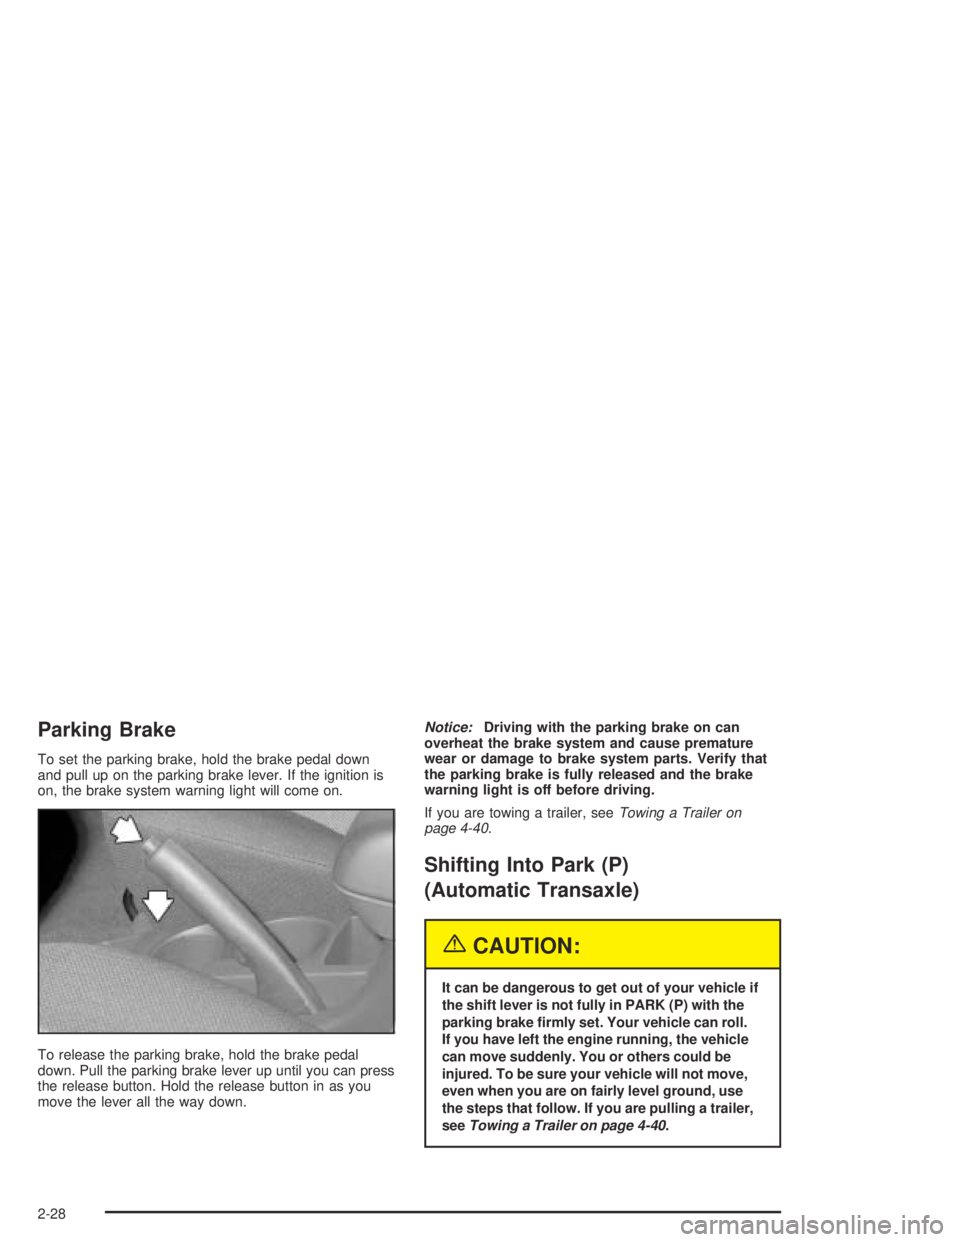
To set the parking brake, hold the brake pedal down
and pull up on the parking brake lever. If the ignition is
on, the brake system warning light will come on.
To release the parking brake, hold the brake pedal
down. Pull the parking brake lever up until you can press
the release button. Hold the release button in as you
move the lever all the way down.Notice:Driving with the parking brake on can
overheat the brake system and cause premature
wear or damage to brake system parts. Verify that
the parking brake is fully released and the brake
warning light is off before driving.
If you are towing a trailer, seeTowing a Trailer on
page 4-40.
Shifting Into Park (P)
(Automatic Transaxle)
{CAUTION:
It can be dangerous to get out of your vehicle if
the shift lever is not fully in PARK (P) with the
parking brake �rmly set. Your vehicle can roll.
If you have left the engine running, the vehicle
can move suddenly. You or others could be
injured. To be sure your vehicle will not move,
even when you are on fairly level ground, use
the steps that follow. If you are pulling a trailer,
seeTowing a Trailer on page 4-40.
2-28
Page 99 of 374
To shift into PARK (P), do the following:
1. Hold the brake pedal down with your right foot and
set the parking brake by pulling up on the parking
brake lever.
2. Move the shift lever into PARK (P) by holding in the
button on the shift lever and pushing the lever all
the way toward the front of the vehicle.
3. Turn the ignition key to LOCK.
4. Remove the key and take it with you. If you can
leave your vehicle with the key in your hand, your
vehicle is in PARK (P).Leaving Your Vehicle With the Engine
Running (Automatic Transaxle)
{CAUTION:
It can be dangerous to leave your vehicle with
the engine running. Your vehicle could move
suddenly if the shift lever is not fully in
PARK (P) with the parking brake �rmly set.
And, if you leave the vehicle with the engine
running, it could overheat and even catch �re.
You or others could be injured. Do not leave
your vehicle with the engine running.
If you have to leave your automatic transaxle vehicle
with the engine running, be sure your vehicle is in
PARK (P) and your parking brake is �rmly set before
you leave it. After you have moved the shift lever
into PARK (P), hold the regular brake pedal down. Then,
see if you can move the shift lever away from PARK (P)
without �rst pulling it toward you. If you can, it means
that the shift lever was not fully locked into PARK (P).
2-29
Page 102 of 374
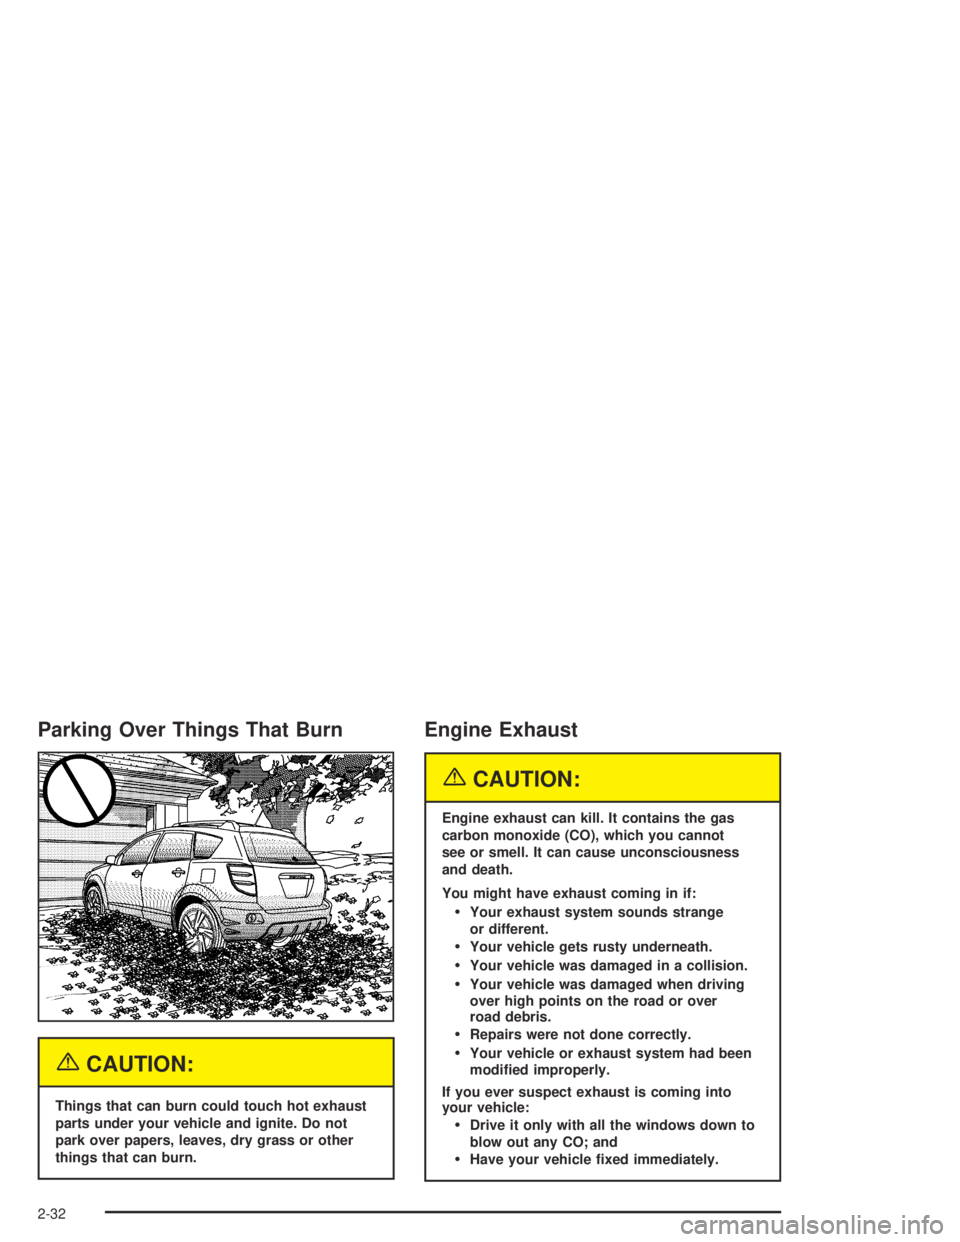
Parking Over Things That Burn
{CAUTION:
Things that can burn could touch hot exhaust
parts under your vehicle and ignite. Do not
park over papers, leaves, dry grass or other
things that can burn.
Engine Exhaust
{CAUTION:
Engine exhaust can kill. It contains the gas
carbon monoxide (CO), which you cannot
see or smell. It can cause unconsciousness
and death.
You might have exhaust coming in if:
Your exhaust system sounds strange
or different.
Your vehicle gets rusty underneath.
Your vehicle was damaged in a collision.
Your vehicle was damaged when driving
over high points on the road or over
road debris.
Repairs were not done correctly.
Your vehicle or exhaust system had been
modi�ed improperly.
If you ever suspect exhaust is coming into
your vehicle:
Drive it only with all the windows down to
blow out any CO; and
Have your vehicle �xed immediately.
2-32
Page 103 of 374

Running Your Engine While You
Are Parked
It is better not to park with the engine running. But if
you ever have to, here are some things to know.
{CAUTION:
Idling the engine with the climate control
system off could allow dangerous exhaust into
your vehicle. See the earlier caution under
Engine Exhaust on page 2-32.
Also, idling in a closed-in place can let deadly
carbon monoxide (CO) into your vehicle even if
the climate control fan is at the highest setting.
One place this can happen is a garage.
Exhaust — with CO — can come in easily.
NEVER park in a garage with the engine
running.
Another closed-in place can be a blizzard.
SeeWinter Driving on page 4-26.
{CAUTION:
It can be dangerous to get out of your vehicle
if the shift lever is not fully in PARK (P) with
the parking brake �rmly set. Your vehicle can
roll. Do not leave your vehicle when the engine
is running unless you have to. If you have left
the engine running, the vehicle can move
suddenly. You or others could be injured.
To be sure your vehicle will not move, even
when you are on fairly level ground, always set
your parking brake and move the shift lever
to PARK (P).
Follow the proper steps to be sure your vehicle will not
move. SeeShifting Into Park (P) (Automatic Transaxle)
on page 2-28.
If you are parking on a hill and if you are pulling a
trailer, also seeTowing a Trailer on page 4-40.
2-33
Page 111 of 374
Instrument Panel Overview...............................3-4
Hazard Warning Flashers................................3-6
Other Warning Devices...................................3-6
Horn.............................................................3-6
Tilt Wheel.....................................................3-7
Turn Signal/Multifunction Lever.........................3-7
Turn and Lane-Change Signals........................3-8
Headlamp High/Low-Beam Changer..................3-8
Flash-to-Pass.................................................3-8
Windshield Wipers..........................................3-9
Windshield Washer.......................................3-10
Cruise Control..............................................3-10
Exterior Lamps.............................................3-13
Headlamps on Reminder................................3-13
Daytime Running Lamps................................3-14
Automatic Headlamp System..........................3-15
Fog Lamps..................................................3-15
Instrument Panel Brightness...........................3-15
Interior Lamps Control...................................3-16
Entry Lighting...............................................3-16
Reading Lamps............................................3-17
Accessory Power Outlets...............................3-18
Power Outlet 115 Volt Alternating Current........3-18
Ashtrays and Cigarette Lighter........................3-19Climate Controls............................................3-20
Climate Control System.................................3-20
Outlet Adjustment.........................................3-22
Passenger Compartment Air Filter...................3-23
Warning Lights, Gages, and Indicators............3-25
Instrument Panel Cluster................................3-26
Speedometer and Odometer...........................3-27
Trip Odometers............................................3-27
Tachometer.................................................3-27
Safety Belt Reminder Light.............................3-28
Airbag Readiness Light..................................3-29
Passenger Airbag Status Indicator...................3-30
Charging System Light..................................3-31
Brake System Warning Light..........................3-32
Anti-Lock Brake System Warning Light.............3-33
Low Tire Pressure Warning Light....................3-33
Traction Control System (TCS)
Warning Light...........................................3-34
Stabilitrak
®Indicator Light...............................3-34
Engine Coolant Temperature Gage...................3-35
Malfunction Indicator Lamp.............................3-35
Oil Pressure Light.........................................3-38
Lights On Reminder......................................3-39
Section 3 Instrument Panel
3-1
Page 124 of 374
Daytime Running Lamps
Daytime Running Lamps (DRL) can make it easier for
others to see the front of your vehicle during the
day. DRL can be helpful in many different driving
conditions, but they can be especially helpful in the short
periods after dawn and before sunset. Fully functional
daytime running lamps are required on all vehicles
�rst sold in Canada.
The DRL system will make your headlamps come on at
a reduced brightness when the following conditions
are met:
The ignition is on with the engine running.
The exterior lamps switch is off.
The parking brake is released.
When the DRL are on, only your headlamps will be on
at a reduced brightness. The taillamps, sidemarker
and other lamps won’t be on. Your instrument panel
won’t be lit up either.When you turn the exterior lamp switch to the headlamp
position, your DRL will go off and your headlamps will
come on. The other lamps that come on with your
headlamps will also come on.
When it begins to get dark, the headlamps will
automatically switch from DRL to the regular headlamps.
See “Automatic Headlamp System” following.
When you turn the exterior lamp switch off, the regular
lamps will go off and your headlamps will change to
the reduced brightness of DRL provided it is not
dark outside. DRL also comes on if only the parking
lamps are being used.
To idle your vehicle with the DRL off, do the following:
1. Set the parking brake.
2. Turn the ignition off.
3. Turn the ignition back on.
The DRL will stay off until you release the parking brake.
As with any vehicle, you should turn on the regular
headlamp system when you need it.
3-14
Page 129 of 374

The power outlet is located near the center of the
instrument panel. Before using the outlet, turn on the
ignition and press the button next to the outlet.
An indicator light in the button will come on. After using
the outlet, press the button again to turn it off.
The power outlet is not designed for the following
electrical equipment and they may not work properly:
Equipment with high initial peak wattage:
cathode-ray tube type televisions,
compressor-driven refrigerators, electric
power tools.
Other equipment requiring an extremely stable
power supply: microcomputer-controlled electric
blankets, touch sensor lamps, etc.
Ashtrays and Cigarette Lighter
Notice:If you put papers or other �ammable items
in the ashtray, hot cigarettes or other smoking
materials could ignite them and possibly damage
your vehicle. Never put �ammable items in
the ashtray.
To use the lighter, if your vehicle has one, push the
lighter in all the way and let go. When it’s ready, it will
pop back out by itself. If the engine is not running,
the key must be in ACC to use the lighter.
It is not recommended to use the cigarette lighter to
plug in auxiliary electrical equipment. Use the accessory
power outlet for phones and other electrical equipment.
SeeAccessory Power Outlets on page 3-18orPower
Outlet 115 Volt Alternating Current on page 3-18.
Notice:Holding a cigarette lighter in while it is
heating will not allow the lighter to back away from
the heating element when it is hot. Damage from
overheating may occur to the lighter or heating
element, or a fuse could be blown. Do not hold a
cigarette lighter in while it is heating. Do not
use anything other than the cigarette lighter in the
heating element.
Your vehicle may have a removable ashtray that sits in
your front cupholder in the center console storage area.
3-19
Page 131 of 374

Temperature Control:Turn the right knob clockwise or
counterclockwise to increase or decrease the
temperature inside your vehicle.
A/C (Air Conditioning):Press this button, located in the
center of the instrument panel to the left of the audio
system, to turn the air-conditioning system on or off.
When A/C is pressed, an indicator light in the button will
come on to let you know that the air conditioning is
activated.
MAX A/C (Maximum Air Conditioning):Press the A/C
and recirculation buttons at the same time to select
MAX A/C.
On hot days, open the windows to let hot inside air
escape; then close them. This helps to reduce the time
it takes for your vehicle to cool down. It also helps
the system to operate more efficiently.
The air-conditioning system removes moisture from the
air, so you may sometimes notice a small amount of
water dripping underneath your vehicle while idling
or after turning off the engine. This is normal.Defogging and Defrosting
Fog on the inside of windows is a result of high humidity
(moisture) condensing on the cool window glass. This
can be minimized if the climate control system is used
properly. There are two modes to clear fog or frost from
your windshield. Use the defog mode to clear the
windows of fog or moisture and warm the passengers.
Use the defrost mode to remove fog or frost from the
windshield more quickly.
-(Defog):This mode directs the air between the
windshield, side windows, instrument panel outlets and
the �oor outlets. The air-conditioning compressor will run
automatically in this setting without pressing A/C, unless
the outside temperature is at or below 32°F (0°C).
1(Defrost):This mode directs the air to the
windshield, instrument panel outlets and the side
windows. The air-conditioning compressor will run
automatically in this setting without pressing A/C, unless
the outside temperature is at or below 32°F (0°C).
Do not drive the vehicle until all the windows are clear.
3-21