turn signal PONTIAC VIBE 2010 Owners Manual
[x] Cancel search | Manufacturer: PONTIAC, Model Year: 2010, Model line: VIBE, Model: PONTIAC VIBE 2010Pages: 318, PDF Size: 1.7 MB
Page 85 of 318
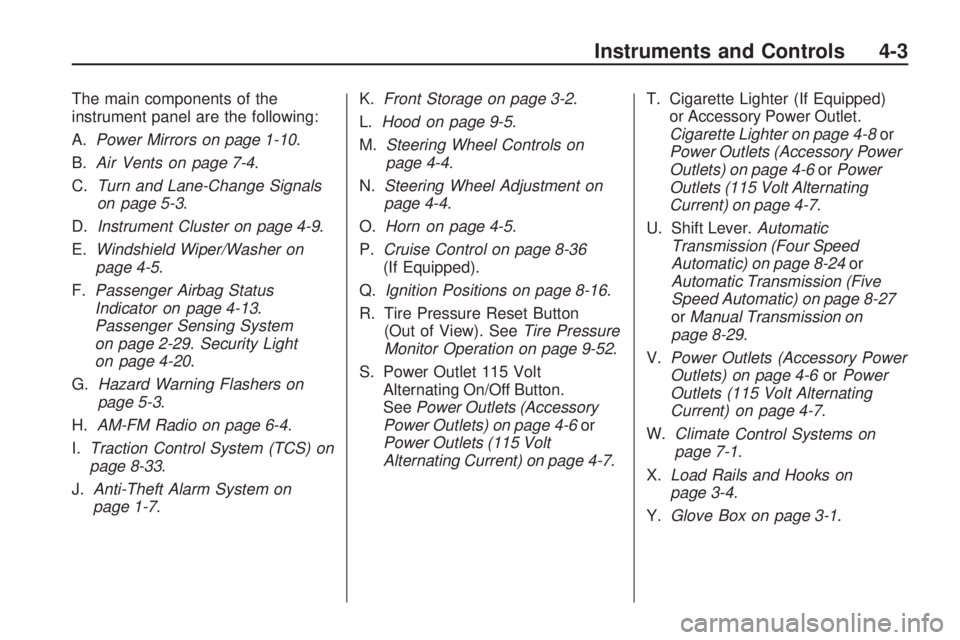
The main components of the
instrument panel are the following:
A.Power Mirrors on page 1-10 .
B. Air Vents on page 7-4.
C. Turn and Lane-Change Signals
on page 5-3.
D. Instrument Cluster on page 4-9 .
E. Windshield Wiper/Washer on
page 4-5.
F. Passenger Airbag Status
Indicator on page 4-13 .
Passenger Sensing System
on page 2-29. Security Light
on page 4-20.
G. Hazard Warning Flashers on
page 5-3.
H. AM-FM Radio on page 6-4 .
I. Traction Control System (TCS) on
page 8-33.
J. Anti-Theft Alarm System on
page 1-7. K.
Front Storage on page 3-2 .
L. Hood on page 9-5.
M. Steering Wheel Controls on
page 4-4.
N. Steering Wheel Adjustment on
page 4-4.
O. Horn on page 4-5.
P. Cruise Control on page 8-36
(If Equipped).
Q. Ignition Positions on page 8-16 .
R. Tire Pressure Reset Button (Out of View). See Tire Pressure
Monitor Operation on page 9-52 .
S. Power Outlet 115 Volt Alternating On/Off Button.
See Power Outlets (Accessory
Power Outlets) on page 4-6 or
Power Outlets (115 Volt
Alternating Current) on page 4-7 .T. Cigarette Lighter (If Equipped)
or Accessory Power Outlet.
Cigarette Lighter on page 4-8 or
Power Outlets (Accessory Power
Outlets) on page 4-6 orPower
Outlets (115 Volt Alternating
Current) on page 4-7.
U. Shift Lever. Automatic
Transmission (Four Speed
Automatic) on page 8-24 or
Automatic Transmission (Five
Speed Automatic) on page 8-27
or Manual Transmission on
page 8-29.
V. Power Outlets (Accessory Power
Outlets) on page 4-6 orPower
Outlets (115 Volt Alternating
Current) on page 4-7 .
W. Climate
Control Systems on
page 7-1.
X. Load Rails and Hooks on
page 3-4.
Y. Glove Box on page 3-1 .
Instruments and Controls 4-3
Page 86 of 318
Controls
Steering Wheel
Adjustment
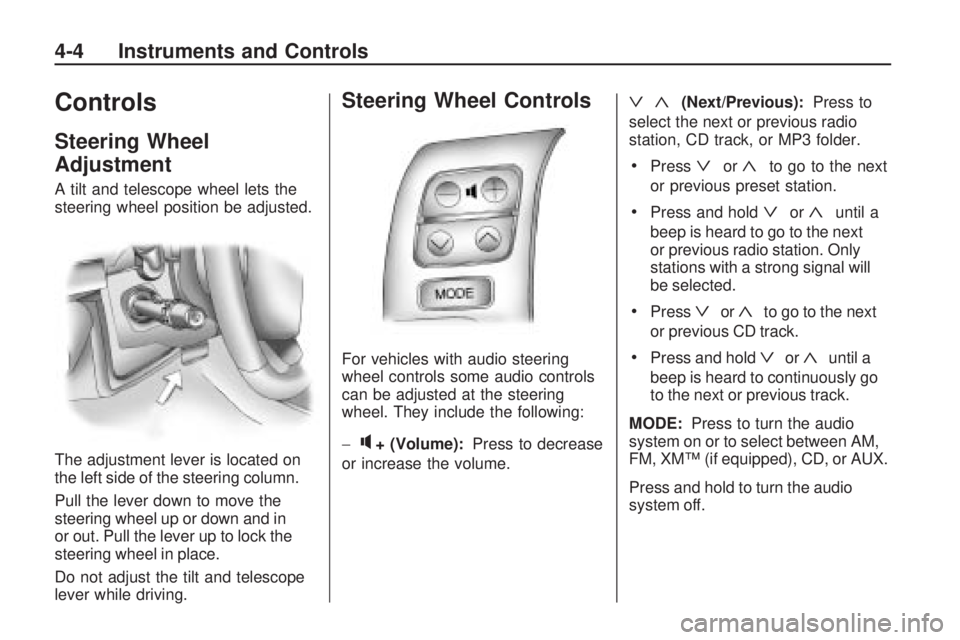
A tilt and telescope wheel lets the
steering wheel position be adjusted.
The adjustment lever is located on
the left side of the steering column.
Pull the lever down to move the
steering wheel up or down and in
or out. Pull the lever up to lock the
steering wheel in place.
Do not adjust the tilt and telescope
lever while driving.
Steering Wheel Controls
For vehicles with audio steering
wheel controls some audio controls
can be adjusted at the steering
wheel. They include the following:
−
q+ (Volume):Press to decrease
or increase the volume.
ª«(Next/Previous): Press to
select the next or previous radio
station, CD track, or MP3 folder.
•Pressªor«to go to the next
or previous preset station.
•Press and holdªor«until a
beep is heard to go to the next
or previous radio station. Only
stations with a strong signal will
be selected.
•Pressªor«to go to the next
or previous CD track.
•Press and holdªor«until a
beep is heard to continuously go
to the next or previous track.
MODE: Press to turn the audio
system on or to select between AM,
FM, XM™ (if equipped), CD, or AUX.
Press and hold to turn the audio
system off.
4-4 Instruments and Controls
Page 104 of 318
Courtesy Lamp Timer:This
feature allows for changing how
long the courtesy lamps stay
on when all the doors and liftgate
are closed and the key is out of
the ignition, in LOCK/OFF, or
in ACC/ACCESSORY. When the
vehicle left the factory the courtesy
lamps were programmed to stay
on for 15 seconds. This can
be changed to 7.5 seconds
or 30 seconds.
Interior Lamps when Ignition off:
If this feature is programmed on,
the interior lamps will come on when
the ignition is turned off when it is
dark outside. When the vehicle
left the factory this feature was
programmed on.
Interior Lamps on with Door
Key Unlock: If this feature is
programmed on, the interior lamps
will come on when the doors are
unlocked when it is dark outside.
When the vehicle left the factory
this feature was programmed on. Key Fob Signal:
If this feature
is programmed on, the Remote
Keyless Entry (RKE) transmitter
can be used to lock and unlock
the vehicle. When the vehicle left
the factory this feature was
programmed on.
RFA Visual Feedback: If this
feature is programmed on, the
hazard lights will flash when you
lock and unlock the vehicle with the
RKE transmitter. When the vehicle
left the factory this feature was
programmed on.
RFA All Unlock Enable: If this
feature is programmed on, pressing
the RKE unlock button twice
within three second will unlock
all of the doors. When the vehicle
left the factory this feature was
programmed on.
Remote Panic Command: If this
feature is programmed on, pressing
and holding the RKE panic button
will cause the horn to sound and the
lights to flash. When the vehicle
left the factory this feature was
programmed on. Automatic Door Locking:
If this
feature is programmed on, the doors
will automatically lock when the
vehicle is shifted out of P (Park) or
when the vehicle speed is greater
than 8 mph (13 km/h).
Automatic Door Unlocking: If this
feature is programmed on, the doors
will automatically unlock when the
vehicle is shifted into P (Park) or
when the ignition is turned off.
All Door Unlock Command: If this
feature is programmed on, the doors
will all unlock when the driver’s door
is opened.
Lock-out Timer: This feature
allows for changing how long of a
delay there is before all of the doors
lock when pressing the lock button
on the RKE transmitter. When the
vehicle left the factory the delay
was set for 1 minute. This can be
changed to 30 seconds or 2 minutes.
4-22 Instruments and Controls
Page 109 of 318
Lighting
Exterior LightingExterior Lamp Controls...........5-1
Headlamp High/Low-Beam Changer ............................
.5-2
Flash-to-Pass .......................
.5-2
Daytime Running Lamps (DRL) .....................
.5-2
Automatic Headlamp System .............................
.5-3
Hazard Warning Flashers .......5-3
Turn and Lane-Change Signals ..............................
.5-3
Fog Lamps ..........................
.5-4
Interior LightingInstrument Panel Illumination
Control ..............................
.5-4
Dome Lamps .......................
.5-4
Reading Lamps ....................
.5-5
Lighting FeaturesEntry Lighting ......................
.5-5
Battery Power Protection ........5-5
Exterior Lighting
Exterior Lamp Controls
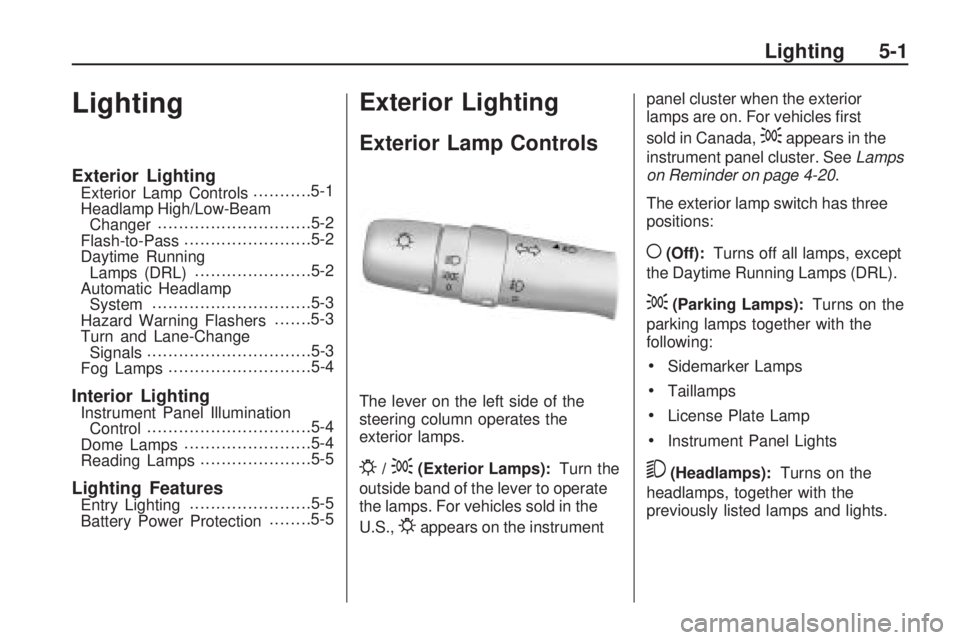
The lever on the left side of the
steering column operates the
exterior lamps.
P/;(Exterior Lamps):
Turn the
outside band of the lever to operate
the lamps. For vehicles sold in the
U.S.,
Pappears on the instrument panel cluster when the exterior
lamps are on. For vehicles first
sold in Canada,
;appears in the
instrument panel cluster. See Lamps
on Reminder on page 4-20 .
The exterior lamp switch has three
positions:
((Off): Turns off all lamps, except
the Daytime Running Lamps (DRL).
;(Parking Lamps): Turns on the
parking lamps together with the
following:
•Sidemarker Lamps
•Taillamps
•License Plate Lamp
•Instrument Panel Lights
5(Headlamps): Turns on the
headlamps, together with the
previously listed lamps and lights.
Lighting 5-1
Page 110 of 318
Headlamps on Reminder
A tone sounds when the ignition is
turned to LOCK/OFF, the driver door
is opened and the key is removed
from the ignition while the lamps
are on.
Headlamp High/
Low-Beam Changer
The headlamps must be on for this
feature to work.
Push the turn signal lever away
from you to turn the high beams on.
This instrument panel cluster
light
3comes on while the high
beam headlamps are on.
Pull the lever towards you to return
to low beams.
Flash-to-Pass
This feature is used to signal to the
vehicle ahead that you want to pass.
With the lever in the low-beam
position, pull the lever toward you to
momentarily switch to high-beams.
If the headlamps are on when the
lever is released, the high-beams
will return to low-beam.
Daytime Running
Lamps (DRL)
Daytime Running Lamps (DRL) can
make it easier for others to see the
front of your vehicle during the day.
Fully functional DRL are required
on all vehicles first sold in Canada. The DRL system makes the
headlamps come on at a reduced
brightness when the following
conditions are met:
•The ignition is on with the engine
running.
•The exterior lamps switch is off.
•The parking brake is released.
When the exterior lamp switch is
turned to the headlamp position, the
DRL go off and the headlamps come
on. The other lamps that come on
with the headlamps also come on.
The headlamps automatically switch
from DRL to the regular headlamps
depending on the darkness of
the surroundings. See Automatic
Headlamp System on page 5-3 .
DRL also comes on if only the
parking lamps are being used.
5-2 Lighting
Page 111 of 318
Automatic Headlamp
System
When it is dark enough outside,
the automatic headlamp system
turns on the low-beam headlamps
at the normal brightness along with
other lamps such as the taillamps,
sidemarker, parking lamps and
instrument panel lights. An indicator
light on the instrument panel comes
on when the headlamps are on.
SeeInstrument Cluster on page 4-9 .
If the vehicle is driven through a
parking garage, overcast weather,
or a tunnel, the automatic headlamp
system may turn on. There is a
delay before the lights turn on when
starting the car at night.
Do not cover the automatic light
sensor, located on the top left corner
of the instrument panel. If the sensor
is covered the headlamps will stay on
continuously.
Hazard Warning Flashers
|
(Hazard Warning Flasher):
Press this button located on the
instrument panel, to make the front
and rear turn signal lamps flash on
and off. This warns others that you
are having trouble.
Press
|again to turn the
flashers off.
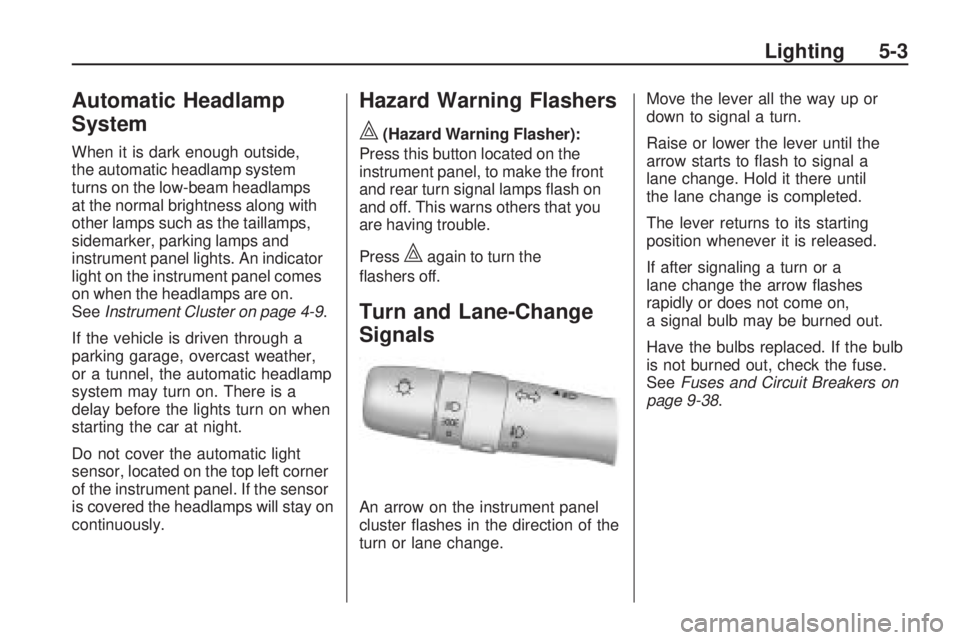
Turn and Lane-Change
Signals
An arrow on the instrument panel
cluster flashes in the direction of the
turn or lane change. Move the lever all the way up or
down to signal a turn.
Raise or lower the lever until the
arrow starts to flash to signal a
lane change. Hold it there until
the lane change is completed.
The lever returns to its starting
position whenever it is released.
If after signaling a turn or a
lane change the arrow flashes
rapidly or does not come on,
a signal bulb may be burned out.
Have the bulbs replaced. If the bulb
is not burned out, check the fuse.
See
Fuses and Circuit Breakers on
page 9-38.
Lighting 5-3
Page 112 of 318

Fog Lamps
#
(Fog Lamps):For vehicles with
fog lamps, move the band on the turn
signal/multifunction lever to
#to turn
them on. The fog lamps only come
on when the headlamps are on
low beam.
Some localities have laws that
require the headlamps to be
on along with the fog lamps.
Interior Lighting
Instrument Panel
Illumination Control
Use the trip odometer knob located
on the right side of the instrument
panel cluster to adjust the instrument
panel brightness.
Turn the knob clockwise or
counterclockwise to brighten
or dim the instrument panel.
The brightness of the instrument
panel lights decreases when
the headlamps are on.
Dome Lamps
The interior lamps control is located
on the overhead lamp. To change
the interior lamps setting, slide
the switch to one of the following
positions:
OFF: Turns the lamp off.
ON: Keeps the lamp on all the time.
Door: Turns the lamp on when
any door or the liftgate is opened.
The lamp goes off when all the side
doors and the liftgate are closed.
If the lamp switch is in the door
position and a door is left open,
the lamps will go off automatically
after 20 minutes.
5-4 Lighting
Page 119 of 318

RDS relies on receiving specific
information from radio stations and
only works when the information is
available. In rare cases, a radio
station could broadcast incorrect
information that causes the radio
features to work improperly. Contact
the radio station if this happens.
When the radio is tuned to an
RDS station, the station name
or call letters display instead of the
frequency. RDS stations can also
provide the time of day, a program
type (PTY) for current programming,
and the name of the program being
broadcast.
RDS Messages
ALERT:Displays when local
or national emergency
announcements are received.
If the radio tunes to a related network
station for the announcement,
it returns to the original station
when the announcement ends. The announcement should be heard
even if the volume is low or a CD is
playing. If a CD is playing, it will stop
playing during the announcement.
•The RDS alert feature is not
supported by all RDS radio
stations.
•The RDS alert feature cannot be
turned off.
•Alert is not affected by tests of the
emergency broadcast system.
MSG (Message): Displays if the
current RDS station has a message.
The message displays the artist,
song title, call in phone numbers,
etc. If the entire message does
not display, parts of the message
appear every three seconds until
the message is completed.
MSG disappears from the display
once the completed message
has displayed.
Finding a Station
BAND: Press to select AM, FM, or
XM (if equipped).
TUNE ADJ (Tune/Adjust): Turn to
select radio stations.
ySEEK TRACKz: Press to go
to the previous or next radio station.
The radio only stops at stations
with a strong signal.
SCAN: Press to enter scan mode.
The radio will display Scanning, then
goes to the next station, plays for a
few seconds, then continues on to
the next station. Press SCAN again
to stop scanning. The radio only
stops at stations with a strong signal.
INFO (Information) (FM-RDS,
XM™ Satellite Radio Service, and
MP3 Features): Press to display
information for the current FM-RDS,
XM station, or MP3 song. Choose
from Channel, Song, Artist, and
CAT (category).
NO INFO displays when information
is not available from the station.
Infotainment System 6-5
Page 120 of 318

Satellite Radio
Vehicles with an XM™ Satellite
Radio tuner and a valid XM Satellite
Radio subscription can receive
XM programming.
XM Satellite Radio Service
XM is a satellite radio service that
is based in the 48 contiguous
United States and 10 Canadian
provinces. XM Satellite Radio
has a wide variety of programming
and commercial-free music,
coast-to-coast, and in digital-quality
sound. During your trial or when
you subscribe, you will get unlimited
access to XM Radio Online for when
you are not in your vehicle. A service
fee is required to receive the XM
service. For more information,
contact XM at www.xmradio.com
or call 1-800-929-2100 in the U.S.
and www.xmradio.ca or call
1-877-438-9677 in Canada.
Finding a Station
BAND:Press to select AM, FM,
or XM.
TUNE ADJ (Tune/Adjust): Turn to
select radio stations.
ySEEK TRACKz: Press to go
to the previous or next radio station.
The radio only stops at stations
with a strong signal.
SCAN: Press to enter scan mode.
The radio will display Scanning, then
goes to the next station, plays for a
few seconds, then continues on to
the next station. Press SCAN again
to stop scanning. The radio only
stops at stations with a strong signal.
INFO (Information) (FM-RDS,
XM™ Satellite Radio Service, and
MP3 Features): Press to display
information for the current FM-RDS,
XM station, or MP3 song. Choose
from Channel, Song, Artist, and
CAT (category).
NO INFO displays when information
is not available from the station.
Finding a Category (CAT)
Station
XM stations are organized in
categories.
To select and find a desired
category:
1. Press the CAT button.
2. Turn the TUNE ADJ knob to select a category.
3. Press
yorzto go to the
category’s first station, when the
desired category is displayed.
4. Press
yorzto go to another
station within the selected
category.
5. Press CAT to exit the category select mode or wait for CAT to
time out.
If CAT times out and is no longer on
the display, return to Step 1.
NOT FOUND displays if the desired
category cannot be found.
6-6 Infotainment System
Page 121 of 318

Scanning Categories (CAT)
To scan a desired category:
1. Press the CAT button to enterthe category select mode.
2. Turn the TUNE ADJ knob to select a category.
3. Press
yorzfor two seconds
to scan the stations in the
selected category.
4. Press
yorzagain to stop
scanning.
NOT FOUND displays if the desired
category cannot be found.
XM Radio Messages
xL (Explicit Language Channels):
These channels, or any others,
can be blocked by calling
1-800-852-XMXM (9696).
Updating: The encryption code in
the receiver is being updated, and
no action is required. This process
should take no longer than
30 seconds. No Signal:
The system is
functioning correctly, but the
vehicle is in a location that is blocking
the XM signal. When the vehicle is
moved into an open area, the signal
should return.
Loading XM: The audio system is
acquiring and processing audio and
text data. No action is needed. This
message should disappear shortly.
CH Off Air: This channel is not
currently in service. Tune in
to another channel.
CH Unauth: This channel is
blocked or cannot be received with
your XM Subscription package.
CH Unavail: This previously
assigned channel is no longer
assigned. Tune to another station.
If this station was one of the presets,
choose another station for that
preset button.
No Info: No artist, song title,
category, or text information is
available at this time on this
channel. The system is working
properly. Not Found:
There are no channels
available for the selected category.
The system is working properly.
XM Locked: The XM receiver in
the vehicle may have previously
been in another vehicle. For security
purposes, XM receivers cannot be
swapped between vehicles. If this
message is received after having the
vehicle serviced, check with your
dealer/retailer.
Radio ID: If tuned to channel 0,
this message will alternate with the
XM Radio 8 digit radio ID label.
This label is needed to activate
the service. Consult with your
dealer/retailer.
Unknown: If this message is
received when tuned to channel 0,
there could be a receiver fault.
Consult with your dealer/retailer.
Chk XMRcvr: If this message does
not clear within a short period of
time, the receiver may have a fault.
Consult with your dealer/retailer.
Infotainment System 6-7