PORSCHE 911 CARRERA 2005 5.G Owners Manual
Manufacturer: PORSCHE, Model Year: 2005, Model line: 911 CARRERA, Model: PORSCHE 911 CARRERA 2005 5.GPages: 282, PDF Size: 4.34 MB
Page 221 of 282
Practical Tips, Emergency Service
221
E Maximum Load rating
The maximum load in kilograms and pounds can
be carried by the tire. If you replace tires always
use a tire that has the same maximum load rating
as the factory installed tire.
FRadial
The identification indicates if the tire has radial
structure.
G Term of tubeless or tube tire
Identification for tubeless tires.Speed code letterThe speed code letter indicates the maximum per-
missible speed for the tire.
This code letter is shown on the tire sidewall.
T = up to 118 mph (190 km/h)
H = up to 131 mph (210 km/h)
V = up to 150 mph (240 km/h)
W = up to 167 mph (270 km/h)
Y = up to 186 mph (300 km/h)Tip on driving
Tires with a maximum speed rating that is lower
than the specified maximum vehicle speed may be
mounted only if they bear an M+S identification on
the tire sidewall.
fPlease note that in addition to the winter tires,
all-season and all-terrain tires are also subject
to speed limits and bear this identification.
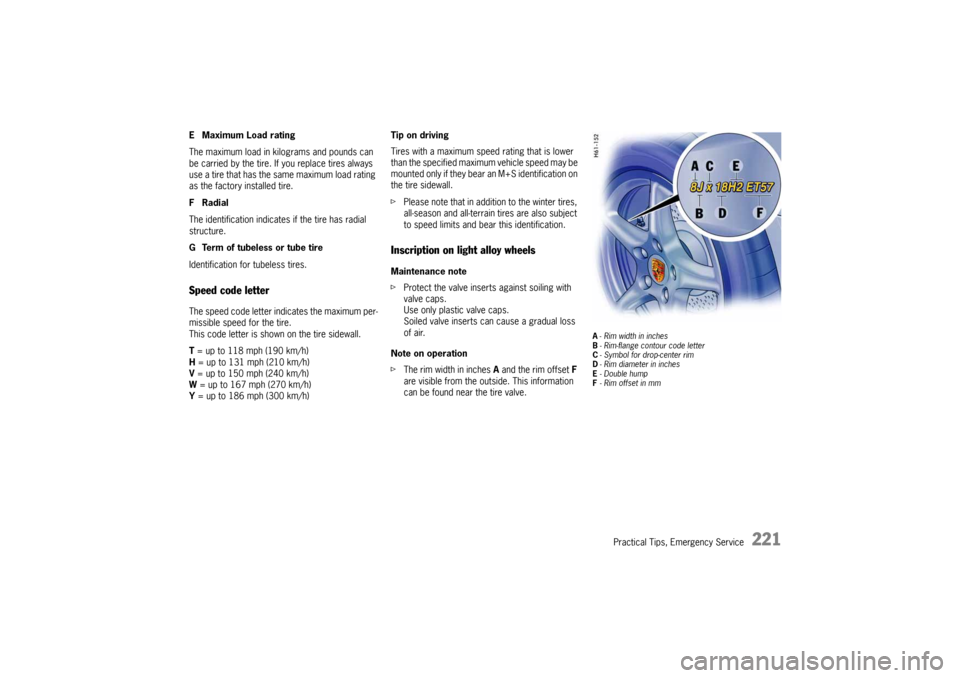
Inscription on light alloy wheelsMaintenance note
fProtect the valve inserts against soiling with
valve caps.
Use only plastic valve caps.
Soiled valve inserts can cause a gradual loss
of air.
Note on operation
fThe rim width in inches A and the rim offset F
are visible from the outside. This information
can be found near the tire valve.
A-Rim width in inches
B- Rim-flange contour code letter
C- Symbol for drop-center rim
D- Rim diameter in inches
E-Double hump
F- Rim offset in mm
Page 222 of 282

222
Practical Tips, Emergency Service
Loading InformationDefinitionsThe Curb weight - actual weight of your vehicle -
vehicle weight including standard and optional
equipment, fluids and emergency tools. This
weight does not include passengers and cargo.
The Gross Vehicle Weight is sum of the curb
weight and the weight of passengers and cargo
combined.
The Gross Vehicle Weight Rating is the maxi-
mum total weight of vehicle, passengers, luggage
and optional equipment.
The Gross Axle Weight Rating is the maximum
load limit for the front or the rear axle. This infor-
mation is located on the safety compliance sticker
located in the driver’s side door jamb.
For determining the compatibility of the tire and
vehicle load capabilities:
fPlease observe the chapter “TIRES, RIMS,
TRACKS” on Page 266.
The load capacity coefficient (e.g. “100”) is a min-
imum requirement.The Gross Combined Weight Rating is the
maximum total weight rating of vehicle, passen-
gers and cargo.
The Vehicle Capacity Weight - Load Limit - is
the maximum total weight limit specified of the
load (passengers and cargo) for the vehicle. This
is the maximum weight of passengers and cargo
that can be loaded into the vehicle. This informa-
tion can be found on the tire pressure plate.
The maximum loaded vehicle weight is the
sum of curb weight, accessory weight, vehicle ca-
pacity weight and production options weight.
The load rating is the maximum load that a tire
is rated to carry for a given inflation pressure.
The maximum load rating is the load rating for
a tire at the maximum permissble inflation pres-
sure.
The cargo capacity is the permissible weight of
cargo, the substracted weight of passengers from
the load limit.
fNever exceed the permissible limits.
Danger!
Risk of personal injury, loss of control and
damage to vehicle.
fNever exceed the specified axle loads. Over-
loading can shorten the service life of the tires
and car, as well as lead to dangerous vehicle
reactions and long braking distances. Damage
due to overloading is not covered by the vehi-cle warranty.
Page 223 of 282
Practical Tips, Emergency Service
223
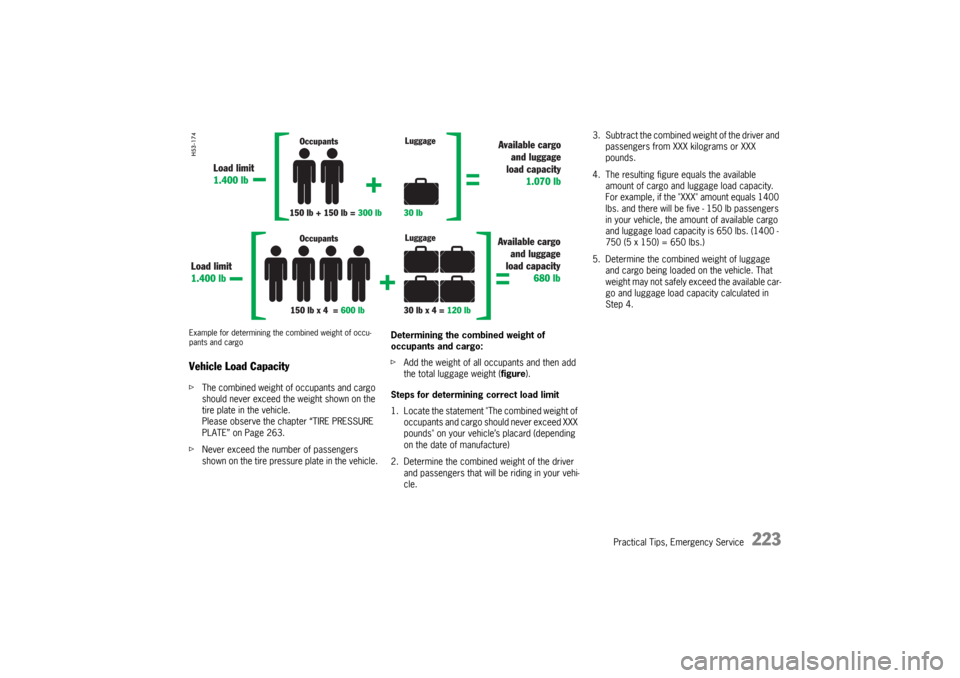
Example for determining the combined weight of occu-
pants and cargoVehicle Load CapacityfThe combined weight of occupants and cargo
should never exceed the weight shown on the
tire plate in the vehicle.
Please observe the chapter “TIRE PRESSURE
PLATE” on Page 263.
fNever exceed the number of passengers
shown on the tire pressure plate in the vehicle.Determining the combined weight of
occupants and cargo:
fAdd the weight of all occupants and then add
the total luggage weight (figure).
Steps for determining correct load limit
1. Locate the statement "The combined weight of
occupants and cargo should never exceed XXX
pounds" on your vehicle’s placard (depending
on the date of manufacture)
2. Determine the combined weight of the driver
and passengers that will be riding in your vehi-
cle.
3. Subtract the combined weight of the driver and
passengers from XXX kilograms or XXX
pounds.
4. The resulting figure equals the available
amount of cargo and luggage load capacity.
For example, if the "XXX" amount equals 1400
lbs. and there will be five - 150 lb passengers
in your vehicle, the amount of available cargo
and luggage load capacity is 650 lbs. (1400 -
750 (5 x 150) = 650 lbs.)
5. Determine the combined weight of luggage
and cargo being loaded on the vehicle. That
weight may not safely exceed the available car-
go and luggage load capacity calculated in
Step 4.
Page 224 of 282
224
Practical Tips, Emergency Service
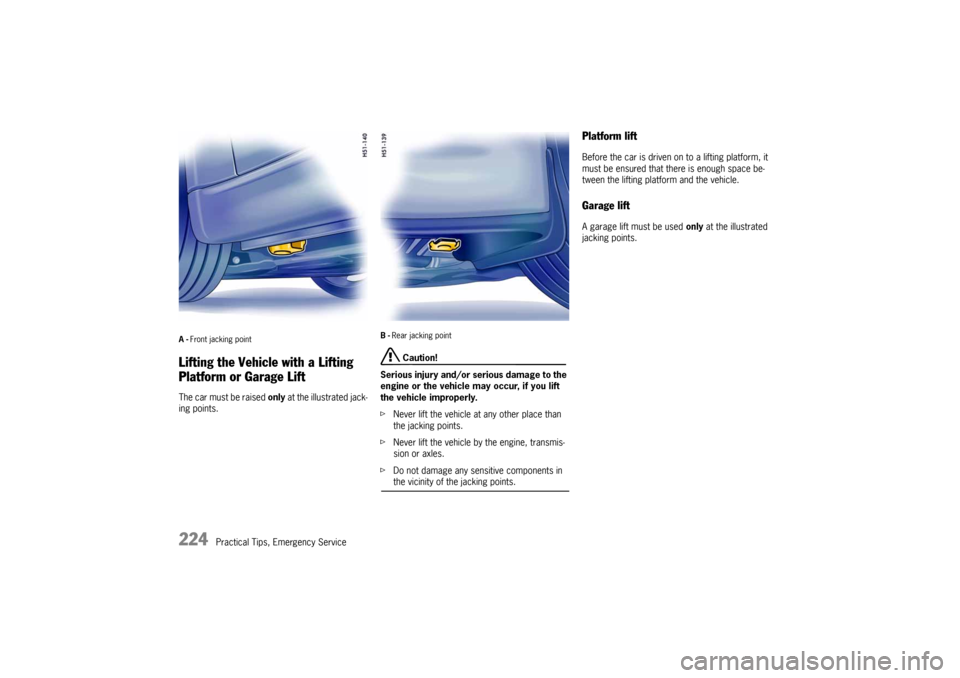
A-Front jacking pointLifting the Vehicle with a Lifting
Platform or Garage Lift The car must be raised only at the illustrated jack-
ing points.
B-Rear jacking point
Caution!
Serious injury and/or serious damage to the
engine or the vehicle may occur, if you lift
the vehicle improperly.
fNever lift the vehicle at any other place than
the jacking points.
fNever lift the vehicle by the engine, transmis-
sion or axles.
fDo not damage any sensitive components in the vicinity of the jacking points.
Platform lift Before the car is driven on to a lifting platform, it
must be ensured that there is enough space be-
tween the lifting platform and the vehicle. Garage lift A garage lift must be used only at the illustrated
jacking points.
Page 225 of 282

Practical Tips, Emergency Service
225
Flat Tire
Warning!
Failure to follow these instructions may result
in serious personal injuries to you or to by-
standers.
fIf you have a flat tire, move a safe distance off
the road. Turn the emergency flasher on and
use other warning devices to alert other motor-
ists. Set the parking brake.
fDo not park your vehicle where it may contact
dry grass, brush or other flammable materials.
The hot parts of the exaust system could set
such materials on fire, thereby causing both
property damage and severe or fatal physical injury.
A tire sealant and compressor with pressure
tester are located in the toolbox in the luggage
compartment.
fPlease observe the safety and operating in-
structions on the special sealant bottle with a
special Porsche part number and on the com-
pressor – these are essential.Important note
Sealing the tire with the tire repair kit is only
an emergency repair. Even with the tire air-
tight, it may be used only for short journeys
in an emergency.
The maximum permitted speed is 50 mph
(80 km/h).
fDo not use commercially available sealant or
tire inflating bottles.
Use only the tire sealant located in the tool box
in the luggage compartment.
Warning!
Risk of accident.
fHave tires replaced by a specialist workshop
as soon as possible.
fAvoid hard acceleration and high cornering speeds.
f f f
Page 226 of 282
226
Practical Tips, Emergency Service
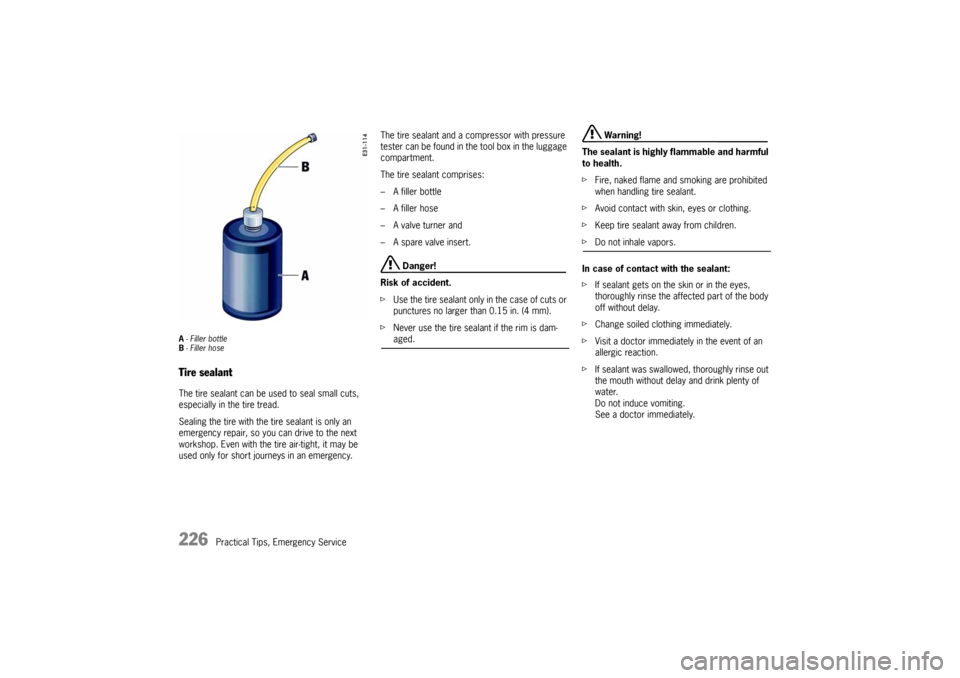
A- Filler bottle
B- Filler hoseTire sealantThe tire sealant can be used to seal small cuts,
especially in the tire tread.
Sealing the tire with the tire sealant is only an
emergency repair, so you can drive to the next
workshop. Even with the tire air-tight, it may be
used only for short journeys in an emergency.The tire sealant and a compressor with pressure
tester can be found in the tool box in the luggage
compartment.
The tire sealant comprises:
– A filler bottle
– A filler hose
– A valve turner and
– A spare valve insert.
Danger!
Risk of accident.
fUse the tire sealant only in the case of cuts or
punctures no larger than 0.15 in. (4 mm).
fNever use the tire sealant if the rim is dam-aged.
Warning!
The sealant is highly flammable and harmful
to health.
fFire, naked flame and smoking are prohibited
when handling tire sealant.
fAvoid contact with skin, eyes or clothing.
fKeep tire sealant away from children.
fDo not inhale vapors.
In case of contact with the sealant:
fIf sealant gets on the skin or in the eyes,
thoroughly rinse the affected part of the body
off without delay.
fChange soiled clothing immediately.
fVisit a doctor immediately in the event of an
allergic reaction.
fIf sealant was swallowed, thoroughly rinse out
the mouth without delay and drink plenty of
water.
Do not induce vomiting.
See a doctor immediately.
Page 227 of 282
Practical Tips, Emergency Service
227
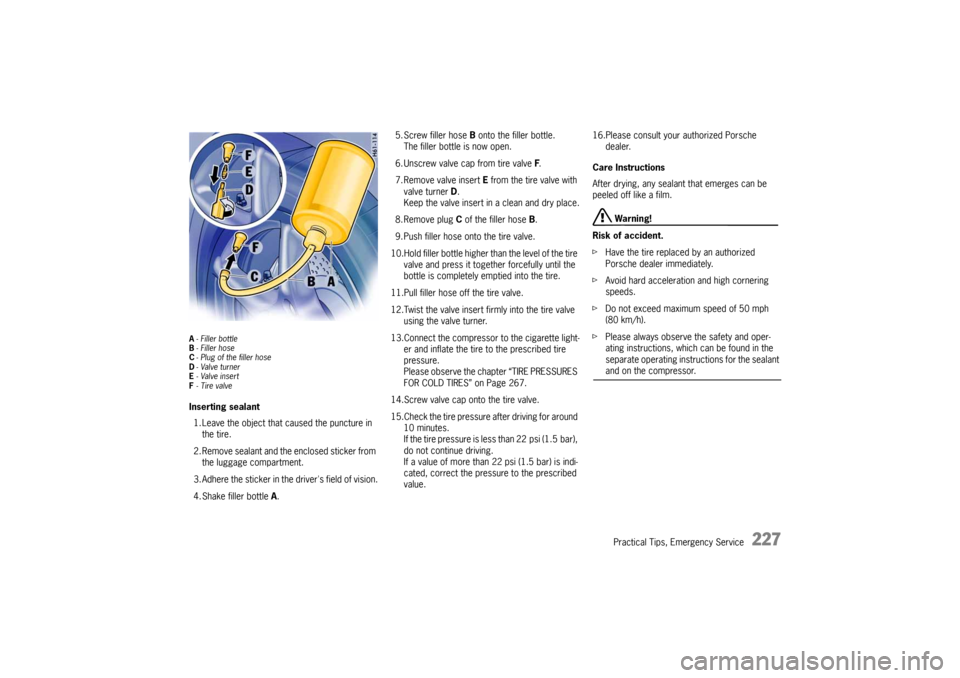
A- Filler bottle
B- Filler hose
C- Plug of the filler hose
D-Valve turner
E-Valve insert
F- Tire valveInserting sealant
1. Leave the object that caused the puncture in
the tire.
2. Remove sealant and the enclosed sticker from
the luggage compartment.
3. Adhere the sticker in the driver's field of vision.
4. Shake filler bottle A.5. Screw filler hose B onto the filler bottle.
The filler bottle is now open.
6. Unscrew valve cap from tire valve F.
7. Remove valve insert E from the tire valve with
valve turner D.
Keep the valve insert in a clean and dry place.
8. Remove plug C of the filler hose B.
9. Push filler hose onto the tire valve.
10.Hold filler bottle higher than the level of the tire
valve and press it together forcefully until the
bottle is completely emptied into the tire.
11.Pull filler hose off the tire valve.
12.Twist the valve insert firmly into the tire valve
using the valve turner.
13.Connect the compressor to the cigarette light-
er and inflate the tire to the prescribed tire
pressure.
Please observe the chapter “TIRE PRESSURES
FOR COLD TIRES” on Page 267.
14.Screw valve cap onto the tire valve.
15.Check the tire pressure after driving for around
10 minutes.
If the tire pressure is less than 22 psi (1.5 bar),
do not continue driving.
If a value of more than 22 psi (1.5 bar) is indi-
cated, correct the pressure to the prescribed
value.16.Please consult your authorized Porsche
dealer.
Care Instructions
After drying, any sealant that emerges can be
peeled off like a film.
Warning!
Risk of accident.
fHave the tire replaced by an authorized
Porsche dealer immediately.
fAvoid hard acceleration and high cornering
speeds.
fDo not exceed maximum speed of 50 mph
(80 km/h).
fPlease always observe the safety and oper-
ating instructions, which can be found in the
separate operating instructions for the sealant and on the compressor.
Page 228 of 282
228
Practical Tips, Emergency Service
Wheel Bolts
Warning!
Risk of wheel bolt breakage and wheel sepa-
ration, resulting in severe personal injury or
death.
fFollow all instructions concerning wheel bolts. fAlways clean the wheel bolts before fitting.
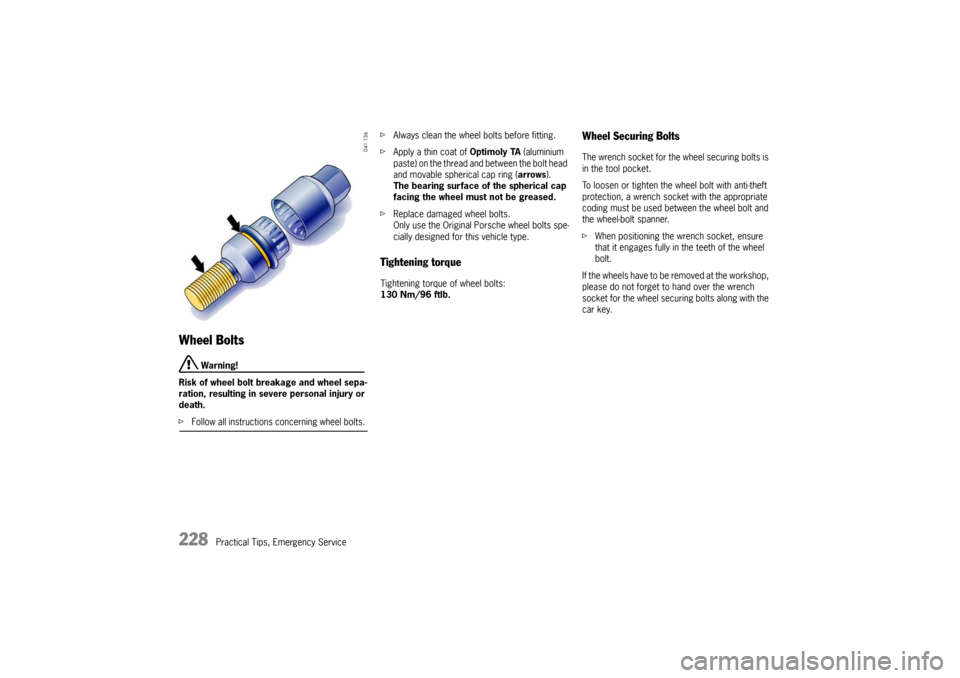
fApply a thin coat of Optimoly TA (aluminium
paste) on the thread and between the bolt head
and movable spherical cap ring (arrows).
The bearing surface of the spherical cap
facing the wheel must not be greased.
fReplace damaged wheel bolts.
Only use the Original Porsche wheel bolts spe-
cially designed for this vehicle type.
Tightening torque Tightening torque of wheel bolts:
130 Nm/96 ftlb.
Wheel Securing Bolts The wrench socket for the wheel securing bolts is
in the tool pocket.
To loosen or tighten the wheel bolt with anti-theft
protection, a wrench socket with the appropriate
coding must be used between the wheel bolt and
the wheel-bolt spanner.
fWhen positioning the wrench socket, ensure
that it engages fully in the teeth of the wheel
bolt.
If the wheels have to be removed at the workshop,
please do not forget to hand over the wrench
socket for the wheel securing bolts along with the
car key.
Page 229 of 282

Practical Tips, Emergency Service
229
Checking tire pressure with a
pressure gauge1. Remove the valve stem cap from the tire.
2. Press the pressure gauge onto the valve stem.
Note on operation
fDo not press too hard or force the valve stem
sideways, or air will escape.
If the sound of air escaping from the tire is
heard, reposition the pressure gauge.
3. Read the tire pressure on the gauge stem and
compare it to the permissble tire pressure.
This information can be found on the tire pres-
sure plate or in the chapter Technical Data.
Please observe the chapter “TIRE PRESSURES
FOR COLD TIRES” on Page 267.
4. Remove the pressure gauge.
Page 230 of 282
230
Practical Tips, Emergency Service
Changing a wheel
Warning!
Risk of injury. The car may slip off the jack.
fMake sure that no one is in the vehicle when
jacking up and changing a wheel.
fAlways place the car on stable supports if work
has to be carried out under the car.
Risk of damage to the brake discs of the
Porsche Ceramic Composite Brake (PCCB).
fAlways screw in both assembly aids when changing a wheel.
Note
The tools required for changing a wheel (e.g. jack,
wheel bolt wrench, assembly aids) are not sup-
plied with the car.
Your authorized Porsche dealer will be pleased to
advise you.1. Fully apply the handbrake, engage 1st gear or
select position P and withdraw the ignition key.
2. Secure the car against rolling away, e.g. by
means of wedges under the wheels on the op-
posite side.
This is particularly important on slopes.
3. Slightly slacken the wheel bolts of the wheel to
be changed.
4. Raise the car until the wheel lifts off the
ground.
fPlease observe the chapter “LIFTING THE VE-
HICLE WITH A LIFTING PLATFORM OR GARAGE
LIFT” on Page 224.
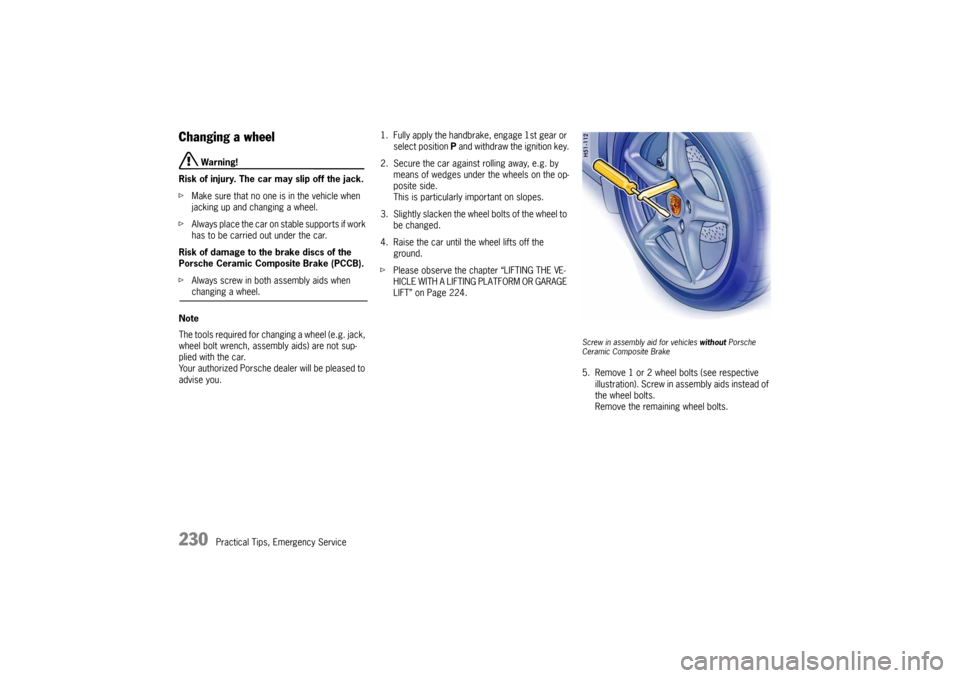
Screw in assembly aid for vehicles without Porsche
Ceramic Composite Brake5. Remove 1 or 2 wheel bolts (see respective
illustration). Screw in assembly aids instead of
the wheel bolts.
Remove the remaining wheel bolts.