PORSCHE 911 CARRERA 2006 5.G Owners Manual
Manufacturer: PORSCHE, Model Year: 2006, Model line: 911 CARRERA, Model: PORSCHE 911 CARRERA 2006 5.GPages: 308, PDF Size: 3.69 MB
Page 251 of 308
Practical Tips, Emergency Service
251
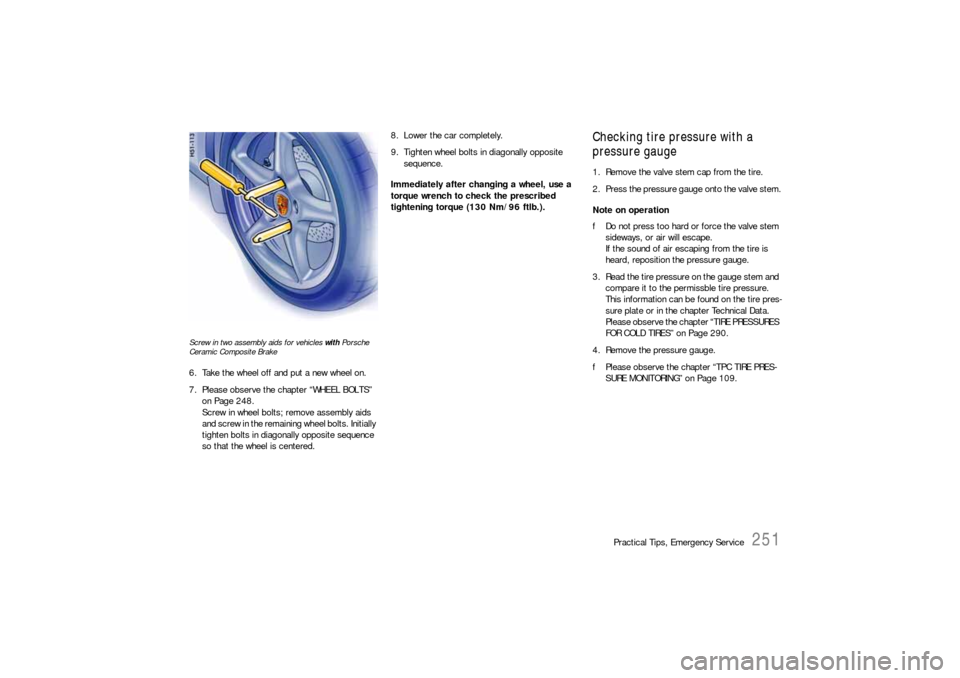
Screw in two assembly aids for vehicles with Porsche
Ceramic Composite Brake6. Take the wheel off and put a new wheel on.
7. Please observe the chapter “WHEEL BOLTS”
on Page 248.
Screw in wheel bolts; remove assembly aids
and screw in the remaining wheel bolts. Initially
tighten bolts in diagonally opposite sequence
so that the wheel is centered.8. Lower the car completely.
9. Tighten wheel bolts in diagonally opposite
sequence.
Immediately after changing a wheel, use a
torque wrench to check the prescribed
tightening torque (130 Nm/96 ftlb.).
Checking tire pressure with a
pressure gauge1. Remove the valve stem cap from the tire.
2. Press the pressure gauge onto the valve stem.
Note on operation
fDo not press too hard or force the valve stem
sideways, or air will escape.
If the sound of air escaping from the tire is
heard, reposition the pressure gauge.
3. Read the tire pressure on the gauge stem and
compare it to the permissble tire pressure.
This information can be found on the tire pres-
sure plate or in the chapter Technical Data.
Please observe the chapter “TIRE PRESSURES
FOR COLD TIRES” on Page 290.
4. Remove the pressure gauge.
fPlease observe the chapter “TPC TIRE PRES-
SURE MONITORING” on Page 109.
Page 252 of 308
252
Practical Tips, Emergency Service
17 mm spacers
911 Carrera 4, 911 Carrera 4S
Danger!
Risk of accident.
17 mm spacers must only be mounted on the
rear axle together with 11.5 J x 19 (67 mm
rim offset) wheels.
fAlways remove 17 mm spacers before
mounting other wheel sizes or an emergency
spare wheel because the wheel cannot be mounted correctly.
fFor information on the spacers: Please
observe the chapter “SPACERS” on Page 249.
Removing the spacers
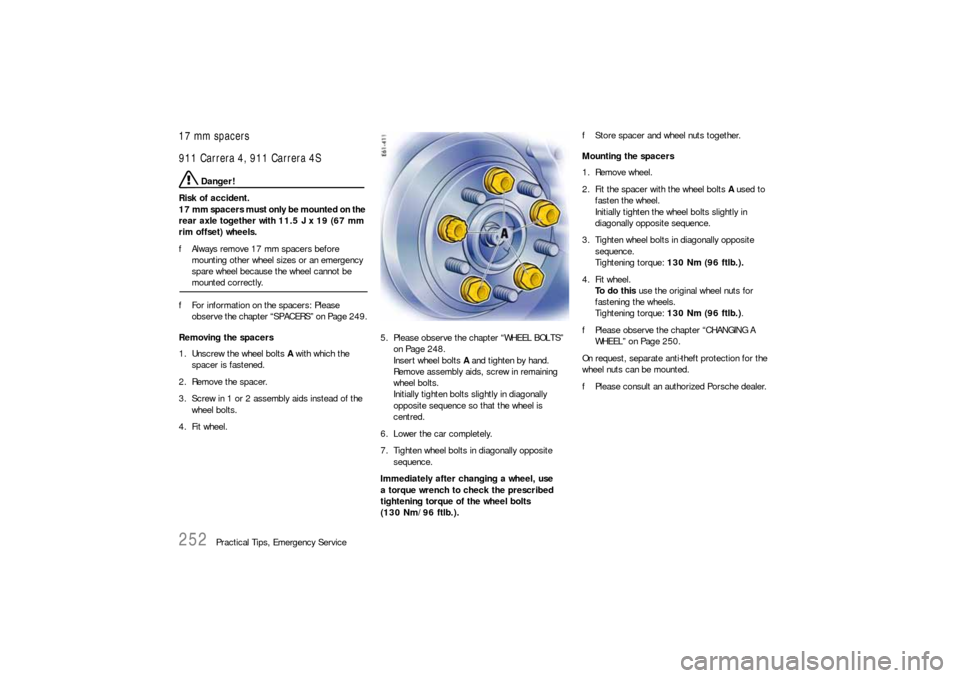
1. Unscrew the wheel bolts A with which the
spacer is fastened.
2. Remove the spacer.
3. Screw in 1 or 2 assembly aids instead of the
wheel bolts.
4. Fit wheel. 5. Please observe the chapter “WHEEL BOLTS”
on Page 248.
Insert wheel bolts A and tighten by hand.
Remove assembly aids, screw in remaining
wheel bolts.
Initially tighten bolts slightly in diagonally
opposite sequence so that the wheel is
centred.
6. Lower the car completely.
7. Tighten wheel bolts in diagonally opposite
sequence.
Immediately after changing a wheel, use
a torque wrench to check the prescribed
tightening torque of the wheel bolts
(130 Nm/96 ftlb.).fStore spacer and wheel nuts together.
Mounting the spacers
1. Remove wheel.
2. Fit the spacer with the wheel bolts A used to
fasten the wheel.
Initially tighten the wheel bolts slightly in
diagonally opposite sequence.
3. Tighten wheel bolts in diagonally opposite
sequence.
Tightening torque: 130 Nm (96 ftlb.).
4. Fit wheel.
To d o t h i s use the original wheel nuts for
fastening the wheels.
Tightening torque: 130 Nm (96 ftlb.).
fPlease observe the chapter “CHANGING A
WHEEL” on Page 250.
On request, separate anti-theft protection for the
wheel nuts can be mounted.
fPlease consult an authorized Porsche dealer.
Page 253 of 308
Practical Tips, Emergency Service
253
5 mm spacers
911 Carrera, 911 Carrera SMounting an emergency spare wheel
If 5 mm spacers are mounted, these must not be
removed to mount an emergency spare wheel.
Fitting snow chains
The use of snow chains is not permitted when
5 mm spacers are mounted.
Caution!
Risk of damage to the wheel housings if the
5 mm spacers are not removed before fitting
snow chains.
f To permit the fitting of snow chains, have the 5 mm spacers removed on all 4 wheels.
f To fit/remove the spacers:
Please consult an authorized Porsche dealer. Removing the spacers
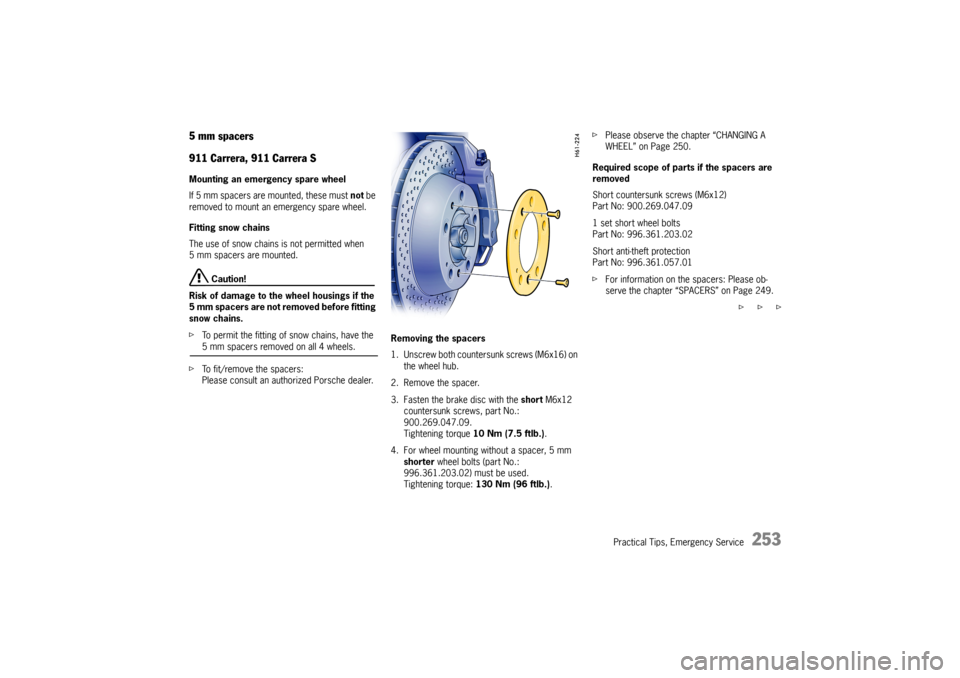
1. Unscrew both countersunk screws (M6x16) on
the wheel hub.
2. Remove the spacer.
3. Fasten the brake disc with the short M6x12
countersunk screws, part No.:
900.269.047.09.
Tightening torque 10 Nm (7.5 ftlb.) .
4. For wheel mounting without a spacer, 5 mm
shorter wheel bolts (part No.:
996.361.203.02) must be used.
Tightening torque: 130 Nm (96 ftlb.) .f
Please observe the chapter “CHANGING A
WHEEL” on Page 250.
Required scope of parts if the spacers are
removed
Short countersunk screws (M6x12)
Part No: 900.269.047.09
1 set short wheel bolts
Part No: 996.361.203.02
Short anti-theft protection
Part No: 996.361.057.01
f For information on the spacers: Please ob-
serve the chapter “SPACERS” on Page 249.
f f f
Page 254 of 308
254
Practical Tips, Emergency Service
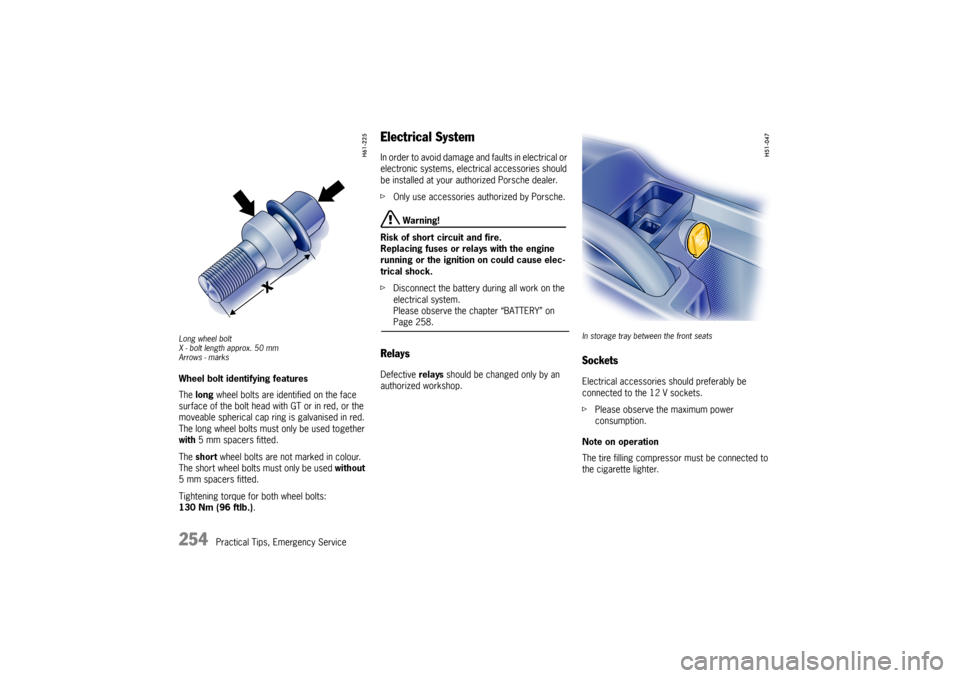
Long wheel bolt
X - bolt length approx. 50 mm
Arrows - marksWheel bolt identifying features
The long wheel bolts are identified on the face
surface of the bolt head with GT or in red, or the
moveable spherical cap ring is galvanised in red.
The long wheel bolts must only be used together
with 5 mm spacers fitted.
The short wheel bolts are not marked in colour.
The short wheel bolts must only be used without
5 mm spacers fitted.
Tightening torque for both wheel bolts:
130 Nm (96 ftlb.).
Electrical System In order to avoid damage and faults in electrical or
electronic systems, electrical accessories should
be installed at your authorized Porsche dealer.
fOnly use accessories authorized by Porsche.
Warning!
Risk of short circuit and fire.
Replacing fuses or relays with the engine
running or the ignition on could cause elec-
trical shock.
fDisconnect the battery during all work on the
electrical system.
Please observe the chapter “BATTERY” on Page 258.
Relays Defective relays should be changed only by an
authorized workshop.
In storage tray between the front seatsSocketsElectrical accessories should preferably be
connected to the 12 V sockets.
fPlease observe the maximum power
consumption.
Note on operation
The tire filling compressor must be connected to
the cigarette lighter.
Page 255 of 308
Practical Tips, Emergency Service
255
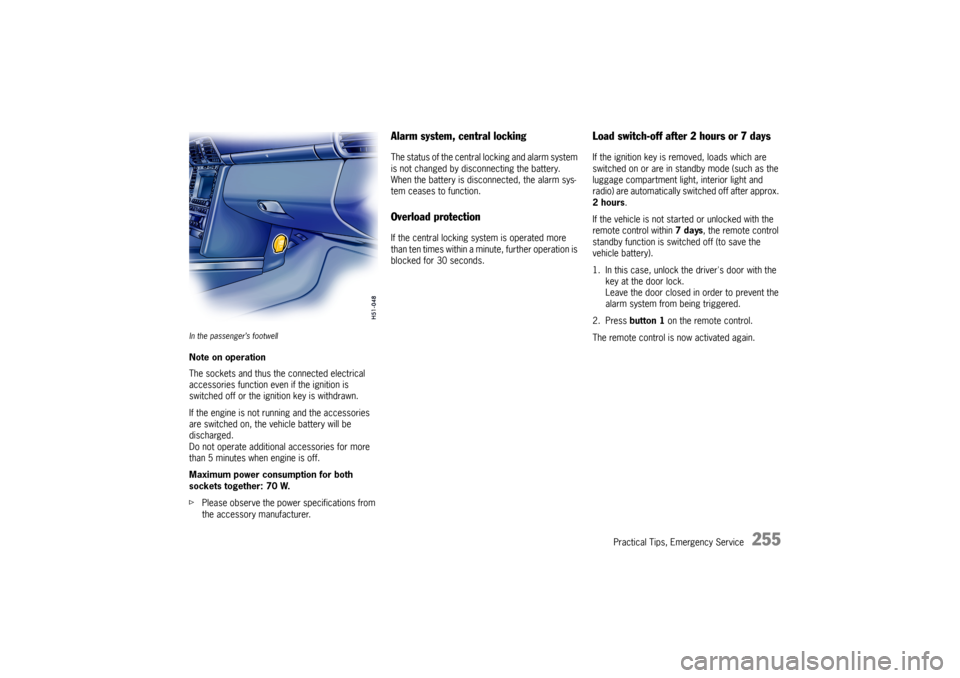
In the passenger’s footwellNote on operation
The sockets and thus the connected electrical
accessories function even if the ignition is
switched off or the ignition key is withdrawn.
If the engine is not running and the accessories
are switched on, the vehicle battery will be
discharged.
Do not operate additional accessories for more
than 5 minutes when engine is off.
Maximum power consumption for both
sockets together: 70 W.
fPlease observe the power specifications from
the accessory manufacturer.
Alarm system, central lockingThe status of the central locking and alarm system
is not changed by disconnecting the battery.
When the battery is disconnected, the alarm sys-
tem ceases to function. Overload protectionIf the central locking system is operated more
than ten times within a minute, further operation is
blocked for 30 seconds.
Load switch-off after 2 hours or 7 daysIf the ignition key is removed, loads which are
switched on or are in standby mode (such as the
luggage compartment light, interior light and
radio) are automatically switched off after approx.
2hours.
If the vehicle is not started or unlocked with the
remote control within 7days, the remote control
standby function is switched off (to save the
vehicle battery).
1. In this case, unlock the driver's door with the
key at the door lock.
Leave the door closed in order to prevent the
alarm system from being triggered.
2. Press button 1 on the remote control.
The remote control is now activated again.
Page 256 of 308
256
Practical Tips, Emergency Service
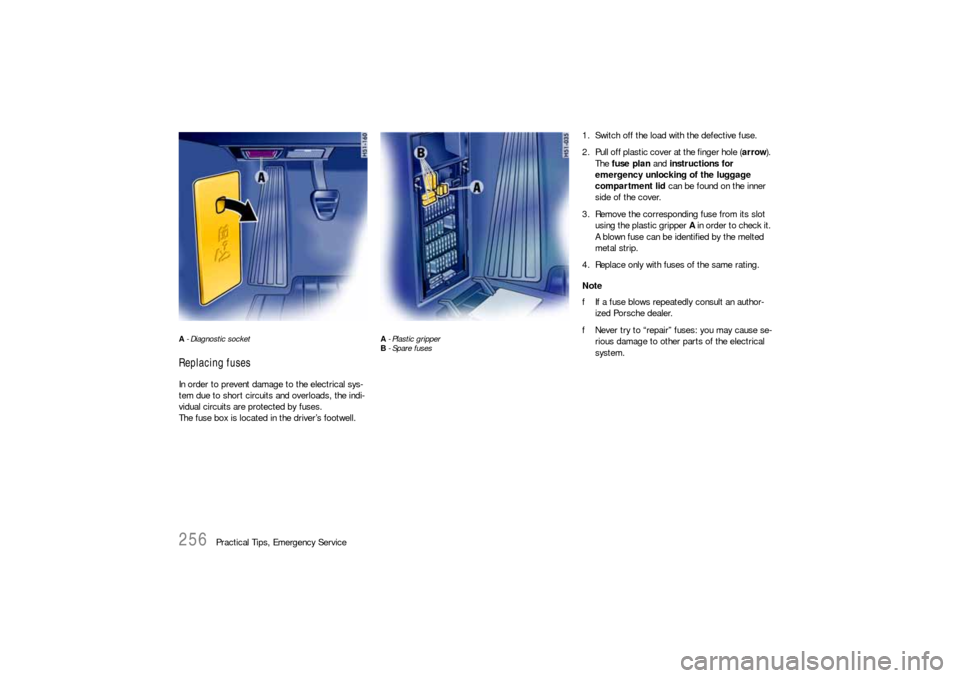
A - Diagnostic socket Replacing fuses In order to prevent damage to the electrical sys-
tem due to short circuits and overloads, the indi-
vidual circuits are protected by fuses.
The fuse box is located in the driver’s footwell.
A - Plastic gripper
B - Spare fuses
1. Switch off the load with the defective fuse.
2. Pull off plastic cover at the finger hole (arrow).
The fuse plan and instructions for
emergency unlocking of the luggage
compartment lid can be found on the inner
side of the cover.
3. Remove the corresponding fuse from its slot
using the plastic gripper A in order to check it.
A blown fuse can be identified by the melted
metal strip.
4. Replace only with fuses of the same rating.
Note
fIf a fuse blows repeatedly consult an author-
ized Porsche dealer.
fNever try to “repair” fuses: you may cause se-
rious damage to other parts of the electrical
system.
Page 257 of 308
Practical Tips, Emergency Service
257
Emergency unlocking of the luggage
compartment lidIf the battery is discharged, the lid can be opened
only with the aid of a donor battery.
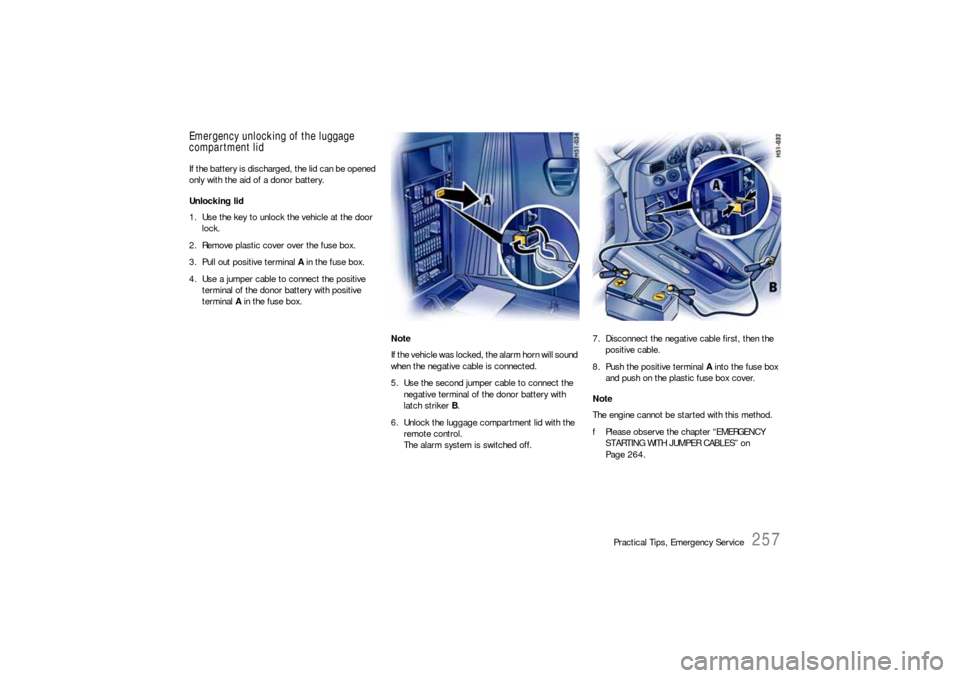
Unlocking lid
1. Use the key to unlock the vehicle at the door
lock.
2. Remove plastic cover over the fuse box.
3. Pull out positive terminal A in the fuse box.
4. Use a jumper cable to connect the positive
terminal of the donor battery with positive
terminal A in the fuse box.
Note
If the vehicle was locked, the alarm horn will sound
when the negative cable is connected.
5. Use the second jumper cable to connect the
negative terminal of the donor battery with
latch striker B.
6. Unlock the luggage compartment lid with the
remote control.
The alarm system is switched off.7. Disconnect the negative cable first, then the
positive cable.
8. Push the positive terminal A into the fuse box
and push on the plastic fuse box cover.
Note
The engine cannot be started with this method.
fPlease observe the chapter “EMERGENCY
STARTING WITH JUMPER CABLES” on
Page 264.
Page 258 of 308

258
Practical Tips, Emergency Service
Battery
Warning!
Risk of short circuit and fire.
fObserve all warning notes on the battery.
fDisconnect the battery during all work on the
electrical system.
fDo not lay tools or other metal objects on the
battery as they could cause a short circuit
across the battery terminal.
Hydrogen gas generated by the battery
could cause an explosion, resulting in severe
personal injuries.
fDo not expose the battery to an open flame,
electrical spark or a lit cigarette.
fDo not wipe battery with a dry cloth.
Risk of severe personal injury and damage to
the fabric, metal or paint.
fWear eye protection.
fDo not allow battery acid to come in contact
with your skin, eyes, fabric or painted surfac-
es. fIf you get electrolyte, which is an acid, in your
eyes or on your skin, immediately rinse with
cold water for several minutes and call a doc-
tor.
fSpilled electrolyte must be rinsed off at once
with a solution of baking soda and water to
neutralize the acid.
Battery posts, terminals and related acces-
sories contain lead and lead compounds,
chemicals known to the State of California to
cause cancer and reproductive harm.
fAlways protect your skin by washing thorough-
ly with soap and water.
Risk of explosion as a result of static charge.
fDo not wipe the battery with a dry cloth.
fEliminate potential electrostatic charge by
touching the vehicle before touching the bat-
tery.
Charge state A well charged battery will not only prevent start-
ing problems but will also last longer.
In order to avoid discharging the battery
unintentionally:
fSwitch off unnecessary electrical loads in city
traffic, on short trips or in a line or traffic.
fAlways remove the ignition key from the igni-
tion switch when leaving the car.
fAvoid frequent operation of the convertible top
and operation of the Porsche Communication
Management system when the engine is not
running.
Page 259 of 308

Practical Tips, Emergency Service
259
Battery care fEnsure that battery is securely mounted.
fKeep terminals and connections clean and
properly tightened.
Corrosion can be prevented by coating the ter-
minals and connections with petroleum jelly or
silicone spray.
fEnsure that vent caps are securely tightened to
prevent spillage. Checking the electrolyte fluid level
Generally, the electrolyte level must be checked
more often in summer than in the winter, and more
often when driving long distances.
fWhen adding water, use only clean containers.
In no case may alcohol (e.g. window cleaner
residues) be permitted to enter the battery.
fUnscrew and open the filler vent caps of each
cell.
With the car on a level surface, the fluid level
should meet the indicator mark in each cell.
fIf necessary, top up with distilled water.
Do not use acid.
Only fill up to the mark, otherwise the electro-
lyte will overflow when the battery is being
charged and cause damage. Battery charging
Automotive batteries loose their efficiency when
not in use.
The charge available in your battery can be meas-
ured with a battery hydrometer.
We recommend that the battery voltage be tested
by your Porsche dealer who has the appropriate
equipment.
If the car is not driven for prolonged periods, the
battery must be charged at least every 6 weeks.
A discharged battery allows rapid formation of sul-
fates, leading to premature deterioration of the
plates.
f f f
Page 260 of 308

260
Practical Tips, Emergency Service
Warning!
Hydrogen gas generated by the battery
could cause an explosion, resulting in severe
personal injuries.
fCharge battery in a well ventilated area.
fNever charge a frozen battery. It may explode
because of gas trapped in the ice. Allow a fro-
zen battery to thaw out first.
fIf you get electrolyte, which is an acid, in your
eyes or on your skin, immediately rinse with
cold water for several minutes and call a doc-tor. Slow battery charging
1. Pay attention to all warnings and follow instruc-
tions that come with your battery charger.
2. When charging, ensure adequate ventilation.
3. Remove battery.
Please observe the chapter “REMOVING THE
BATTERY” on Page 262.
4. All vent caps should be open.
The fluid level should meet the indicator mark
in each cell.
5. Ensure that charger is switched off – danger of
short circuit!
6. Connect charger cables.
Charger cables must be connected
POSITIVE (+) to POSITIVE (+) and
NEGATIVE (–) to NEGATIVE (–).
7. Switch on charger.
Normally, a battery should be charged at no
more than 10 percent of its rated capacity.
Rated capacity of the battery in your vehicle is
listed on the battery housing.
8. After charging, turn off charger and disconnect
charger cables.
9. Tighten the vent caps and reinstall battery.
Please observe the chapter “INSTALLING THE
BATTERY” on Page 263.
Winter operation The capacity and ability of the battery to store
power decreases at low outside temperatures.
Additionally, more power is consumed while start-
ing, and the headlights, heater, rear window de-
fogger, etc., are used more frequently.
fLet your Porsche dealer test the battery’s
capacity before winter sets in.
The battery will discharge more quickly if your ve-
hicle is not driven on a daily basis over a distance
of several miles. The more often you drive your ve-
hicle, and the longer the distance driven on each
trip, the more opportunity the vehicle’s charging
system will have to recharge the batteries.