warning lights PORSCHE 911 CARRERA 2006 5.G Owner's Guide
[x] Cancel search | Manufacturer: PORSCHE, Model Year: 2006, Model line: 911 CARRERA, Model: PORSCHE 911 CARRERA 2006 5.GPages: 308, PDF Size: 3.69 MB
Page 161 of 308

Controls, Instruments
161
Car Telephone and
Aftermarket Alarms Important legal and safety information
regarding the use of cellular telephones
Some states may prohibit the use of cellular tele-
phones while driving a vehicle. Check the laws and
regulations on the use of cellular telephones in the
areas where you drive.
Danger!
Risk of an accident.
Severe personal injury or death can result in
the event of an accident.
Looking away from the road or turning your
attention away from your driving can cause
an accident and serious or fatal injury.
When using your cellular telephone, you should al-
ways:
fGive full attention to your driving - pull off the
road and park before making or answering a
call if traffic conditions so require; and
fKeep both hands on the steering wheel - use
hands-free operation (if available) - pull off the
road and park before using a hand-held tele-phone. It is essential to observe the instructions of
the telephone manufacturer before putting
the telephone into operation.
Any portable telephone or radio transmitter which
is used in a Porsche must be properly installed in
accordance with the technical requirements of
Porsche.
The transmission power must not exceed
10 W.
The devices must possess a type approval for
your vehicle and have an “e” symbol.
If you should require equipment with transmission
power values greater than 10 W, please consult
your authorized Porsche dealer for this purpose.
He is familiar with the technical requirements for
installing devices of this kind.
The antennas for all radios and telephones with a
transmitting antenna must be externally mounted.
The improper installation of radios or telephones
or use of a radio or telephone with a transmitting
antenna inside the car may cause the warning
lights to come on.
Improper installation of such equipment can cre-
ate a discharged battery or excessive current
draw from added equipment.If aftermarket systems are installed by non-dealer-
ship technicians or outside the selling dealer,
problems may result. Installation of aftermarket
equipment is not covered under the New Car War-
ranty.
fConsult your authorized Porsche dealer about
the installation of non Porsche approved equip-
ment.
Reception quality
The reception quality of your car telephone will
change constantly when you are driving. Interfer-
ence caused by buildings, landscape and weather
is unavoidable. It may become particularly difficult
to hear when using the hands-free function due to
external noise such as engine and wind noise.
Automatic car-wash
fUnscrew external antennas before using an au-
tomatic car-wash.
Page 164 of 308

164
Shifting Gears
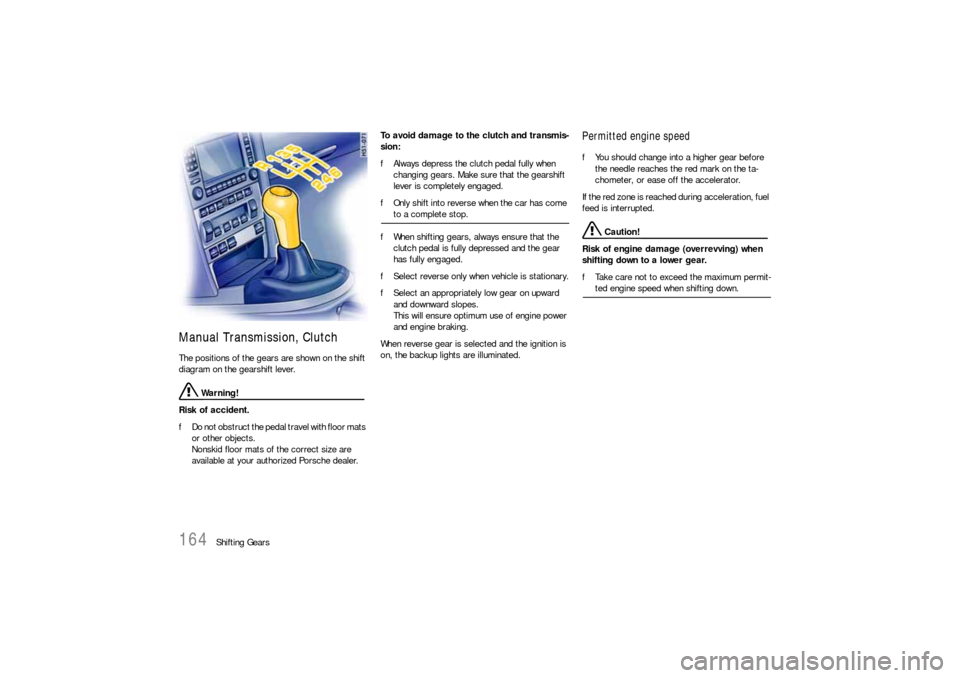
Manual Transmission, ClutchThe positions of the gears are shown on the shift
diagram on the gearshift lever.
Warning!
Risk of accident.
fDo not obstruct the pedal travel with floor mats
or other objects.
Nonskid floor mats of the correct size are
available at your authorized Porsche dealer.To avoid damage to the clutch and transmis-
sion:
fAlways depress the clutch pedal fully when
changing gears. Make sure that the gearshift
lever is completely engaged.
fOnly shift into reverse when the car has come
to a complete stop.
fWhen shifting gears, always ensure that the
clutch pedal is fully depressed and the gear
has fully engaged.
fSelect reverse only when vehicle is stationary.
fSelect an appropriately low gear on upward
and downward slopes.
This will ensure optimum use of engine power
and engine braking.
When reverse gear is selected and the ignition is
on, the backup lights are illuminated.
Permitted engine speedfYou should change into a higher gear before
the needle reaches the red mark on the ta-
chometer, or ease off the accelerator.
If the red zone is reached during acceleration, fuel
feed is interrupted.
Caution!
Risk of engine damage (overrevving) when
shifting down to a lower gear.
fTake care not to exceed the maximum permit-ted engine speed when shifting down.
Page 206 of 308

206
Maintenance, Car Care
Changing the brake fluid Brake fluid absorbs moisture from the air over
time. This accumulation of water lowers the boil-
ing point and, under certain operating conditions,
can affect the braking action.
Therefore have the brake fluid changed in accord-
ance with the change intervals stated in the
brochure “Maintenance”. – The warning lights on the instrument panel and
on the on-board computer indicate an insuffi-
cient brake fluid level.
– If the warning light lights up on the instrument
panel and the warning message appears on
the on-board computer in combination with a
larger pedal travel, a brake circuit may have
failed.
If the warning lights should light up whilst
driving:
fStop immediately in a suitable place.
fDo not continue driving.
Consult an authorized Porsche dealer.
Warning light USA
Warning light Canada
Page 208 of 308

208
Maintenance, Car Care
Fuel
Warning!
Fuel is highly flammable and harmful to
health.
fFire, open flame and smoking are prohibited
when handling fuel.
fAvoid contact with skin or clothing.
fDo not inhale fuel vapors.
To prevent damage to the emission control
system and engine:
fNever drive the tank completely out of fuel.
fAvoid high cornering speeds after the warning lights have come on.
fPlease observe the chapter “EMISSION CONT-
ROL SYSTEM” on Page 211.
Please observe the chapter “FUEL ECONOMY”
on Page 207.
Please observe the chapter “LEVEL GAUGE”
on Page 94.
Check engine warning light
If the warning lights in the instrument panel and on-
board computer come on and remain on while
driving, it suggests:
– an improperly fastened tank cap or
– refuelling with engine running.
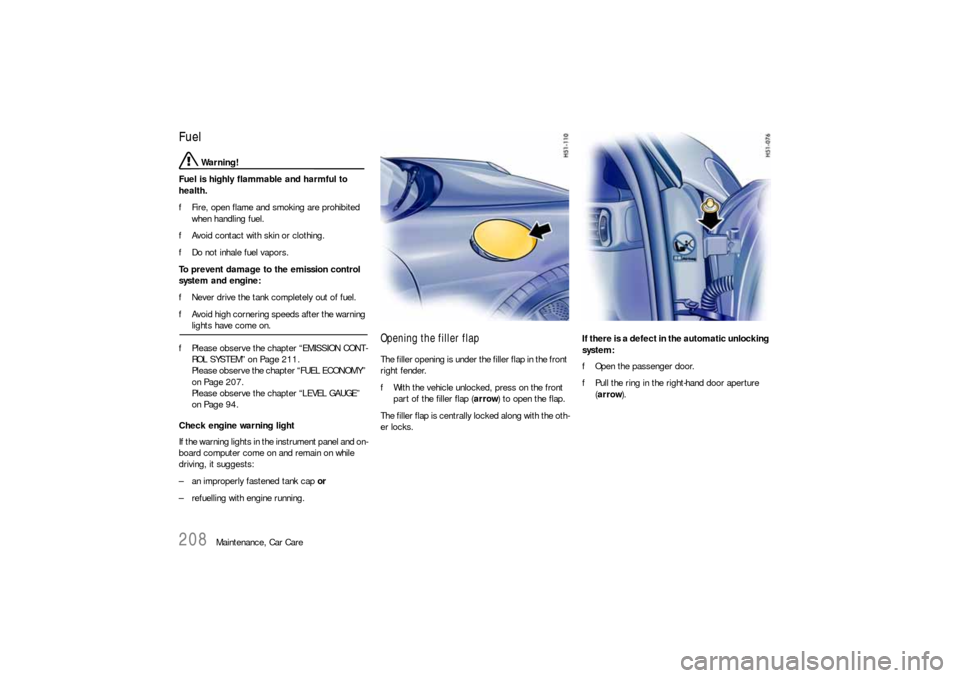
Opening the filler flap The filler opening is under the filler flap in the front
right fender.
fWith the vehicle unlocked, press on the front
part of the filler flap (arrow) to open the flap.
The filler flap is centrally locked along with the oth-
er locks. If there is a defect in the automatic unlocking
system:
fOpen the passenger door.
fPull the ring in the right-hand door aperture
(arrow).
Page 213 of 308

Maintenance, Car Care
213
Fuel Evaporation Control Fuel tank venting The evaporation chamber and the carbon canister
prevent fuel from escaping to the atmosphere at
extreme high outside temperatures, when driving
abruptly around curves and when the car is parked
at an incline or in any other nonlevel position. Vapor control system and storage When the fuel tank is filled, vapors are collected in
the evaporation chamber by a vent line leading the
vapors to the carbon canister where they are
stored as long as the engine does not run. Purge system When the engine is running, the fuel vapors from
the canister will be mixed with fresh air from the
ambient air of the canister. This mixture will be
directed to the intake air housing by the tank vent
line, mixed with the intake air and burned during
normal combustion.
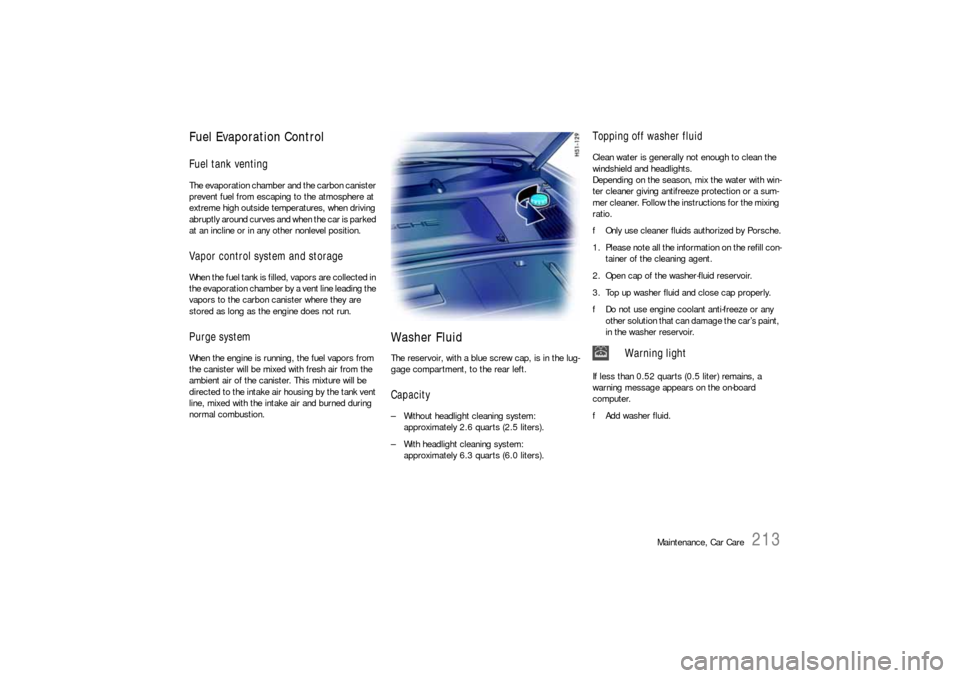
Washer FluidThe reservoir, with a blue screw cap, is in the lug-
gage compartment, to the rear left. Capacity – Without headlight cleaning system:
approximately 2.6 quarts (2.5 liters).
– With headlight cleaning system:
approximately 6.3 quarts (6.0 liters).
Topping off washer fluidClean water is generally not enough to clean the
windshield and headlights.
Depending on the season, mix the water with win-
ter cleaner giving antifreeze protection or a sum-
mer cleaner. Follow the instructions for the mixing
ratio.
fOnly use cleaner fluids authorized by Porsche.
1. Please note all the information on the refill con-
tainer of the cleaning agent.
2. Open cap of the washer-fluid reservoir.
3. Top up washer fluid and close cap properly.
fDo not use engine coolant anti-freeze or any
other solution that can damage the car’s paint,
in the washer reservoir.
If less than 0.52 quarts (0.5 liter) remains, a
warning message appears on the on-board
computer.
fAdd washer fluid.
Warning light
Page 224 of 308

224
Maintenance, Car Care
Light alloy wheels fPlease observe the chapter “WASHING” on
Page 219.
Warning!
Danger of accident if cleaning agents (e.g.
wheel cleaning agents) come into contact
with the brake discs. The resulting film on the
brake discs can impair braking perform-
ance.
fMake sure that no cleaning agent comes into
contact with the brake discs.
fIf cleaning agent has come into contact with
the brake discs, thoroughly clean the brake
discs with a strong jet of water.
fPaying attention to any road users behind you,
dry the brake discs by applying the brakes at short intervals.Pitting may occur if metallic particles which cause
contact corrosion (e.g. brass or copper in brake
dust) are allowed to remain on the aluminum for
too long.
fIf possible, wash the wheels with a sponge or
wash brush about every two weeks. In areas
where salt is spread on winter roads or there is
a lot of airborne industrial dust, it is best to
clean the wheels weekly.
The Porsche Light Alloy Wheel Cleaner
(ph-value 9.5) can be used for this pur-
pose.
If the ph-value of the detergent is incor-
rect, the protective coating on the wheels
will be destroyed.
Polishes which dissolve oxides, such as those
frequently used for other metals, or abrasive
tools or agents are unsuitable because they
break down the oxide film of the protective
coating and will cause discoloration of the
wheel.
fEvery three months, after cleaning, coat the
wheels with a car wax or non-corrosive grease
(vaseline).
Using a clean cloth thoroughly rub the grease
into the surface.
Door, roof, lid and window seals fWash dirt (e.g. abrasion, dust, road salts) from
all seals regularly using warm soapy water. Do
not use any chemical cleaning agents or sol-
vents.
When there is a frost hazard, the outer door seals
and the front and rear lid seals can be protected
against freezing into place by a suitable care prod-
uct.
In order to prevent damage to the anti-
friction coating, the inner door seals, the
convertible top seals and hardtop seals must
not be treated with care products. Headlights, lights, interior and exterior
plastic parts fUse only clean water and a little dishwashing
detergent to clean light lenses, plastic head-
light lenses, plastic parts and surfaces.
Do not clean when dry.
Use a soft sponge or a soft, lint-free cloth. Gen-
tly wipe the surface without applying too much
pressure.
The Porsche inside window cleaner is also suit-
able for cleaning plastic surfaces. Follow the
cleaning instructions on the container.
Never use other chemical cleaners or
solvents.
fRinse cleaned surfaces with clear water.
Page 260 of 308

260
Practical Tips, Emergency Service
Warning!
Hydrogen gas generated by the battery
could cause an explosion, resulting in severe
personal injuries.
fCharge battery in a well ventilated area.
fNever charge a frozen battery. It may explode
because of gas trapped in the ice. Allow a fro-
zen battery to thaw out first.
fIf you get electrolyte, which is an acid, in your
eyes or on your skin, immediately rinse with
cold water for several minutes and call a doc-tor. Slow battery charging
1. Pay attention to all warnings and follow instruc-
tions that come with your battery charger.
2. When charging, ensure adequate ventilation.
3. Remove battery.
Please observe the chapter “REMOVING THE
BATTERY” on Page 262.
4. All vent caps should be open.
The fluid level should meet the indicator mark
in each cell.
5. Ensure that charger is switched off – danger of
short circuit!
6. Connect charger cables.
Charger cables must be connected
POSITIVE (+) to POSITIVE (+) and
NEGATIVE (–) to NEGATIVE (–).
7. Switch on charger.
Normally, a battery should be charged at no
more than 10 percent of its rated capacity.
Rated capacity of the battery in your vehicle is
listed on the battery housing.
8. After charging, turn off charger and disconnect
charger cables.
9. Tighten the vent caps and reinstall battery.
Please observe the chapter “INSTALLING THE
BATTERY” on Page 263.
Winter operation The capacity and ability of the battery to store
power decreases at low outside temperatures.
Additionally, more power is consumed while start-
ing, and the headlights, heater, rear window de-
fogger, etc., are used more frequently.
fLet your Porsche dealer test the battery’s
capacity before winter sets in.
The battery will discharge more quickly if your ve-
hicle is not driven on a daily basis over a distance
of several miles. The more often you drive your ve-
hicle, and the longer the distance driven on each
trip, the more opportunity the vehicle’s charging
system will have to recharge the batteries.
Page 261 of 308

Practical Tips, Emergency Service
261
Replacing battery The service life of the battery is subject to normal
wear; it depends greatly on care, climatic condi-
tions, and driving conditions (distances, loads).
fOnly use an original Porsche battery, with the
correct part number, as a replacement.
fPlease observe the disposal instructions for
batteries.
Putting vehicle into operationAfter the battery is connected or after an exhaus-
tively discharged battery is charged, the multi-
functional PSM light lights up on the instrument
panel and a message appears on the on-board
computer to indicate a fault.
This fault can be remedied with a few simple
steps:
1. Start the engine.
2. With the vehicle stationary, perform a few
steering movements to the left and right and
then drive a short distance in a straight line
until the multifunctinal PSM light goes out and
the message on the on-board computer
disappears.
3. If the warnings do not disappear, then:
Drive carefully to the nearest authorized
Porsche dealer.
Have the fault remedied.
4. After the warnings disappear:
Stop the vehicle in a suitable place.
fPerform adaptation of the power windows:
Please observe the chapter “STORING END
POSITION OF THE WINDOWS” on Page 29.Ignition key/ignition lock
fDo not insert the ignition key into the ignition
lock if the vehicle battery is discharged.
The ignition key can no longer be removed.
The key cannot be removed until the vehicle elec-
trical system is supplied with power again.
fPlease observe the chapter “EMERGENCY UN-
LOCKING OF THE LUGGAGE COMPARTMENT
LID” on Page 257.
fPlease observe the chapter “EMERGENCY
STARTING WITH JUMPER CABLES” on
Page 264.
f f f
Page 266 of 308

266
Practical Tips, Emergency Service
Lights, Replacing Bulbs
Warning!
Risk of short circuit.
fAlways switch off the relevant consumer when
changing bulbs.
Risk of injury. The Bi Xenon headlights are
under high voltage when installed.
fBe careful during all work in the area of the Bi
Xenon headlights.
Risk of damage. Bulbs of a higher wattage
can damage the lamp housing.
fOnly the bulbs shown in the chart may be used.
fNew bulbs must be clean and free from oil,
grease and fingerprints. Therefore, never
touch bulbs with your bare hands.
Use a cloth or soft paper while replacing bulbs.
Caution!
Risk of damage to headlights due to exces-
sive temperatures and abrasion.
fAttach no coverings (e.g. films, “stone
guards”) in the area of the headlights.
fUse soapy water only to clean light lenses and
plastic headlight lenses.
In no case may chemical cleaners or other vol-
atile cleaning fluids be used.
fTo prevent scratches, do not rub with a dry or merely moist cloth, tissue or insect sponges.
Page 305 of 308

Index
305
Compact disc
Player and Changer ............................. 160
Storage.............................................. 147
Compartment monitoring............................... 26
Compressor ............................................... 151
Convertible top ........................................... 176
Care .................................................. 220
Coolant ................................................92
, 199
Level.................................................. 199
Temperature gauge.............................. 92
Warning light ........................................ 92
Cooling system .....................................92, 199
Cruise control .............................. 96
, 136
, 137
Cupholder .................................................. 144
DDashboard ................................................... 78
Data bank .................................................. 284
Defrosting windows ...............................33
, 139
Diagnostic socket .................................17, 256
Diagrams ................................................... 299
Dimensions ................................................ 298
Door ............................................................ 21
Guard lights ........................................ 277
Handles................................................ 21
Locks...........................................21, 221
Mirror .................................................. 32
Mirror heating ....................................... 33
Windows ....................... 21
, 28, 176
, 223
Driving hints ................................................. 14
Driving in winter .......................................... 170
Driving performance...........................296, 297
Drop-center rim .......................................... 241
DVD Navigation...................................150, 158DVD navigation ...........................................151
Dynamometer testing....................................61
EElectrical system.........................................254
Emergency flasher ......................................130
Emergency operation
Central locking ......................................23
Lids ...................................................257
Sliding roof .........................................174
Tank flap ............................................208
Emergency service......................................228
Emergency starting
with jumper cables............................. 264
, 265
Emission control system ........... 7
, 97, 211
, 212
Engine
Checking the oil level ...........................118
Exhaust ..................................................9
Number ..............................................285
Oil consumption........................... 16, 201
Oil level ..............................................201
Oil level indicator.................................118
Oil pressure ..........................................96
Oil temperature .....................................88
Oils ........................................... 201, 291
Speeds ............................... 16
, 296
, 297
Starting ................................................82
Stopping ..............................................83
Engine compartment
Blower .......................................... 83, 92
Lid ............................................ 148, 149
Lid warning light ..................................148
Light ..................................................277
Environment ...................................................6
FFilling pressure, tire................................ 5
, 290
Fire extinguisher......................................... 154
Floor mats ................................................. 225
Fluids and fuels .......................................... 291
Fog lights .................................................. 131
Footbrake .................................................... 66
Footwell lights ............................................ 277
Four-wheel drive ..................................... 61, 62
Fresh air intake .......................................... 141
Front lid ..................................................... 149
Fuel................................................. 4
, 94, 208
Containers ..................................... 8, 210
Economy ........................................... 207
Evaporation control ............................ 213
Level gauge ......................................... 94
Level warning light................................ 94
Recommendation ....................... 209, 210
Tank.................................................. 209
Function keys ............................................... 40
Fuses ........................................................ 256
GGarage door opener................................... 155
Garage lift ................................................. 244
Glove compartment .................................... 147
Gong ..................................... 18
, 81, 100
, 131
Ground clearance ........................................... 9